
Yellowihss's Garage Ideas / Garage Build


There is absolutely no reason you couldn't extend the tracks. You'd have to either get the torsion style opener (like in second pic), but they aren't that expensive.
Reply
 0
0

0


To those who did a DIY floor coating, how much time/effort was invested, to get a clearer picture? do the kits come with the etching/clear? it wasn't clear on the description.
Reply
0
0

Thread Starter
Joined: Dec 2008
Posts: 736
Total Cats: 8
From: Austin, TX
"The Armor Chip kit contains:
Etching solution
2 gallons of part A epoxy & 1 gal part B epoxy
8 LBS OF COLORED CHIPS. Colors are as follows:
Gray & Lt Gray kits have white, black and light blue chips.
Dk Gray has black, white and primary blue chips.
Beige kit has black, white and brown chips.
Beige Plus(12lbs of chips total) has black, white, brown, chocolate and clay chips.
Red kit comes with additional primer material for proper color coverage and has black, white and tan chips.
Kahki Tan kit has 10lbs of brown, buff and ivory chips.
Harley Tan kit has 10lbs of brown, clay, chocolate, white and black chips.
Harley Tan Light kit has 10lbs of clay, buff, chocolate, white and black chips.
Blue kit has black, white and gray chips.
Racing Blue kit has black, white, gray and rustic red chips.
Harley Gray has Light Gray epoxy with 10 lbs. of dk gray, medium gray, black and white chips.
Desert Tan and Sandlewood are the same color and has burgundy, white, navy, clay and chocolate chips.
If you are ordering the White kit, it comes with additional primer for proper color coverage and please specify up to 4 chip colors in the comment box at bottom of checkout page. Note: You can select up to any 4 chip colors you want with any epoxy kit, simply select base color you want ie: Tan, Gray etc and then just indicate the chip colors you would prefer in the comment box at checkout.
Two coats of crystal clear urethane fortified protective topcoat.For Fork Lift traffic or other heavy duty usage choose the single coat Fork Lift Duty Topcoat Option.
Rubber gloves
Cut in brush
Mixing sticks to mix individual cans.
Mixing bucket
1-unit of non skid additive for areas where additional traction is desired. Won't affect high gloss finish!
1-notched squeegee for spreading epoxy
3-9" epoxy roller covers (1 for epoxy & 2 for topcoats)
1-paddle mixer to mix combined epoxy parts A & B.
Clear and Easy to follow detailed written instructions"
"COMPLETE AND EASY TO FOLLOW INSTRUCTIONS
Our unique system is easy to apply and can be installed by anyone who can paint with a roller. Its simple and easy!
1.Clean/wash the floor well (power washing is preferred but not required)to remove all dirt, loose paint and residues. If your floor was previously coated with an inferior epoxy that has failed or is beginning to fail please refer to these set of images on how to properly redo your floor with Armor Chip. HOW TO COAT OVER AN EXISTING EPOXY. Please note that if a major percentage of the floor is peeling or flaking off it means that its only a matter of time before the entire floor fails and it's best to completely remove the coating.
Apply epoxy in temperature range of 45-95 degrees. Do not apply if raining.
2. Mix our supplied environmentally safe floor etching solution with water per packaged instructions. Apply and scrub in well with a stiff shop broom, let stand for 10 minutes then rinse thoroughly. Let dry 24-48 hrs to be sure concrete is completely dry. For best results floor must be completely clean, dry and have a slightly rough feel to it. A second etching may be necessary for new floors due to large amounts of curing residues at the surface or older floors that are extra dirty. See our Acid Safe Etching Kit for additional etchings. If using the Acid Safe Etching Kit prior to rinsing acid off sprinkle 2 boxes of the supplied TSP over the floor, brush in to neutralize the floor and then rinse thoroughly.
3. Mix the contents of each individual can of the two part epoxy and then mix the two parts together at a 2 parts A to 1 part B ratio. Use two measured containers to get accurate amounts of each epoxy part(2:1 ratio). Pour the container of A and the container of B into the supplied 6 gallon bucket and mix thoroughly for 3-4 minutes. Do not mix all the epoxy at once, this is not like store bought epoxy paints that have a pot life of up to 8 hours. Armor Chip is pure Military Spec epoxy and has a pot life of about 45 minutes. We recommend doing your floor in 3-4 batches per kit, this will allow you to apply the epoxy and chips without rushing and still have plenty of work time left over as a safety margin. Apply a bead of the mixed base color coat from the container in a left to right direction directly to the floor do not use a roller pan. Spread evenly over a 4-5 ft wide strip(you can do much larger sections if purchasing the optional spiked soles) with supplied notched squeegee. Then roller over to smoothen. Armor Chip Epoxy will automatically be at the proper thickness.
4. While the epoxy is wet, apply the supplied color chips by simply tossing them slightly up into the air and at a 45 degree angle away from you so that they freely rain down onto the epoxy in an even pattern. We give you plenty of chips do achieve the look your eye thinks is best. You can use as much of the chips as you want without worrying about running out. Avoid tossing too many chips at a time so that you don't wind up with piles of chips which will spoil the the look of your new floor. Tossing a little at a time is best, you can you use a Johny Apple Seed type spreader if you have one. Leave the last 6 inches of the epoxy without chips. You will overlap the epoxy from the next section onto this area and then apply the chips. All the sections will blend together to form a single monolithic seamless finished coating.
5. Once you have completed the first section repeat steps 3 & 4 until done. Note: After the first section you may do larger areas as you get comfortable working with the epoxy. You should be done painting and applying chips in about 2 hrs per kit. Note: for large areas use our spike shoe bottoms which allow walking on the wet epoxy. Use Xylene for any clean ups(available at Home Depot/Lowes).
6. Let epoxy & chips dry to the touch, usually in approximately 5-6 hrs, you can let the peoxy cure overnight also. Once dry to the touch sweep the floor good with a stiff shop broom or shovel with plastic edge to remove any loose chips or any chips that are sticking straight up. Then apply half of the clear topcoat to seal in the chips and magnify the beautiful high gloss finish. The chips themselves give the floor some texture but if you desire to use the non skid additive supplied for added traction, mix it right into the second final clear coat. Allow first coat to dry to the touch before applying second coat. Clear coat dries to a touch/walk on, in about 2 hrs(you can move all your stuff back in at that point). Let cure for 36-72 hrs before driving on it. That's it!"
or
Garage Epoxy Flooring Kit| Epoxy Floors
For 600sq ft it cost me 801 shipped with the roller, and the spiked shoes so you can walk on it to apply the flakes.
I assume a full Saturday of work.
I will be doing it this Saturday if it shows up.
Reply
0
0
Thread Starter
Joined: Dec 2008
Posts: 736
Total Cats: 8
From: Austin, TX

http://www.liftmaster.com/lmcv2/page...px?modelId=436
Again, anyone with experience?
Reply
0
0

Not much more difficult than painting a room inside the house.
Reply
0
0
Every kit I've looked at includes the etching acid, it's usually just a powder citric acid that you mix with water. Clear coat is usually an option. The higher end kits usually include a clear that you can upgrade to the "heavy duty" clear coat.
Reply
0
0

Newb
Joined: Jul 2012
Posts: 31
Total Cats: -4
From: Lititz Pa.
I do garage floors for a living and one thing that is necessary is proper floor prep.unless you put your coating over a clean diamond ground floor you are asking for trouble later on. Sticky tires will pull the coating off in a heartbeat unless its properly prepared, acid washing and cleaning doesn't cut it.. I redo 3 to 4 floors a week that people did themselves and listened to so guy at home depot that never did a floor in his life..they call me when it peels off. Maybe I should buy the guy lunch at home depot !!
Reply
0
0


A clean and etched floor with properly applied epoxy shouldn't peel, hot tire lift, etc. The floors you redo were most likely applied improperly.
Maybe they were done by someone who doesn't know how to make a picture larger than a postage stamp?
Maybe they were done by someone who doesn't know how to make a picture larger than a postage stamp?
Reply
0
0


I do garage floors for a living and one thing that is necessary is proper floor prep.unless you put your coating over a clean diamond ground floor you are asking for trouble later on. Sticky tires will pull the coating off in a heartbeat unless its properly prepared, acid washing and cleaning doesn't cut it.
A) I probably only did a mediocre cleaning job
B) I did not lay the coating down nearly as thick as I could/should have
On the other hand, my garage floor was in reasonably good shape because the house was only about 5 years old.
Braineack - If I remember correctly, I did prep on Saturday and application on Sunday.
Reply
0
0
Newb
Joined: Jul 2012
Posts: 31
Total Cats: -4
From: Lititz Pa.
Hey I'm sorry my picture posting doesn't meet your standards . considering it was my first time posting a picture I thought I did good..I'll try to live up to your expectation next time
Reply
0
0
Newb
Joined: Jul 2012
Posts: 31
Total Cats: -4
From: Lititz Pa.
I have no doubt that your floor jobs are vastly superior to the one I have done and mine is only about 18 - 24 months old, but I can tell you that mine has held up better than expected given that:
A) I probably only did a mediocre cleaning job
B) I did not lay the coating down nearly as thick as I could/should have
On the other hand, my garage floor was in reasonably good shape because the house was only about 5 years old.
Braineack - If I remember correctly, I did prep on Saturday and application on Sunday.
Its like painting a car. you can do a quick sand and spray or a meticulous strip to the bare metal it all depends on what you want the finish product to be.
A floor that has not been sealed will hold up longer to a epoxy job then one that was sealed and etched..
Reply
0
0
Apparently this is the end-all, be-all of the side openers.
3800 - DC Motor Residential Jackshaft Opener
Again, anyone with experience?
3800 - DC Motor Residential Jackshaft Opener
Again, anyone with experience?
like much of the new "efficient" (space, energy, time) gadgets coming out today, it works well for it's purpose and isn't as loud as the traditional setups we have on our other garage doors.
Reply
0
0
Thread Starter
Joined: Dec 2008
Posts: 736
Total Cats: 8
From: Austin, TX
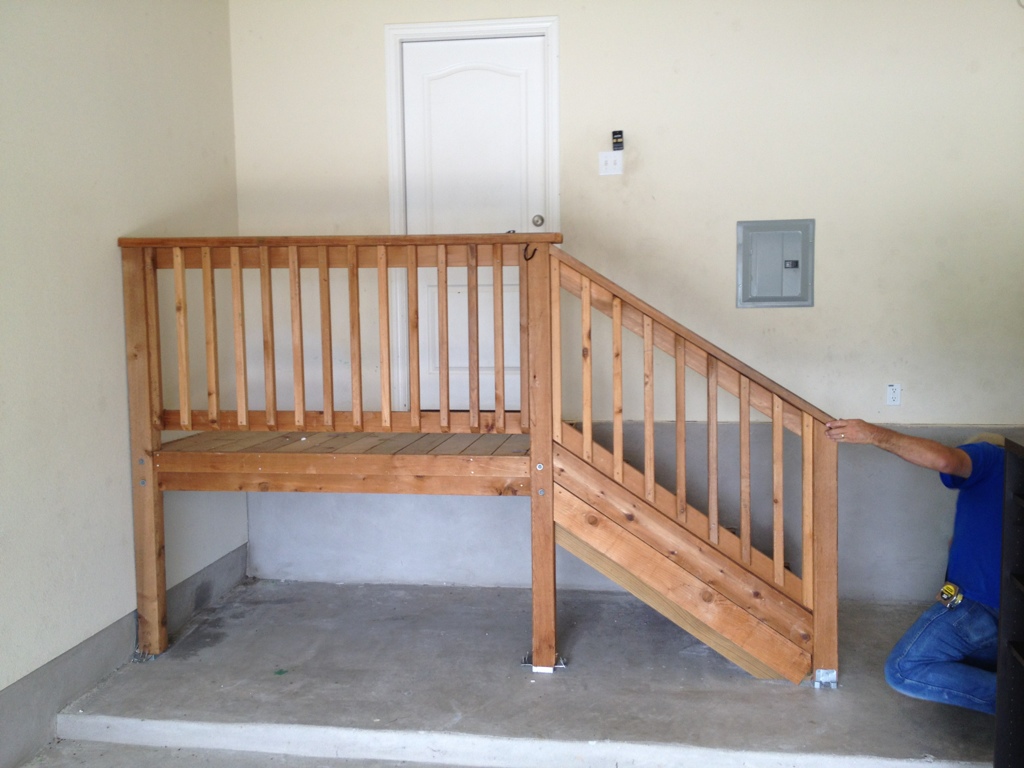
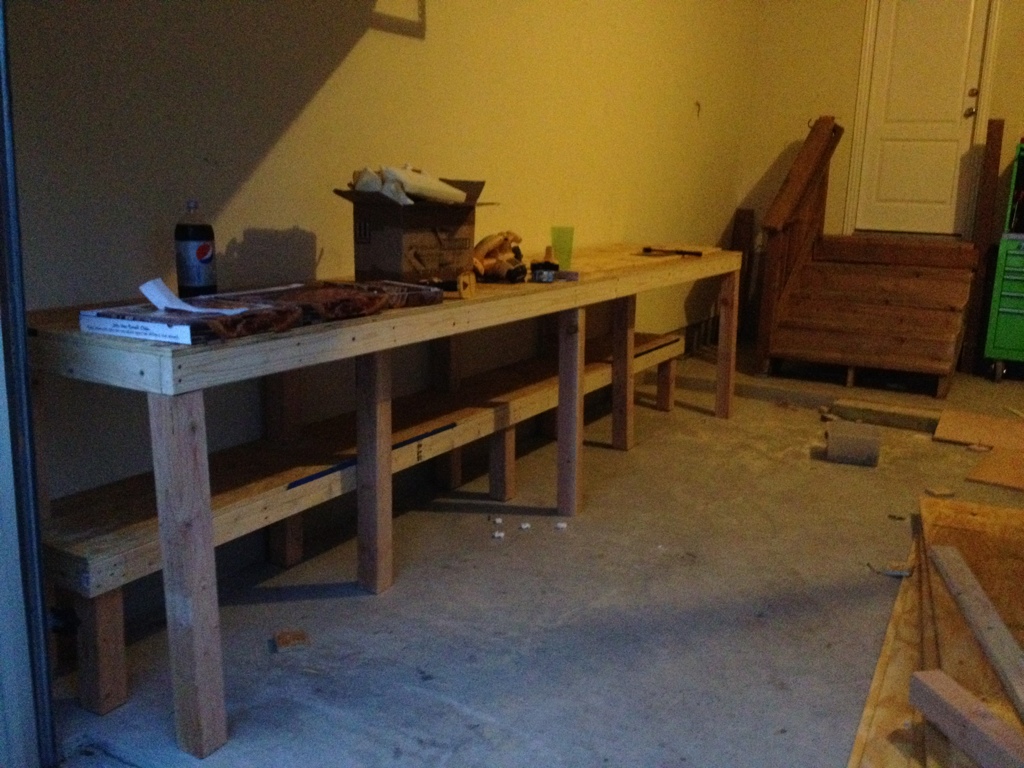
So to start the actual build:
One drawback to having high ceiling in my new garage is that the entry is not ground level. Building code required this huge waste of space.
I converted my huge landing, and stairs to just stairs to free up a lot of space.
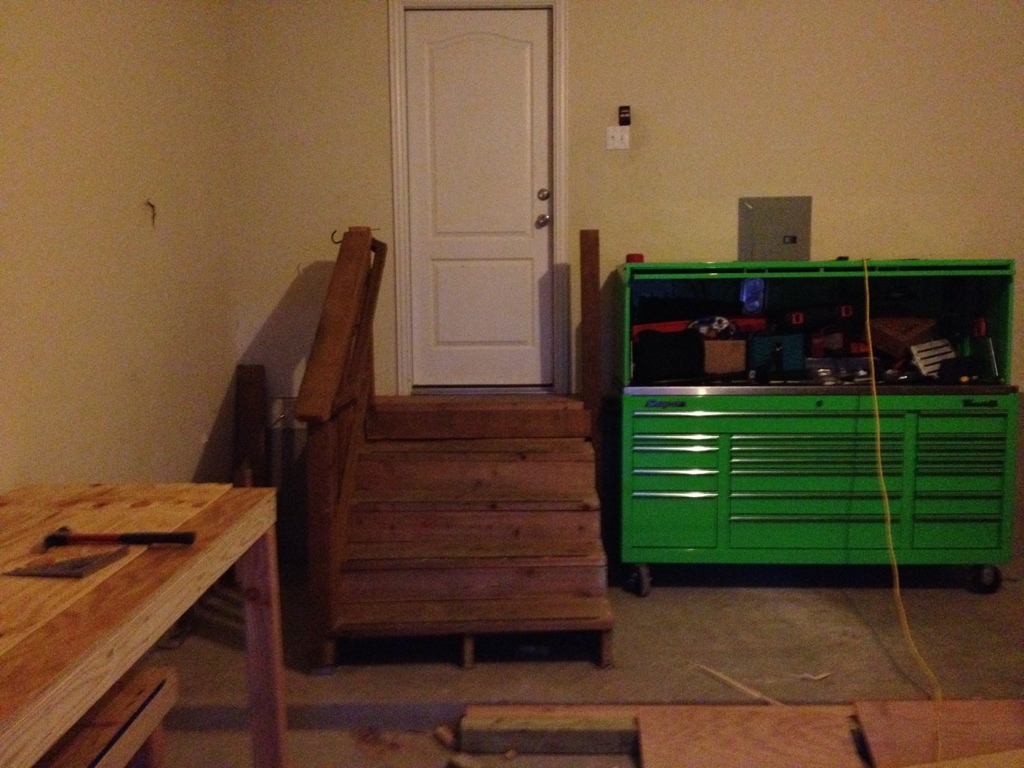
Next was my work bench.
14' long, 40" high, and 30" deep.
It is made out of 3/4" pine, and I will be covering it with 1/4" plate steel.
It also has a nifty lower shelve that is shorter so I can pull a stool up and work without hitting my legs.
One drawback to having high ceiling in my new garage is that the entry is not ground level. Building code required this huge waste of space.
I converted my huge landing, and stairs to just stairs to free up a lot of space.
Next was my work bench.
14' long, 40" high, and 30" deep.
It is made out of 3/4" pine, and I will be covering it with 1/4" plate steel.
It also has a nifty lower shelve that is shorter so I can pull a stool up and work without hitting my legs.
Reply
0
0
my 2 cents:
I help build my grandpop's garage earlier this summer, and what simple rule he followed was brilliant... lighter colors, the more light reflects. we built 6 rows of 8 flood lamps in the ceiling for his projects and it lights the whole damn place up, very little shadows in engine bays when lifted on a lift with little to no help of hook lights. He has gloss white walls, with a heavy gloss light greyblue-ish garage floor coating
I help build my grandpop's garage earlier this summer, and what simple rule he followed was brilliant... lighter colors, the more light reflects. we built 6 rows of 8 flood lamps in the ceiling for his projects and it lights the whole damn place up, very little shadows in engine bays when lifted on a lift with little to no help of hook lights. He has gloss white walls, with a heavy gloss light greyblue-ish garage floor coating
Reply
0
0

That's that arrangement I made with my new fiance (now wife) before we got married. When we get a house the inside is hers the garage is mine.
Reply
0
0

Thread
Thread Starter
Forum
Replies
Last Post


