When you click on links to various merchants on this site and make a purchase, this can result in this site earning a commission. Affiliate programs and affiliations include, but are not limited to, the eBay Partner Network.
Uh huh. You seem like an intelligent person. We are to believe that you don't know why you can't post an ad, and that you don't know what you're actually trying to do with this thread?
I didn't think I was trying to convince people of anything, but to be frank I haven't been able to look at the rules as the link times out. If you review the thread, you'll see that I was not the one who first mentioned the car was for sale. If it appears that I'm being deceitful, I apologize as it was not my intention.
My intention of this thread was to help others who are considering going down this expensive road. I remember being somewhat unsure of this project as K24 swaps weren't that popular. If I can help ease that pain, I'd like to take that opportunity.
This is a community, and for a couple years I was taking without contributing. Now is my time to give back before the car is gone.
I mean, even if he just joined to list it for sale, he hasn't been shitposting or anything. He posted his beautiful car with some build information, and has answered questions after someone else brought up that it was for sale.
If you're going to join a forum in order to sell something, this is the way to do it, and this is the kind of vehicle we want for sale here anyway. I don't see a problem here.
I am in love with this car. It's everything I want.
That exhaust looks almost exactly like my Artech system. Is that header at risk of vibrating on the oilpan/trans?
I checked out the clearance last tight of that area. Oil pan is good, and I do remember making clearance between the flywheel cover and headpipe. It was touching as-is. If I were to do it again I'd have it all ceramic coated by Swain Tech.
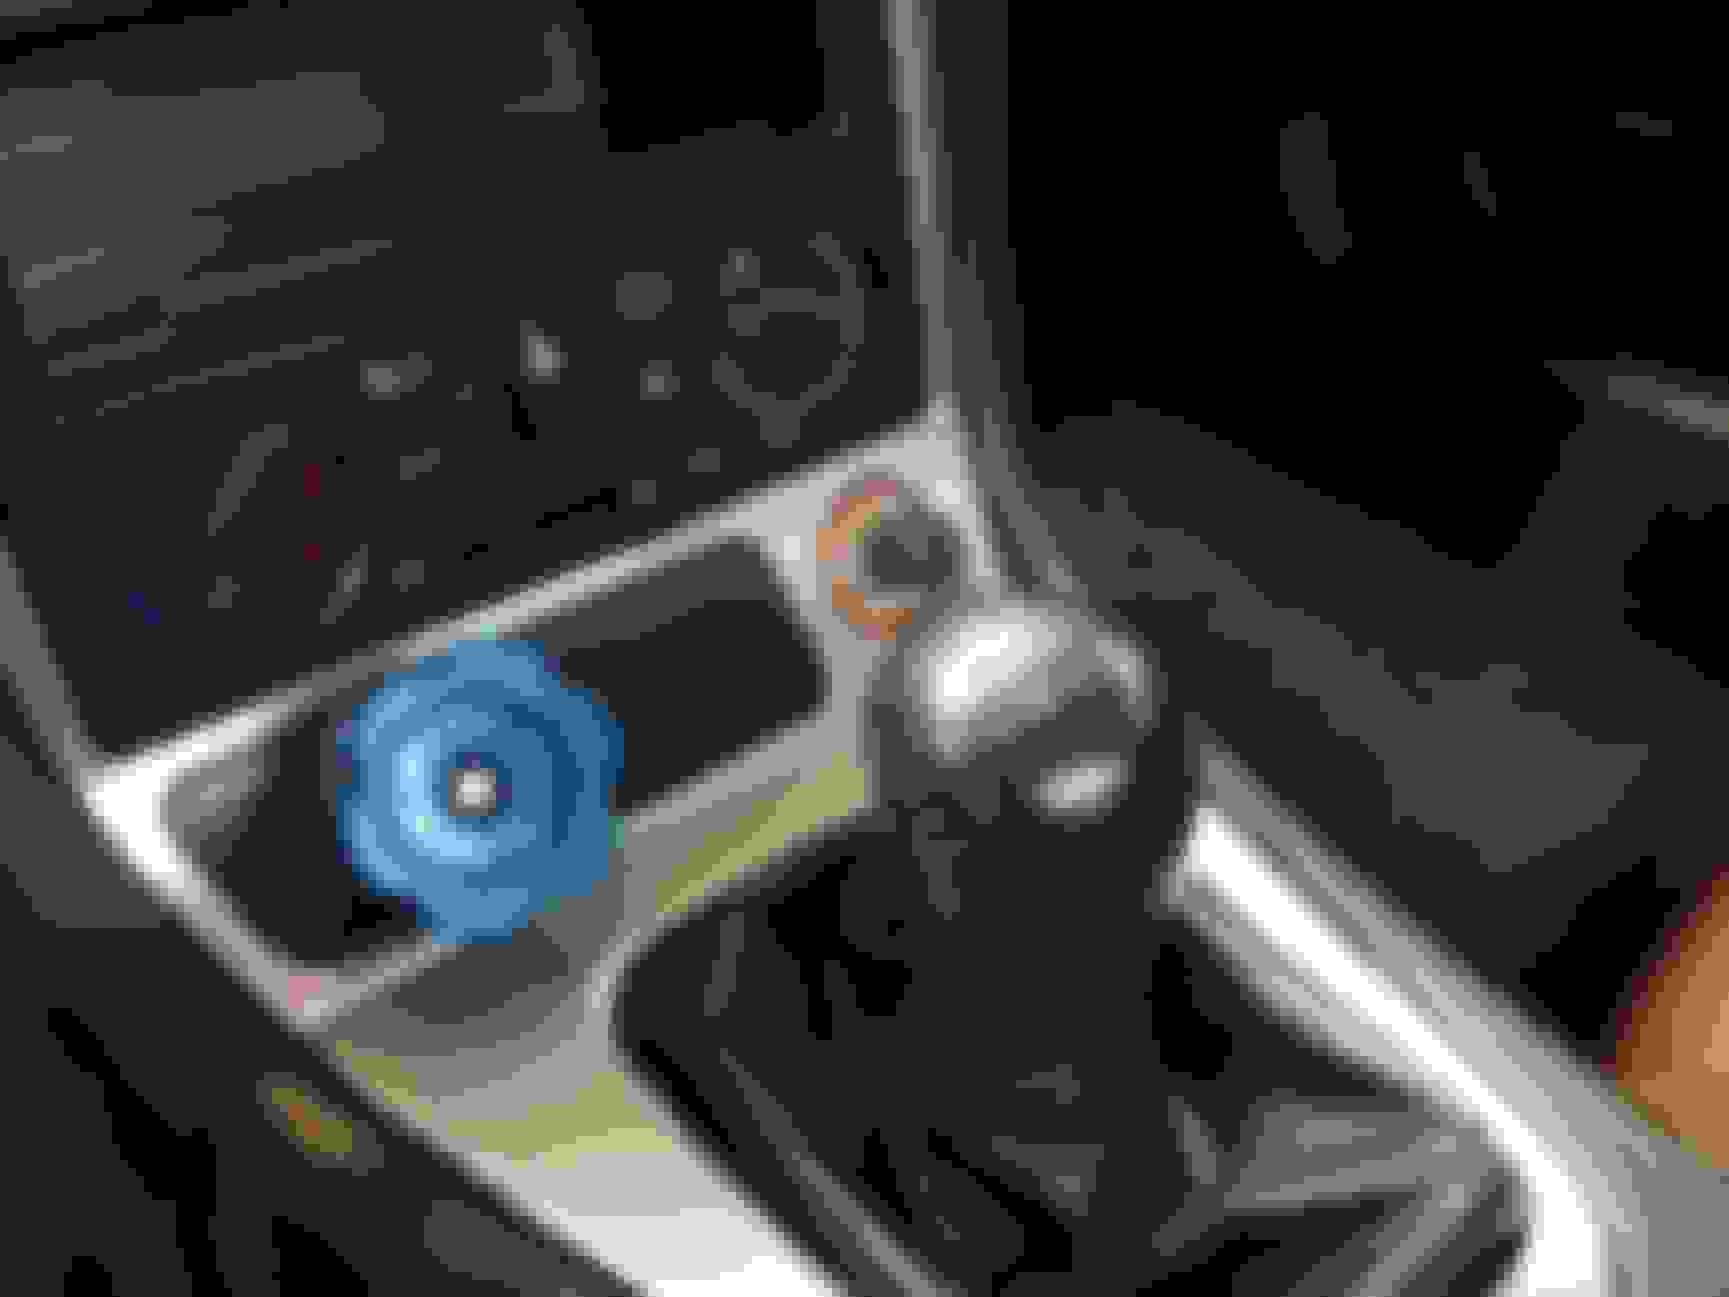
Here's some photos of the remote bias adjuster. I did this for a couple reasons:
1. I added a front caliper with a slightly different piston area than stock;
2. I track the car on rain days. I've found the car behaves differently enough between full and near empty (fuel) that it helps to add forward bias, but only in the rain. Two clicks is all it takes and makes me more consistent.
IMO, the blue **** sticks out like a sore thumb and if I were to do it again I would just paint it or something. The placement is wonderful, you can drop your right hand quickly and give it a couple clicks without breaking concentration. I have the STL file if anybody wants it, but you'll need a pretty good printer to make it work.
This was a subject I debated not bringing up. There are a few good coilovers out there for Miatas that are plug and play and have the valving about as good as you can ask for - thinking of Xidas here. You just can't go wrong with these and the price is market aggressive.
Because I have the mental disability of being an engineer, I like to over-complicate things. Shocks are one of my favorite parts to design, test and build. I have a shock dyno in my office and Excel spreadsheets that spit out rough ideas of what the valving should look like, so I wanted a shock that was user-buildable and user-serviceable. Enter the Bilstein family of shocks.
The only issue with Bilstein is obtaining the parts you need. For example, for these AS2's, you buy a bare shock (body cap, body, top cap, piston, and DA shaft). No shims, no oil, no nitrogen. It's a dry shock. YOU figure out what shims you want (and be sure to order the shock with the right piston), build it, oil it, then fill to 200PSI and test. Repeat, test, make changes. It took me about 7 iterations to get what I wanted, then small adjustments to make sure all the sweep settings were equal for both front and rear axles.
Funny thing is, the compression curve I ended up with is about exactly what the Xidas have. I chose a linear rebound because that's what I prefer. Everybody has their own opinion on this.
The adjusters on AS2s have a nice solid detent and are of high quality. Sweep tests are very, very repeatable which is a must for high quality shocks. As you can see the adjusters are easy to access when using Bilstein's stem type shaft typically used on strut builds.
Anyway, in the end, you get a car that is sprung stiff but rides amazingly well - better than my E46 Performance Package I used to have. Having the freedom to choose body lengths, you can get the rear travel to be more than acceptable. These shocks, along with the K24, is what I will miss the most.
As you can see in the photos, I run a stock sway bar. I find this setup easy to drive on wet track days. Up here in Washington, limiting yourself to dry days makes the track season pretty short.
Front
Rear
Rear adjuster
Front adjuster
Last edited by mattj; 03-28-2019 at 09:40 AM.
Reason: Punctuation, rear travel
Here's some photos of the remote bias adjuster. I did this for a couple reasons:
1. I added a front caliper with a slightly different piston area than stock;
2. I track the car on rain days. I've found the car behaves differently enough between full and near empty (fuel) that it helps to add forward bias, but only in the rain. Two clicks is all it takes and makes me more consistent.
IMO, the blue **** sticks out like a sore thumb and if I were to do it again I would just paint it or something. The placement is wonderful, you can drop your right hand quickly and give it a couple clicks without breaking concentration. I have the STL file if anybody wants it, but you'll need a pretty good printer to make it work.
You got a very nice surface finish on the **** for a printed part. Has that been vapor-bathed? What kinda printer, SLA?
Beautiful car, top notch work. For modeling the suspension, did you model all the components (control arms and knuckles mainly) from scratch?
Your kit was great, it turned a dream to reality. This car set the bar really high for future projects and I worry I'll never be able to top it.
Glad to hear that, it's definitely a really fun setup.
Regarding your header clearance - everything is inherently really tight under the pan. Try loosening up the lower header flange bolts (and the upper flange on the head if needed) and moving the lower section around a bit and then re-tightening. It's usually not hard to make a bit more clearance just by doing that.
__________________ KPower Industries
Home of the original KMiata Swap
You got a very nice surface finish on the **** for a printed part. Has that been vapor-bathed? What kinda printer, SLA?
Beautiful car, top notch work. For modeling the suspension, did you model all the components (control arms and knuckles mainly) from scratch?
Thank you. I actually downloaded the model for the suspension online, that saved me a ton of time. Everything is pretty accurate within reason, but not accurate enough to do an analysis on geometry. I probably just Googled "Miata suspension CAD download" and avoided the gay popups.
The blue **** is a Wilwood part, I printed the panel it attaches to. I scanned the airbag key switch panel and modeled the shape, then added the boss for the **** and detents.
The printed part is skim coated with Bondo, sanded, polyester primed, sanded, more primer, more sanding, then SEM Trim Black. Works great.
Glad to hear that, it's definitely a really fun setup.
Regarding your header clearance - everything is inherently really tight under the pan. Try loosening up the lower header flange bolts (and the upper flange on the head if needed) and moving the lower section around a bit and then re-tightening. It's usually not hard to make a bit more clearance just by doing that.
It wouldn't hurt to make a little more room. It's OK the way it is now, but I'll try your suggestion. Your right, it's crazy tight but works just fine.
Thank you. I actually downloaded the model for the suspension online, that saved me a ton of time. Everything is pretty accurate within reason, but not accurate enough to do an analysis on geometry. I probably just Googled "Miata suspension CAD download" and avoided the gay popups.
The blue **** is a Wilwood part, I printed the panel it attaches to. I scanned the airbag key switch panel and modeled the shape, then added the boss for the **** and detents.
The printed part is skim coated with Bondo, sanded, polyester primed, sanded, more primer, more sanding, then SEM Trim Black. Works great.
Ahh, I see, I misunderstood and thought the entire assembly was printed.
The other cars in your quiver must be pretty sick to be letting this one go!
Ahh, I see, I misunderstood and thought the entire assembly was printed.
The other cars in your quiver must be pretty sick to be letting this one go!
Probably! They better behave now!
Seriously though, in the past, I have had no problem selling a car when I'm not happy with it any longer. Make the decision, boom, gone. This is the first time I've decided to sell one that I truly enjoy. It's sad. It's not a money thing, I'm getting older and my kids are too; I need to maximize the time I have with them while I can. The other 3 toy cars came from my family so I can't let those go. Ugh. I question sometimes if I'm doing the right thing but I need to keep my focus.
So, we all want to know what else is in the stable, if this is the one you'v decided to part with? Beautiful build!
1969 Camaro, Corvette front / IRS rear suspension, LS motor
1967 Chevelle, stock paint/interior, 383 with fuel injection
1964 Corvette, aftermarket frame, 5.3L LS
Two came from my family, and I bought the Camaro in college back when they were cheap. I have serious attachments to these cars because of the history.
Here's one I forgot about. Before I put in the K24, my oil temps were OK on the track but still on the high side. I ran the 1.8 for a couple years and removed & cleaned the oil cooler to make sure it was as efficient as it could be. That didn't change anything, but adding (printing) a shroud around the oil cooler helped quite a bit. Temps were noticeably cooler and more consistent.
That oil cooler shroud makes sense; it limits spill-over. We had something similar made up for a friends' stock AE86 Corolla oil cooler, worked like a charm.
It's a Fusion3D F306. Very happy with this printer. Thousands of hours on it and it just simply works great. Mid priced, but probably too much for home use. Most (well, all) are printed in ABS.
I should admit this printer is at my work, I don't own it. I'm poor 'cause I have too many cars.
 03-27-2019, 09:03 PM


 2
2