
Closed loop boost control starting numbers


Thread Starter
Junior Member
Joined: Dec 2011
Posts: 75
Total Cats: 3
I've tuned open loop, ran this for 4 years. Max boost I look for is 12psi
Interested in trying closed loop but after several failed attempts thought it was worth asking for help.
I've a ms2 rev enhanced ecu, FM2 turbo set up on a 1.8.
Does anyone running a similar set up on closed loop boost control have a basic set of numbers I can start on ?
Interested in trying closed loop but after several failed attempts thought it was worth asking for help.
I've a ms2 rev enhanced ecu, FM2 turbo set up on a 1.8.
Does anyone running a similar set up on closed loop boost control have a basic set of numbers I can start on ?
Reply
 1
1

1

Thread Starter
Junior Member
Joined: Dec 2011
Posts: 75
Total Cats: 3
Ok, but ......
Is there at least a starting point?
PID values ?
I had these numbers but they were from another guys set up and the car keep overboosting cutting.
My open loop map is fairly good so I figure if I can get close with PID and start dropping P until it stops over boosting I'm heading in the right direction.
P=145
I=40
D=100
Do you start at 0-0-0 or 100-0-0 or 100- 50-0 ?
Reply
1
1

Newb
Joined: Jul 2013
Posts: 35
Total Cats: 3
From: Alfred, Maine

Reply
1
1

I had these numbers but they were from another guys set up and the car keep overboosting cutting.
P=145
I=40
D=100
Do you start at 0-0-0 or 100-0-0 or 100- 50-0 ?
P=145
I=40
D=100
Do you start at 0-0-0 or 100-0-0 or 100- 50-0 ?
start at 100-0-0.
Reply
1
1
Currently his setup is charge pipe before TB -> EBC -> Wastegate
Reply
0
0
Thread Starter
Junior Member
Joined: Dec 2011
Posts: 75
Total Cats: 3
So here's what I had my settings at for open loop control
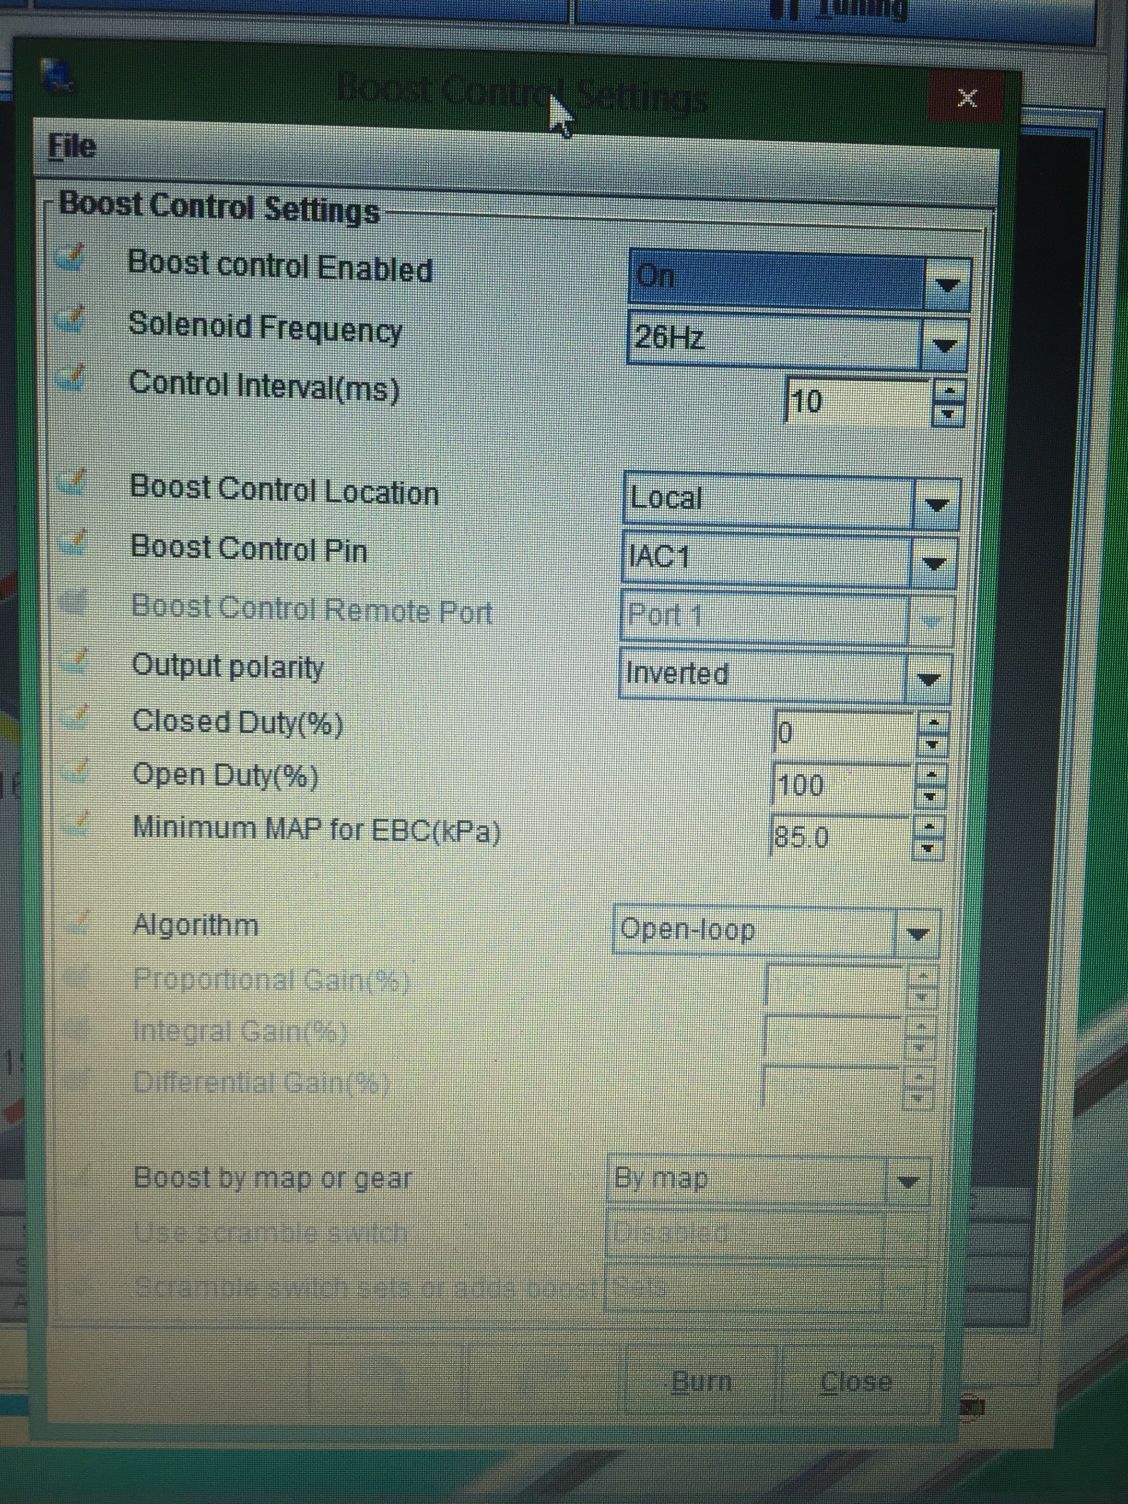 <br >
<br >This is now my closed loop, just changed the PID settings to my starting numbers. Am I right in that's all I need to change to get started ?
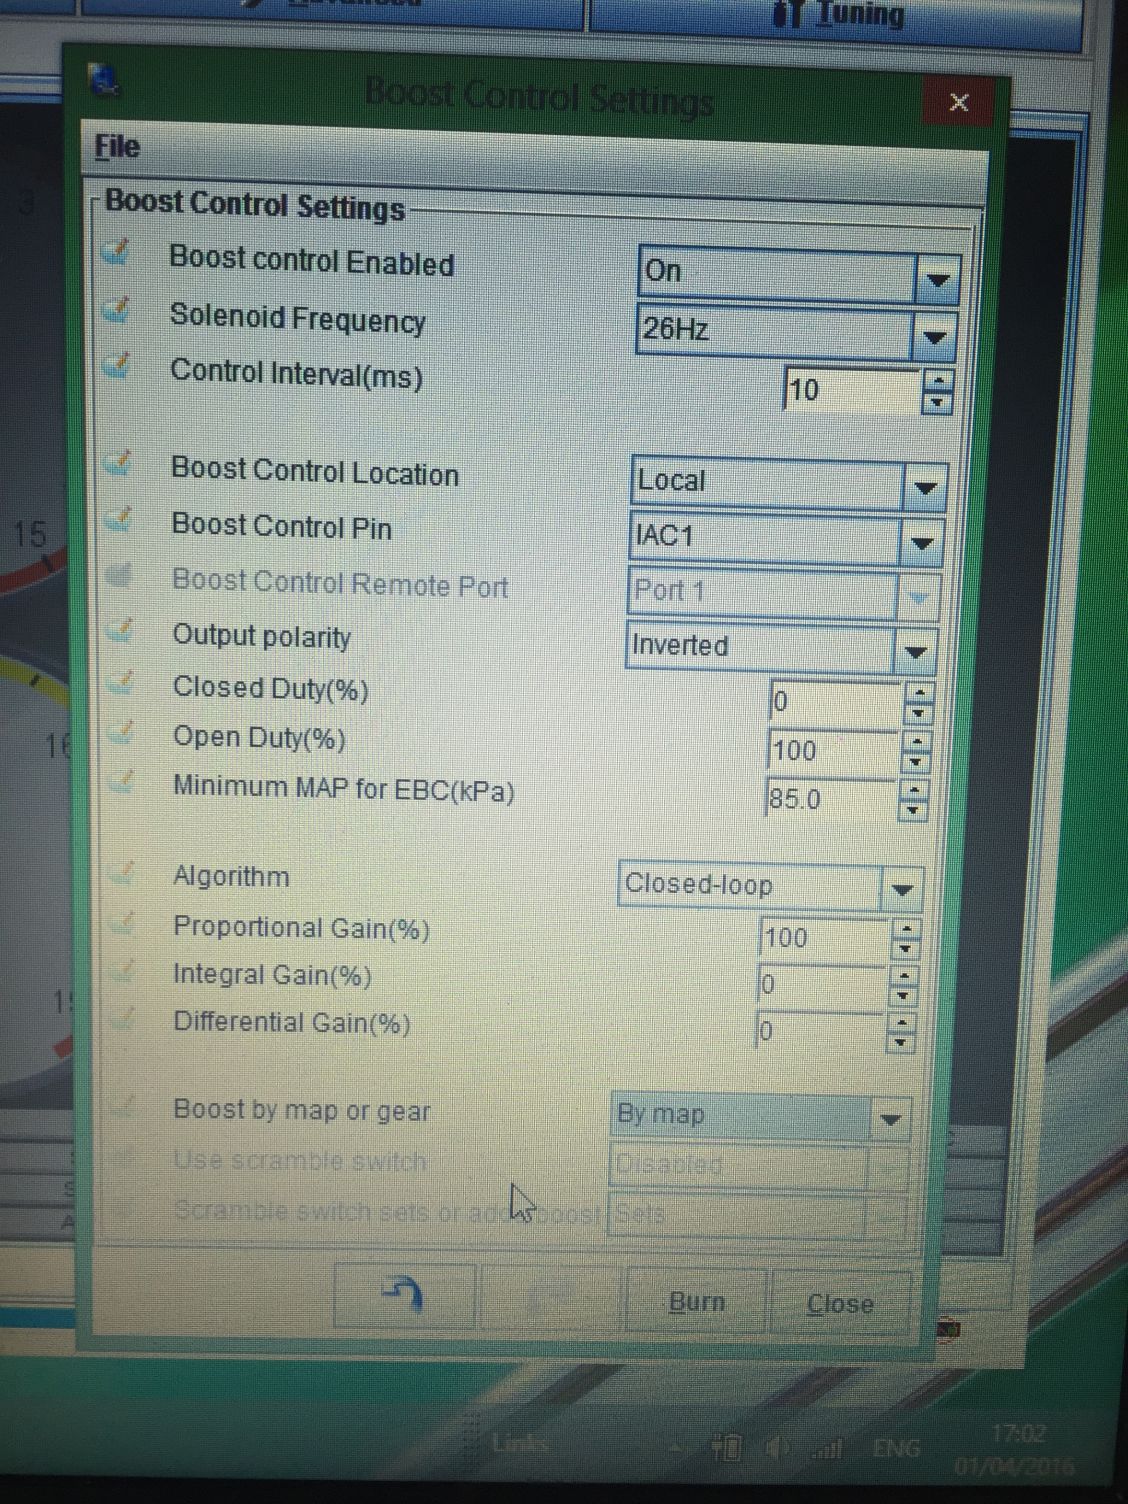 <br >
<br >
Reply
2
2
Thread Starter
Junior Member
Joined: Dec 2011
Posts: 75
Total Cats: 3
Followed the guide below with settings
P = 100
I = 0
D = 0
Held it at 2000rpm Wot runs in 3rd
No matter what I lowered P to nothing changed. Fairly slow spool up gets the wastgate.
The boost duty figure is changing but the same with any PID number.
Followed these guidelines:
Set Integral and Differential Gains to 0% - To make tuning the Proportional gain easier, set the Integral and Differential gains to 0%.
Set Proportional gain to 150% and slowly lower - While tuning Proportional gain, higher numbers mean slower boost climb and lower final boost. For safety, start with a very high gain (150% should be sufficient). Find the RPM that typically spools quickly, and fully and quickly depress the accelerator. Note how much boost is reached. If boost overshoots the target, increase the Proportional gain. Otherwise, reduce the Proportional gain and try again. Do this until boost reaches the target with little or no overshoot.
Switched back over to open loop and all back to normal working from my OL boost control duty table spools upto target 10psi
Reply
2
2
Thread Starter
Junior Member
Joined: Dec 2011
Posts: 75
Total Cats: 3
Reply
1
1
Thread Starter
Junior Member
Joined: Dec 2011
Posts: 75
Total Cats: 3
Then started tweaking I and went to 10.05.0 and it overshot
Went to 10.02.0 and it overshot
Went to 10.01.0 and it didn't seem to change anything
Ended up back at 10.0.0
Log attached
Reply
2
2

Thread Starter
Junior Member
Joined: Dec 2011
Posts: 75
Total Cats: 3
Logging - Can anyone confirm if my goal is to get my MAP to be matched with the my Boost Target, as much as possible. If that's correct how close should I be aiming for, whats achievable ? Thanks
Reply
0
0

Newb
Joined: Apr 2016
Posts: 2
Total Cats: 0
Brain - can you elaborate on this:
Every PID controller I've ever tuned (I work in controls for a living) uses P gain such that it is being multiplied by the instantaneous error Kp*(target boost - actual boost) for this case. Increasing P in all the other controllers I use should INCREASE boost response (more adjustment for a given error should result, ultimately, in overshoot and oscillation conditions)...Why is it reverse in this case?
I have an email out to Matt at DIY about it and so far he has told me it is a PID Type C controller but I'm not finding much on it, even in the source code!
Any help is appreciated here.
higher numbers mean slower boost climb and lower final boost.
I have an email out to Matt at DIY about it and so far he has told me it is a PID Type C controller but I'm not finding much on it, even in the source code!
Any help is appreciated here.
Reply
0
0
Thread Starter
Junior Member
Joined: Dec 2011
Posts: 75
Total Cats: 3
Got back onto this after a year hill climbing the car in England.
Found an old thread from Braineack and did the following:
1) Ran some WOT runs in 2nd gear with no boost control to get the wastegate pressure which on mine is 9psi (approx 165 MAP)
2) Set the boost control to closed loop and the rate to 40
3) Set the boost target table to a higher pressure than wastgate - 185 MAP (approx 12 psi)
4) Set P.I.D to 200.0.0
5) Ran 2nd gear pulls nice and steady and allowed boost to build the revs
6) Checked the log to see if the MAP was getting close to target boost.
7) Repeated steps 5 & 6 and reduced P until it overshot slightly.... on mine it was 11.0.0
8) Next step I believe is to increase I until it maintains the boost target better, oscillation to be tuned out with D. Will try again at the weekend.
What I like about the open loop is that it appears to give a consistent boost level through the gears and doesn't fluctuate by +2 psi dependent on ambient temps.
Previously if my target was 14psi I had to tune this for 4th gear pulls which gave me about 11psi in 2nd gear. Seems not to vary with closed loop.
Reply
0
0

Junior Member
Joined: Jun 2023
Posts: 354
Total Cats: 12
I know this is an old thread, but I found it in the archives and thought I would add for future people. Here's a easy to understand YT vid on PID control which made it way easier to under wtf you guys are all talking about:
I also found an online PID controller simulator so you can play with the PID values ,then change your set point and see how the output responds. I'm sure its not even close to 1 to 1 with the megasquirt, but again, gives you a good idea what the values do: https://grauonline.de/alexwww/ardumower/pid/pid.html
Best part of the video is the description:
For those not in the know, PID stands for proportional, integral, derivative control. I’ll break it down:
P: if you’re not where you want to be, get there.
I: if you haven’t been where you want to be for a long time, get there faster
D: if you’re getting close to where you want to be, slow down.
Reply
2
2
Junior Member

Joined: Dec 2019
Posts: 299
Total Cats: 62
From: Kingsport, Tennessee
While we're at it, I just got my CL boost control working very well on my MS2PNP. I remember reading in some thread that one of the well-respected members on this forum just used open loop on MS2 due to CL not working well at the time, but I think that was before the latest revision of software came out. Regardless, I never used it because of this comment until just recently due to being very close to running out of injector duty cycle when weather fluctuations caused huge pressure swings. It works wonderfully now, at least for me. I used this write up and got my setting dialed in over this last week. It goes really in-depth into every setting specifically on MS2. So many numbers on this forum are thrown around for things like control interval and the boost control lower limit delta, but none of them ever seemed to get me the results that I wanted. Fast forward to the datalog I took on my way to work... With PID settings of 12/90/18, the gain slider at 150, Control interval of 51ms (19.5hz solenoid), and lower limit delta of 35kpa I get nearly perfect boost control regardless of the target pressure. I'll try to provide more detail on my build thread today in case more details can help others.
The post on mighty5s.com by schercheeroo (linked above) that helped me get the desired results:
The post on mighty5s.com by schercheeroo (linked above) that helped me get the desired results:
************************************************** ***
# Boost Control: Improving Transient Response #
************************************************** ***
I attempted to tune closed loop boost control the other day.
I made some notes while tuning that I though could be useful to other.....
Assumptions
--------------
MS2 running firmware Version 3.4
Tuned Open loop boost control
Fully tuned VE table (don't Boost before you can idle)
Tuning Advanced boost control with initial table values switched on
Tuning on the road
You know what you're doing and why you're doing it
************************************************** ***
# Set Up #
************************************************** ***
Solenoid Frequency
----------------------
Solenoid frequency, get it from the manufacturer or use a value you know works
control interval
----------------
set this to 1000/solenoid frequency
i.e. if the solenoid frequency is 19.5 Hz set the control interval as 1000/19.5 = 51.28205 which we will round to 51 m/s
If you need better control half that number, if you still need better control half it again or change the solenoid frequency
Maximum boost
-------------------
Target boost plus boost margin. I use a 15 kPa boost margin with a target boost of 180 kPa
Therefore maximum boost = 195 kPa
Boost control lower limit Delta (I will refer to this as pressure delta or delta pressure)
-------------------------------------------------------------------------------------------
A good starting place is to set it to around 10 % to 15 % of your target boost value.
I use 25 kPa (~3.5 PSI)
We'll discuss this in more detail later as its an important number so put some thought into this figure before you start tuning because changing it later requires re calibrating stuff.
Open and closed Duty settings
------------------------------------
You can get a pretty accurate figure for these values by using the I/O test mode found in the CANBUS/testmode tab (upper far right in tuner studio).
With the ignition on but the engine not running select output testmode-I/O, set the frequency to match your solenoid frequency, select the pulsed option under the output pin you have configured to run your boost solenoid.
Set Pulsed Duty Cycle(%) to zero, and increase the duty cycle until you hear the solenoid valve clicking. Decrease the valve until the clicking stops.
This is your Closed duty(%).
Repeat this process but start at 100% duty and decrease the duty cycle until the valve starts clicking. Add duty until the clicking stops.
This is your Open Duty(%)
I Stuck a DTI and an air line into the solenoid valve when I did this so I could see when the actuator arm actually started moving and can confirm it was within a couple of percent of the valve starting to click.
Output Polarity
-----------------
Test this in open loop, set all the values to 0 and make a full throttle run.
you should be seeing Wastegate pressure.
Add some duty cycle (10, 20, 30% ?? you know your set-up better than I do) and you should get higher than Wastegate pressure.
To make closed loop boost control work correctly you need to make sure More Duty = More Boost
Therefore in your open loop control table:
100 = Maximum Boost
0 = Minimum Boost (Wastegate Pressure)
************************************************** ***
# Boost Control Initial Duty Table #
************************************************** ***
This look up table determines the EBC duty cycle when entering closed loop operation.
The control strategy holds the Wastegate fully closed (100% duty cycle) until a predetermined boost pressure is reached.
The strategy then employs the duty cycle as entered into the look up table, and applies the PID terms to this starting value to reach the final target boost value.
For example if the desired boost pressure at 100% throttle is 180 kPa, and the boost delta pressure is 20 kPa, the closed loop strategy will start to control the Wastegate at 160 kPa (180 - 20 = 160) and will apply the duty cycle from the initial duty cycle look up table that corresponds to 160 kPa at the specific RPM that 160 kPa MAP is achieved.
i.e. The delta pressure determines when the ecu starts to control the waste gate. Below this pressure the waste gate is held shut to improve transient response.
The smaller the delta pressure number, the longer the Wastegate is held fully shut before closed loop control starts.
Boost Target Table
--------------------
The requested boost valve is calculated from the throttle position and engine engine speed as referenced in the boost demand table.
A target boost table will give good driving characteristics if setup to flow air like a butterfly valve on an NA engine.
Setting the boost target table to request full boost from idle is harsh on the turbo as butterfly valve is throttling the boost down meaning the turbo has to work harder to get the pressure into the intake manifold.
The diagram below shows the non linear relationship between butterfly valve angle and air flow. Use it as guidance on how to setup the target boost table.
Lets say we have set up our target boost table as below:
100% TPS = 180 kPa at every rpm
90 % TPS = 162 kPa at every rpm
80 % TPS = 144 kPa at every rpm
60 % TPS = 108 kPa at every rpm
40 % TPS = 72 kPa at every rpm
30 % TPS = 54 kPa at every rpm
10 % TPS = 18 kPa at every rpm
0 % TPS = 0 kPa at every rpm
Initial Duty Table
--------------------
In the example target boost table above, any valve below 60 % TPS we are requesting to operate in vacuum (i.e low torque demand driving), so we can set up a 100 kPa row and set the value to 0% duty cycle.
We should have already determined our Duty cycle at target boost from open loop testing so we can add those figures, but we should probably allow for over boost too.
That's the top and bottom of the table sorted so now we must determine the remaining break points.
So our initial value break points will end up the same as the target boost table like this:
195 kPa (over boost values same as target boost values)
180 kPa (Target Boost values from open loop testing)
170 kPa
162 kPa
142 kPa
124 kPa
106 kPa
Low Torque Demand = 100 kPa (i.e anything in vacuum)
Now we have to populate the table with accurate duty cycle figures.
The Target boost figures should be known if you have tuned open loop first (I would also set the overboost values to match these to start with).
The bottom row is easy (all zeros)
100% throttle is easy. Set up Open loop Control, put in your best guess duty cycle figures to achieve 180 kPa (target boost at 100% throttle), start logging and mash your foot to the floor. Check the data log and adjust duty cycle as required to achieve 180 kPa.
We only need ball park figures here. Open loop duty cycle figures that are +/- 5 kPa of target at every RPM in 3ed, 4th, and 5th gear will be more than adequate (and probably not achievable, just get it close).
Throttle angles of less than 100% will be a little tricky to calibrate. It'll probably require the use of a throttle limiting device as holding the throttle open at 90%, or 80% or 70% etc accurately while driving down the road is not easy.
That or a lot of guess work and time looking at data logs. I'll let you decide the best method, however if you want to use a device to limit throttle travel when driving on the road you should be aware that it can be dangerous. Your throttle limiting device malfunction and turn into a throttle not allowed to close device.
************************************************** ***
# PID Tuning #
************************************************** ***
When you're happy with your initial duty cycle table you are ready to start tuning the PID values.
Set all the PID values to zero and position the gain slider mid way (~250)
Data log a full throttle run in third gear starting from around 2000 RPM.
When you review the logged data (use the alt + V keyboard short cut in tuner studio to open the last data log) put boost duty cycle, MAP, RPM and target boost on the same chart.
Everything is working correctly if you see 100% boost duty cycle when you go to 100% throttle and boost duty cycle jump to the initial table duty cycle value when the target boost minus delta pressure value is reached (160 kPa in our example). Because all the PID values are zero this duty cycle value should be held steady as long as you are at 100% throttle.
If you hit over boost protection your initial table value is wrong, and you need to make the initial table calibration more better.
Proportional gain Tuning
---------------------------
When the control strategy jumps into closed loop, the initial duty cycle (from the look up table) is too low to achieve the target boost so we need to force the controller to add duty cycle.
To drive the boost control duty cycle high enough to reach the target boost pressure we need to add some P term.
So add some P term! Try maybe 100 to start with and data log a full throttle run in third gear starting from around 2000 RPM.
You should see 100% boost duty cycle when you go to 100% throttle. The boost duty cycle should jump to the initial duty cycle value when the target boost minus delta pressure value is reached, and then the P term should start adding duty cycle to try and achieve the target boost pressure.
While tuning Proportional gain, higher numbers mean slower boost climb and lower final boost. Lower numbers mean faster boost climb and higher final boost.
Note how much boost is reached. If boost overshoots the target dramatically, increase the Proportional gain. Otherwise, reduce the Proportional gain and try again. Do this until boost reaches the target with a small amount of overshoot soon after entering closed loop (to speed things up don't data log and review every run. Set the maximum boost value close to target boost value and keep reducing the P term until you hit boost cut. Put the overboost protection value back to the value you want to use and then take a data log)
If you're not quite getting the response you want change the gain on the slider (more for faster response, less for slower response)
If the overshoot is within an acceptable tolerance (10 kPa overshoot is a nice figure to target) its time to start tuning the I term.
************************************************** ***************
Save this tune for reference if you mess up tuning the next stage
************************************************** ***************
Integral gain Tuning
-----------------------
What should be happening now is:
You go to full throttle
Wastegate duty cycle goes to 100% until the target boost pressure minus the delta pressure value is reached
Wastegate duty cycle jumps to the value in the initial table
P term starts adding duty cycle to drive boost towards the target boost pressure slightly overshooting on the way
Boost pressure may oscillate around the target boost figure, or hang slightly above or below the target
To drive the boost to hit the target value at all RPMs we need to add some I term.
So add some I term! Try maybe 2 to start with and data log a full throttle run in third gear starting from around 2000 RPM.
The effect of the I term should be evident, pushing the boost duty cycle either up or down as required to achieve the target boost pressure.
Keep adding I term until you are +/- 3 or 4 kPa of the boost target at all RPMs (3.5 kPa is around 0.5 PSI)
You may have to alter the P term or slider value to adjust the initial overshoot after the addition of I term since the two gains tend to counteract each other.
Keep playing with it to get the response you want.
************************************************** ******************************
Nearly there!! Save this Tune for reference if you mess up tuning the next stage
************************************************** ******************************
Gear changes
---------------
Closed loop Boost Control is now set up to achieve near perfect control in Third gear.
The control strategy needs to be tested during gear changes. Find a long, straight, quiet stretch of private road, and do a full throttle run to red line in third, forth and as fast as you dare in fifth.
If you hit boost cut on gear shifts you need to retune the P term or adjust the gain slider.
If you hit boost cut at high RPM you need to retune the I term or adjust the gain slider.
Part load Throttle changes
------------------------------
Hopefully the PID values will be close to perfect now, but the final test is throttle stabs.
On a long, straight, quiet stretch of private road hold the car at part throttle in third gear (throttle angle doesn't matter, just make sure you've making boost) and allow it to build boost, then smash the throttle to the floor.
If you hit boost cut on a throttle stab you need to adjust the P term or adjust the gain slider.
Derivative gain Tuning
-------------------------
Increase the D gain until any overshoot is minimised. Care must be taken when increasing the D gain as too much D gain can over dampen the effects of the P and I gains
I'll let you decide if you need to use any D term
Reply
5
5

Thread
Thread Starter
Forum
Replies
Last Post


