
DIYPNP 1.1 and DIYPNP 1.5, Miata 1.6 Fuelpump


Thread Starter
Junior Member
Joined: Jan 2007
Posts: 121
Total Cats: 0
From: Austria
Hi, whats about the FUELPUMP solution on V 1.5 Board ?
Can i make the same also in V 1.1 ?
Can i use the "Relay 1 IN OUT" for this solution ?
on DIYPNP V1.5:
Fuel Pump
To successfully gain control over the fuel pump circuit, first you need to be sure you remove the "ST SIG" fuse for the 90 to 93 model Miata. Jumper from "Fuel Pump" on the edge of the main board to "IN" on the high side driver circuit. Jumper from "OUT" of the high side driver circuit to terminal 1C on the connectorboard.
Install Guide for B6 Engine:
http://www.diyautotune.com/diypnp/ap...3-16b6-mt.html
Please help me
Reply
 0
0

0


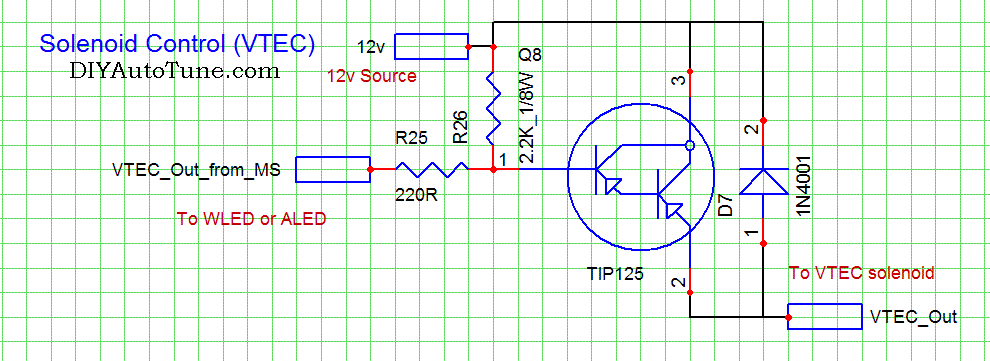
you should easily be able to add it into the proto area.
you need a tip125 or alike.
a 1N4001 Diode (use one from the 3 wire IACV circuit)
2.2K resistor (left over from R14)
220ohm resistor (two leftover 100ohm in series)
Put the tip125 through 3 separate proto area holes. Remember, the vertical rows all connect, so be careful how you position it.
Run the 220 ohm resistor from the fuel pump hole on the PCB, to the left most leg (1) of the TIP120.
Jump the left leg (1) with the right leg (3) using the 2.2K resistor.
Run a wire from a spare 12v hole to the right leg (3).
Put the diode across the middle leg (2) with the right leg (3), banded side goes towards (3).
Run a wire from the middle leg to 1C on the adapter board.
the end. You are sending out 12v not a ground, so this High Side Driver must be built. The new V1.5 board has this circuit built within the PCB.
Last edited by Braineack; Oct 28, 2010 at 02:54 PM.
Reply
0
0

You can build the exact same circuit we show for VTEC activation, but use the Fuel Pump pin on the mainboard for the input and 1C on the connector board for the output. As Brainy stated, this only applies to the earliest DIYPNP kits, V1.1. The kit that currently ships has a high side driver on board.

Reply
0
0

Thread
Thread Starter
Forum
Replies
Last Post
Dustin
Miata parts for sale/trade
4
Sep 23, 2015 10:34 PM


