
Ignition Fail on Dyno!!! Help Please.


Reply
 0
0

0

Thread Starter
Junior Member
Joined: Nov 2009
Posts: 109
Total Cats: 2
From: Dumfries, VA
I put together the attached table detailing batch vs. sequential fuel and ignition board wiring. Can brain and others look it over for accuracy. I'm like 99% on this because I've had both batch and seq for fuel and ignition. Looking to do a write-up on this once I'm all done. Very difficult to find good info in one place online.
Reply
0
0
Thread Starter
Junior Member
Joined: Nov 2009
Posts: 109
Total Cats: 2
From: Dumfries, VA
This definitely works. Anyone with a DIYPNP - if ALED and WLED are open, you're golden. I plant to do a full write-up about this when I get time. Busy for the next week and a half. Here is the jist:
If your coils suck(which is all miatas), why pay as much as $240 or $140 club price for stock coil replacements to suck again. This setup cost: $60 for FM bracket shipped, $100 for coils shipped and $40 for pigtails shipped. I used 2 short ground runs tacked onto the pigtails and 1 additional ground lug. So, $200 for a permanent fix and sequential ignition. That's a damn good deal.
What this entails in short:
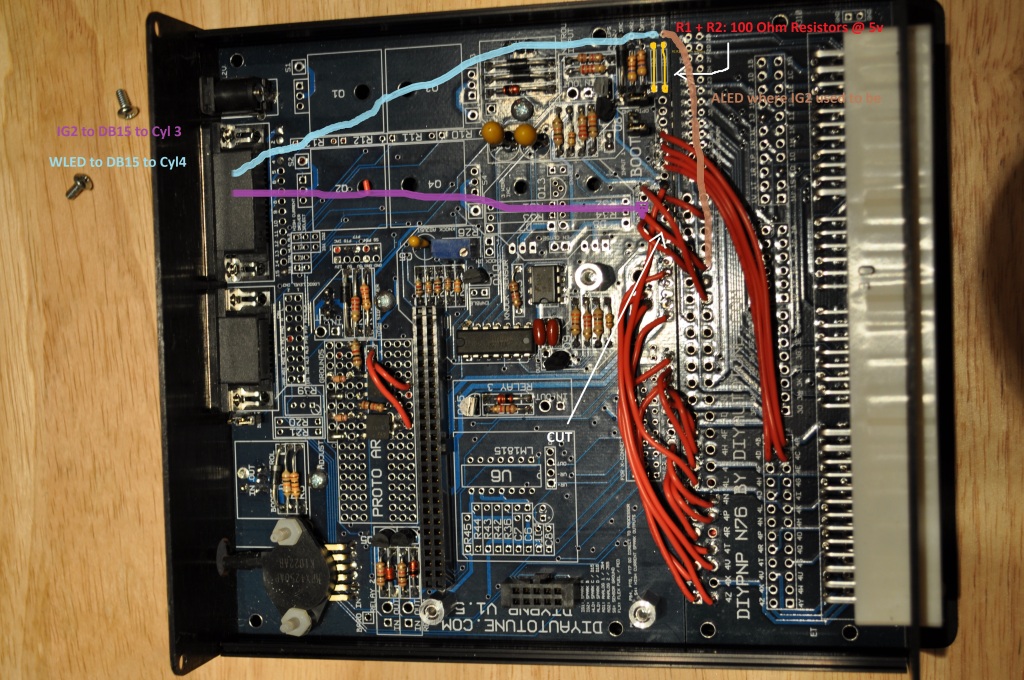
R1 and R2 need 100Ohm resistors in the 5V position. IGN2 needs to run out the DB15 connector to Cylinder 3's signal on it's pigtail. WLED needs to run out the DB15 connector to Cylinder 4's signal on it's pigtail ALED gets wired where IGN2 was for batch ignition on the connector board - this was 4R for me. Build up the coils and bracket as Shuiend has pictured. Now, label the coils from right to left as 1, 2, 3 and 4. Do this on the car to make sure the bracket is oriented properly. Plug a pigtail into each coil off the car. Now, tie with zip ties or tape or whatever the following together: [Coil1 and Coil4 ground], [Coil2 and Coil3 ground], [Coil1 and Coil4 Positive], [Coil2 and Coil3 positive], [Coil1 and Coil4 signal ground], [Coil2 and Coil3 signal ground]. The ground, signal ground and positive for Coil1 and Coil4 are going to tie to the respective stock Coil 1 harness wire. Same goes for new Coil2 and Coil3 lines tying to stock Coil 2 harness wires. Coil1 signal is going to go to stock Coil1 harness wire for signal. Coil 2 signal is going to go to stock Coil2 harness wire for signal. You'll need to run extra length on the Coil3 and Coil4 signal wires since they will need to be run to the DIYPNP inside the cabin. All of the connections at this point should be soldered with heat shrink sleeves over top. Don't forget to put the heat shrink over top ahead of time, keep it away from the soldering action and double up on heat shrink. Don't worry, its not like condoms - one won't break the other. Now, run the signals for 3 and 4 into the cabin to a couple empty terminals on your DB15. If you don't already have a terminal board to DB15 setup, now is a good time. Remember which DB number goes to which coil and be sure it matches the board wiring above. That's it for hardware unless you want to wire in the capacitors as suggested to eliminate noise by some others. You can search on that. In software, switch to "coil on plug" and use the dwell settings and voltage table values I've posted earlier in this forum. I believe that was it! Feel free to ask questions - it might spark my memory.
So, what do you get...Well, I've gone from batch injection to seq. injection and that was very nice - especially free reving and at cruise nice and steady. But, this was so much more worth it. Starting is incredibly fast. Idle is even a bit smoother. Now I can rev in boost without blowing spark out. But, the best thing I didn't think about until it happened. If your miata hesitates a bit due to heavy clutch or poor tune when engaging cluth on start, this settles those hesitations right out making it soooo much more drivable.
If your coils suck(which is all miatas), why pay as much as $240 or $140 club price for stock coil replacements to suck again. This setup cost: $60 for FM bracket shipped, $100 for coils shipped and $40 for pigtails shipped. I used 2 short ground runs tacked onto the pigtails and 1 additional ground lug. So, $200 for a permanent fix and sequential ignition. That's a damn good deal.
What this entails in short:
R1 and R2 need 100Ohm resistors in the 5V position. IGN2 needs to run out the DB15 connector to Cylinder 3's signal on it's pigtail. WLED needs to run out the DB15 connector to Cylinder 4's signal on it's pigtail ALED gets wired where IGN2 was for batch ignition on the connector board - this was 4R for me. Build up the coils and bracket as Shuiend has pictured. Now, label the coils from right to left as 1, 2, 3 and 4. Do this on the car to make sure the bracket is oriented properly. Plug a pigtail into each coil off the car. Now, tie with zip ties or tape or whatever the following together: [Coil1 and Coil4 ground], [Coil2 and Coil3 ground], [Coil1 and Coil4 Positive], [Coil2 and Coil3 positive], [Coil1 and Coil4 signal ground], [Coil2 and Coil3 signal ground]. The ground, signal ground and positive for Coil1 and Coil4 are going to tie to the respective stock Coil 1 harness wire. Same goes for new Coil2 and Coil3 lines tying to stock Coil 2 harness wires. Coil1 signal is going to go to stock Coil1 harness wire for signal. Coil 2 signal is going to go to stock Coil2 harness wire for signal. You'll need to run extra length on the Coil3 and Coil4 signal wires since they will need to be run to the DIYPNP inside the cabin. All of the connections at this point should be soldered with heat shrink sleeves over top. Don't forget to put the heat shrink over top ahead of time, keep it away from the soldering action and double up on heat shrink. Don't worry, its not like condoms - one won't break the other. Now, run the signals for 3 and 4 into the cabin to a couple empty terminals on your DB15. If you don't already have a terminal board to DB15 setup, now is a good time. Remember which DB number goes to which coil and be sure it matches the board wiring above. That's it for hardware unless you want to wire in the capacitors as suggested to eliminate noise by some others. You can search on that. In software, switch to "coil on plug" and use the dwell settings and voltage table values I've posted earlier in this forum. I believe that was it! Feel free to ask questions - it might spark my memory.
So, what do you get...Well, I've gone from batch injection to seq. injection and that was very nice - especially free reving and at cruise nice and steady. But, this was so much more worth it. Starting is incredibly fast. Idle is even a bit smoother. Now I can rev in boost without blowing spark out. But, the best thing I didn't think about until it happened. If your miata hesitates a bit due to heavy clutch or poor tune when engaging cluth on start, this settles those hesitations right out making it soooo much more drivable.
Reply
0
0

Thread Starter
Junior Member
Joined: Nov 2009
Posts: 109
Total Cats: 2
From: Dumfries, VA
No, 3.2.1 firmware now. That could have something to do with the cut-out in boost, but these LS2 coils would light water on fire, so I don't need to worry about blowing out at 9.5psi anymore!
No link to bracket. Call up FM at 1-800-FLY-MX5S and ask to buy the bracket in their big spark kit. They sell every part separately, but don't list everything online.
No link to bracket. Call up FM at 1-800-FLY-MX5S and ask to buy the bracket in their big spark kit. They sell every part separately, but don't list everything online.
Reply
0
0

Since they sell everything separately, would buying their wiring set up along with the bracket be a good idea?
Reply
0
0


Are you planning on using the round truck/LS2 coils? Pretty sure FMs bracket if for the flat side LS1 & LS3 style coils.
Last edited by EO2K; Apr 6, 2012 at 01:41 PM.
Reply
0
0
LS1, LS2 & LS2 "Truck/Yukon/FlexFuel" coils. I *believe* the LS3 coil that FM uses has the same footprint as the LS1 coil, but yeah, call FM about that.
BBundy posted a pic somewhere that had good visual identification. I believe it was in Falcons "My LS2 Coil Install" thread
edit: Bob's teh man! https://www.miataturbo.net/showpost....2&postcount=56
BBundy posted a pic somewhere that had good visual identification. I believe it was in Falcons "My LS2 Coil Install" thread
edit: Bob's teh man! https://www.miataturbo.net/showpost....2&postcount=56
Reply
0
0
You want either GM #12570616 which uses the LS2 wiring diagram for sure or you want GM #12611424 which is what the FM kit uses. I am not sure what way the FM coil is wired, LS1 or LS2 wiring. The round truck coils will not fit on the fm bracket. I have been happy with my FM bracket so far. I am planning on ordering their spark plug wires for the kit on Monday.
Reply
0
0
Thread Starter
Junior Member
Joined: Nov 2009
Posts: 109
Total Cats: 2
From: Dumfries, VA
Nope. Don't touch the 12V nodes on R1 and R2. Up near the DB15 (to the left if the DB is facing out) are a couple tie in points for WLED and IGN2. Use those to run out the DB connector. The yellow resistors go in the 5V location as you've shown - yes. Theres an ALED tie in closer to the harness connector board that you should use to go to Cylinder 2 where IGN2 is currently run. I can't verify that the location you've shown on the harness board is correct for your year, but it looks like it goes to the IGN2 location on the mainboard currently. A good place to check is the instructions for the AEM ECU for your year car. They label the harness pins very nicely in the instructions. I apologize for the delayed response.
Reply
0
0

Thread
Thread Starter
Forum
Replies
Last Post


