
Devils Own Wi Relay Wiring
 03-27-2007, 09:45 PM
#1
Junior Member
Thread Starter

Join Date: Nov 2005
Location: Athens
Posts: 197
Total Cats: 0
Me stuff come today for the WI install, so its round 2 tomorrow.
I could do with a bit of advice with regards to the wiring though.
This is the wiring diagram provided with the kit:
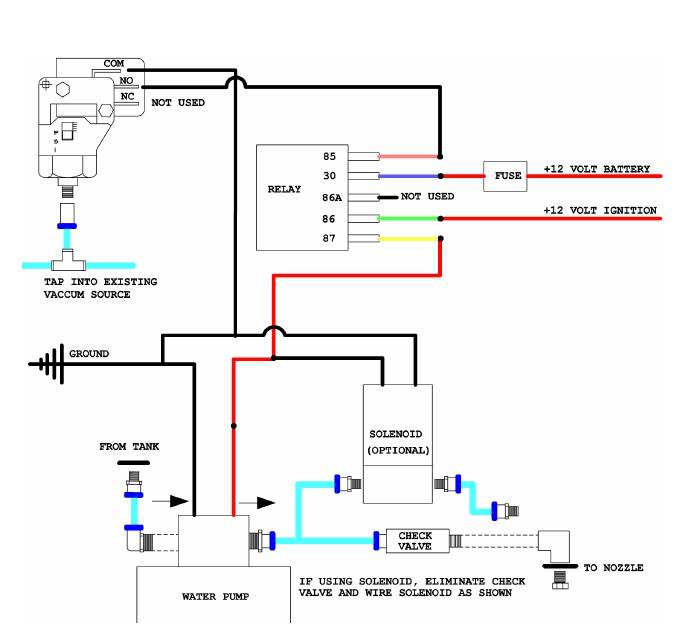
Only difference is i won't be running the pressure switch, (HSV Instead) so i'll be wanting the pump to be enabled the whole time the ignition is on.
I'm guessing pin 85 is the switching input, and if i wire a second ignition source to this it will enable the relay.
Am i correct?
Also is it ok that my pump will be active the while time i'm driving?
Ok it won't actually be pumping unless it sees a drop in pressure but still.
Cheers
Mark
I could do with a bit of advice with regards to the wiring though.
This is the wiring diagram provided with the kit:
Only difference is i won't be running the pressure switch, (HSV Instead) so i'll be wanting the pump to be enabled the whole time the ignition is on.
I'm guessing pin 85 is the switching input, and if i wire a second ignition source to this it will enable the relay.
Am i correct?
Also is it ok that my pump will be active the while time i'm driving?
Ok it won't actually be pumping unless it sees a drop in pressure but still.
Cheers
Mark

Reply
 0
0

0
 03-27-2007, 10:20 PM
#3
Junior Member
Thread Starter
Join Date: Nov 2005
Location: Athens
Posts: 197
Total Cats: 0
Thanks for the quick response.
As far as i know there is a internal pressure switch in the pump, so if i was to wire the pump directly to a 12v source, and block the end of the water pipe with my finger, the pump would stop automatically.
When i remove my finger, the pump would then errrrr pump
I'm unsure on how to wire up the relay though,
I am looking to completely remove the MAP pressure switch (top left in the diagram), instead i will control the quantity of water flowing and when with my Aquamist HSV connected to my EMU.
With the MAP pressure switch removed though there will be no signal to turn on the pump.
As the MAP pressure switch is only earthed on the other contact, i presume if i wire pin 85 to ground this will continuously supply the pump with power while the ignition is on right?
Cheers
Mark
Reply
0
0
03-27-2007, 10:30 PM
#4
Supporting Vendor


iTrader: (33)
Join Date: Jul 2006
Location: atlanta-ish
Posts: 12,659
Total Cats: 134
Single Pole Single Throw Relay:
30 +12V power feed
85 GROUND
86 +12V trigger
87 Normally Open Output
Pin 87 supplies +12V (supplied from pin 30) when triggered by pin 86
30 +12V power feed
85 GROUND
86 +12V trigger
87 Normally Open Output
Pin 87 supplies +12V (supplied from pin 30) when triggered by pin 86
Reply
0
0
03-27-2007, 10:55 PM
#6
When I was installing my kit I tested the pump to prime the line before finishing up the install I connected the pump directly to 12V and no fluid was coming out the pipe. Even holding on there for a solid minute nothing came out. Turned out my check valve was on backwards (mislabeled). Turned it around and voila, fluid spewing out like mad.
Moral of the story: If the pump has power it will run, no matter the pressure build up.
Moral of the story: If the pump has power it will run, no matter the pressure build up.
Reply
0
0
 03-28-2007, 11:15 AM
#8
Supporting Vendor
iTrader: (33)
Join Date: Jul 2006
Location: atlanta-ish
Posts: 12,659
Total Cats: 134
86 is the trigger
When you supply power at pin 86, the contact between pins 30 and 87 closes
In the diagram in the original post, the circuit is completed when the pressure switch's contact closes and provides ground.
Reply
0
0
03-28-2007, 01:15 PM
#9
Junior Member
Thread Starter
Join Date: Nov 2005
Location: Athens
Posts: 197
Total Cats: 0
Wired 85 to ground and pump comes on.
As soon as the HSV opens to pump turns on, when the HSV closes the pump turns off
Seems as though there is a pressure switch in the pump, as it only pumps when the pressure drops.
Cheers
Mark
As soon as the HSV opens to pump turns on, when the HSV closes the pump turns off
Seems as though there is a pressure switch in the pump, as it only pumps when the pressure drops.
Cheers
Mark
Reply
0
0
03-29-2007, 06:02 PM
#10
Junior Member
Thread Starter
Join Date: Nov 2005
Location: Athens
Posts: 197
Total Cats: 0
At last install now finished.
Went for a 8.5 litre Go-Kart tank (copied off Joes idea), bit big but what the hell.
 Reduced: 86% of original size [ 928 x 666 ] - Click to view full image

The design is absolutly perfect for a WI tank, from the pick up to the breather valve, to do fact that its dished at the bottom to stop the water slopping around too much.
Reduced: 86% of original size [ 929 x 697 ] - Click to view full image

Fitted 2 jets:
1 x preSC a 0.3mm jet.
1 x Dummy TB 0.4mm jet.
Reduced: 86% of original size [ 929 x 697 ] - Click to view full image

Only done a quick couple of tuning runs, but i'm well impressed.
Leaned off my AFR's to 12.
Advanced my timing back to stock, so i'm now at 14 btdc without pulling any timing AT ALL
NO KNOCK
Still need to carryout some fine tuning to get it spot on, but this is the SUB I/J map i'm currently using:

As i say i really to spend a bit of time experimenting to get it spot on, but with the timing advanced and the AFR's leaned out the car feels waaayyyy more responsive.
Once i'm happy with the results in goes the 115mm and hello 12psi
Cheers
Mark
Went for a 8.5 litre Go-Kart tank (copied off Joes idea
), bit big but what the hell. Reduced: 86% of original size [ 928 x 666 ] - Click to view full imageThe design is absolutly perfect for a WI tank, from the pick up to the breather valve, to do fact that its dished at the bottom to stop the water slopping around too much.
Reduced: 86% of original size [ 929 x 697 ] - Click to view full imageFitted 2 jets:
1 x preSC a 0.3mm jet.
1 x Dummy TB 0.4mm jet.
Reduced: 86% of original size [ 929 x 697 ] - Click to view full imageOnly done a quick couple of tuning runs, but i'm well impressed.
Leaned off my AFR's to 12.
Advanced my timing back to stock, so i'm now at 14 btdc without pulling any timing AT ALL
NO KNOCK
Still need to carryout some fine tuning to get it spot on, but this is the SUB I/J map i'm currently using:
As i say i really to spend a bit of time experimenting to get it spot on, but with the timing advanced and the AFR's leaned out the car feels waaayyyy more responsive.
Once i'm happy with the results in goes the 115mm and hello 12psi
Cheers
Mark
Reply
0
0
 03-29-2007, 06:57 PM
#12
Junior Member
Thread Starter
Join Date: Nov 2005
Location: Athens
Posts: 197
Total Cats: 0
Don't ask, What a ball ache :(
Why don't the Americans fall in line with the rest of the world?
In the end i had to buy a 4mm to 1/8" connector, screw this into a threaded bar, then attach a 1/4" to 1/8" connector on the other end
I bought some 4mm fittings, but obviously these were in mm and wouldn't fit any of the DO parts :(
Still well worth it the end though.
One thing i forgot to add, i couldn't seem to get the Aquamist check valve to work, when attached the DO pump just kept on pumping way over its normal pressure.
So much so that i had to cut the plastic pipe before i could release the quick fit connector
Tried it both ways but still the same.
Not running any check valve right now (the DO Check valve is 1/4"), the HSV seems pretty solidly shut though.
Guess the only way to see is tomorrow morning, hydro locked engine anyone?
Cheers
Mark
Reply
0
0
04-02-2007, 03:48 AM
#13
Junior Member
Thread Starter
Join Date: Nov 2005
Location: Athens
Posts: 197
Total Cats: 0
Did a bit a datalogging today.
I'm stunned by how much better the car feels, i can't believe it's ONLY from the 6 degrees of advance i was able to claw back, there must also be more power from the cooler intake charge.
To give you some idea i've posted to comparison data pulls.
The top 1 is a data log from about 1 month ago, i was having to pull around 6 degrees of timing to avoid knock.
The bottom 1 was taken this morning, my fueling is still mega rich at 11.8, but to say i'm getting this amount of gain already, without any real fine tuning yet is amazing.

The ambient temps were exactly the same on both runs, even though in the top 1 i was rolling 5 kmh faster, the WI pull ended up over 20 kmh faster over just under 2 secs.
I was not expecting this sort of gain
You can also see i'm running slightly more boost, this is exactly the same pulley ratio as the top run, but i assume the extra boost is because i'm injecting preSC.
Cheers
Mark
I'm stunned by how much better the car feels, i can't believe it's ONLY from the 6 degrees of advance i was able to claw back, there must also be more power from the cooler intake charge.
To give you some idea i've posted to comparison data pulls.
The top 1 is a data log from about 1 month ago, i was having to pull around 6 degrees of timing to avoid knock.
The bottom 1 was taken this morning, my fueling is still mega rich at 11.8, but to say i'm getting this amount of gain already, without any real fine tuning yet is amazing.
The ambient temps were exactly the same on both runs, even though in the top 1 i was rolling 5 kmh faster, the WI pull ended up over 20 kmh faster over just under 2 secs.
I was not expecting this sort of gain
You can also see i'm running slightly more boost, this is exactly the same pulley ratio as the top run, but i assume the extra boost is because i'm injecting preSC.
Cheers
Mark
Reply
0
0
 04-02-2007, 08:38 AM
#16
Junior Member
Thread Starter
Join Date: Nov 2005
Location: Athens
Posts: 197
Total Cats: 0
Red = RPM
Blue = PSI
Black = VSS
Basically i have highlighted 2 point,
1 right at the start of the pull just before WOT.
The other is 1.6 seconds after the WOT.
The bottom graph is with WI, the step up is the tranny locking up (Auto tranny) its not visible on the first one as the tranny hasn't locked up within the time frame.
Cheers
Mark
Reply
0
0
04-03-2007, 05:30 AM
#19
Junior Member
Thread Starter
Join Date: Nov 2005
Location: Athens
Posts: 197
Total Cats: 0
Its basically a roll-on at the toll station i have to go through to get to work
The first 1 i was rolling at 16 kmh when i nailed the throttle.
The second i was rolling at 11 kmh when i went WOT.
I then zoomed in on the datalog window till they were showing exactly the same time frame, and compared the results.
I've got the 115mm pulley to on yet as well, bang goes the tranny
The first 1 i was rolling at 16 kmh when i nailed the throttle.
The second i was rolling at 11 kmh when i went WOT.
I then zoomed in on the datalog window till they were showing exactly the same time frame, and compared the results.
I've got the 115mm pulley to on yet as well, bang goes the tranny
Reply
0
0

Thread
Thread Starter
Forum
Replies
Last Post
Zaphod
MEGAsquirt
47
10-26-2018 11:00 PM


