When you click on links to various merchants on this site and make a purchase, this can result in this site earning a commission. Affiliate programs and affiliations include, but are not limited to, the eBay Partner Network.
Just a quick update on this... I'm still running the stock pedal ratio and I'm used to it now, in fact I think the pedal feel is awesome. It works fine on 245 Hoosiers with some aero and I still have spare brake capability if I want to lock them so I don't see an issue on a high downforce big grip setip. I have pulled the dash and checked all the steelwork to make sure it's all holding up to the higher pedal forces and all the welds looks good. It was one of my bigger concerns of modifying the stock peddle box.
I've just upgraded to a hydraulic handbrake and Wilwood rear calipers but I have yet to run the car with them on yet. I'm still waiting for new pads to rock up. The Wilwoods move the brake bias to the rear a bit so I'm going to adjust the sizing of the masters to balance it out.
The best thing about my brake setup is I can jump in the car and hit the brakes on that first corner with cold pads, tyres etc and I know what the car will do. With the booster, I used to stress about that first corner and take it overly easy so that I could get a gauge on how much the brakes would bite but now I don't even think about it. Some of the street events I've been running are extremely unforgiving with big concrete barriers on all corners. One lockup and you're in the wall so having predictable brakes helps.
One thing people never consider is adding a vacuum pump to retain the brake booster with larger cams. When you drop in vacuum due to the cams, if you added a vacuum pump either set to PWM through a stand alone or just full time on with key on.
Vacuum pumps can be had for super cheap from many cars in the junk yard. New Chevy trucks also have a belt driven vacuum pump that could easily be mounted and setup for a miata engine.
I like your set up though and I am glad it is working for you. I'll have to weigh all my options when it comes time for me to upgrade my brakes before I do a setup like yours.
I just installed some more aggressive brake pads and now it is very easy to lock up and the pedal feel doesn't really give any hint that it's about to happen. I am wondering if this will help that.
Also experienced some inconsistent pedal feel at my last event before the brake upgrade and wondering if that booster check valve is failing.
Ideally for motorsport you don't want pads with bite. A lot of the so called racer pads have very high bite which feels great to a new driver as it gives some immediate feedback to hitting that pedal. You actually want a nice smooth application of friction when hitting that pedal so you are shocking the tyre as little as possible. OGracing has an excellent write up in his brakes thread.
You can try installing a volume in the brake booster vacuum line but really that will only help if you have real big cams or ITB's. You can make a buffer volume cheaply by using a short length of PVC plumbing pipe, glue some end caps on either side and tap in some hose nipples. But really for you the first port of call should be to check the PCV valve. You can buy some cheap aluminium ball bearing valves that you just put into the hose rather than using the stock PCV. Second is to make sure the booster isn't faulty. Mine was 25 years old and rusty which might have been half my problems.
Second is to make sure the booster isn't faulty. Mine was 25 years old and rusty which might have been half my problems.
That seems likely to me. AIUI, boosters don't let air in (or "release vacuum") until you let off the pedal, so in theory a properly functioning booster with a working one-way valve in the booster line shouldn't really care if the manifold vacuum is wavering during a single braking event.
That seems likely to me. AIUI, boosters don't let air in (or "release vacuum") until you let off the pedal, so in theory a properly functioning booster with a working one-way valve in the booster line shouldn't really care if the manifold vacuum is wavering during a single braking event.
--Ian
Yeah... My symptoms were that I could feel the brake pedal moving as I blipped the throttle. So I could feel the gain and loss of assistance as I went down through the gears under brakes. I also found the very first application of the brake would give me more assist and then rapid brake applications immediately after would reduce in effectiveness. It was fairly painful... so I got rid of the problem altogether.
stock pivot has a delicious firm brake pedal. on stock 93 1.8 calipers, rotors, though, so weak as ****
put a new hole at 60mm from pedal pivot, bit more pedal travel, but still far to hard to get any sort of hard braking.
Threshold braking feels absolutely great, so communicative, but its almost a 1 rep max for little me haha.
will be putting on braided lines next week, so should firm up a bit hopefully. My main mission goal here is to have a very solid pedal, maybe 1- 1.5" of travel to full lockup, but i can compromise :(
If you change pedal ratio you ideally need to firm up everything in the brake system so that you don't get a spongy pedal. You need braided lines, low compressible pads and to bleed the system well. I run Ferodo DS Uno pads which have a low compressibility.
Up front I'm running Wilwood 11.75" rotors with Radial Mount Dynapros (Mini Cooper S kit)
On the rear I'm running Wilwood 11.44" solid rotors with stock NA6 caliper (to be replaced with Dynalite rotors once I make up the second offset bracket)
Thanks for the reply
May hold off on the braided lines for a moment, seen some kits which have them included.
Was checking out the fedoros yesterday, have you tried the ds2500? Wondering if the the Uno's won't be very effective till their warmed up? Car will be being tracked, but some fast roads or popping over to mates house... Don't want to have to curb-stomp it.
Sorry should have asked before; 15" wheels? I hear some fit for 11.75, some don't.
I've run DS3000s and they are great on a race track but you need to get them hot. First corner and they will either lock or not stop. I also chewed through rotors and pads in 6 events.
DSUnos stop well from cold and don't change much as they heat up. I've now done 30 events on them with the same rotors and they still have some left. I had to cut them by hand to fit the rear stick calipers though.
My brakes just fit into Kosei 15s and 949 15s fine.
I'm also running ITBs and had been thinking about dual master setups, but I wanted to copy how you retained OEM pedal geometry while I test it out.
I wasn't happy with how much the pedal mount had to be cut, so I built my own mount and changed the pedal ratio to 5.5:1, while leaving the position and actual pedal stock. With a brace that runs to the underdash mount and some gas pedal surgery, it's now stiffer than stock. It's 1/8" plate, since I never want to worry about braking my breaks
I can't tell from the OP post whether there is a "pivot" on the pedal arm attachment, but because the pedal apply point actually swings through an arc during your brake apply you really need to allow the rod pushing on your master cylinder to move a bit up and down.
If you dont do this then over time the side loads of a "stiff" rod (get it?) will cause your pistons and seals to mash against the casting of the master cylinder and eventually they will wear and you will not generate enough brake pressure. That's not a great situation to be in so I wanted to put that info out there.
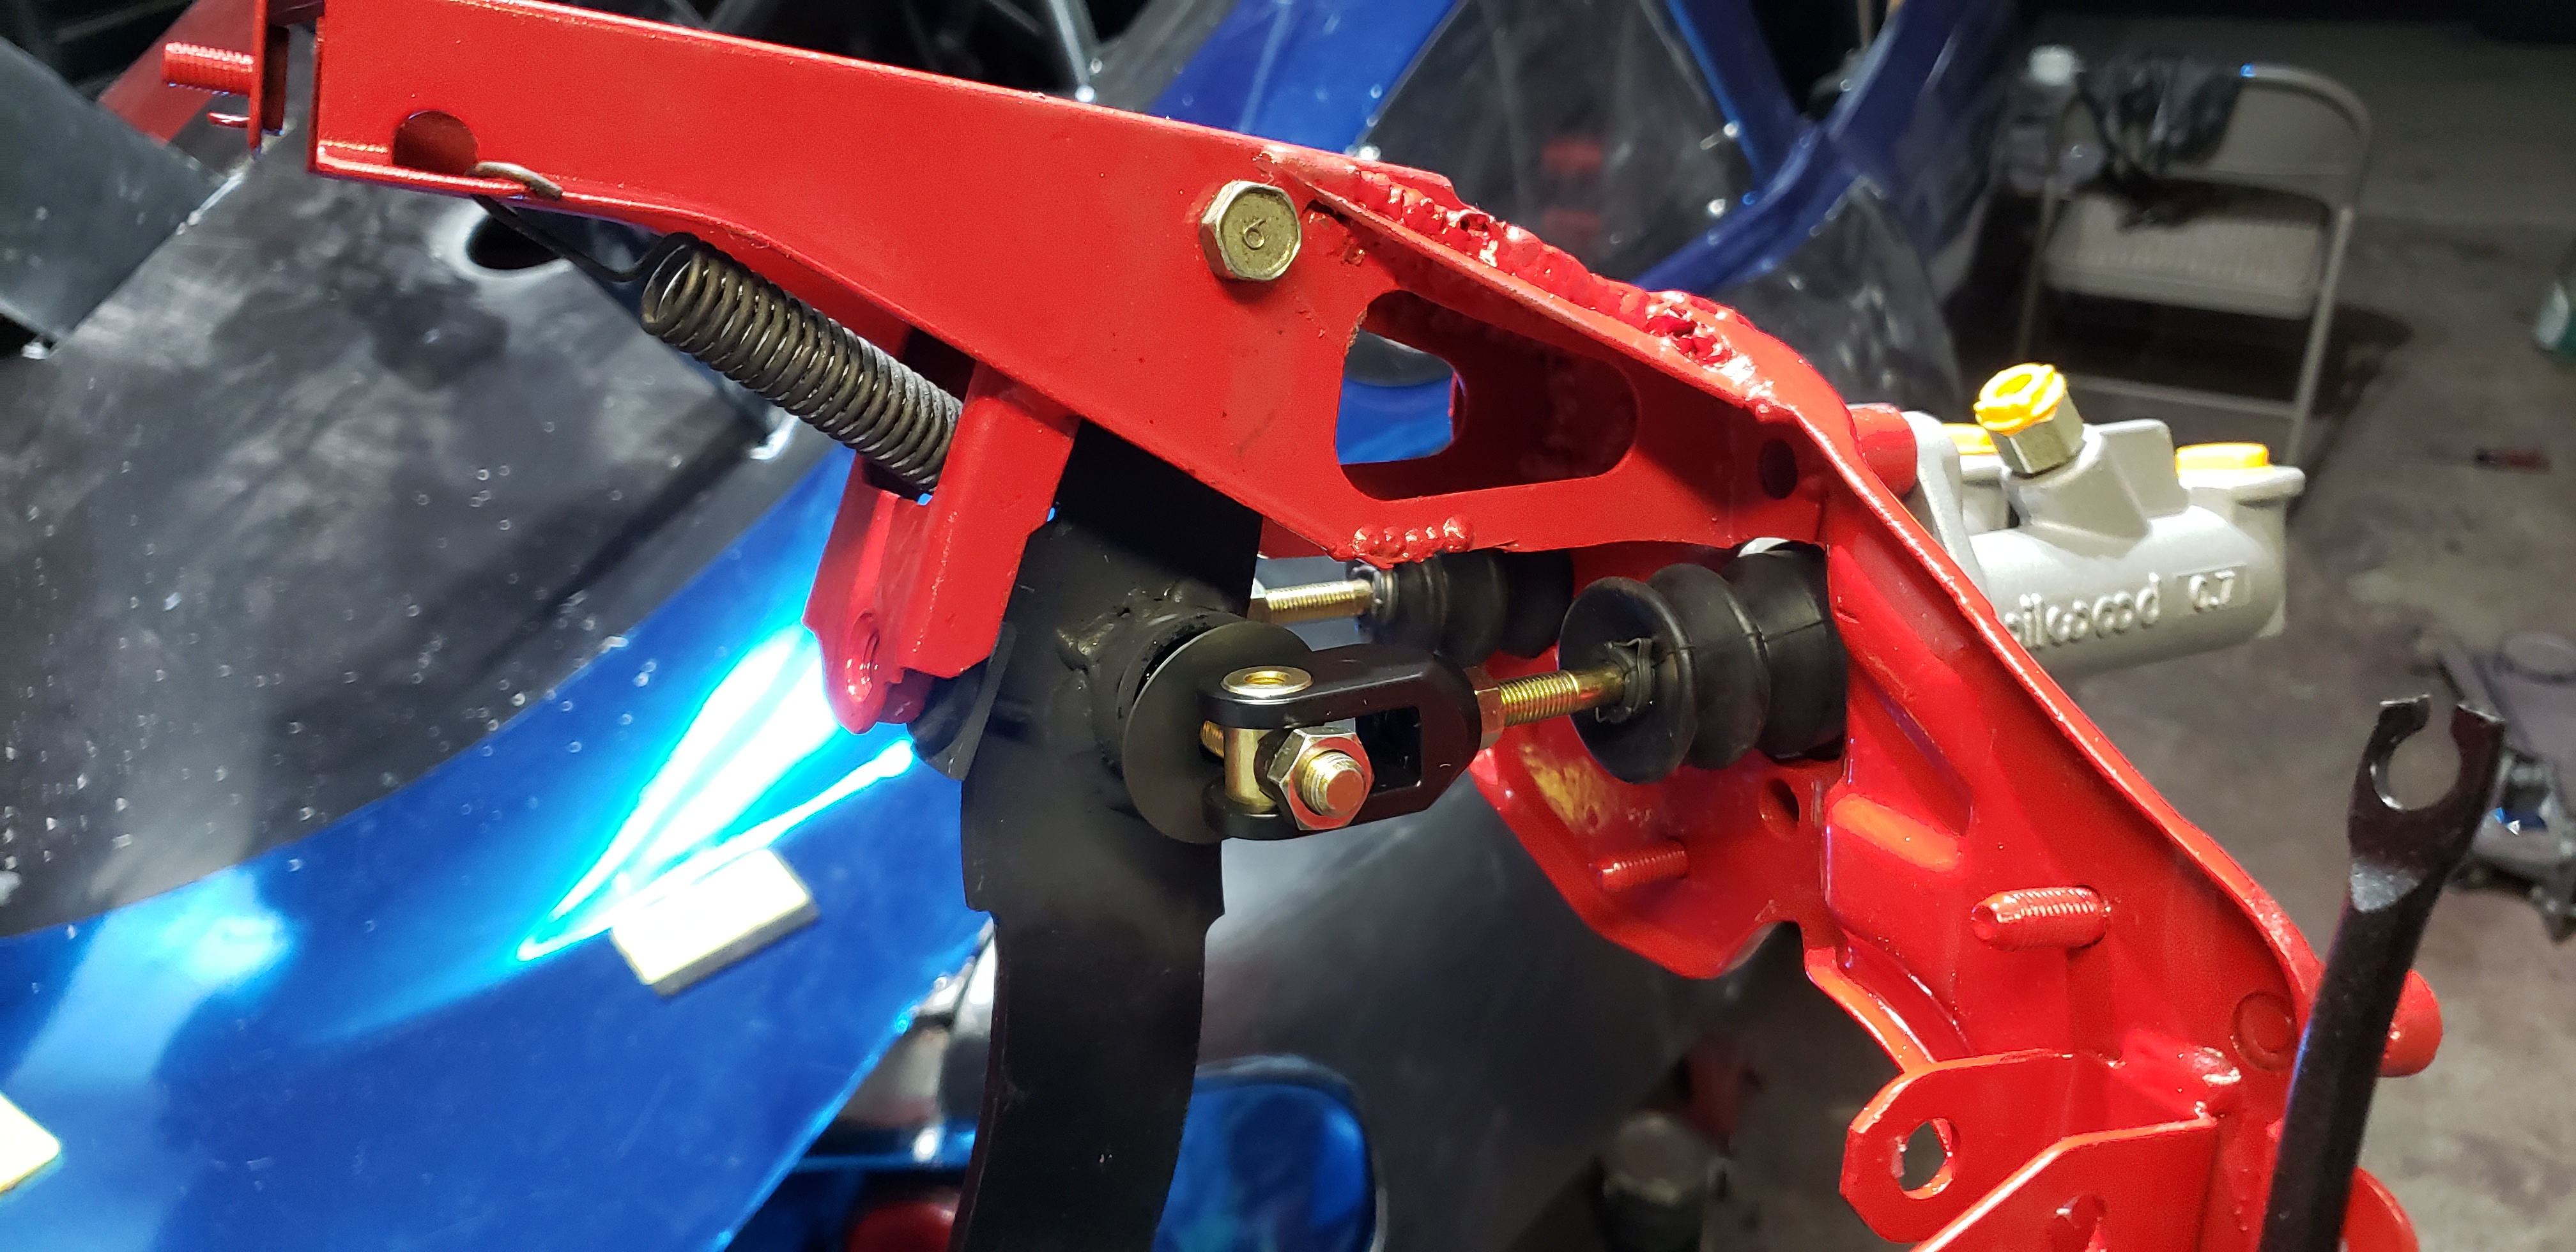
Madjak's setup has the exact same set of components and degrees of freedom as 99% of dual master pedals in race cars: a spherical bearing bias bar in a tube with clevises on each end.
There is no need to add any extra pivots, but it is important to play with pushrod lengths to make sure the geometry is as good as possible.
Total materials required:
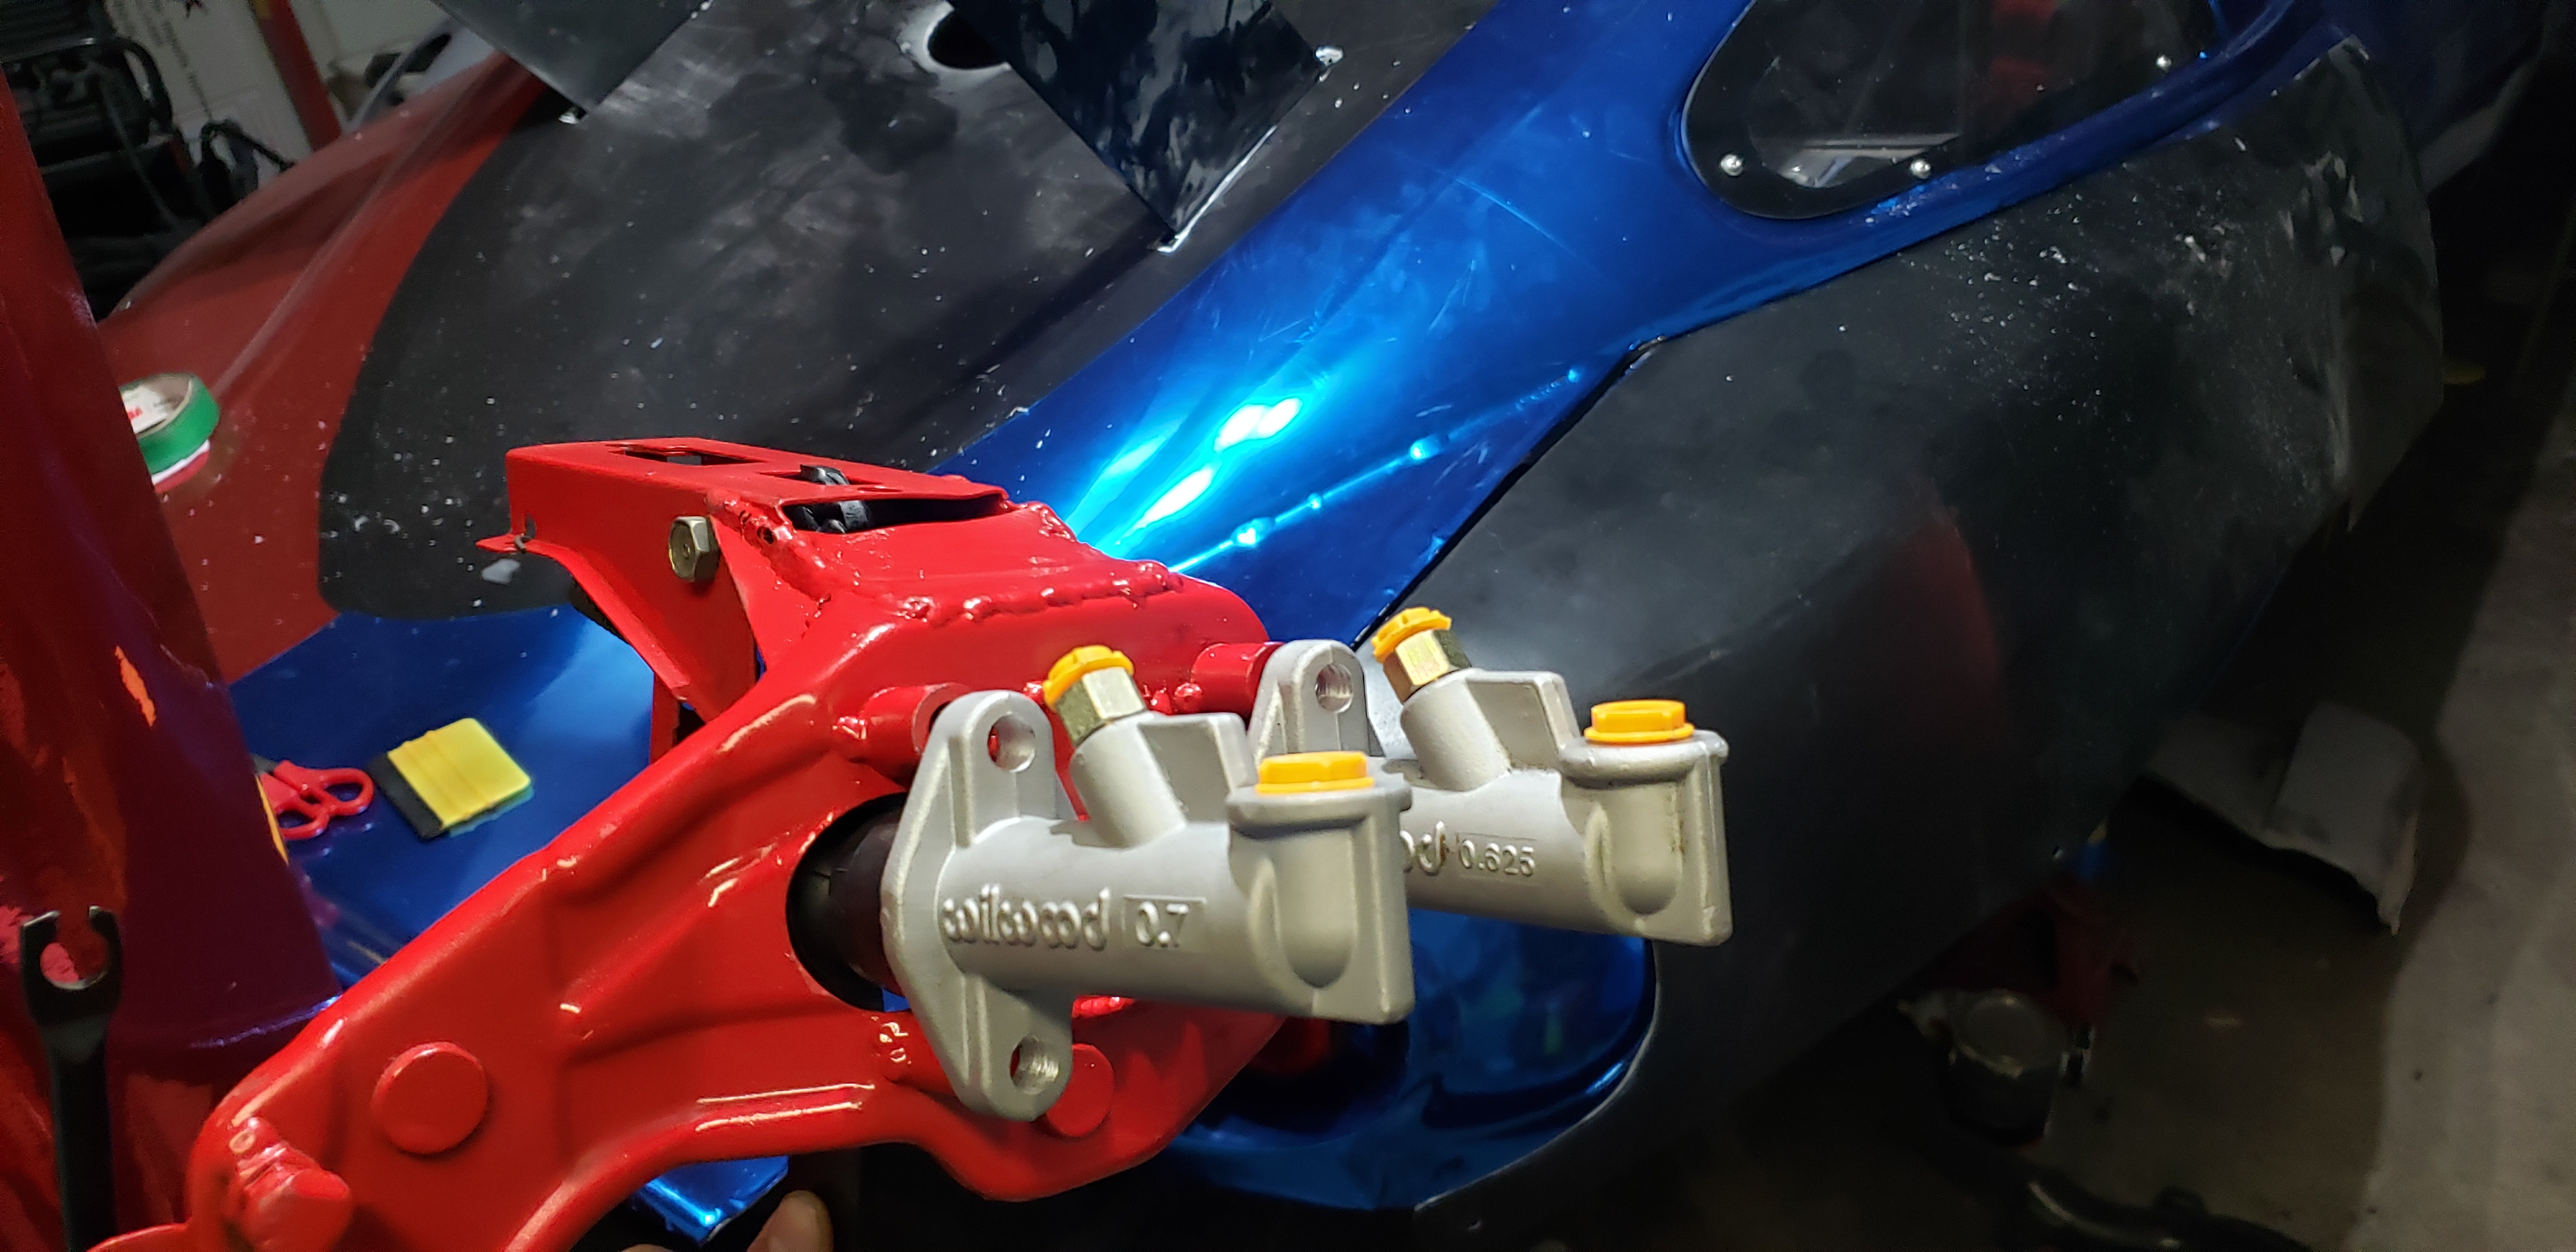
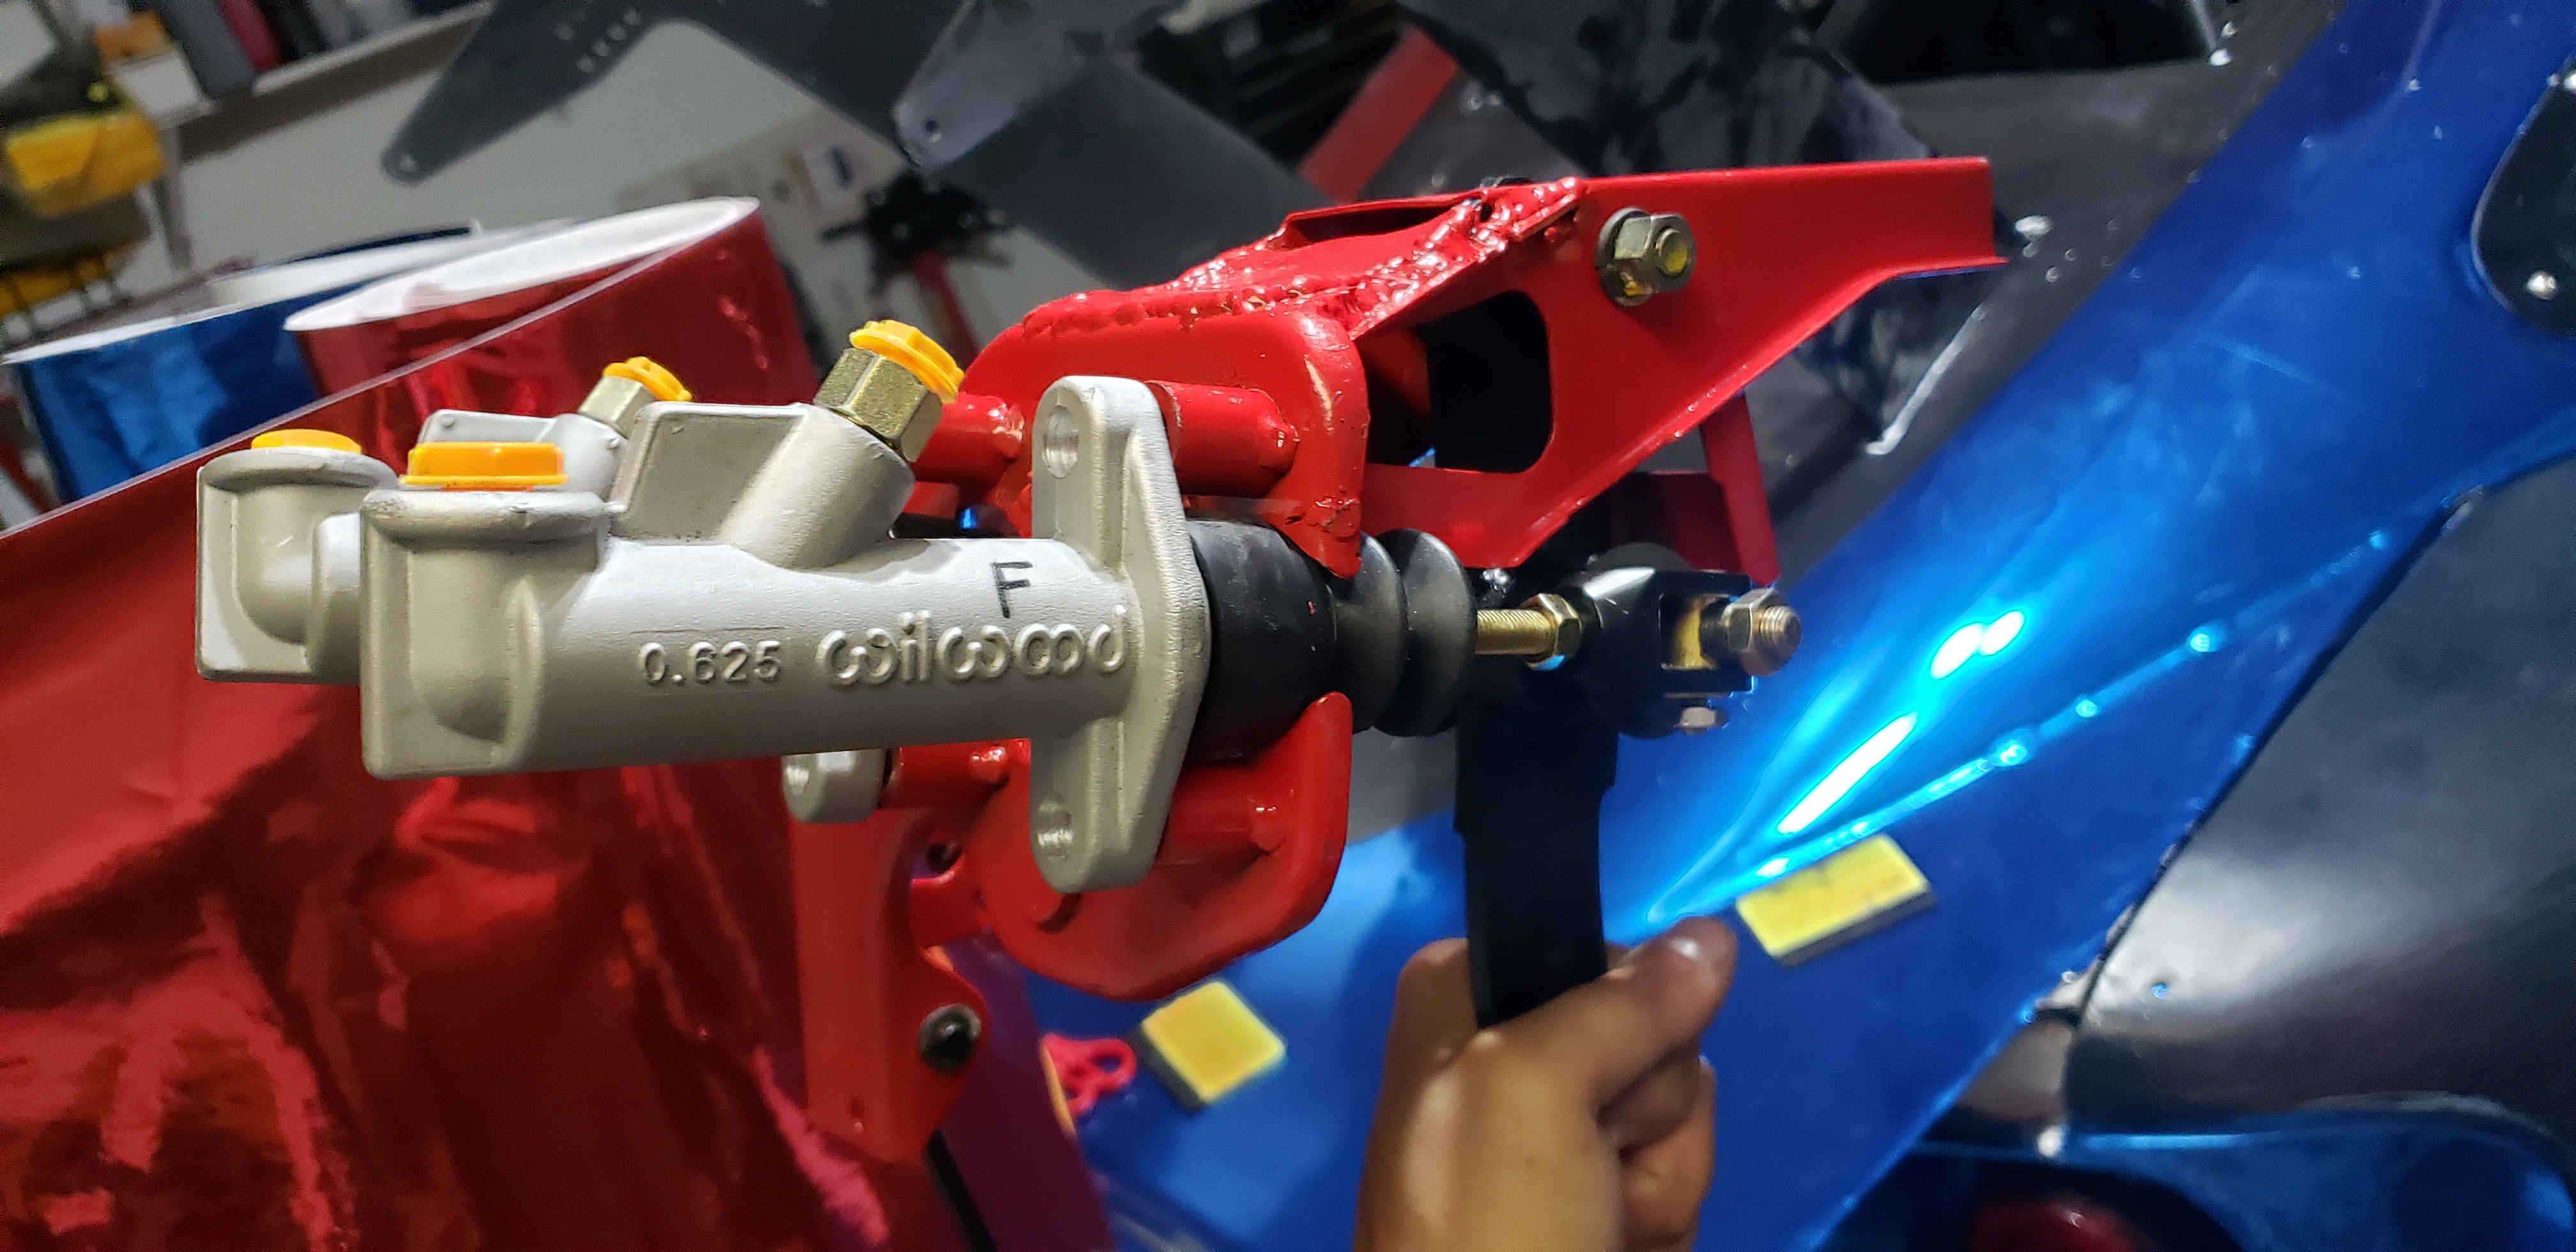
5/8" (0.625") master for front
0.7" master for rear - may be different based on caliper and rotor size
Balance bar (2.5 - 3")
Balance bar remote adjuster
Ally block off plate (make it yourself from offcuts)
28mm hole saw for drilling into firewall and pedal box
Welding some bracing on the pedal box
Modify the existing lines to fit to the new masters.
Approx costs: $300-450 USD depending on masters and fittings etc.
Reviving this thread because I recently went through this, and have some feedback. First things first, however - massive thank you to Madjak! Without your thread I wouldn't have a general guide to follow and would be blind the entire way.
Next, I'd like to update the BOM with the exact parts I used:
Wilwood 340-1757 Balance Bar Assembly
Wilwood 340-4990 Remote Brake Bias Adjuster Cable
Wilwood 260-6087 .625" Bore Compact Master Cylinder
Wilwood 260-6088 .700" Bore Compact Master Cylinder
uxcell 38mm Carbide Hole Cutter, TCT Hole Saws for 5mm Stainless Steel Sheet Metal
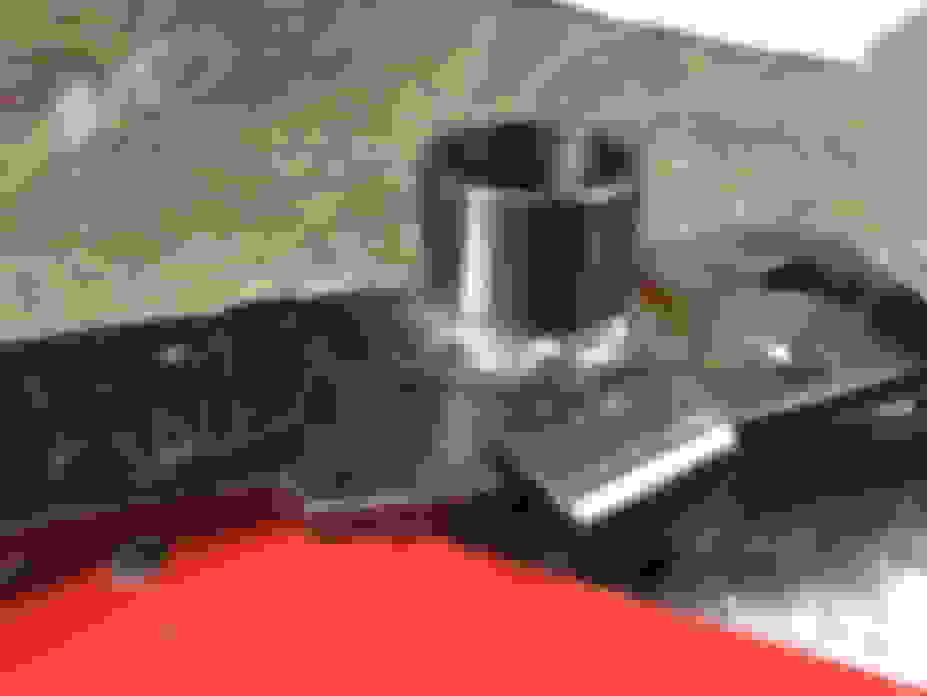
Notice the holesaw is 38mm - you could get away with 36mm, but the 28mm not helpful at all.
Some pics (take special note to the horrible welds):
Reviving this thread because I recently went through this, and have some feedback. First things first, however - massive thank you to Madjak! Without your thread I wouldn't have a general guide to follow and would be blind the entire way.
Next, I'd like to update the BOM with the exact parts I used:
Wilwood 340-1757 Balance Bar Assembly
Wilwood 340-4990 Remote Brake Bias Adjuster Cable
Wilwood 260-6087 .625" Bore Compact Master Cylinder
Wilwood 260-6088 .700" Bore Compact Master Cylinder
uxcell 38mm Carbide Hole Cutter, TCT Hole Saws for 5mm Stainless Steel Sheet Metal
Notice the holesaw is 38mm - you could get away with 36mm, but the 28mm not helpful at all.
Some pics (take special note to the horrible welds):
dude, ******* thank you!!!
thanks for posting all the parts!!
dude, ******* thank you!!!
thanks for posting all the parts!!
Glad I could help! One thing to note, you may end up with different cylinder bore sizes depending on your caliper choice and piston sizing. Feel free to report back with feedback!
Glad I could help! One thing to note, you may end up with different cylinder bore sizes depending on your caliper choice and piston sizing. Feel free to report back with feedback!
so i'm about to purchase this. i see you mentioned a remote bias adjuster but did not list which adjuster you went with.
what did you end up installing?

 05-07-2018, 12:35 AM


 4
4