

NOOB Suspension Help-KYB and S Techs?


It should be cupping the underside of the rubber bushing that lives under the tophat. Like a bowl full of rubber bushing. The squeaking is probably the shock rods sliding up and down in the tophat holes. It won't do that when properly assembled.
I wish I could remember where I saw the exploded parts diagram for all of these parts so I could post it here.
I wish I could remember where I saw the exploded parts diagram for all of these parts so I could post it here.
Reply
 0
0

0

Thread Starter
Junior Member
iTrader: (1)
Joined: Jan 2013
Posts: 157
Total Cats: -1
From: Davidson, NC
I think I found the image you're referring to and the washer looks opposite of what you recommended. Hmmm...
http://www.y8spec.com/suspension/NB_mounts_to_NA_v1.gif
And, like I said before, that washer doesn't pass through the 2.5" ID springs, it kindof rests on them. Will that be ok?
http://www.y8spec.com/suspension/NB_mounts_to_NA_v1.gif
And, like I said before, that washer doesn't pass through the 2.5" ID springs, it kindof rests on them. Will that be ok?
Last edited by Dustin; Jan 29, 2013 at 04:35 PM.
Reply
0
0
Yeah, I just found it, too. Memory fail.
Page 120 in here:
http://www.mazdamotorsports.com/pdfs...MX5/0073_1.PDF
Page 120 in here:
http://www.mazdamotorsports.com/pdfs...MX5/0073_1.PDF
Reply
0
0
It needs to pass freely through the springs. So that being the case, does the upper cupped washer (28-774 in your diagram) have the same inner hole diameter as the bottom one? If so you could switch them with each other. I sourced hardware outside of Mazda when doing mine and used heavy grade washers on mine so I was unaware of this possible pitfall. This definitely isn't the factory way but I think you will be well pleased with the results upon completion. It was the single best modification I ever made on my car.
Reply
0
0
Thread Starter
Junior Member
iTrader: (1)
Joined: Jan 2013
Posts: 157
Total Cats: -1
From: Davidson, NC
So, what do you recommend? Like a 2" diameter heavy duty washer? That seems like it would work and not have to be the fancy 'cup' shape, but just a regular flat, heavy-duty, 2" washer may work. 2" so it will fit inside the spring comfortably and allow shock to travel through....
Reply
0
0
Get grade 8 or better washers. Around 1.5 to 2 inch should be fine. The inside diameter is critical. And you could end up with it bending if it isn't strong enough. It receives a lot of force. You could use two or even use a nut on there first and then the washer if the first washer you use is too thin/weak.
Reply
0
0
Thread Starter
Junior Member
iTrader: (1)
Joined: Jan 2013
Posts: 157
Total Cats: -1
From: Davidson, NC
Get grade 8 or better washers. Around 1.5 to 2 inch should be fine. The inside diameter is critical. And you could end up with it bending if it isn't strong enough. It receives a lot of force. You could use two or even use a nut on there first and then the washer if the first washer you use is too thin/weak.
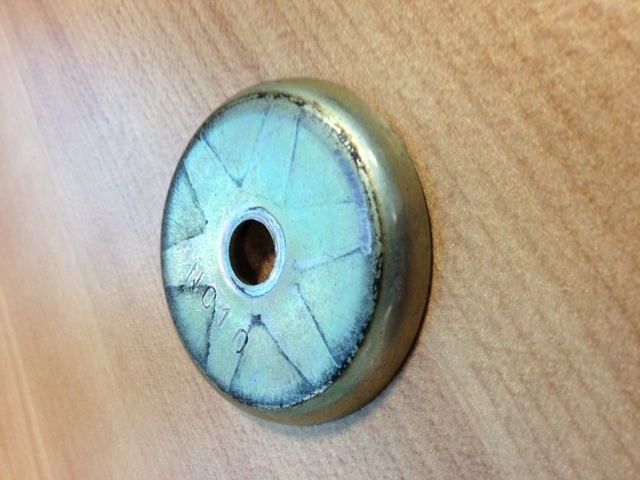
I work in some offices in front of a classic car garage/shop and periodically hang with them. I was asking for said washers and brought my original hardware as an example. He said, "You just need that lip off, right, to pass through your springs?" I said, "Yea, exactly."
He proceeded to a lathe machine and cut the lip off. this is the end result and will pass through my spring and function as it did before... that's the idea at least.
Reply
0
0
Thread Starter
Junior Member
iTrader: (1)
Joined: Jan 2013
Posts: 157
Total Cats: -1
From: Davidson, NC
Alright, guys!
Got it all put on last night. Took my friend and I almost 6 hours to complete the project. With cutting the bumpstops, I didnt feel safe having my eBay sleeves sticking above the shock body, so we had to pick up a hand saw and saw each one down to size.
Now, in extreme cases the 1/2 bumpstops should absorb the impact and not my eBay sleeves! lol
Anyway, it rides like a dream now! Night and day difference. No more squeaks, no more bounce. Just a firm, comfortable ride. Im convinced it will be the perfect budget setup for dual duty cars.
Once again, thanks for all the help. When I get home from work Ill try to post pics of the build and things I did wrong, and had to correct so other newbs can just refer to my post on exactly what they need to do.
Reply
0
0


Congrats, I'm glad you got that all working.
Doing my suspension (the first major mod that I have done to ANY car) taught me 2 things.
Don't panic.
Don't work on your DD on a weeknight.
I need to take them off and adjust the perches/ride height/make sure I did it right in the first place. That will probably take me ~15 minutes per corner now that I know how to do it. But installing them took 3 days and ~15 hours.
Reply
0
0
Thread Starter
Junior Member
iTrader: (1)
Joined: Jan 2013
Posts: 157
Total Cats: -1
From: Davidson, NC
Oh yea man, I've been at this going on two weeks. Waiting on parts, making adjustments, etc. It's always those things you dont think about, like my jack failing on me last night and having to use the jack in my trunk the rest of the time.
Reply
0
0
He cut the gigantic white ones in the second pic of post 54 in half for sure. He may have trimmed one of the other yellow ones as well.
Dustin, congrats man! I knew you would be happy if we could get the bugs worked out. I will say you had me a bit nervous for awhile.
I bet you feel much more confident on curvy and rolling roads now. The Bilsteins make it feel like the car is in control of the road instead of the road being in control of the car. It is hard to describe to someone who has not felt the difference.
Reply
0
0
Thread Starter
Junior Member
iTrader: (1)
Joined: Jan 2013
Posts: 157
Total Cats: -1
From: Davidson, NC
I will say you had me a bit nervous for awhile.
I bet you feel much more confident on curvy and rolling roads now. The Bilsteins make it feel like the car is in control of the road instead of the road being in control of the car. It is hard to describe to someone who has not felt the difference.
I bet you feel much more confident on curvy and rolling roads now. The Bilsteins make it feel like the car is in control of the road instead of the road being in control of the car. It is hard to describe to someone who has not felt the difference.
And you're absolutely right about the ride. Just from driving back and forth from work I have yet to find the limits (curvy back roads and traffic circles, flying around them, lol). Only thing holding me back now are tires. I am confident I made the right decision. This truly is the only 'bang for the buck' option. So glad I didnt have to dish out $1k on some cheap coilovers. And, making, and completing projects on your own, makes the experience that much better.
Up next: Drilled/slotted rotors and pads and hopefully Enkei RPF1 15x7 +35mm with maybe ZE12s? Enkei RPF1 15x7 4x100 35 Black Civic Del Sol Integra | eBay
Then, I'll hopefully be ready for my first autocross day!

Reply
0
0
Drilled and slotted rotors aren't commonly used around here, even (or especially) on track cars. Proper brake pads make a big difference, but there are dozens of threads on that topic already.
Reply
0
0

Thread
Thread Starter
Forum
Replies
Last Post
StratoBlue1109
Miata parts for sale/trade
21
Sep 30, 2018 01:09 PM


