
99mx5 EFR build


 [/URL]
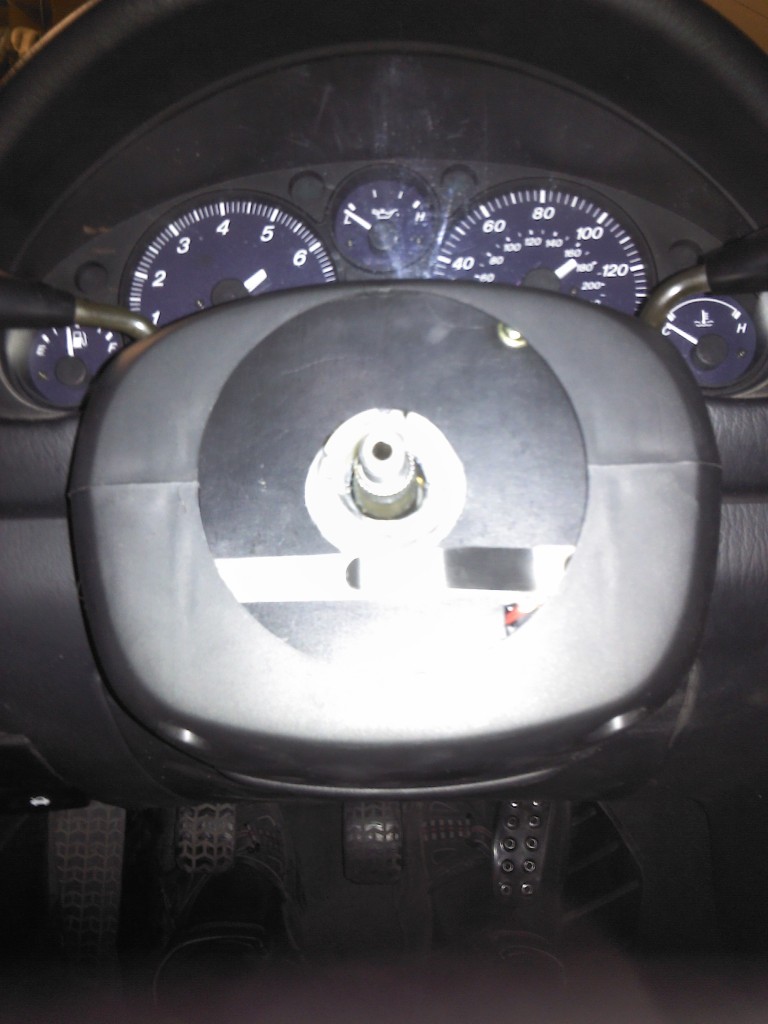 [/URL]

creepy hairy legs... lol
ABS shield looks nice. Not sure if you find it uncomfortable, but you should probably make a throttle pedal extension to help with heel-toeing. I made one from a pieces of folded sheet metal (left over aluminum from something).
I think the OMP pedal set is probably worth it, my foot will snag under the brake pedal occasional and can be a bit unnerving sometimes. Having the right shoes helps though. My speed cats don't snag, but the OMP sports are wider and do sometimes.
Reply
 0
0

0

Thread Starter
Elite Member
iTrader: (16)
Joined: Oct 2006
Posts: 1,656
Total Cats: 526
From: Las Cruces, NM
LOL!!! Damn, and I was hoping not to get them in the pic.
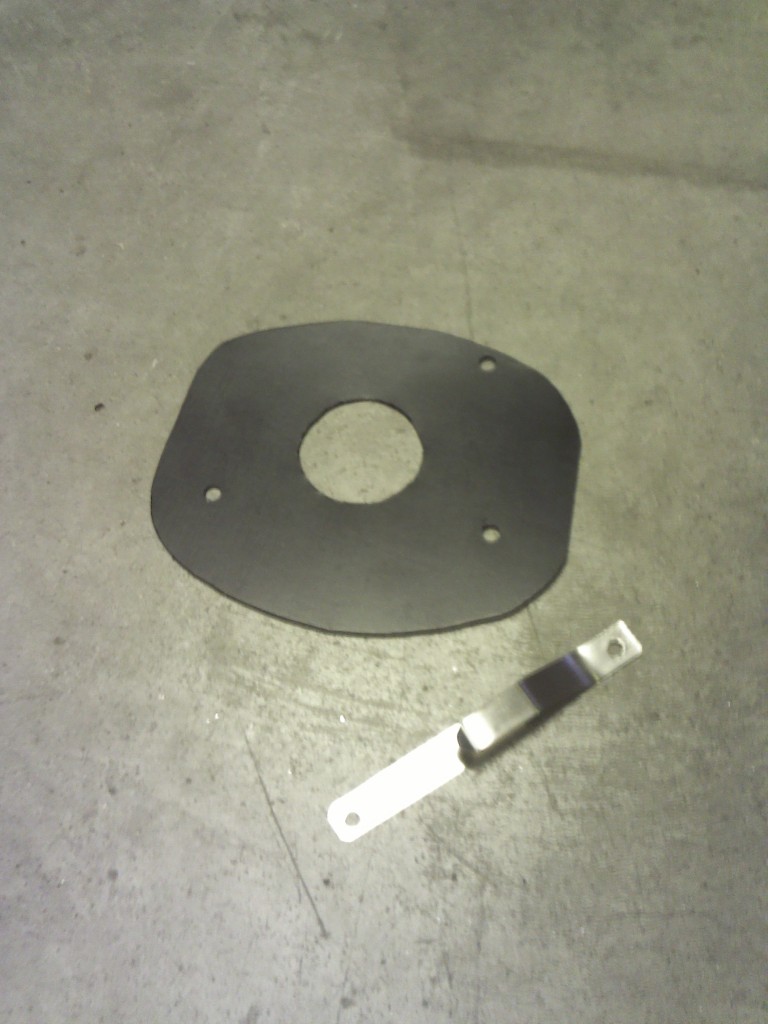
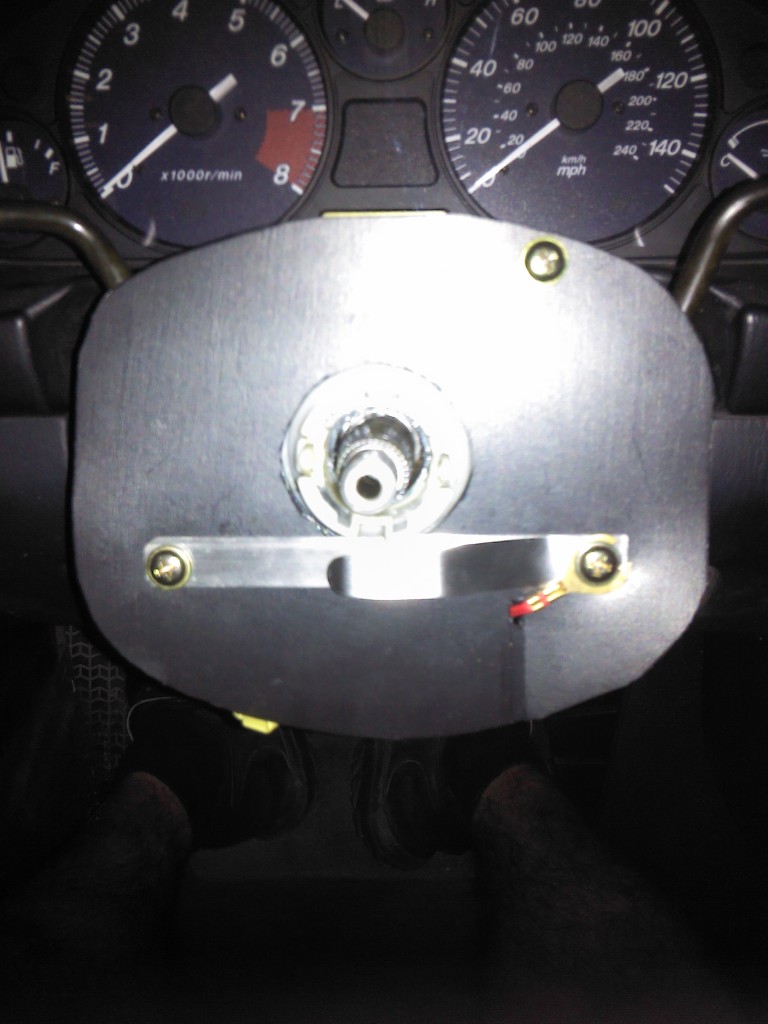
I made this mod because I found lots of grit in the mechanism when I took it apart and saw that it was exposed after installing the short hub.
I don't have any problems with heel and toe with the stock pedals, I like the room between the pedals.
I made this mod because I found lots of grit in the mechanism when I took it apart and saw that it was exposed after installing the short hub.
I don't have any problems with heel and toe with the stock pedals, I like the room between the pedals.
Reply
0
0

I drove the car and noticed that the turn signal cancelling wasn't functioning correctly as before. I compared the factory steering wheel and the hub adapter and saw that the collar that cancels the turn signals was off by 90 degrees. I removed the hub and drilled two holes to orient the collar as it was in the OEM steering wheel. Another option would be to install the hub with the top marker 90 degrees off to one side.
Reply
0
0
Thread Starter
Elite Member
iTrader: (16)
Joined: Oct 2006
Posts: 1,656
Total Cats: 526
From: Las Cruces, NM
According to the instructions I found online, it mentions orienting the hub with a dimple next to one hole facing upwards as well as the quick release.
Edit: I realized that if the hub was oriented with a 90 degrees offset, then the quick release would not line up to have the release button on the top and collar wings centered with the steering wheel if you have the NRG gen 2.5 or the gen 3.0.
Edit: I realized that if the hub was oriented with a 90 degrees offset, then the quick release would not line up to have the release button on the top and collar wings centered with the steering wheel if you have the NRG gen 2.5 or the gen 3.0.
Last edited by 99mx5; Nov 11, 2013 at 05:09 PM.
Reply
0
0

I got a ride in this car last weekend at the ASR Superlap finals. It is FAST. It had no problems all weekend, except for the tires on it being complete crap. They were corded by the end of the day. I can't imagine how fast it would be when it actually has good tires on it!
Reply
1
1


I have the same steering hub and couldn't figure out how to get the horn to work so I'm stealing that idea from you! If my car ever gets running again that is... Your Miata is definitely looking good! Keep up the great work!
Reply
1
1
Thread Starter
Elite Member
iTrader: (16)
Joined: Oct 2006
Posts: 1,656
Total Cats: 526
From: Las Cruces, NM
Thanks for the comments!
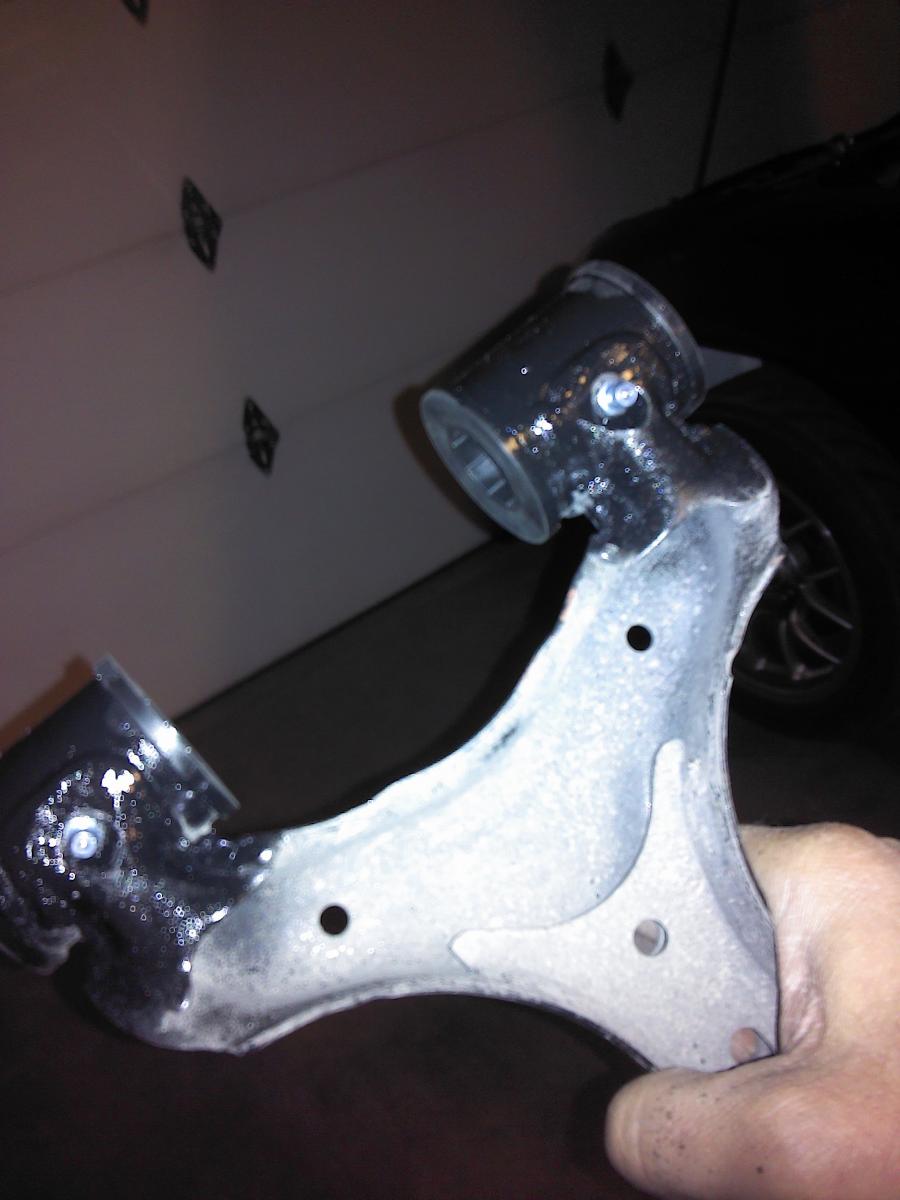
I finally got some time to work on the car for the next season. My polyurethane bushing set for the suspension and differential has been sitting in the box for too long.
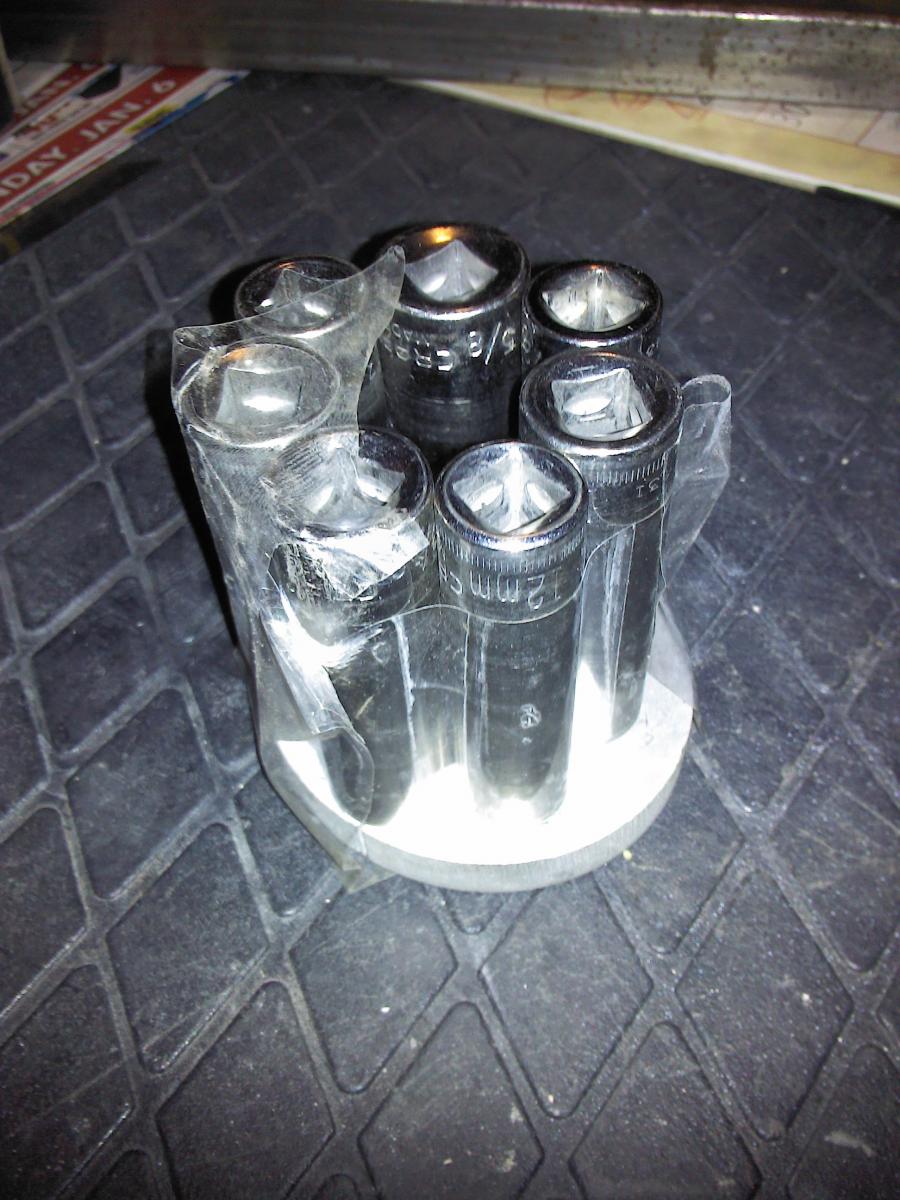
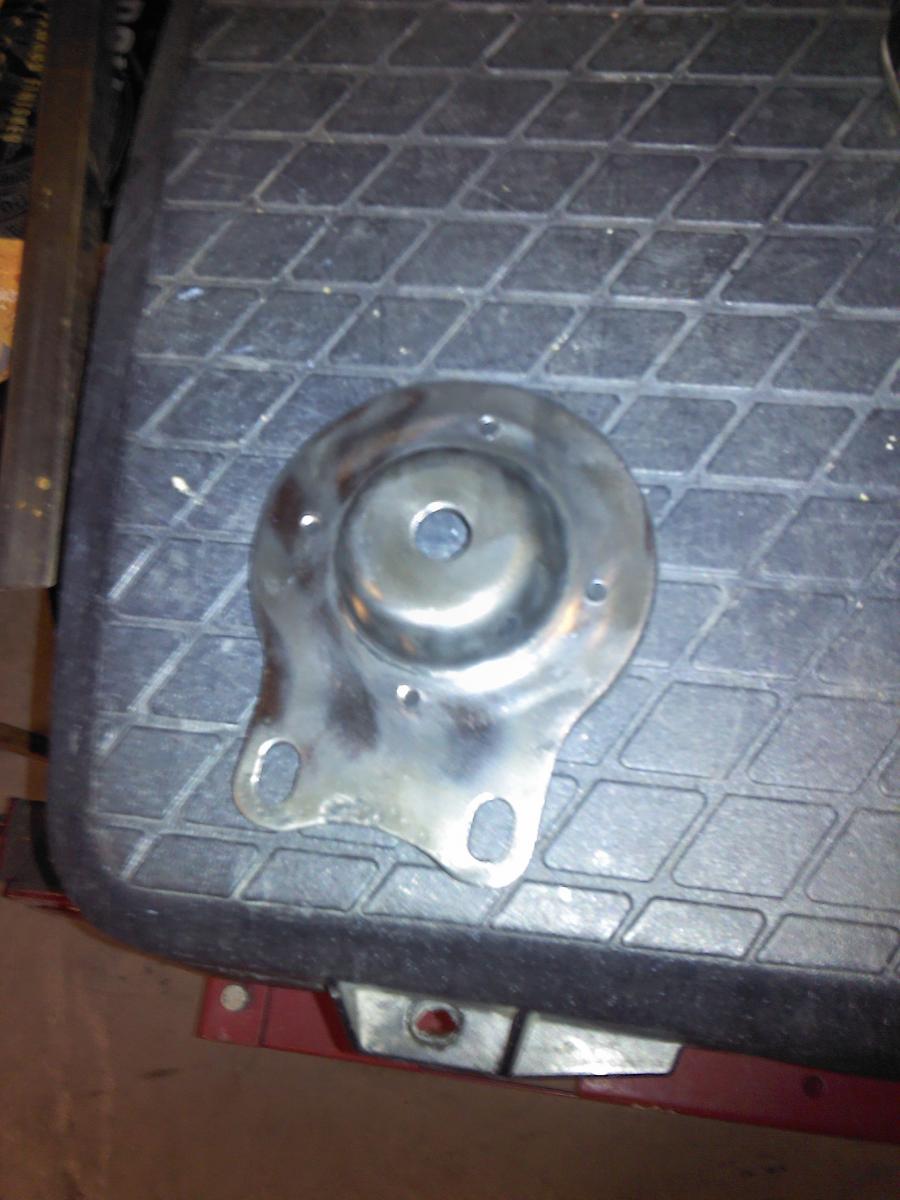
I raised the car and started with the differential. It ended up being far easier than I expected. I used a 6" two-jaw puller and a small aluminum plate with long sockets taped to it. The diff bushings slid right out without any issues. I loosened the PPF frame bolts at the transmission and lowered the diff to access the bushings.


I prepared the diff brackets for the install by first cutting the rubber from the brackets and then finish with a twisted-wire brush.
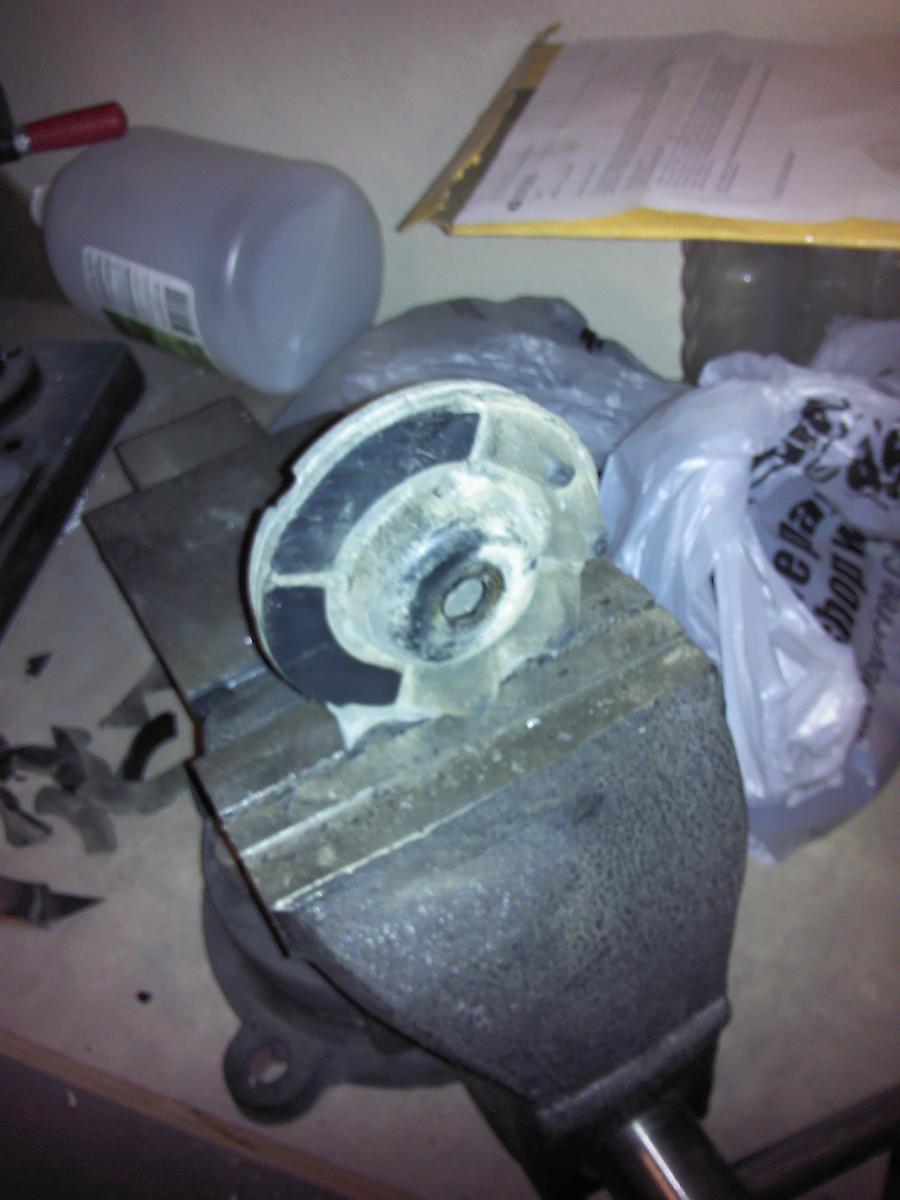
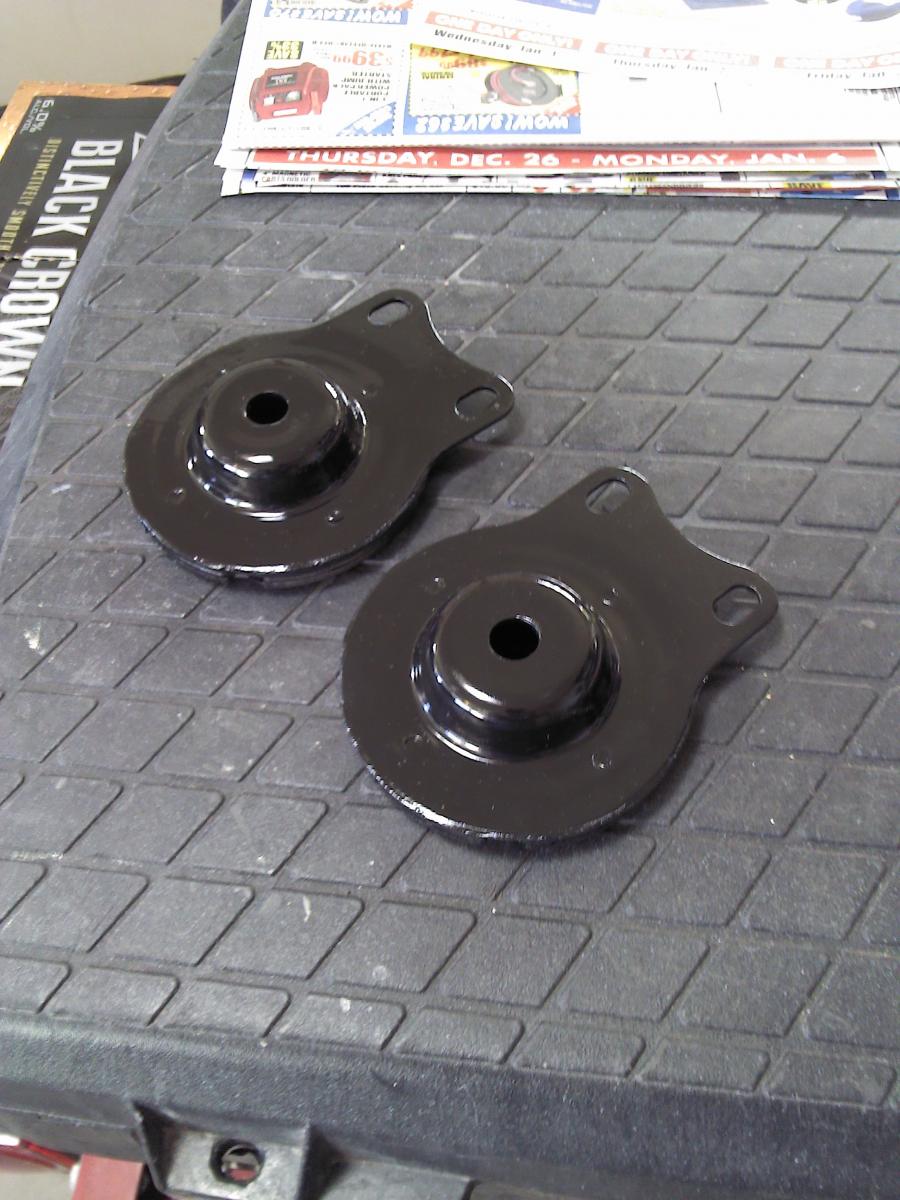
I painted them black before reinstalling them.
I also installed the bushings for the rear sway bar. I had to cut a bit of the lip to fit the bracket.
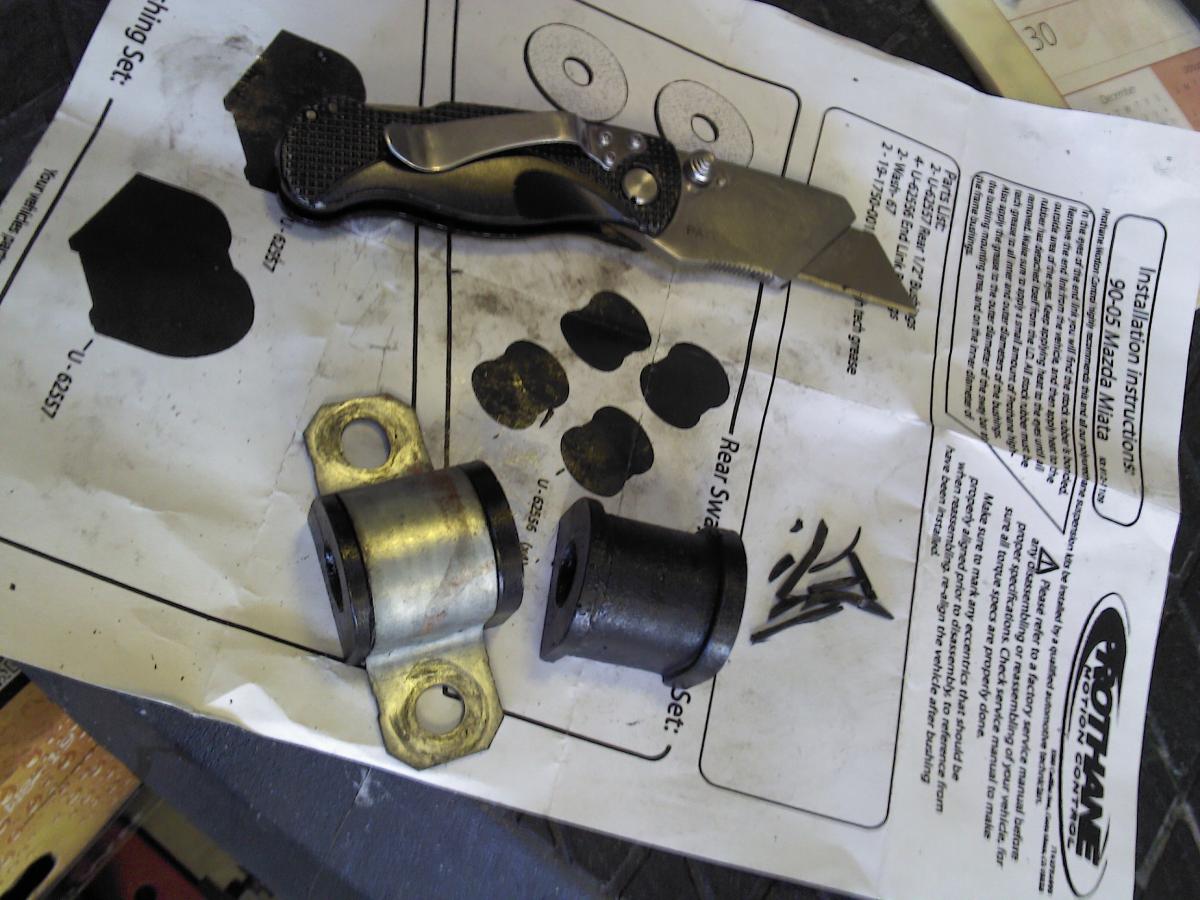
Here is the whole suspension bushing set.
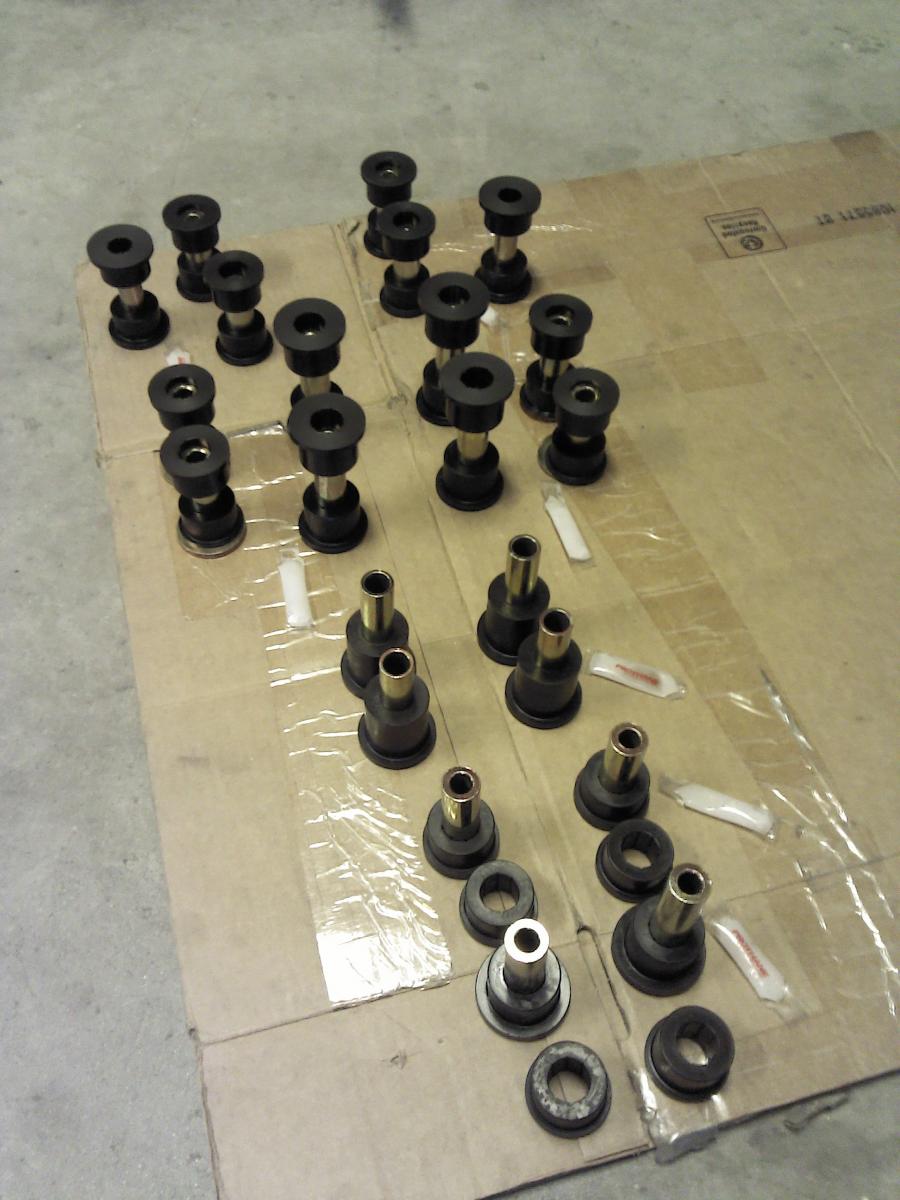
Winning!

I found that I had to seal factory holes in the arms. I welded and grinded them down then painted them before drilling and tapping new ones for the grease fittings.
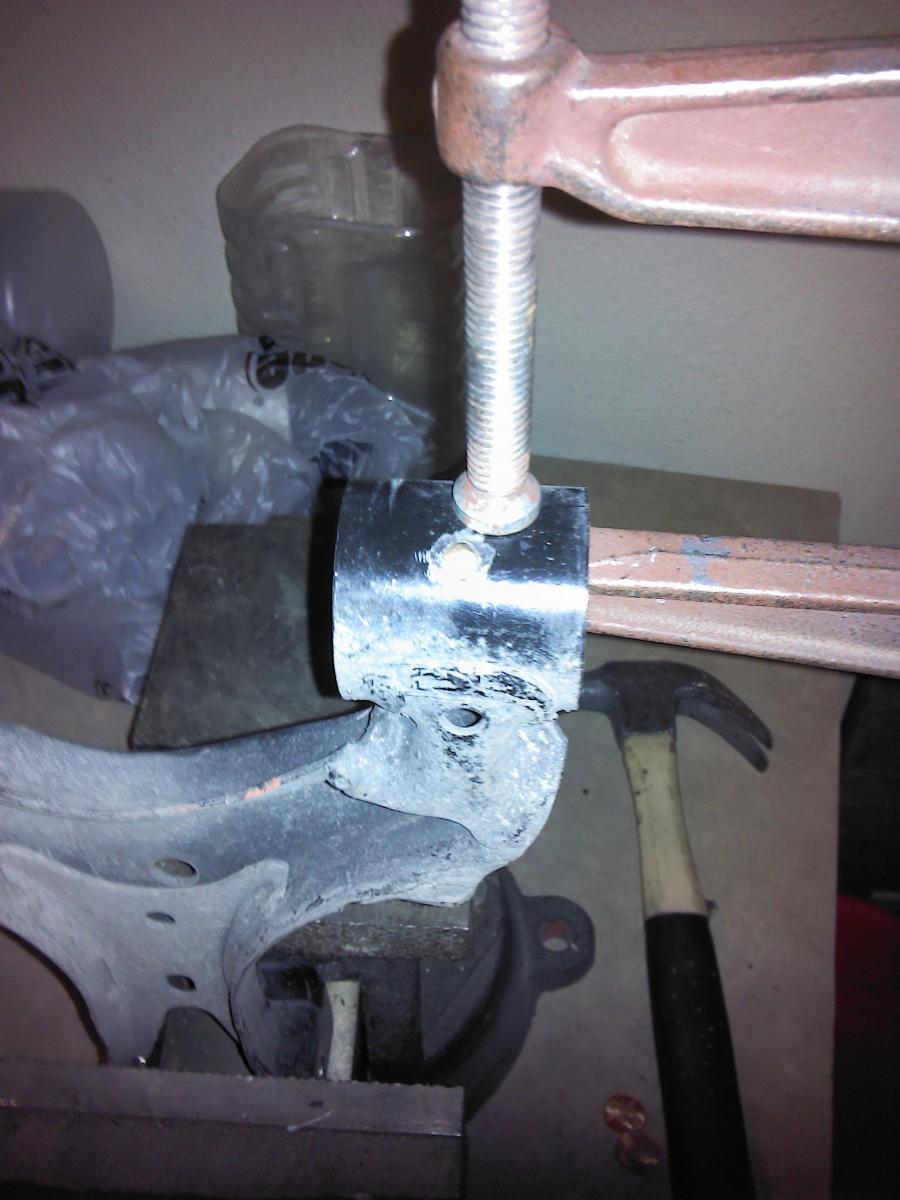
Front suspension arms with fittings.
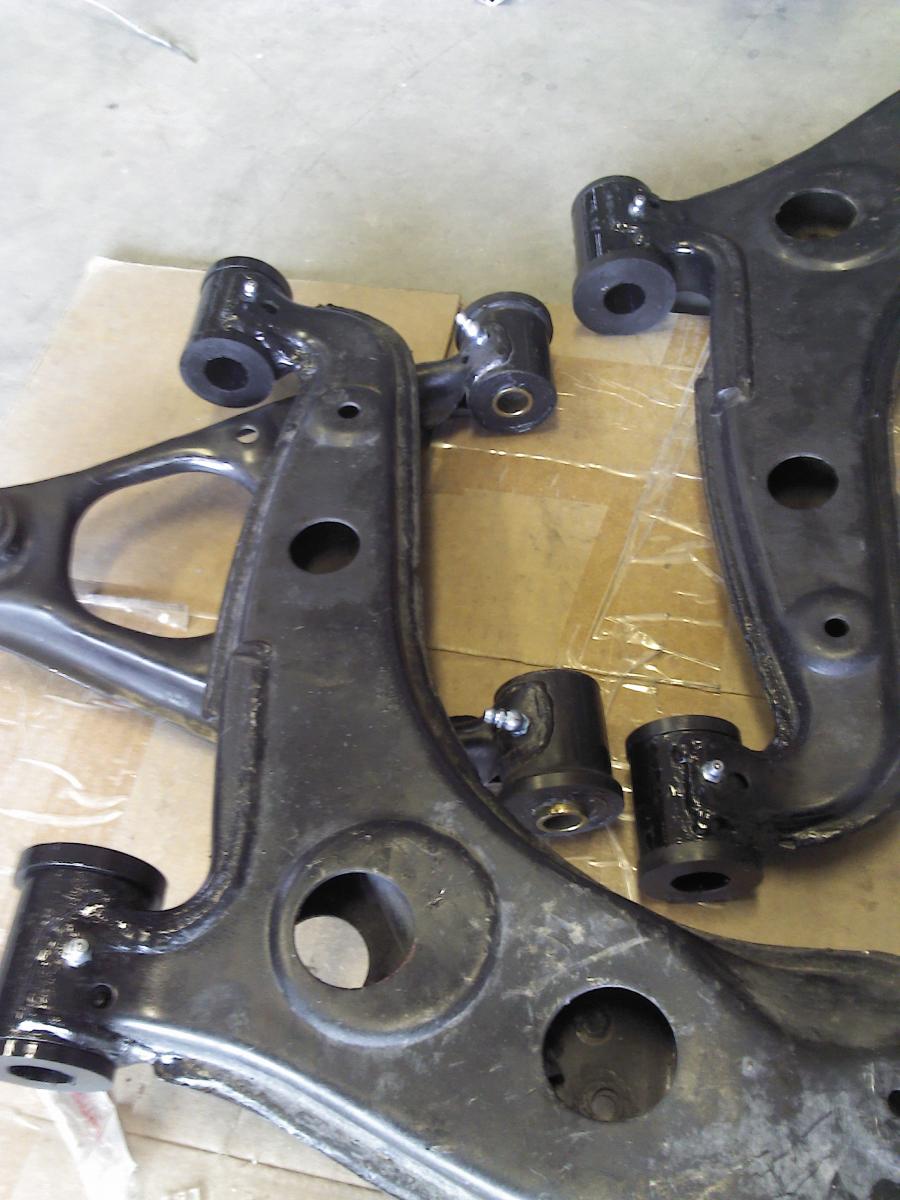
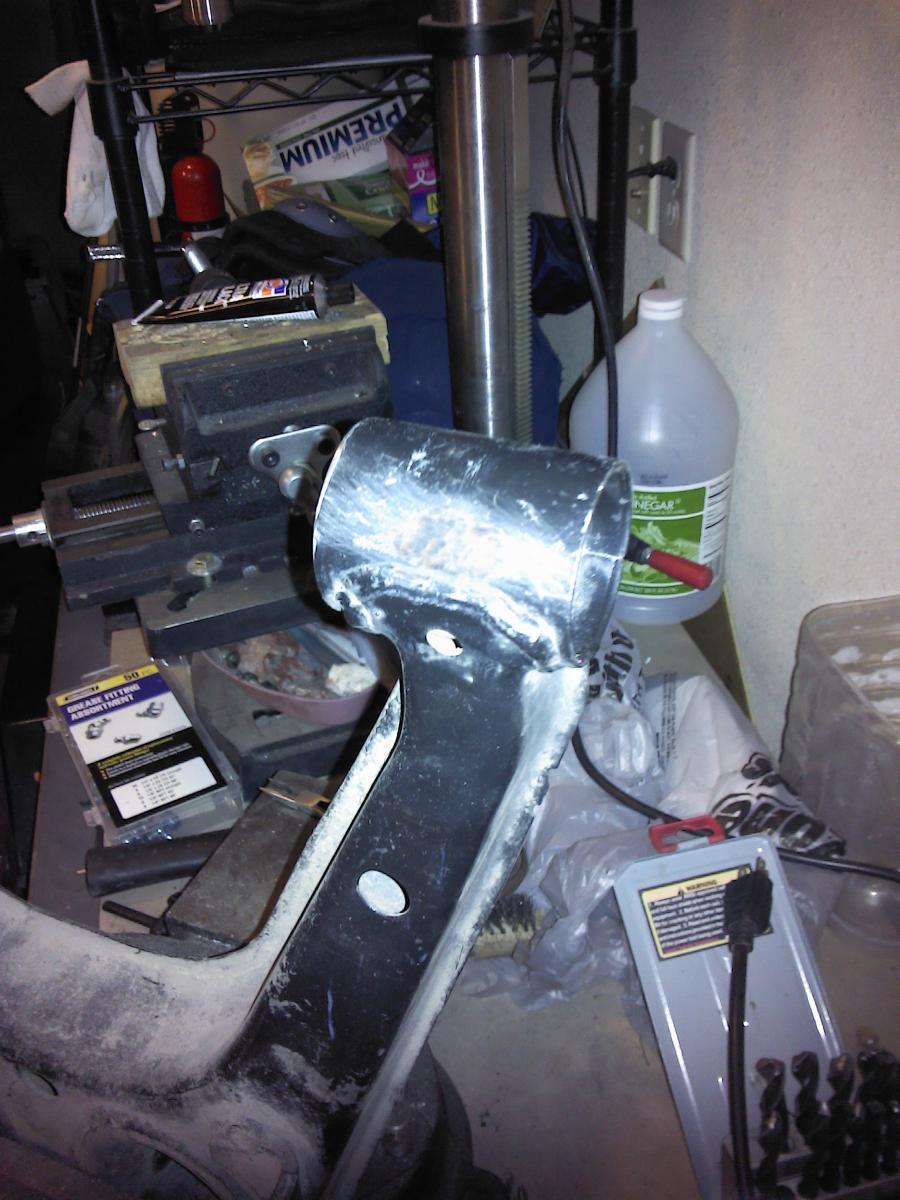
Upper rear arm with fittings.
I got a bronze shifter bushing on a black Friday sale. Shifting feels real tight, and precise. It doesn't quite snap back to neutral position at first, but it then wears in and feels smooth.
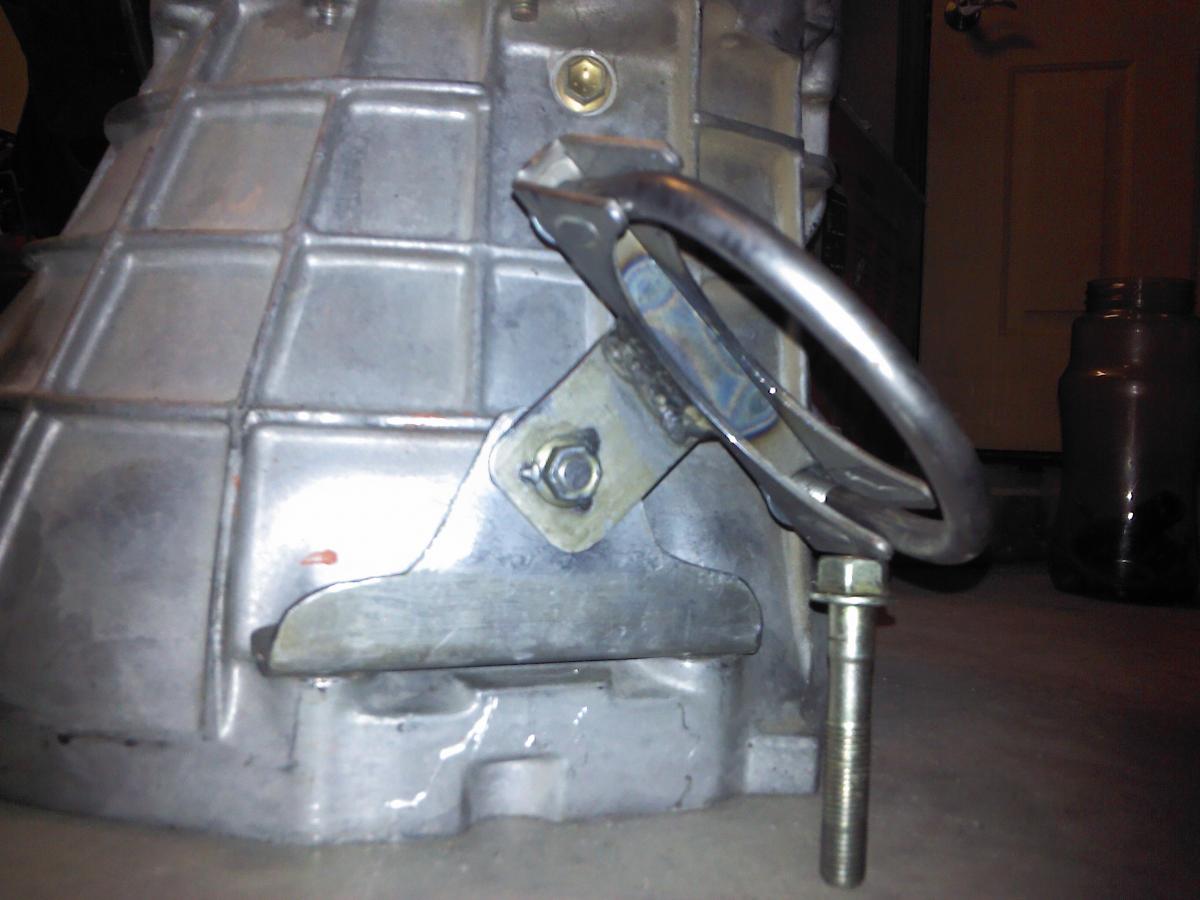
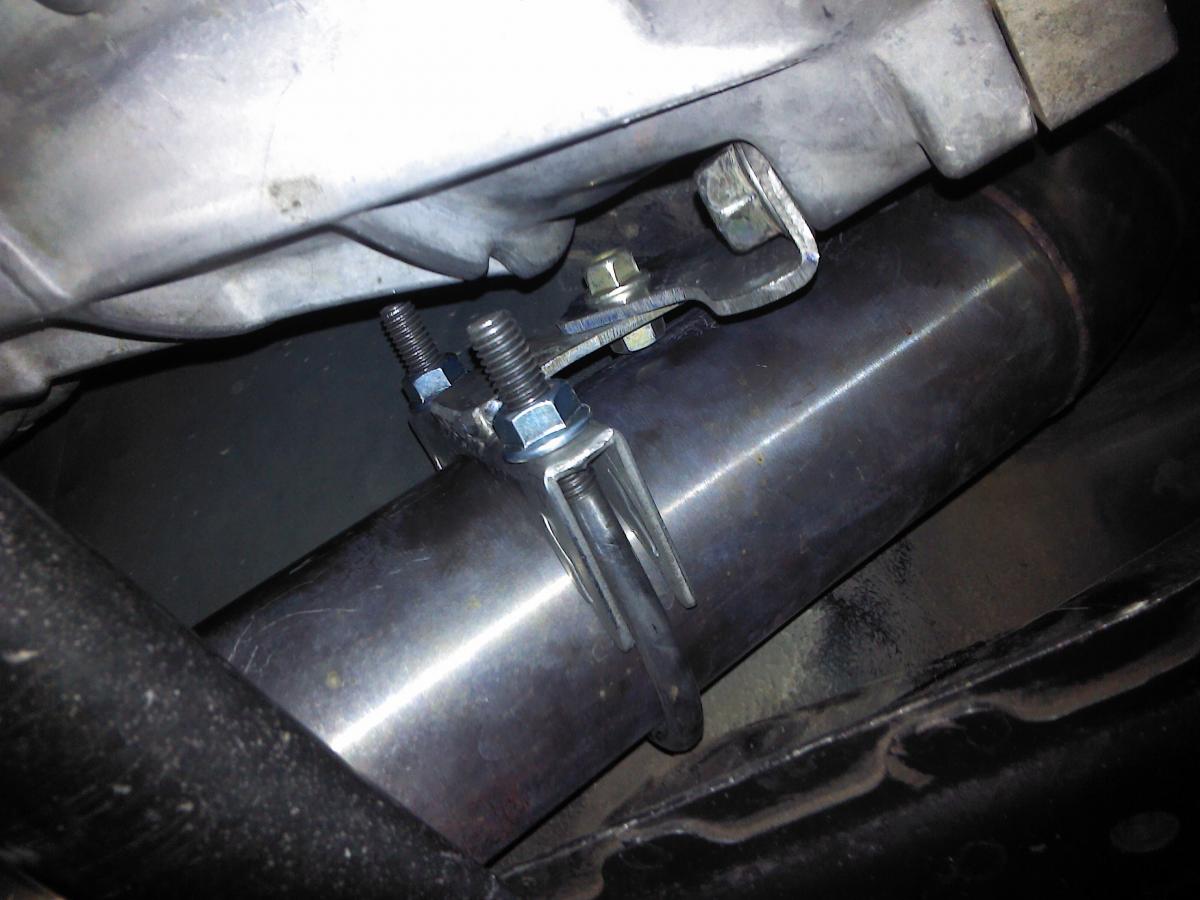
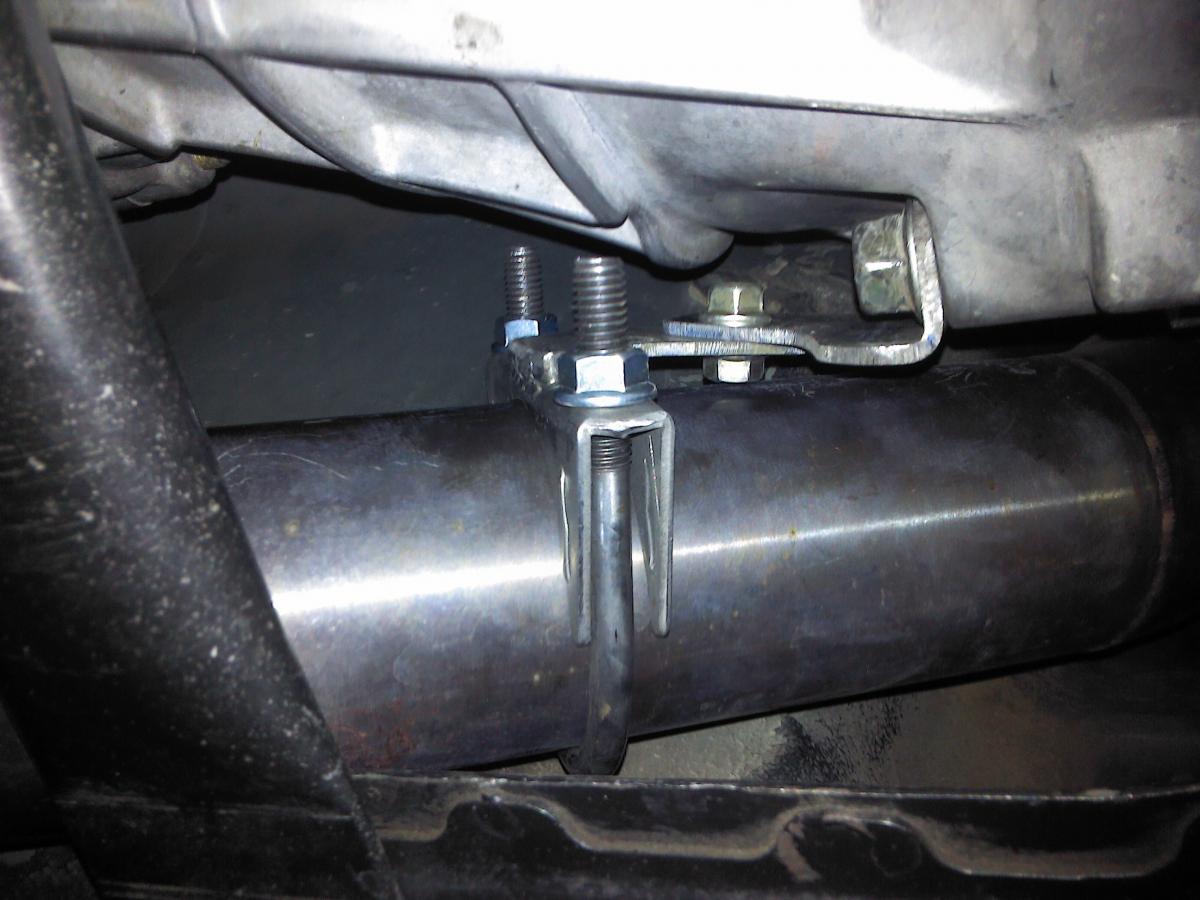
I also made a down-pipe support bracket. It uses the two factory mounting points on the transmission. I trimmed a piece of angle for the transmission bracket and welded a tab to an exhaust clamp. I plan to make a sleeve for the clamp.
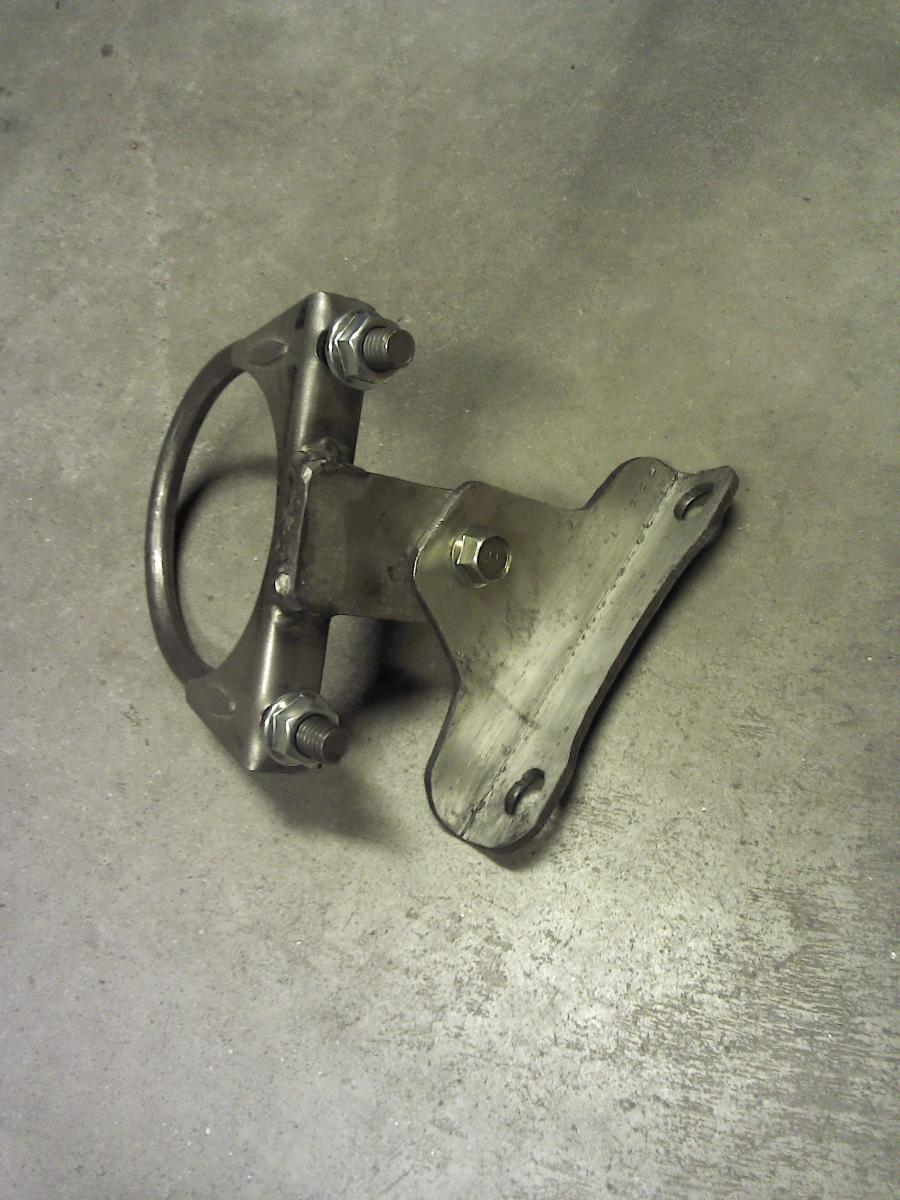
Here is how it mounts the the transmission.
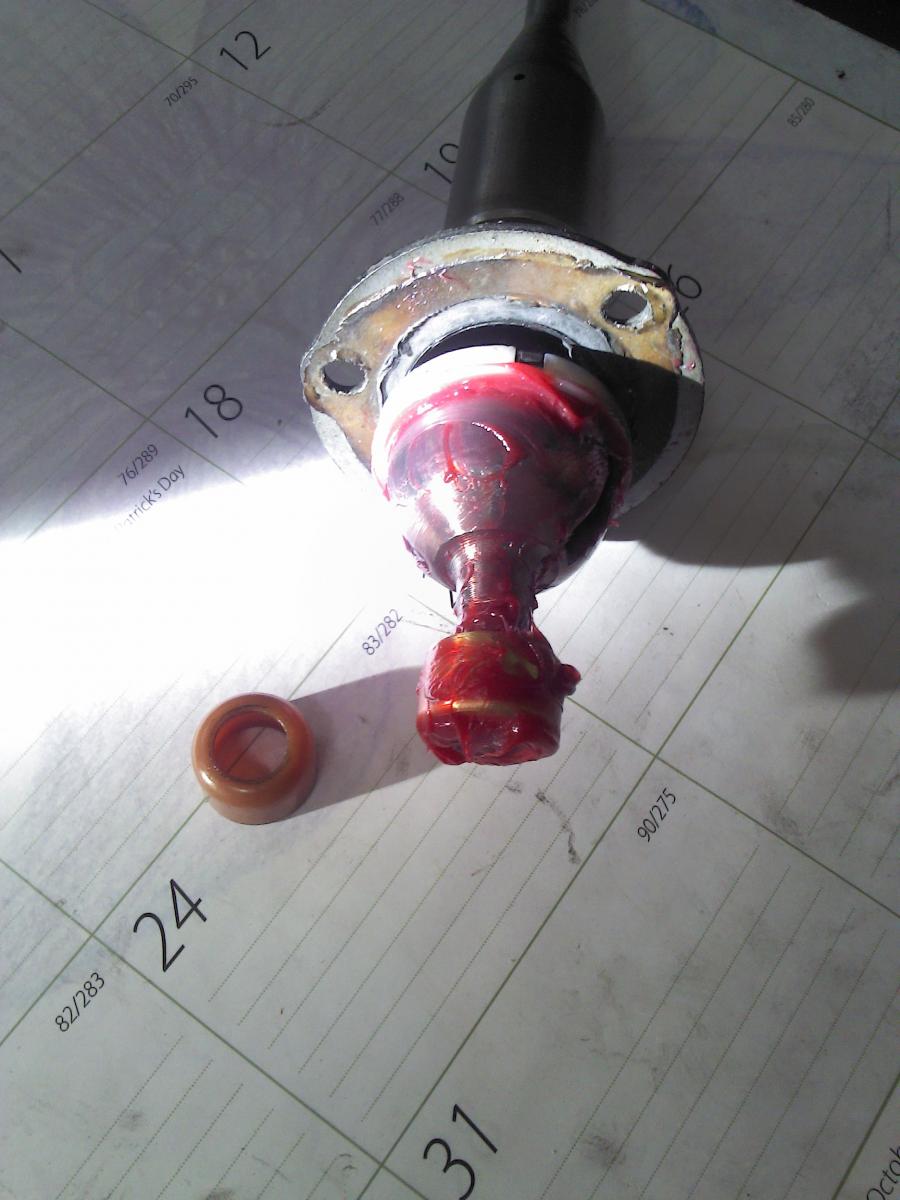
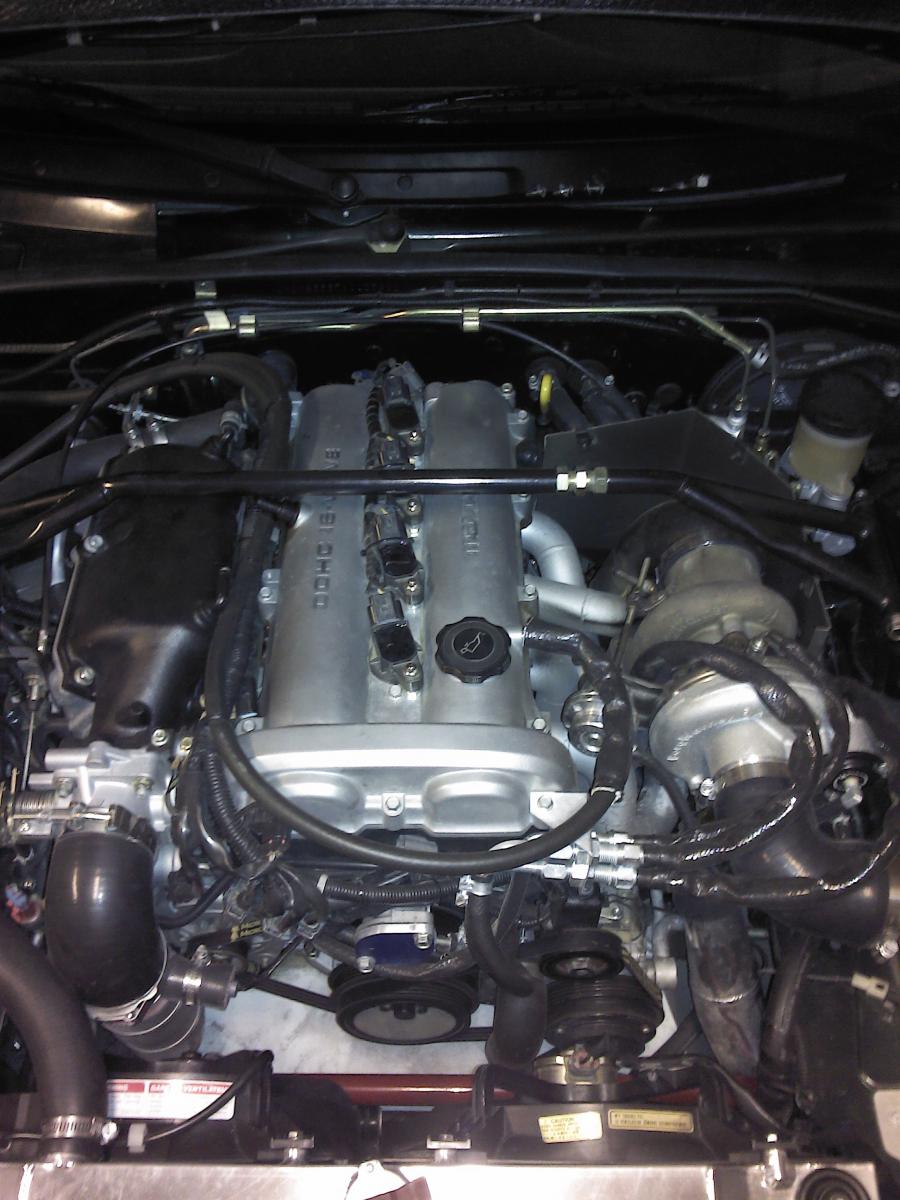
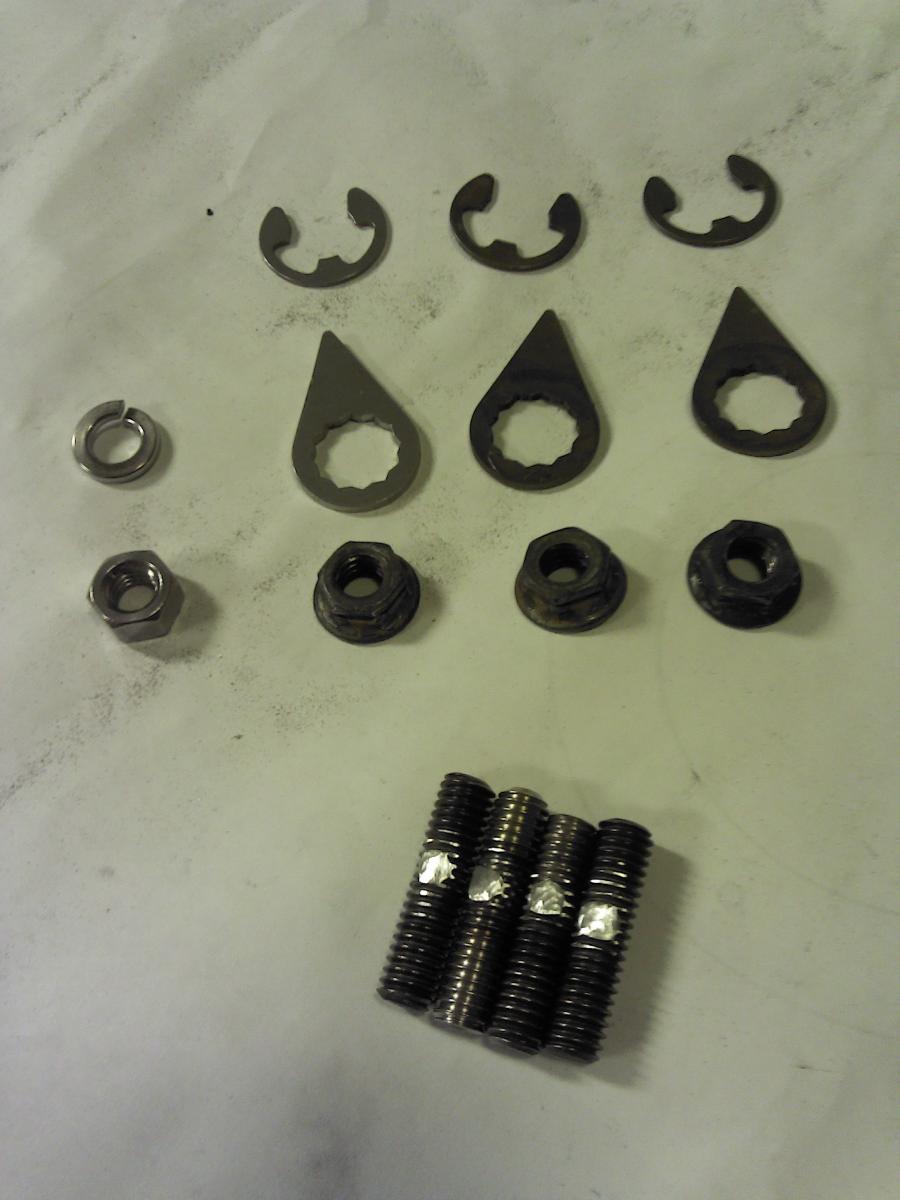
I decided to check the turbo and found this... Looks like I caught this soon after it happened.
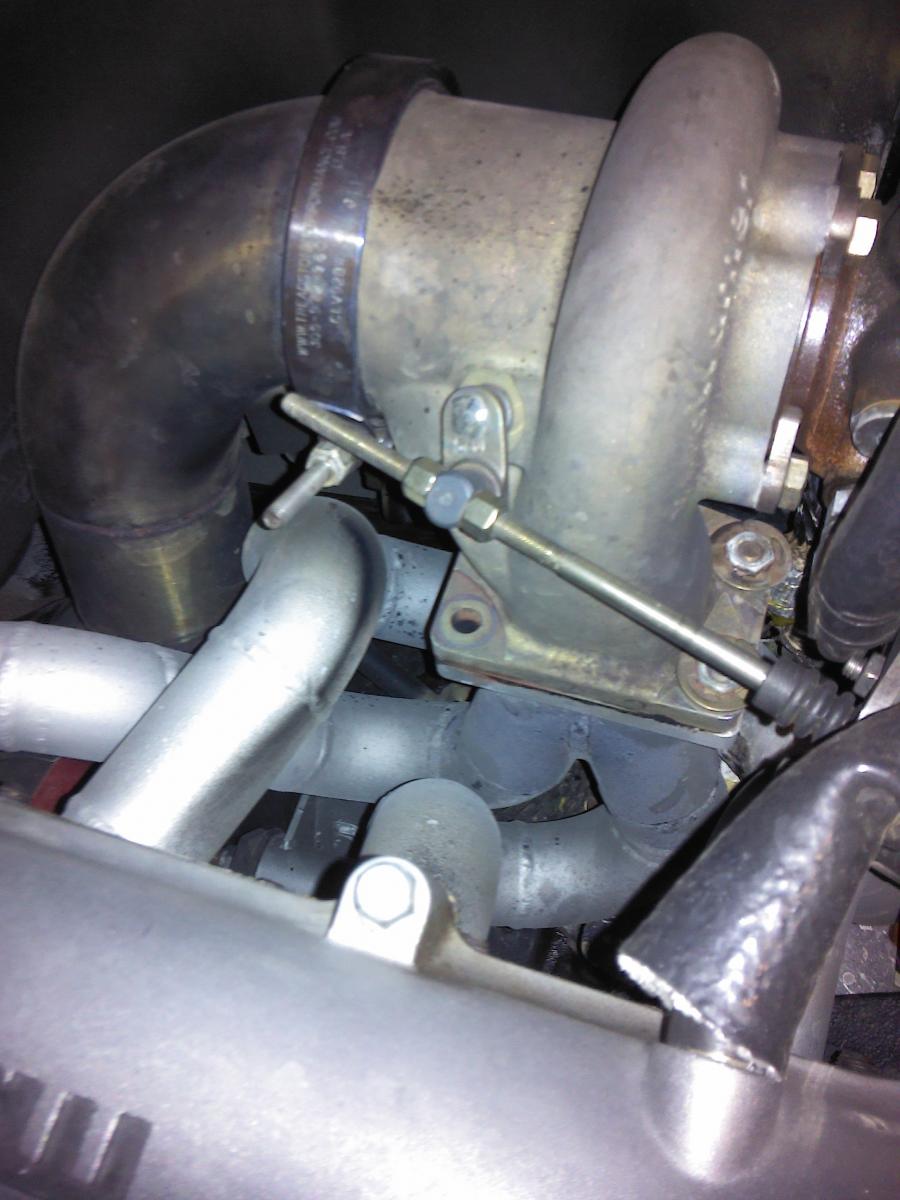
I'll contact ARTech and see if I can buy another stud and nut.
More pics...

I finally got some time to work on the car for the next season. My polyurethane bushing set for the suspension and differential has been sitting in the box for too long.
I raised the car and started with the differential. It ended up being far easier than I expected. I used a 6" two-jaw puller and a small aluminum plate with long sockets taped to it. The diff bushings slid right out without any issues. I loosened the PPF frame bolts at the transmission and lowered the diff to access the bushings.
I prepared the diff brackets for the install by first cutting the rubber from the brackets and then finish with a twisted-wire brush.
I painted them black before reinstalling them.
I also installed the bushings for the rear sway bar. I had to cut a bit of the lip to fit the bracket.
Here is the whole suspension bushing set.
Winning!
I found that I had to seal factory holes in the arms. I welded and grinded them down then painted them before drilling and tapping new ones for the grease fittings.
Front suspension arms with fittings.
Upper rear arm with fittings.
I got a bronze shifter bushing on a black Friday sale. Shifting feels real tight, and precise. It doesn't quite snap back to neutral position at first, but it then wears in and feels smooth.
I also made a down-pipe support bracket. It uses the two factory mounting points on the transmission. I trimmed a piece of angle for the transmission bracket and welded a tab to an exhaust clamp. I plan to make a sleeve for the clamp.
Here is how it mounts the the transmission.
I decided to check the turbo and found this... Looks like I caught this soon after it happened.
I'll contact ARTech and see if I can buy another stud and nut.
More pics...
Last edited by 99mx5; Jan 14, 2014 at 04:11 AM. Reason: Adding more pics..
Reply
0
0

Is you waste gate able to make the full throw? I know I had problems with mine from the rod being too long on the iwga hitting the v band, yours looks like it might hit the pipe. Of course it doesnt matter if you're not trying to have low boost.
Reply
0
0


Senior Member
Joined: May 2011
Posts: 638
Total Cats: 76
great build thread. Thanks for the pix of the zerk fittings and bushing install. I'm in the middle of this myself and the reference of your pictures will help. Can you tell me what size/spec zerk fittings you used? 
Reply
0
0
Thread Starter
Elite Member
iTrader: (16)
Joined: Oct 2006
Posts: 1,656
Total Cats: 526
From: Las Cruces, NM
Thanks for the comments!
Yes, it is able to fully open without interference.
Yup, they are inconel studs with Stage 8 nuts and clips and Resbond.
I took it easy with the suspension. I spent some time on each corner a day.
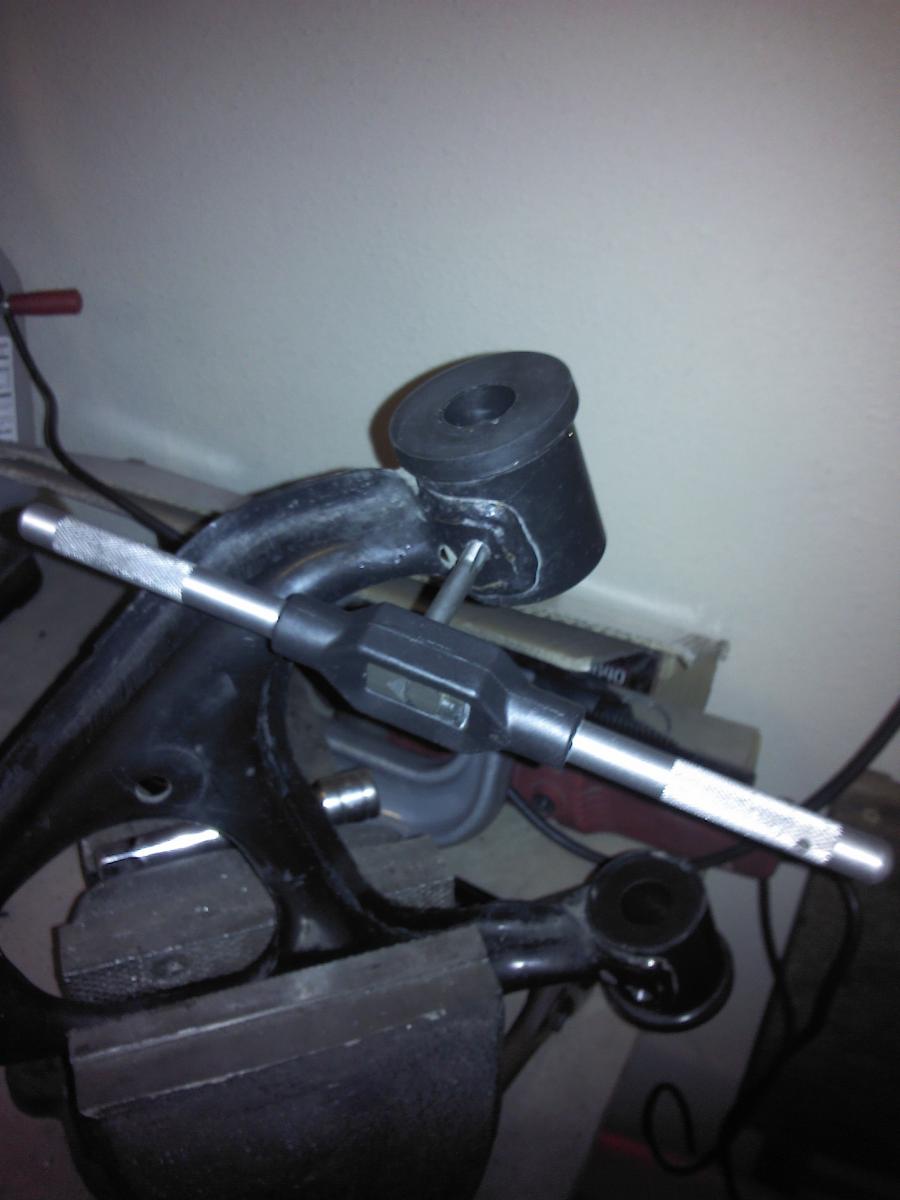
I used 949Racing pics as a reference. I had to change the front lower arm fittings to the bottom, because they hit the chassis with their specified location. I also mounted the upper front arm bushing on the top with angled fittings instead of mounting them on the bottom. I would recommend using their location for the upper front arms and mine for the lower front. I used regular 1/4"-28 TPI Zerk fittings.
Yup, they are inconel studs with Stage 8 nuts and clips and Resbond.
I used 949Racing pics as a reference. I had to change the front lower arm fittings to the bottom, because they hit the chassis with their specified location. I also mounted the upper front arm bushing on the top with angled fittings instead of mounting them on the bottom. I would recommend using their location for the upper front arms and mine for the lower front. I used regular 1/4"-28 TPI Zerk fittings.
Reply
0
0
Senior Member
Joined: May 2011
Posts: 638
Total Cats: 76
I used 949Racing pics as a reference. I had to change the front lower arm fittings to the bottom, because they hit the chassis with their specified location. I also mounted the upper front arm bushing on the top with angled fittings instead of mounting them on the bottom. I would recommend using their location for the upper front arms and mine for the lower front.
From the following link (click grease fittings)
McMaster-Carr
Again awesome build. Subb'd.
Reply
0
0
Reply
0
0
Thread Starter
Elite Member
iTrader: (16)
Joined: Oct 2006
Posts: 1,656
Total Cats: 526
From: Las Cruces, NM
I used these fittings.
50 Piece Grease Fitting Assortment
The 1/4" - 28 TPI are the smallest ones in the set.
Edit: These are straight, not NPT. Sorry for the confusion.
50 Piece Grease Fitting Assortment
The 1/4" - 28 TPI are the smallest ones in the set.
Edit: These are straight, not NPT. Sorry for the confusion.
Reply
0
0
Thread Starter
Elite Member
iTrader: (16)
Joined: Oct 2006
Posts: 1,656
Total Cats: 526
From: Las Cruces, NM
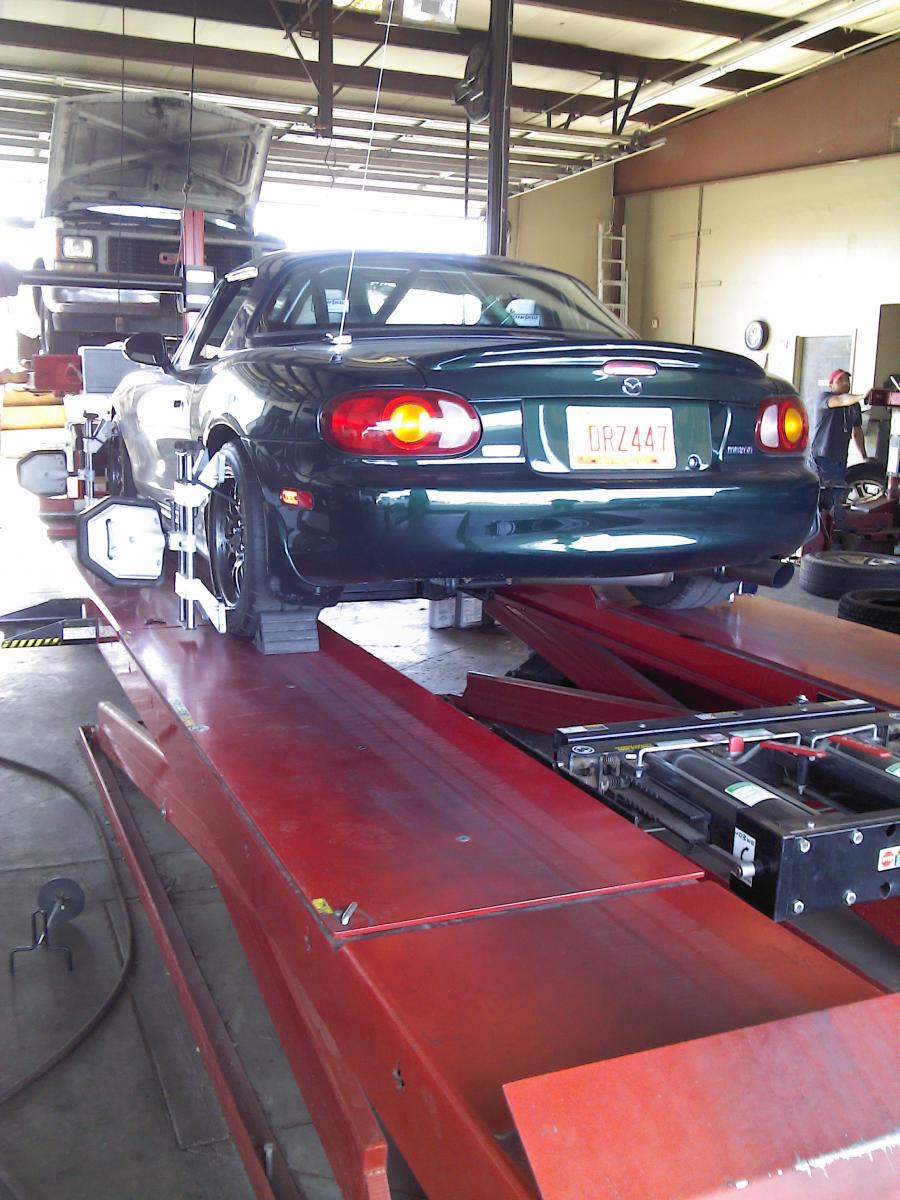
I removed the studs and had a spot welded on them to prevent them from falling out. I can use only three of the Stage 8 fasteners on the EFR housing. I also took the car to get aligned after the bushing install. I also got new tires. The daily tires are BFG Rivals and Track tires are Nitto NT-01s.
Reply
0
0


