DJWade's (Hopefully) California Legal LFXocet Swap Build
 06-20-2017, 10:55 PM
#61
Junior Member
Thread Starter

Join Date: Sep 2016
Location: Concord, CA
Posts: 122
Total Cats: 12
Thanks for all the advice, I really appreciate it. I think it makes a lot of sense to start with TIG, so I'm going to look into taking some classes locally. Fortunately I have quite a few options for that.
In the meantime, I don't want to wait to make progress on the build, so I dropped off the subframe and the differential mount with a shop nearby, and they'll have it ready in the morning (including pushing out the stubborn bushing sleeve and installing the new one, which saves me some headache).
Besides purchase price, any reason to buy a MIG over a TIG welder for home use once I've gotten some experience (besides price)?

Reply
 0
0

0
06-21-2017, 08:05 AM
#62
Senior Member
iTrader: (1)

Join Date: Dec 2010
Location: Farmington Hills, MI
Posts: 1,218
Total Cats: 175
Overall, TIG>MIG. TIG will look nicer, have no splatter, smaller weld bead, and allow you to easier control penetration.
Reply
0
0
06-21-2017, 08:06 AM
#63
mkturbo.com


iTrader: (24)
Join Date: May 2006
Location: Charleston SC
Posts: 15,177
Total Cats: 1,681
I use my MIG welder when I am tacking exhausts together on a car upside down. It makes life so much easier then doing that with a TIG welder. I use my TIG the rest of the time whenever I am welding something on a bench.
I would honestly skip the classes. I did a 4 week long Saturday class and it was a waste of time. They taught me nothing that I had not already learned on my own. I picked up my TIG welder on CL, got some scrap, and started playing with it. It took a few days to get things figured out with having it setup decently, and good gas flow. After that it was just laying a ton of beads to get better.
I would honestly skip the classes. I did a 4 week long Saturday class and it was a waste of time. They taught me nothing that I had not already learned on my own. I picked up my TIG welder on CL, got some scrap, and started playing with it. It took a few days to get things figured out with having it setup decently, and good gas flow. After that it was just laying a ton of beads to get better.
Reply
0
0
06-21-2017, 12:22 PM
#64
Elite Member
Join Date: Sep 2015
Location: Seattle, WA
Posts: 1,651
Total Cats: 884
Agreed with above, mig is really useful for tacking stuff together or seam welding especially. I didn't even try to use the tig for seam welding and it was still a pita.
This site has some good information and gives you an idea on where to start with settings and such. I read it a bit when I was first starting, once I got the hang of it, it was just experimenting and getting lots of practice. Welding Tips and Tricks - TIG, MIG, Stick and a pantload of other info
This site has some good information and gives you an idea on where to start with settings and such. I read it a bit when I was first starting, once I got the hang of it, it was just experimenting and getting lots of practice. Welding Tips and Tricks - TIG, MIG, Stick and a pantload of other info
Reply
0
0
06-21-2017, 12:53 PM
#65
Junior Member
Thread Starter
Join Date: Sep 2016
Location: Concord, CA
Posts: 122
Total Cats: 12
So assuming I only have budget for 1 decent welder at the present, and if the approach is to start learning TIG first, but do it at home, is it best to just find a DC only TIG machine (since they're cheap) and learn on that, then buy a decent 220V MIG, and get a good AC/DC TIG later on down the road? It makes a lot of sense to learn on TIG, but I definitely don't have the funds right now to buy a good AC/DC TIG and MIG welder back to back.
Reply
0
0
06-21-2017, 12:54 PM
#66
SADFab Destructive Testing Engineer

iTrader: (5)
Join Date: Apr 2014
Location: Beaverton, USA
Posts: 18,642
Total Cats: 1,866
You can get a good chinesium AC/DC tig for like $800.
https://www.miataturbo.net/fabulous-...-welder-72401/
https://www.miataturbo.net/fabulous-...-welder-72401/
Reply
0
0
06-21-2017, 01:06 PM
#67
Junior Member
Thread Starter
Join Date: Sep 2016
Location: Concord, CA
Posts: 122
Total Cats: 12
You can get a good chinesium AC/DC tig for like $800.
https://www.miataturbo.net/fabulous-...-welder-72401/
https://www.miataturbo.net/fabulous-...-welder-72401/
Reply
0
0
06-21-2017, 04:57 PM
#68
Elite Member
Join Date: Sep 2015
Location: Seattle, WA
Posts: 1,651
Total Cats: 884
Definitely go for AC/DC, you'll thank yourself down the road. A welder is one of those tools where you'll never look back and regret buying it. You also won't understand how you worked on things without one, having the ability to do all types of metal is really really useful.
Reply
0
0
06-21-2017, 05:30 PM
#69
Junior Member
Thread Starter
Join Date: Sep 2016
Location: Concord, CA
Posts: 122
Total Cats: 12
Definitely go for AC/DC, you'll thank yourself down the road. A welder is one of those tools where you'll never look back and regret buying it. You also won't understand how you worked on things without one, having the ability to do all types of metal is really really useful.
Reply
0
0
06-21-2017, 07:16 PM
#70
Senior Member

Join Date: May 2007
Location: Atlanta
Posts: 997
Total Cats: 156
TIG is way more flexible, but MIG isn't as terrible as some of these opinions would have you believe. I got really lucky with a $200 110v Miller that came with a cart and cylinder off craigslist, and that's what I welded the LFX with. And I tend to use it more than our TIG because if it's a bracket that I really don't care about how it looks - its much faster to drag it out and lay down a bead. TIG - I'm usually having to sharpen a tungsten / change out a collet / lens, find the right filler rod, clean off the welding table, fixture the piece to the table, dry run to figure out torch angle and hand positions, and then I can start welding. I don't know if I would want to jump straight to TIG without going thru MIG first - but I felt like I picked up MIG pretty quickly from working with soldering, just knowing how to manage the heat and drag the puddle. TIG is more precise with regards to cleaning your material and torch angle - MIG lets you get away with a lot of sloppiness.
But the ability to weld aluminum has really opened up a lot of stuff we wanted to do with the LFX. The AHP Alphatig 200x has already paid for itself in a couple of parts I've fixed.
But the ability to weld aluminum has really opened up a lot of stuff we wanted to do with the LFX. The AHP Alphatig 200x has already paid for itself in a couple of parts I've fixed.
Reply
0
0
06-22-2017, 12:48 AM
#71
Junior Member
Thread Starter
Join Date: Sep 2016
Location: Concord, CA
Posts: 122
Total Cats: 12
This afternoon I finally got some time to make some major headway on the build again.
First thing on the chopping block was finishing all the work on the underside of the car so I could start attaching the larger, heavier components. I ran the fuel and brake lines down the transmission tunnel, but ran into a slight issue with the offset. Because I didn't rivet or use low profile screws to affix the fuel line P-clips, I had to use nuts as spacers for the brake line p-clips in order to prevent excessive bends. It's not a perfect solution, and it's definitely something I'll revisit in the future, but for now, it should be just fine.
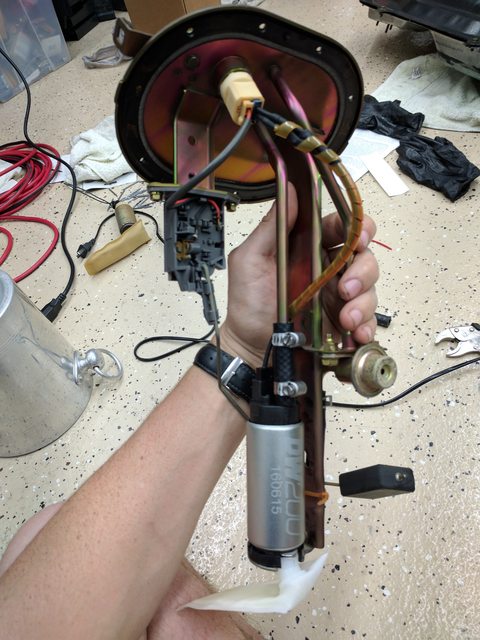
The next order of business was the gas tank. Before I started fitting it on the chassis, I wanted to take care of the fuel pump upgrade. V8 Roadsters supplies a Deatschwerks DW200 fuel pump to supply additional fuel to the LFX engine as a part of their fuel kit. Overall the install is pretty straight forward. The only hiccup encountered was attaching the old connector to the new pump's wires. I could not get the wires to tin for the life of me, resulting in a messy, yet functional, solder job. Just for paranoia's sake, I added additional strain relief around the solder joint, so I shouldn't run into any issues.
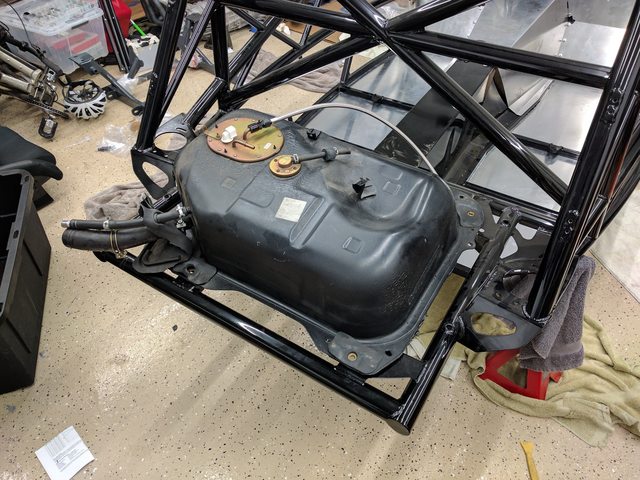
Once that was finished and the chassis flipped back over, I ran a quick test fit of the gas tank. The Exocet holds the gas tank angled back from OEM, so a fairly sizable chunk of the volume is wasted. I could probably fabricate some stands to hold the gas tank forward, keeping it closer to the OEM angle, but I suspect a fuel cell will replace the gas tank before I ever get around to doing that. The other item of note is the lack of clearance between the front of the gas tank and the chassis behind the seats. This is where the new stainless AN lines need to run in order to mate up with the fuel filter. The easiest solution seems to be using vibration isolation mounts to elevate the gas tank, adding in clearance for the AN lines at the front of the gas tank, so those were put on order this afternoon from McMaster-carr, in hopes of getting them by this weekend.
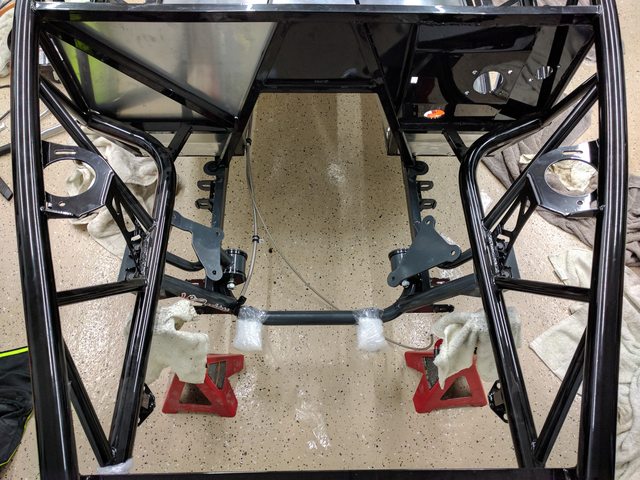
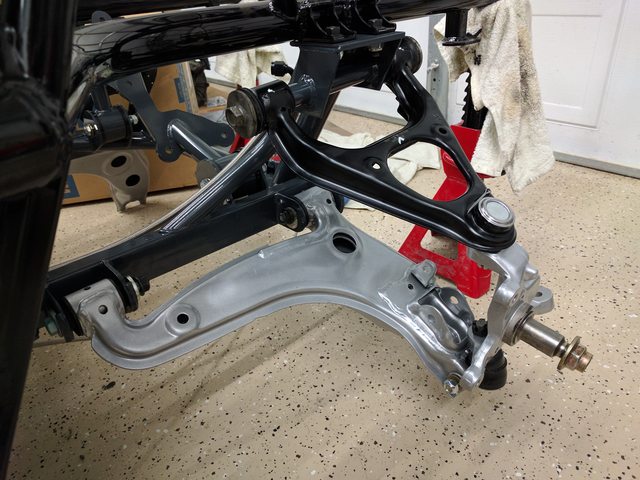
Finally, to end the night on a high note, I decided to install the front subframe. This is different from the standard way of attaching the Miata guts to the Exocet chassis, in that the typical way of doing this is by lowering the chassis onto the Miata "roller-skate". However, because the LFX swap eliminates the PPF, having that roller-skate isn't possible. I was debating assembling the subframes off chassis, then attaching them to the chassis after the fact, but decided that I would have an easier time attaching the subframes to the chassis bare, then building them up on the chassis. Now with the subframe on the chassis, I'll be able to begin brainstorming the easiest solution to make the alternator fit, which is the only real interference that needs a solution when making an LFXocet.
The last pieces from V8 Roadsters are being shipped off shortly, including the clutch kit, which is the next roadblock. I'd like to start throwing on the brake booster and steering components, but I know I'm going to hate myself after the fact if I don't install the master cylinder beforehand.
There's still plenty I can knock out this weekend, however. I'm hoping I'll have both subframes installed along with their respective control arms so I can start clearing out space on my shelves. I'm glad I'm finally starting to see these leaps of progress. It gives me hope that I might get this on the road while it's still warm and sunny out.
First thing on the chopping block was finishing all the work on the underside of the car so I could start attaching the larger, heavier components. I ran the fuel and brake lines down the transmission tunnel, but ran into a slight issue with the offset. Because I didn't rivet or use low profile screws to affix the fuel line P-clips, I had to use nuts as spacers for the brake line p-clips in order to prevent excessive bends. It's not a perfect solution, and it's definitely something I'll revisit in the future, but for now, it should be just fine.
The next order of business was the gas tank. Before I started fitting it on the chassis, I wanted to take care of the fuel pump upgrade. V8 Roadsters supplies a Deatschwerks DW200 fuel pump to supply additional fuel to the LFX engine as a part of their fuel kit. Overall the install is pretty straight forward. The only hiccup encountered was attaching the old connector to the new pump's wires. I could not get the wires to tin for the life of me, resulting in a messy, yet functional, solder job. Just for paranoia's sake, I added additional strain relief around the solder joint, so I shouldn't run into any issues.
Once that was finished and the chassis flipped back over, I ran a quick test fit of the gas tank. The Exocet holds the gas tank angled back from OEM, so a fairly sizable chunk of the volume is wasted. I could probably fabricate some stands to hold the gas tank forward, keeping it closer to the OEM angle, but I suspect a fuel cell will replace the gas tank before I ever get around to doing that. The other item of note is the lack of clearance between the front of the gas tank and the chassis behind the seats. This is where the new stainless AN lines need to run in order to mate up with the fuel filter. The easiest solution seems to be using vibration isolation mounts to elevate the gas tank, adding in clearance for the AN lines at the front of the gas tank, so those were put on order this afternoon from McMaster-carr, in hopes of getting them by this weekend.
Finally, to end the night on a high note, I decided to install the front subframe. This is different from the standard way of attaching the Miata guts to the Exocet chassis, in that the typical way of doing this is by lowering the chassis onto the Miata "roller-skate". However, because the LFX swap eliminates the PPF, having that roller-skate isn't possible. I was debating assembling the subframes off chassis, then attaching them to the chassis after the fact, but decided that I would have an easier time attaching the subframes to the chassis bare, then building them up on the chassis. Now with the subframe on the chassis, I'll be able to begin brainstorming the easiest solution to make the alternator fit, which is the only real interference that needs a solution when making an LFXocet.
The last pieces from V8 Roadsters are being shipped off shortly, including the clutch kit, which is the next roadblock. I'd like to start throwing on the brake booster and steering components, but I know I'm going to hate myself after the fact if I don't install the master cylinder beforehand.
There's still plenty I can knock out this weekend, however. I'm hoping I'll have both subframes installed along with their respective control arms so I can start clearing out space on my shelves. I'm glad I'm finally starting to see these leaps of progress. It gives me hope that I might get this on the road while it's still warm and sunny out.
Reply
0
0
06-29-2017, 10:45 AM
#72
Junior Member
Thread Starter
Join Date: Sep 2016
Location: Concord, CA
Posts: 122
Total Cats: 12
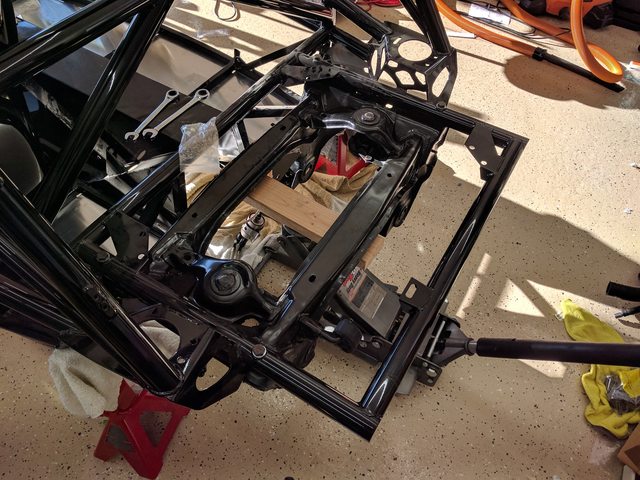
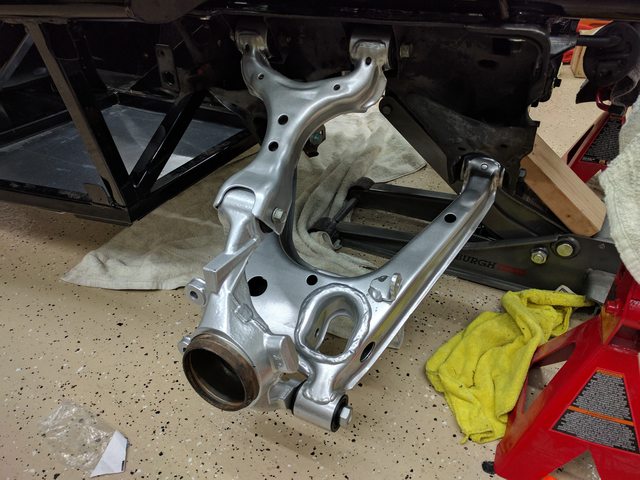
Had some slight delays at the shop, but I finally got the subframe welded and returned with the old bushing sleeve pressed out, and the new one installed. Once I got it home, I gave it a few coats of POR15, and got to work installing it once it had finished drying.
With it in place, I finally got around to loosely bolting the control arms up, and making sure everything looked alright. So far so good. I have an aftermarket of forward upper control arms that I'm using temporarily until I get the rebuildable ball joints and press them into the matching powdercoated OEM control arms. I need to source the replacement vertical bolts for the lower ball joint today, but provided I can pick one up today, I should be able to piece the rest of the suspension together so I can load it up, then torque everything down.
The spacers for the gas tank arrived and look pretty good so far. I may use a few washers as spacers to get it a little higher off the rear subframe and provide some more space for the fuel line, but it seems to be a good solution overall using the rubber isolation mounts. The issue I've run into since I've had the rear subframe mounted is finding a good place for the fuel filer included with the LFX fueling kit. For now, the plan is to shift the entire fuel line back a foot or two, so instead of mounting the fuel filter in front of the subframe where there's no more room, I'll be mounting it on the front side of the gas tank sheet metal in one of the unused through holes. I'll remedy the needed extra length in the engine bay by replacing the 120� Russell fitting with a straight fitting to mount to the FlexFuel sensor I'm adding in, then making a small extension to go from the FlexFuel sensor to the fuel rail. This looks to be the best solution for the Flex-fuel sensor anyways, given there's no return line to use, and i want to minimize the amount of fuel going through the engine pre correction.
There's a lot of potential for progress this weekend given the long weekend for me. I'm cautiously optimistic about getting the engine and transmission dropped in so I can work on the alternator bracket and the transmission brace.
Last edited by Djwade; 06-29-2017 at 10:58 AM.
Reply
0
0
06-29-2017, 11:07 AM
#73
Elite Member
iTrader: (21)

Join Date: Jun 2007
Location: Rochester, NY
Posts: 6,597
Total Cats: 1,263
The one thing that strikes me about builds like this is putting together pristine new parts. I think I could assemble a car in days if I didn't have to constantly deal with rust.
Reply
0
0
06-29-2017, 11:54 AM
#74
Junior Member
Thread Starter
Join Date: Sep 2016
Location: Concord, CA
Posts: 122
Total Cats: 12
You absolutely save time and frustration with fresh, clean parts, but you either spend a lot of money or a lot of time making them fresh and clean prior to assembly. For a lot of people, they enjoy the process of taking a bunch of rusty parts and making them look like new. Other people want to just smash parts together and drive it. There's nothing wrong with either approach. Each project is individual and personal. While I'm taking the time to make most of the parts going onto the car look brand new, I'm also not going to be afraid of thrashing it once it's put together, because I will have the knowledge and confidence that if something breaks and needs to be replaced, I'll be able to do it myself.
Reply
0
0
06-29-2017, 02:41 PM
#75
Elite Member
iTrader: (21)
Join Date: Jun 2007
Location: Rochester, NY
Posts: 6,597
Total Cats: 1,263
I always take the time to refurb anything that gets removed before reassembly. Oh, to have the money to just buy new...
Hell, someday I'd like to be able to just buy a clean car and leave it stock.
Hell, someday I'd like to be able to just buy a clean car and leave it stock.
Reply
0
0
07-12-2017, 09:40 AM
#77
Junior Member
Thread Starter
Join Date: Sep 2016
Location: Concord, CA
Posts: 122
Total Cats: 12
Quick update time:
I've gotten the engine off the engine stand and onto the hoist and started eyeballing the fit of the engine. It's a known issue that the OEM alternator interferes with the passenger side engine bay frame rail, however it doesn't look terribly far off. I'm waiting on spacers that mount between the engine mounts and the block itself that I need before I can really measure how far off the fitment is, but it's looking like some very simple modification of the alternator bracket, when combined with clocking the alternator, will allow to keep the OEM alternator and not need to fabricate a custom bracket for an aftermarket alternator.
A few weeks back I purchased an APR wing, and mistakenly ordered the wrong version. (I had originally been planning on ordering the Miata version and just fabbing some small spacers to adapt it to the exocet pedestals, as it saves a few hundred dollars that way, but due to me ordering the wrong PN and getting the universal wing instead, I was out of luck for making the spacers.) A quick call to APR saved my bacon, as they said I could just give them the measurements I needed for the exocet mounts, ship back my foil and mounts, and either have my foil re-drilled, or exchanged out for a new foil with the mounts at the right location. Totally unexpected, but totally awesome. Can't recommend working with them enough now..
I finally also got the wilwood calipers mounted on the front to check clearances on my temporary wheel-set. I'm eagerly awaiting the arrival of 949Racing's 6UL specific for the Exocet, but as I need to be running for a little bit before then, I picked up a set of MST Time Attack 15x8 +0 wheels. They're not light, nor are they confidence inspiring in terms of strength, but I don't expect to be doing much besides spirited road driving before I can get my hands on the 15x9 6ULs. Unfortunately, the wheels don't clear the calipers as I was hoping, but just barely. I ended up throwing on some 5mm spacers on the front, which gave me about 2mm of clearance from the interference location with the calipers.
Per V8 Roadsters, my engine mount spacers should be here Friday, so hopefully this weekend I'll be able to figure out the engine mounting and alternator modification. Once that's sorted, it's back to full steam ahead with assembly.
Reply
0
0
07-12-2017, 12:43 PM
#79
Junior Member
Thread Starter
Join Date: Sep 2016
Location: Concord, CA
Posts: 122
Total Cats: 12
The rear subframe? For the sake of time, I ended up having a shop locally do the welding for me so i can take my time and learn TIG first without feeling rushed trying to get this on the road while it's still summer. Cost me a whopping $60 to have the old stubborn nose bushing shell pushed out, the new one reinstalled, and the pinion angle set and welded. 100% worth the extra expenditure to let me have confidence in the welds and take my time learning properly.
Reply
0
0
07-12-2017, 07:09 PM
#80
Junior Member

Join Date: Jan 2017
Location: "lol", MA
Posts: 384
Total Cats: 14
The rear subframe? For the sake of time, I ended up having a shop locally do the welding for me so i can take my time and learn TIG first without feeling rushed trying to get this on the road while it's still summer. Cost me a whopping $60 to have the old stubborn nose bushing shell pushed out, the new one reinstalled, and the pinion angle set and welded. 100% worth the extra expenditure to let me have confidence in the welds and take my time learning properly.
Reply
0
0


