When you click on links to various merchants on this site and make a purchase, this can result in this site earning a commission. Affiliate programs and affiliations include, but are not limited to, the eBay Partner Network.
There's a chance that v8 Roadsters used the same wire colors for the ones that need to be connected as they are in the OEM application on the camaro, so I may try to dig up some wiring information to make sure I understand what each wire is doing if I still can't get ahold of them today.
Don't trust the wire colors. I stripped back some of the loom on my V8R harness and wire colors change at the points they made modifications.
Originally Posted by Djwade
In the LFX wiring harness that's been modified, there's a few wires that need to be wired up that I'm not sure about.
The first in question is a wire that's labeled to come from the starter relay. Is this wire simply triggering an internal relay in the starter to then draw from the direct wire from the battery?
The next is a wire that wants +12v from the ignition in the start position. This is the biggest one I have questions about. Instead of start, should this instead be connected to "run"?
Similarly, there's a wire that wants +12V from the battery. Should this actually be wired to the ACC position on the ignition so it only receives 12v when the ignition isn't in lock? Having a constant supply from the battery seems like an easy way to lose charger over time.
To backup what gooflophaze already wrote -
A. This is your starter switch, triggers the relay inside the starter. 14ga wire with 15A fuse.
B. This sounds like Ignition ON, since it's not the starter trigger wire above, which makes sense as that's the third lead the V8R modified harness leaves loose for you to connect to.
C. Yes, straight to battery so it always has power. It's the ECU memory, the draw is minuscule, I have a tiny LiFePo4 battery and no issues with draining it.
Perfect. I think how B was labelled was the most confusing thing, as it seemed to indicate that it should also be tied to when the ignition is in the "Start" position, as opposed to the "On" position, but that didn't make much sense.
Thanks both of y'all for the help. If i have all the correct fluids on hand, I might just be able to fire it up this weekend.
Alright, question for those of you who've done this before and can spot an error: I'm currently wiring up the chassis and starter/alternator, and as part of this I wanted to have the ability to disconnect the battery for a variety of reasons. I also wanted an "Oh Crap" emergency stop switch in the unlikely event that all hell brakes loose. Because I switched from the OEM alternator, I'm now running a 1 wire internally regulated alternator.
Common convention with most of the classic car guys when they switch to a 1 wire alternator is to wire it to the starter to make things simple. However having a direct connection means that even if the battery is disconnected, the car will still run. Initially I was planning on having two disconnect switches, one for the battery, and one for the alternator, but I realized that I could just wire the alternator to the battery side of the switch. From my understanding, this would mean that that single switch would successfully be the "Oh crap" switch I want it to be, without the need for two switches, right? I can't think of any reason why it wouldn't work, but I know a few weeks ago when I was initially making the switch purchases, I had decided I needed two.
The alternator is directly connected to the battery. (technically, in the miata, there's a 80amp slow blow fuse between the two). The car won't run if the main relay is turned off to the ECM, which is what IG1 does. I ran a 1-wire alternator in my 66 Galaxie for awhile till I switched to the nicer 3G taurus alternator - and yes, it's still connected directly to the starter wire which is run directly to the hot side of the starter solenoid. When you turn the ignition off, you're disconnecting the coil and the engine stops.
Generally you run a battery disconnect on the track because if you're in a shunt, the engine is off but your wiring is shorting and causing a fire hazard. If you want a fancy switch to instantly kill the engine, you're just putting something in-line of the main relay.
Yeah, I wanted to have a kill switch primarily as a means of stopping any shorting, but also killing the engine if it was running as well. I ended up just putting the alternator on the battery side of the disconnect and everything seems to be working well, so I probably was just overthinking it.
I've really been slacking here. I have a lot of images and video to upload at a future date, but for now I'll stick with the heavily abridged version.
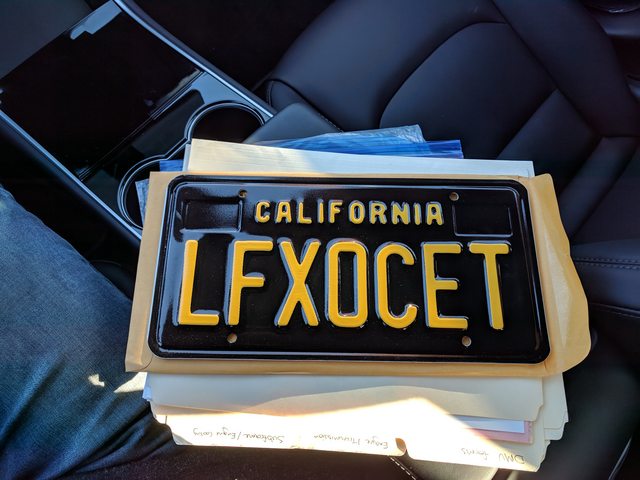
Starting the SB100 process was a total breeze. I was in and out of the DMV in 20 minutes with my sequence number in hand. In the parking lot I scheduled my CHP appointment which is this coming Thursday. Insurance was a little tricky, but I finally got it sorted so I'm now insured, even before I have a CA issued VIN.
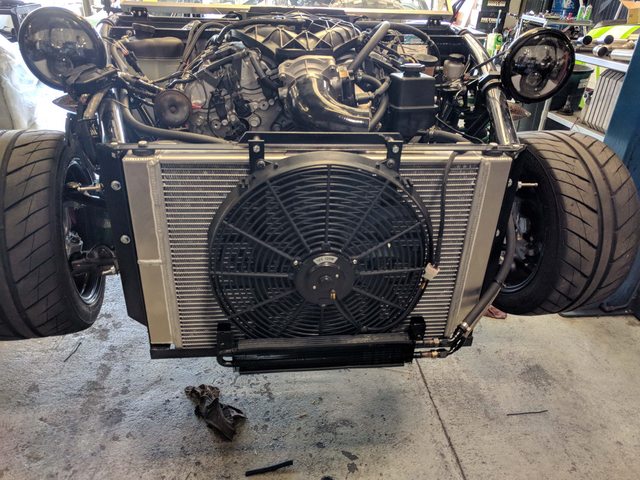
This last friday, I had the exocet trailered to a muffler shop where I had a quick exhaust put together, as well as modifying the heater tubes to be my radiator reservoir return point, and fabbing up some temporary radiator mounts. I may eventually switch over to a full mandrel-bent exhaust, but I'm not starving for power with this build, so crush-bent will do for now, especially at the price I got it at.
Once I had the car back home, I started working on the tune. I've been trying to get it running prior to the CHP appointment, so I can drive it there and not shell out the money for another there and back towing session. The base tune that V8R sent was originally for EFILive, whereas I've been using HPTuners. Because I'm rushing to get it running, I tried transcribing all the tables over to my own tune and loading it up. Something seemed off though, and it wouldn't even turn over for more than a few seconds. I ended up going back to the OEM tune and just disabling the VATS and tweaking a few small parameters and it runs and idles well. I can tell there's definitely room for improvement, but it's a starting point.
Today I got around to refreshing the fluids in the diff and the transmission, as well as torquing down the rest of the suspension until I can get a true alignment. With nothing else on my list of necessary steps, I took it out for it's maiden voyage. A few observations:
1) Ho-Ly crap. This thing is fast. Like...faster than anything I've ever driven. This acceleration in this car, even without me trying to, blew my mind. The Ferrari F430 and Lamborghini Diablo I got to drive this year just got booted a step down the podium of "fastest things DJWade has driven".
2) Theres a few rattles that I need to find when harmonics get hit, but overall the exhaust sounds absolutely incredible.
3) I somehow avoided the dreaded issue with E39A ECUs and have accurate speedometer numbers being reported by the OBD2 port to my tablet that I'm using as a dash for now.
The bad news (I suppose this is observation 4) is I have an issue with my transmission, notably 5th and 6th gear. For whatever reason, I can't move the shift lever all the way to the right for 5th and 6th gear, and when i go as far as I can to the right and move up and down, there's no resistance, whereas 1st - 4th still have the same notchy shifting feel. I disconnected the shift linkage and verified tt wasn't an issue with the remote shifter, and confirmed it's an internal issue. Unfortunately, as is usually the nature of these things, because it took me so long to actually drive the swapped parts, the transmission warrantee has long since expired.
So now I have the wonderful task of dropping the transmission, and finding someone knowledgable in the diagnosis and repairs of these transmissions. I'm going to be keeping my eye out for a replacement transmission, but I'm also hoping that this isn't a massive problem to fix. After all, the transmission only has 600 miles or so on it. Fingers crossed.
Next steps forward will be slapping on some temporary lighting tomorrow/wednesday so I can drive it to my appointment on thursday and keep the registration process rolling.
On a brief shakedown drive to the gas station and back, a few things cropped up that needed addressing that eventually caused me to reschedule my CHP appointment.
1) The rear differential axle seals are leaking too fast for me to ignore for a while, so those will get addressed when the transmission is getting looked at.
2) The heater outlet that I modified to be the new coolant reservoir return also has a leak, so new gaskets and O-rings have been ordered to replace.
3) During the last few streets of the shakedown, one of the brake lines failed from a defect and had a leak in the line, causing me to lose brakes completely. The replacement has been ordered and should be here this weekend.
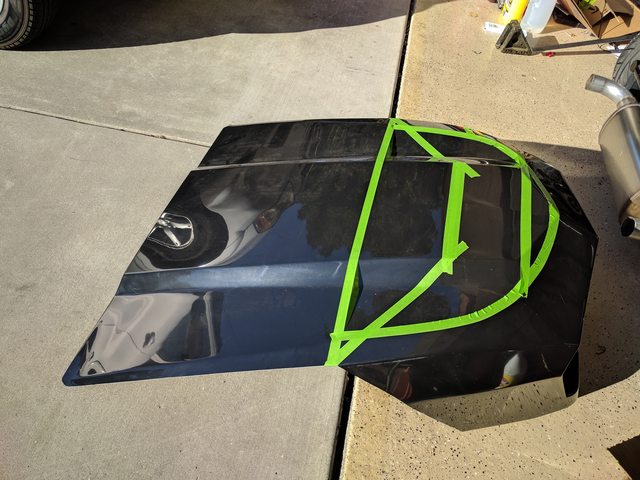
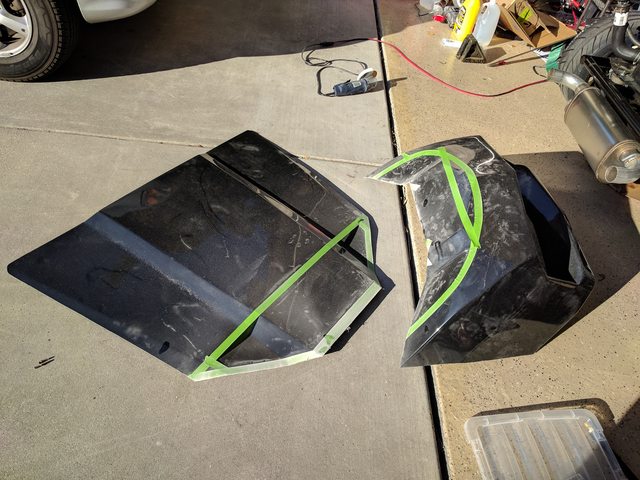
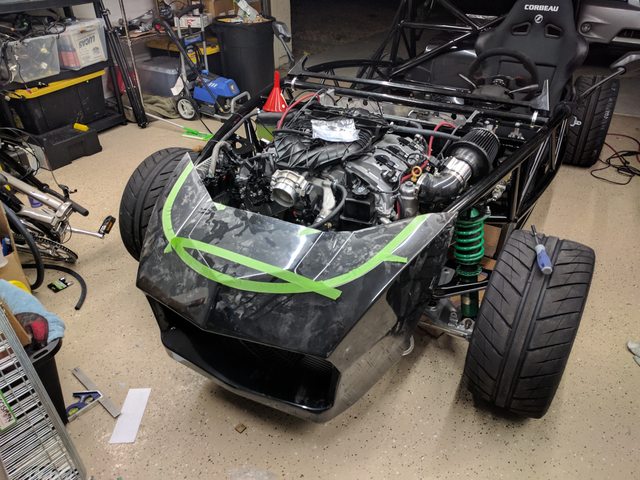
Everything is fixable, but I wasn't too pleased to have a delay on my CHP appointment. As a little pick-me-up, I decided to finally modify the front clip. I didn't like the idea of keeping it in one piece, so I decided I'd separate it into a nose and a hood, which also would allow me to have some body work on it while I figure out the modifications needed for the hood in order to clear the engine. In the end, I opted for a more straight line approach that I feel matched the overall styling, instead of following the style-lines which I felt left too little on the nose.
Yeah, losing the brakes was pretty sketchy, and could have been way worse. The brake line failed where it comes close to the top of the transmission. It wasn't rubbing at the time, but definitely could have. I'm taking some precautionary measures this time around with some anti-rub sleeves, so hopefully it won't be a potential issue in the future.
I may have to take you up on that offer. I've read through your build and I know one day I'll be adapting a more complete body of one form or another, so I'd love to see your build.
Things have been going at a snails pace over the winter, but I'm finally getting close to taking it through the Brake and Lamp inspection. I'll post an update as soon as I can find the time to summarize everything that's been happening.
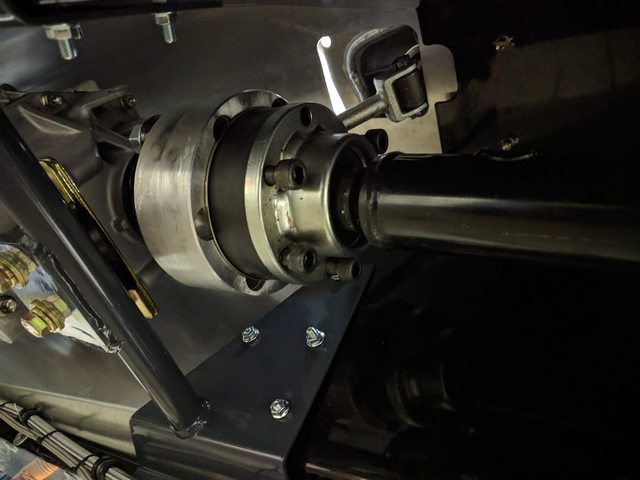
If you get a chance, can you please post a pic of the trans mount on the car? I'm curious what rivets you had to remove and where it bolts up to the exocet chassis.
Based on the previous discussions here, the wire labeled "A" should receive non-kill-switched +12v direct from the battery. This is a very large wire for just a memory circuit. Does this wire serve any other purpose?
Life has been crazy and I just haven't had the time to compile progress on the car, so here's the extreme spark-notes version.
The car is officially road legal as of 9/7. Took way too long but life got in the way.
I didn't take nearly enough photos over the past year, and there were definitely months with no work last winter, but it's finally getting closer to where I want it. I had done a lot of things just to get the car running and moving through the SB100 registration process, and now that I've got that done, I'm going to be replacing those band-aids with permenant solutions.
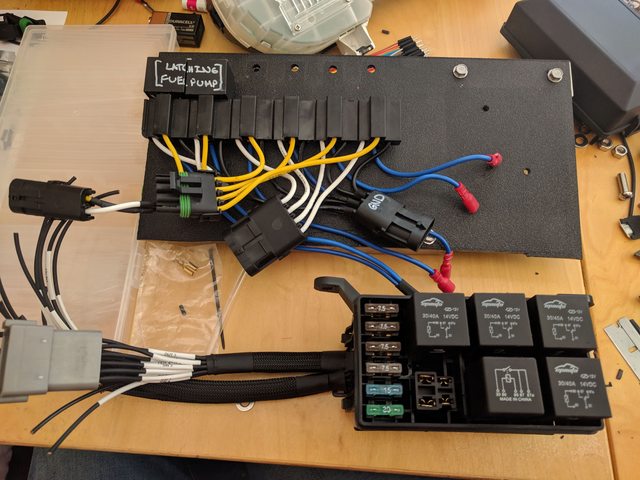
The first major change that is still very much a work in progress was the wiring. There's no OEM wiring on the chassis, just what was supplied by v8 Roadsters for the engine swap. As such, I tried doing it right the first time, but didn't have much first hand experience to go on, so I ended up going back and remaking some of the wiring. The big reason for the re-do was the connectors. The first time I went through this, I ended up using weatherpack clone connectors, which was definitely a mistake. While they're cheap, you get what you pay for and I didn't want to be chasing electrical gremlins. While its also a hotly debated subject, I had soldered all of the original wire terminations, I decided I wanted to do radial crimp instead. In the ended I ordered the tooling required and all the materials to switch everything from the knockoff weatherpack connectors to Deutch connectors with the solid barrel pins. My very questionable first attempt at a relay panel was replaced with a relay and fuse box. It's now all at the point where the wiring is present, but the cable management in the main chassis area is wanting. For now though, I have confidence in the wiring connections.
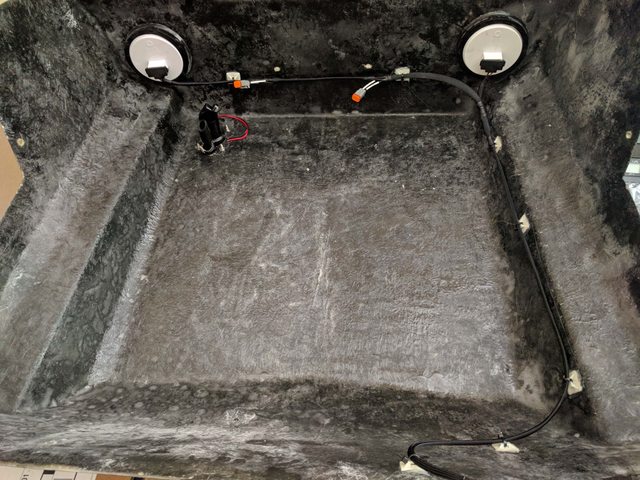
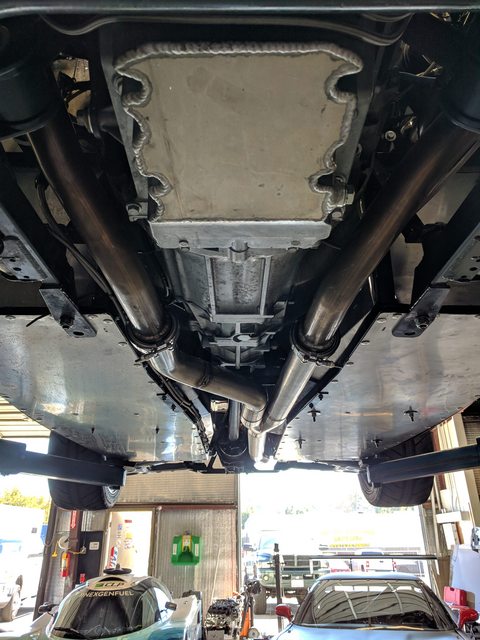
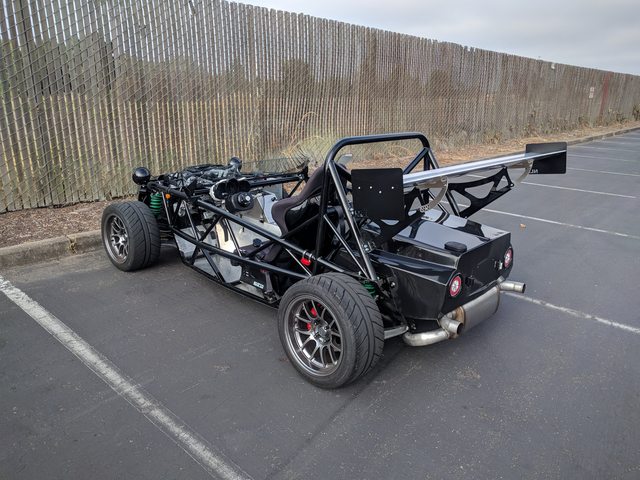
On the chassis side of things, following the suggestions of everyone here, I ended up buying a welder capable of AC/DC tig to start learning on, and eventually had plans to redo my exhaust with mandrel bent tubing myself, but work and some house renovation projects took away a bunch of the time I was hoping to have to learn to do so. Because of this, and the proximity of M@LS, I opted to find a shop to redo the exhaust (mostly because there was a gnarly rattle/exhaust leak that had to be fixed) as well as do some other fab work. Ended up finding a killer shop near me, where it is now for the finishing touches on the full mandrel bent exhaust and a few other fabrication bits here and there. I'm also having a 20 gallon fuel cell put in, as the stock miata tank configuration in exocets is abysmal.
I had an APR wing on the car for a while, but ended up swapping out for a 71" 9 lives racing wing. Exocets have essentially the worst possible aero, but a massive 2d wing was better than the existing APR wing I had on there. There's some more cosmetic changes in the future. The massive headlights are definitely on the chopping block, as well as making some trim pieces to blend things like the new windshield more smoothly into the chassis. I'm hoping to start 3d printing and finishing sections of an interior plug that I can use to make a reusable mold.
Now that i'm approaching the point where its a car I can just take out and drive, I'm realizing I don't want to necessarily have this car out on the track as I'm learning more of the basics. with a good tune (with flex fuel), It's going to have north of 300hp/300lb-ft at the wheels, and I think I want to start with something where I can actually find the limit easier while I'm learning. As such I've started looking for another NB (01-02) to get my hands dirty with again now that the LFXocet is street legal, keep it NA for a bit to learn slow-car fast, then eventually bring the exocet out to some HPDEs. Overall, I'm happy with how it's sitting and excited to get driving it some more, and hopefully see some of y'all down at Laguna Seca this weekend.
If you get a chance, can you please post a pic of the trans mount on the car? I'm curious what rivets you had to remove and where it bolts up to the exocet chassis.
Sorry for the late reply to this, but in case you were still wondering, the trans mount only needed one rivet skipped. The trans mount from V8R is exocet specific, and is intended for exocets after the trans tunnel redesign (somewhere between chassis 100 and 150). It simply bolts through the trans tunnel on each side using 5 bolts. This is the best picture I have on hand from the bottom, as it's still in the shop right now for the fuel cell, but if you're still interested, I can grab more photos when Its back in my garage.
 09-15-2017, 10:34 AM


 1
1