When you click on links to various merchants on this site and make a purchase, this can result in this site earning a commission. Affiliate programs and affiliations include, but are not limited to, the eBay Partner Network.
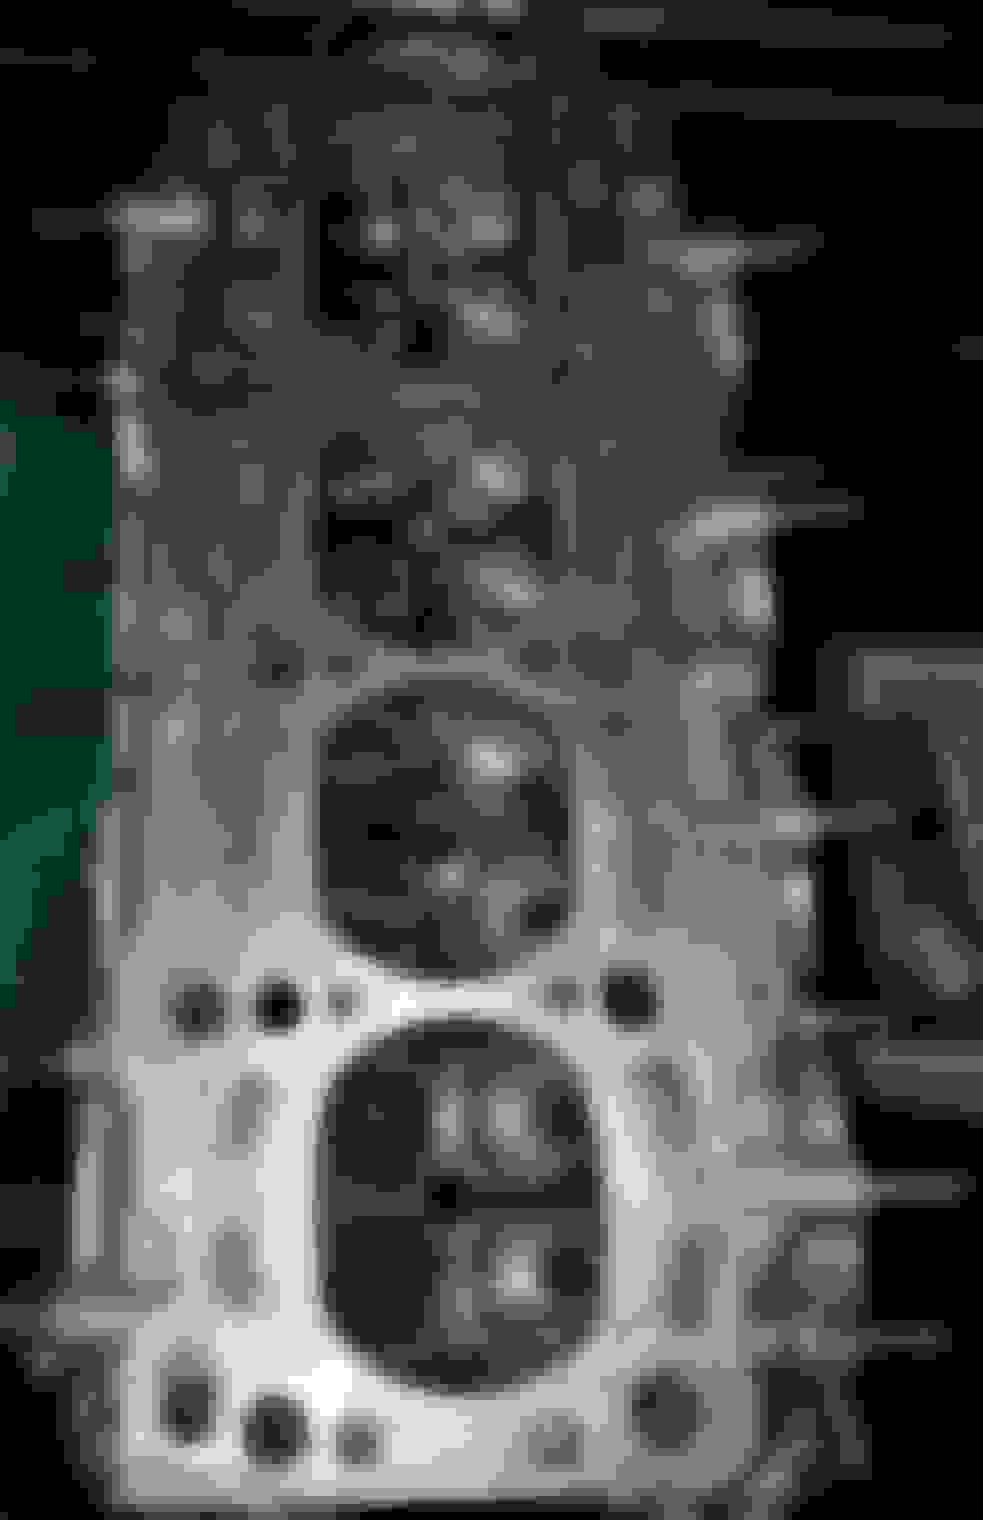
Spring update! I picked up a VVT head over the winter and I have been slowly porting it over the late winter/spring months. I focused on the basics, leave the floor alone and raise the roof of the bowls to smooth out the transitions as well as clean up the steps in the bowls around the valve seats. I also worked on massaging out the machining around the valves seen at #1 and #2 in the image. Here's some before pictures to give you an idea of what I was working with. I'll post more later today, for now off to bed.
As an aside, I saw an old thread of yours discussing issues related to spark cutting out at 2.5-3k rpm. How did you finally manage to solve that issue? I don't think the thread was ever updated and you're clearly well on your way!
Can you link me to it? I can't find the post. I think it might have been the time I had water in the spark plug wells maybe? Or maybe it was the timing gear?
To start off with the head, I disassembled the valvetrain and removed the camshafts, lifters, keepers and valves. I then took a gallon of mineral spirits and washed things down and scrubbed it with a nylon brush. This removed almost all of the carbon, the rest was removed in the hot tank when I had the guides extracted. I took a set of the valves to the bench grinder and machined the valves down until a set of four sat just above the seat face. With no guides the valves would just flop around so I took masking tape and wrapped it around the valve stem to make something to secure the vales in place. Worked out pretty well in the end.
Once I got the head back I set my (secondary) air pressure regulator to 40psi and took a 6" arbor and 80 grit sanding rolls and cones to the intake and exhaust runners. I took pictures when possible, but some of them came out a little poor due to the lighting. The first exhaust runner picture looks finer than it is due to the lighting. The 80 grit really cleaned things up well, but it can remove a lot of material if you aren't careful. I found there was still a few spots where the metal had tiny bubbles in the casting process, rather than mess with the shape of the ports I opted to just clean up things and leave the rest be. I also opted to not try to over-sharpen the dividers as I would rather not risk cracking. The intake runners are fairly sharp as-is so a little cleanup gets them to satisfactory levels, the exhaust runners are much more blunt than the intake dividers. I tried to add a small taper as the gasses approached the end of the divider to help the gasses proceed out of the bowl area but I only did so well within the runner, past the bowls to avoid affecting flow there and even then, it was very slight.
I cleaned up the bowls with 80grit staying below the top half of the seats and I blended them into the bowls. A few of the bowls and seats didn't quite line up and had some small overhangs but overall the casting was pretty great and required little to get things smoothed out which was pretty great as this was tough to do without a real workbench and stool to sit on. I did this all standing.
Last edited by Der_Idiot; May 15, 2018 at 04:10 PM.
I used the shaved down valves to protect the valve seats and permanent marker as a substitute for machinists dye to mark my targeted shaving areas and used the sanding rolls to work down the machining around the valves and ever so slightly sanded down the spot near the squish area to give the valve a little more room on both I/E ports at low lift. I avoided removing material from the decked surface and instead removed material from the tapered ledge leading from the valve seat up to the deck. In theory this will avoid affecting the squish while allowing more flow, I didn't get too extreme here because this is my first attempt at this. I polished the exhaust runners with 120/180/320/400 grit polishing buffs which came together rather nicely. Polishing around the guide bossing sucked though and I had to save my more worn-down buffs for that and a couple other spots to get them to even polish.
At this point, the combustion chamber and intake runners+bowls are done in 80 grit and the exhaust runners+bowls are done to 400 grit. The short-side radius on all runners are sanded in the same grits and I cleaned up the transitions from the runners to the valve seats ever so slightly - I avoided excessive re-shaping and focused purely on blending things together to get ride of the ridge in the turn there.
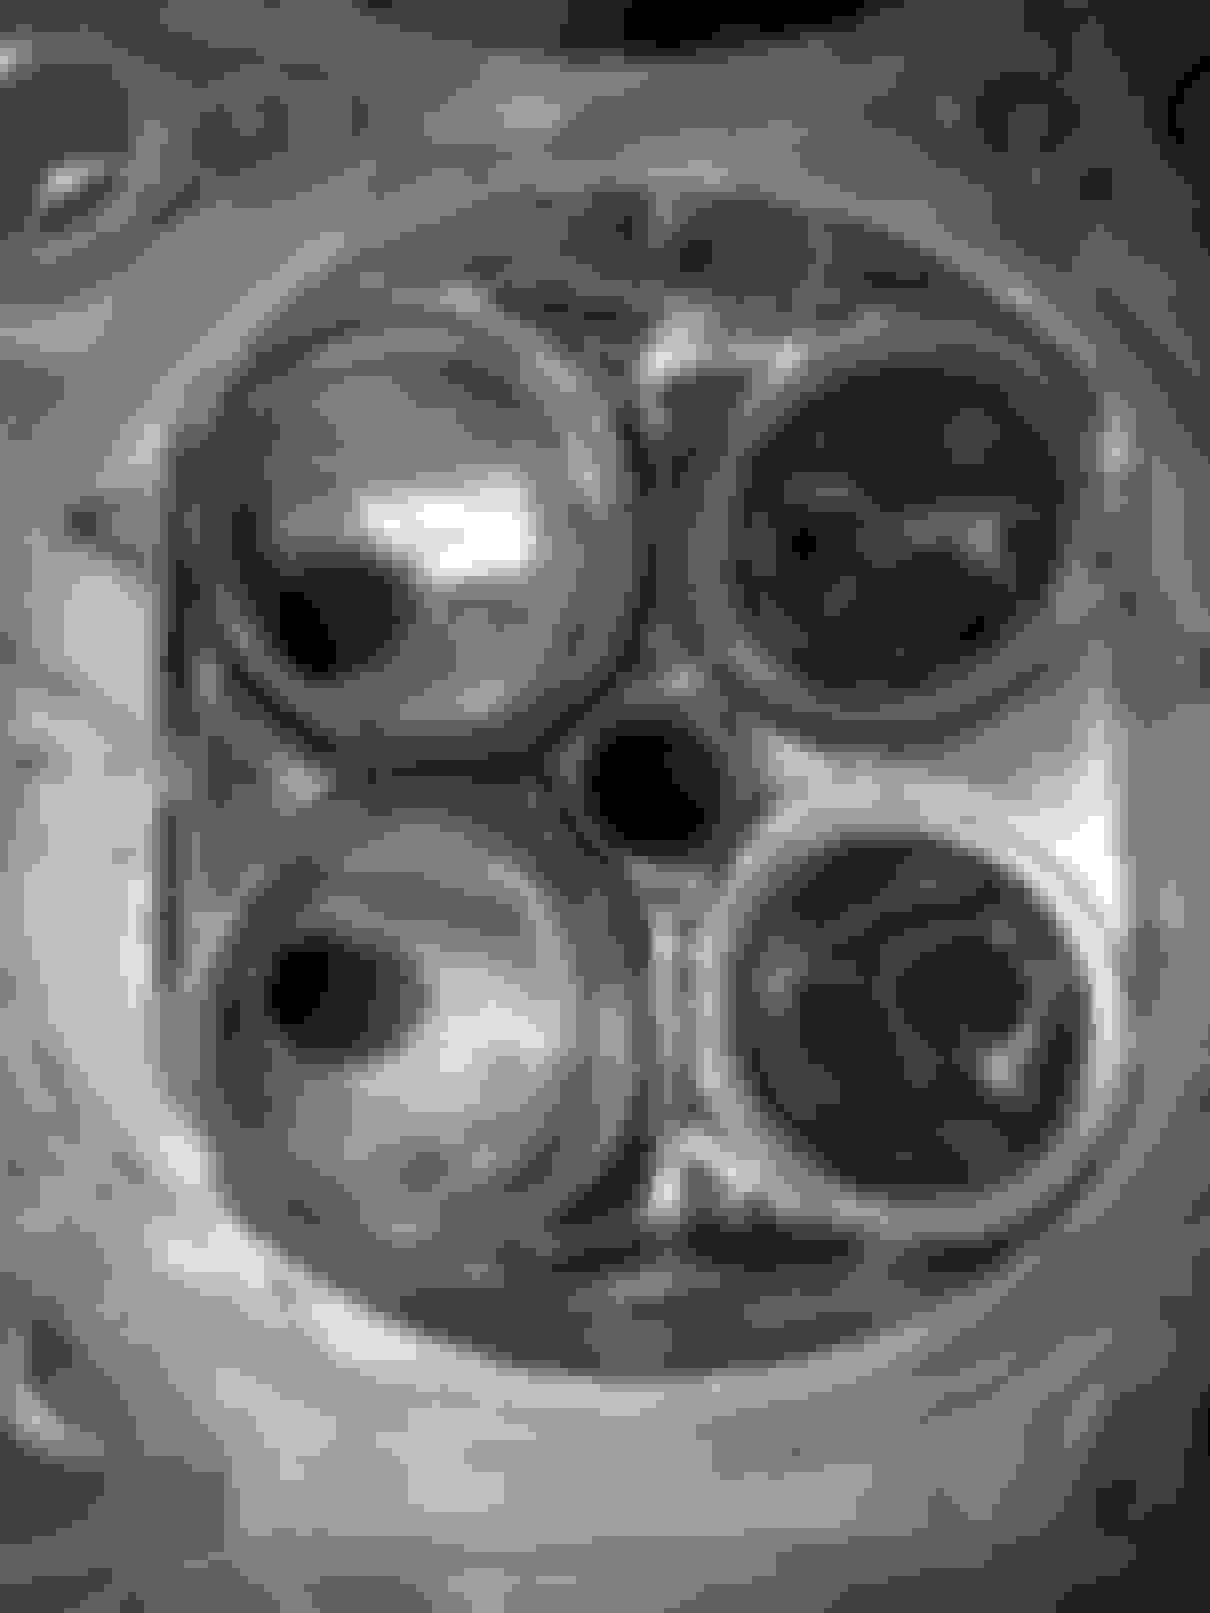
I have cylinder 1 done in 320 grit with all four coming out like this after two passes. I then ran 400 grit over the combustion chambers in four alternating passes until I was satisfied with the end product. I have some time before I pull the cylinder head off to start swapping things, so I will probably polish the chamber and exhaust runners with a nylon wheel and some black emery and white diamond rouge. I have red jeweler's polish as well but that's only if I'm six beers in..
So it occurred to me that I have the thin (non VVT) oil pump and since I'm going to VVT I am unsure what to do about my oil pump situation. I wanted to avoid pulling the oil pan when I pulled the engine, but now I think I may end up having to do that anyway. I was debating putting in a BE pump but I really didn't budget for one..
Picked up 5 AC Delco D585 truck coils and harnesses from the junk yard today. Since my Toyota cops mount style wont fit on my VVT valve cover I'm going to pickup a Sadfab bracket and plug wires and go that route.
Finished up the polishing on the head with some Black Emery and followed up with White Diamond rouge as well. The combustion chambers and exhaust runners now have a very bright shine to them, intake is left at 80 grit.
And the final breakdown of parts;
Supertech +1 Stainless intake valves
Supertech +1 Inconel Exhaust valves
MiataRoadster Brass Guides and Viton valve stem seals
VS855 66# valve springs
OEM Lifters, Keepers, Retainers, Shims - I've gone over moving over my SUB setup several times but at this time I'm going to stick with the factory setup for now
You can also see I have ported the small breather port on the valve cover as well. Not sure what color to paint this valve cover just yet..
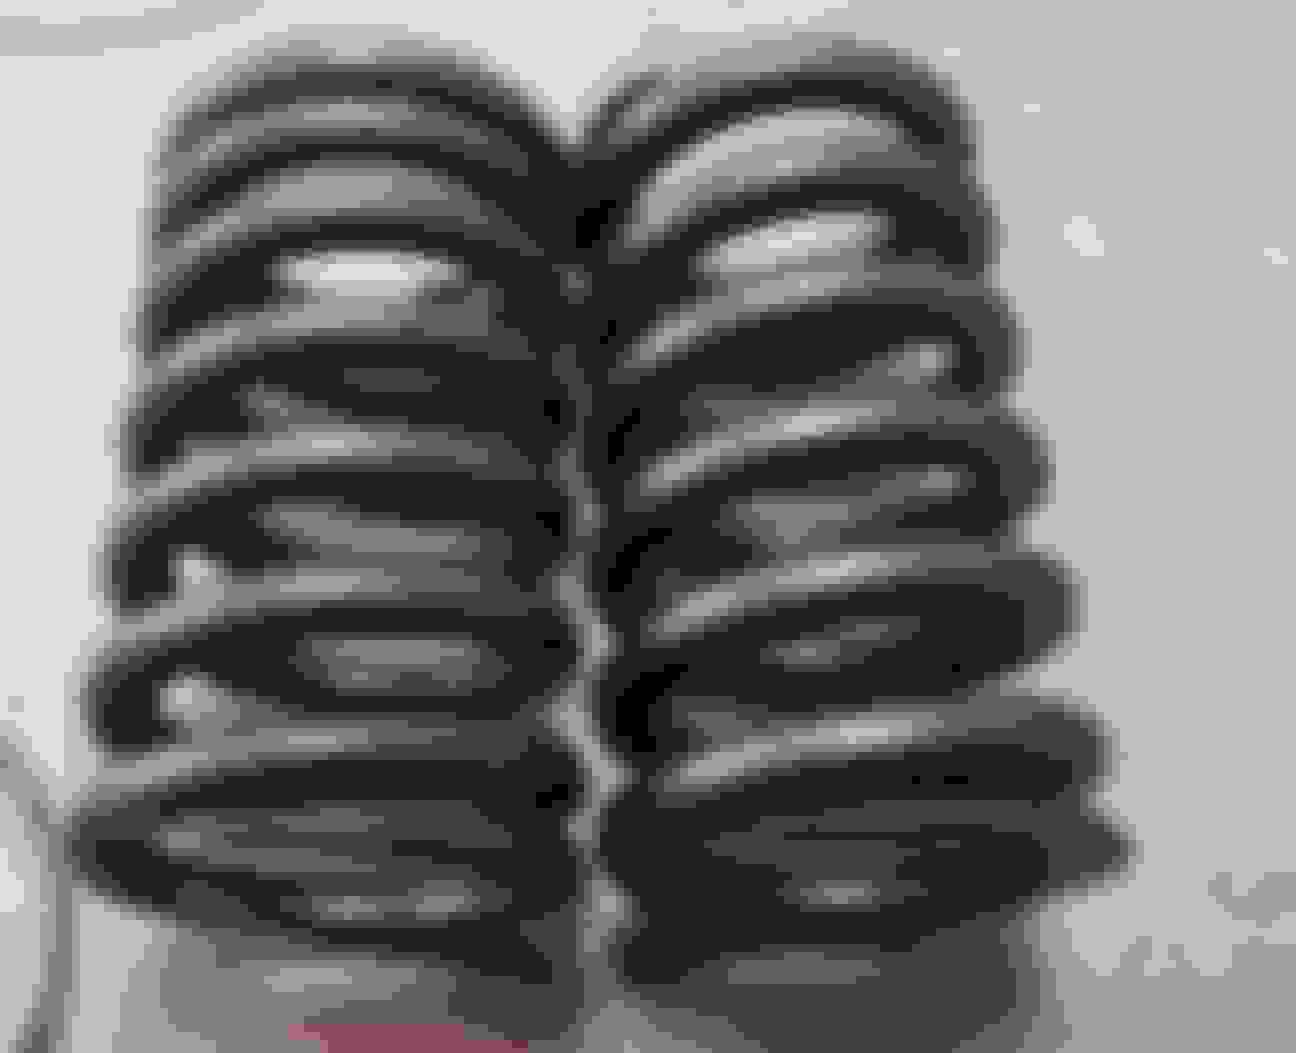
OEM VVT Intake spring on the left, VS855 on the right. OEM springs are ~46 #s seat pressure. The VS855s are rated at 66 #s seat pressure @ 11 #s /mm (.04"), I may have the machinist add a 1mm shim to bump the pressure to 77 #s as I am expecting 25+ psi so better to be safe than sorry.
I was expecting a longer delay but the machinist got motivated by the shiny and called today and let me know he has the seats cut and the guides installed. We talked about the install and he needs to order new shims because the ones with the VVT head are all over 3mm in thickness. He talked to SuperTech and the end of the valve stem is hardened between .004" and .008" (they didn't have precise numbers on this) and so he wants to put in thinner shims to leave more meat on the hardened material. Once he has the shims and some spare time I should hear back by late next week hopefully on lash being set.
I was originally quoted July 4th as my expected finish date so this is great! I don't even have the current head off the engine or the pan pulled yet though so I need to get on that. I'm OnCall until next Friday, though which really limits my time in the garage. I will however have either Monday or Friday off to make a 3 day weekend to get all of this done.... I hope lol
Shims are ordered as of Monday. In the mean time, I ordered a 3.3 R&P to put on the parts shelf. I will need to get an NB cluster and figure out a suitable solution for the speed sensor. Question is, do I put it on the Torsen-II or hold off and buy a clutch-type diff...
Picked up a 3.3 R&P for the rear end whenever I find a diff worthy of housing it. Now that they're sold out I feel like I struck gold with this baby. Oh and here's some comedy gold, stumbled upon this Red while out and about. The ludicrous is high with this one.
In other news the head is finished. I've been sitting on it for the last two weeks because I have been busy with work and raising a puppy. But, it's finally here and ready to install. Things look good too. I also drilled and tapped the oil pan for 1/8 NPT-27 and threaded in a 4an fitting for the OPR return and the sensor which sits about 1.5" below the dipstick's low mark and below the tube so it should always see fluid and should be well clear of the subframe.
While cleaning up for the RTV for the pan I decided to check the mains and it was a good thing I did as they are showing their age. #5 Main bearing and #4 Rod bearing were the worst, #1 Main was the second worst. Both have visible scoring on the crank with a slight catch with my fingernail, going to call the machinist tomorrow and see how long he has for a wait to polish my crank and order up a replacement full set of ACL race bearings. I just put the oil pump on last night, too...
Before I decided to slap the pan back on I opted to pull my mains and review the bearing wear. It's a good thing I did because I've got some substantial wear on a few bearings. After seeing the very slight bluing on Main #4 I opted to pull the rod caps and review, as you can see there is some wear with the worst on #4 as expected but nothing here is really too surprising for an engine with 8+ years and at least 20k boosted (many more N/A). The crank is off to the machine shop for polishing and we decided to grind down .25 and get some new ACL Race .25 oversize bearings. I ordered them Friday night and I'm hoping things will be here by this Friday but we shall see.
Wrapped my downpipe with some DEI titanium wrap that was given to me. Since this is stainless steel it should not corrode like mild steel would. I kept it to a single wrap with a 1/4" overlap as directed where I could however the bend by the turbo required more overlap on the inside edge. I don't expect this to result in cracking however only time will tell. I primarily run E85 around town over 91 nowadays except on long cruises where e85 is not available. The TSE gear has been pretty damn stout so far so I think the pipe is made of sufficient material to handle it.
Bearings are shipped, most likely should see them by weeks end and the machine shop quoted mid-week for the crank. I forgot to take pictures of the Thrust bearings but they were nearly perfect.
To Do;
Install internals (bearings, oil pump, baffle/pickup, oil pan) and plasti-gauge
Paint valve cover (wrinkle black) - Arrives tomorrow. Think I'll tape off the bolt holes this time, the paint messes with the torque readings
Install VVT head and all the VVT stuff
Install engine
Figure out wiring for VVT actuator and Intake Cam sensor
Tap EGR plug bolt for EGT sensor bung
Install LC-2 sensor
Install gauges
And then..... Pray to the gods and crank the engine........
Last edited by Der_Idiot; Aug 27, 2018 at 05:44 PM.
Head is on, wanted to get things finished this weekend but for the life of me I cannot find the banjo bolt that goes to the block for the VVT system (PN 9YA3-51-001C), there are only two areas I had the parts for the head and I cannot find it in either of them. Local dealerships want between 22 and 27 bucks for that bolt, oof. I ordered one off Priority Mazda on Thursday but the ship status hasn't changed. Hoping to get lucky locally...
In the mean the Thermostat goes on tonight along with the MR Viton VVT seal set and my buddy has a crimped ECU lead for me that will let me actuate the VVT system with the Hydra and I have already talked to Jeremy so I can get the ECU setup once I get the last few bits installed. Now I just need to get over this cold from hell..
Looks like everything is coming along, keep it up!
Thanks bud, it's been a trial to get everything completed. Changes at work really put the brakes on working on the car for a while there but I fully intend to have things finished in the next few weeks.
Last night I cleaned up the valve cover gasket surface, greased the cams and poured in a few quarts of oil to coat the cams and then slapped on the VC. I then installed the reroute sandwich in back with an OEM thermostat, stove testing confirmed fully open at 188�f and cracking temps around 182�f. I had to bore out a 3/8npt to 1/8npt fitting to accept the VEI gauges temp sensor as the sensor portion was too large for the fitting but a little time on the drill press solved that issue rather nicely. I need to find some new timing covers though, these are finally starting to die..
To Do (once engine is installed);
-Wire up a harness for the SadFab LS Coils bracket and wires
-EGT probe on #4 runner EGR plug bolt
-Wiring for VVT
-Wiring for Intake CAS
-1wk thorough shakedown
Once I'm confident the car wont explode or leak coolant everywhere on the trip, I will take a 1-1.5 week vacation - I've got almost 2wks to burn I've been saving for trips in the car.
Nice! My SadFab LS coil bracket and the plug wires are here, time to build a harness. Hopefully I don't have to diagnose trigger + spark issues when the engine goes back in..


 0
0