When you click on links to various merchants on this site and make a purchase, this can result in this site earning a commission. Affiliate programs and affiliations include, but are not limited to, the eBay Partner Network.
FWIW, I eventually removed my PS becuase it would consistently boil on track in hot weather. I think it has more to do with wide, sticky tires than heat from the exhaust manifold...
Ahh, good point. Yeah take my comment with a grain of salt. I was running 205 NT05s on my car when I got rid of the PS. Definitely not the stickiest tires you could run, even on an N/A build.
I personally never had problems with my OEM power steering overheating and losing functionality on track, even on 95* days. I deleted my PS before adding forced induction, so no data I can provide there. Sounds like it's a YMMV situation either way.
I had problems at one point, with an overflow of PS fluid. IIRC it was a slight(?) overfill, took out some fluid to drop the level and increase the airspace in the reservoir, problem fixed. Note, I was running a PS cooler, so overheating the (slightly) reduced fluid was not an issue.
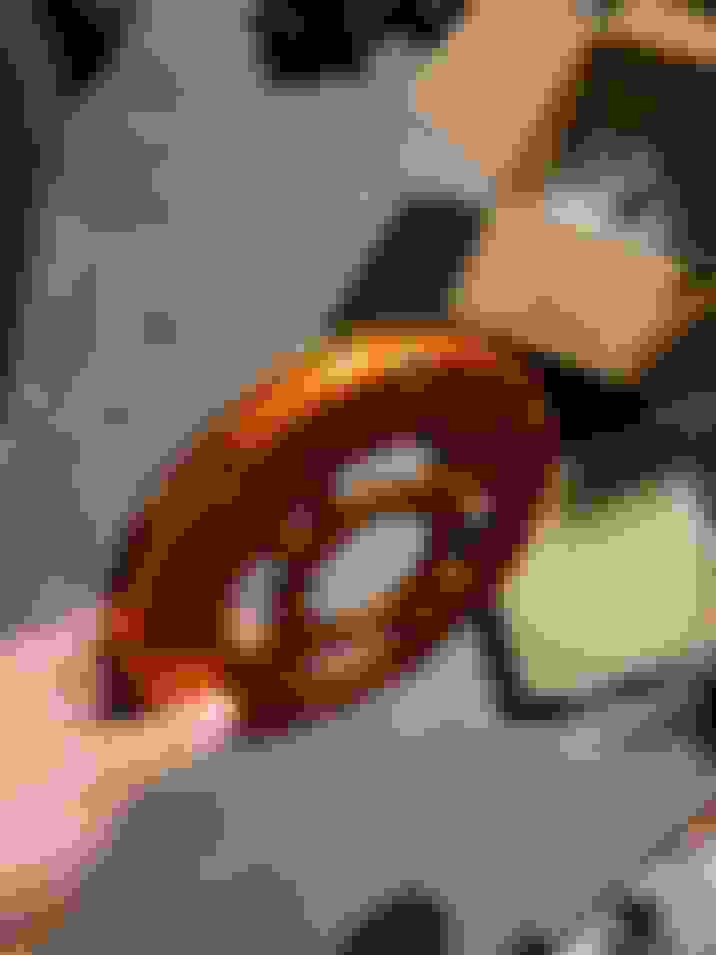
So I took the bbk out of the box and went through the parts and I thought man, that orange is ORANGE.. I put the rotor on the car and was hoping the wheel would hide more of it.. So my next natural question is has anyone painted their Supermiata rotor hats? Anodizing is a good protective coating but I'm wondering if paint will hold up being on the rotor and obviously being exposed to a whole lot of heat. I was thinking of black high temp spray paint, likely doing a coat of primer first. If I spray paint it the last thing I want to do is have it flaking off and looking like crap in just a few months. Anodizing supposedly does take paint well but figured I'm not the first person to not love the bright orange. Any suggestions are appreciated.
It looks quite easy to remove the anodizing with easy off oven cleaner, but the coating is probably a good thing for the Al.
So progress has been steady. Working on the car here and there. I painted the SM rotor hats. Hopefully it sticks. The interwebs says painting over anodizing should stick but I'm worried about the heat. I did a coat of primer and then black high temp paint. On a green car the orange sticks out particularly badly and I couldn't stand it. Hopefully the paint doesn't flake horribly but if it does I'll tackle it later. At least it looks better for now.
Next on this list is all the suspension bushings, hubs, and other suspension bits. I figured I'd start in the rear of the car. The driver's read hub was initially a PITA to remove. I thought I would just pop a slide hammer on and off it'd come. Fortunately it wasn't too bad. I realized the axle was stuck in the hub so I switched over to an air hammer. After going at it for a while it popped free. Then I went back to the slide hammer and the hub popped off. You definitely gotta really put in some work if it's stuck on there. I did the same thing on the passenger side except started with the air hammer and it all came off in 5 mins (it was less seized in the hub for sure). If you don't have an air hammer and it's stuck it could be a big pita. I did also try putting the axle nut on and smacking it with a hammer to free the axle but that didn't work for me.
For hubs I am running the Brofab front and rear hubs. Thus far, my only complaint is that the studs are different colors (black in the front and gold in the rear) but that's a pretty minor complaint. Instructions are very straightforward for installation. I opted to leave the rear dustshields off in the rear mainly because I couldn't be bothered to put them on. I'm not sure they make a big difference with or without anyway since the car is not a daily driver.
I borrowed a friend's baby press and while it worked for some things, it simply wasn't big enough for most of the bushings and installing the new hub. I brought it over to a friend's shop and I used his big boy press to press in the bearings and a few bushings. For the other bushings I used the threaded rod technique mentioned here. I will say the nice thing about the Miata bushings is the lack of an outter steel sleeve makes them so easy to remove/install. Hondas have an outter sleeve that is a sumabitch. Before installing the new bushings I did clean up the inner race on some control arms that had some rust. Fortunately the rust was pretty minor. I used a wirewheel and then applied some rust preventer to make sure it neutralized any rust. To install bushings I just apply some handsoap on the rubber bushings and inner race of the control arm and either pressed them in or used the threaded rod.
Most of the arms went back in the car fine. On a couple the bushings were about a 1/16" off so I just used a simple C clamp to shift the bushing over so it fit between the chassis points. Here's the suspension mostly back together in the rear. I just used IL Motorsport bushings.
I got new reman rear calipers and stainless brake lines I'll install and install the new swaybar and the rear should be back together. I have fresh new alignment bolts as well. These are wear items on track cars. I'm using SM rear caliper brackets to use the larger rear sport rotors in the rear. I am also touching up a couple rust spots on the chassis I come across. I hit them with a sanding disc, then rust preventer, then primer and paint. The only annoying thing about using a rust remover is they say to wait 3 days before painting. Not too big a deal, but you can't do everything in one day. I did install some mazda comp motor mounts but there are no pictures to show.
The one decision I have been on the fence on is removing power steering. I've been thinking about keeping it as it'd make street driving and maneuvering easier but I'm leaning towards just depowering the rack at this point. I did some googling and the power steering system does have some issues on track and a depowered rack seems like a good way to just avoid these headaches. I'm a little surprised no one makes an underdrive pulley for the miata power steering pump but I guess that's just because people remove it. That might not be a bad partial solution. It seems like a bigger PS cooler is pretty much required if you want to keep PS as the pump just heats up the fluid too much. It seems like the "proper" depower is to remove the pinion and have it welded so that there's no slop in the mechanism. Anyone done a before and after? It looks like I can ship just the pinion to miatasource and they weld it and ship it back. I'm definitely leaning that way at this point as it'd be a big pita to do down the road. Also removing the PS would declutter a bunch of junk from the engine bay. I'm sure the 245's will add some good resistance and provide a nice workout while at slow speeds.
Car’s looking good man! Just stay off the brakes and surely you won’t have to worry about the rotor hat paint lol. In for the results, I haven’t tried high heat paint on any brake components before.
My on the depowered rack is that you likely won’t notice the difference between welded and non-welded pinion unless you try them back to back. I ran a non-welded pinion with a looped line, and then properly depowered rack and never felt like the steering was sloppy during that time. I then ended up getting a newer rack for cheap and depowered/welded that one. IMO, the welded pinion feels better/more precise, but it wouldn’t be a dealbreaker if I had to drive a car without it. It’s easy enough to get done while the rack is already apart that I’d do it again, though.
I ran my rack depowered with 205s, then 225s, and now 245s. To me, the resistance went up only marginally with tire size. It’s a bit of a pain to parallel park with, but once you’re moving over 5mph it’s easy enough to drive. And I don’t have a ton of upper body strength by any means lol.
Car�s looking good man! Just stay off the brakes and surely you won�t have to worry about the rotor hat paint lol. In for the results, I haven�t tried high heat paint on any brake components before.
Haha thx. Ya I'm not too hopeful to be completely honest but I think the orange just looks like ***** on a green car and at least I don't have to look at the orange for now. I used high temp bbq type paint. I had a couple cans so just used that. I think the temp said 1200F? There are higher temp Rustoleum paints (2000F) but they have very specific instructions and require baking at higher temps (I want to say it said 400F or so?). The wife wouldn't be too happy about me putting some rotors in the oven and the fumes. lol We'll see how it does..
My on the depowered rack is that you likely won�t notice the difference between welded and non-welded pinion unless you try them back to back. I ran a non-welded pinion with a looped line, and then properly depowered rack and never felt like the steering was sloppy during that time. I the. ended up getting a newer rack for cheap and depowered/welded that one. IMO, the welded pinion feels better/more precise, but it wouldn�t be a dealbreaker I�d I had to drive a car without it. It�s easy enough to get done while the rack is already apart that I�d do it again, though.
I ran my rack depowered with 205s, then 225s, and now 245s. To me, the resistance went up only marginally with tire size. It�s a bit of a pain to parallel park with, but once you�re moving over 5mph it�s easy enough to drive. And I don�t have a ton of upper body strength by any means lol.
Thanks I really appreciate the input. I removed power steering on my old hondas many yrs ago but I'm older and a puss now. I'm not a small guy and it's not my daily so it sounds like it should be fine on the street.. I'll probably be pulling the rack in the next week so I'll have to send out the pinion to get welded. Like you said, I might as well if I've got everything apart.
they have very specific instructions and require baking at higher temps (I want to say it said 400F or so?). The wife wouldn't be too happy about me putting some rotors in the oven and the fumes. lol We'll see how it does..
Haha, my dad used to do similar stuff like that. I'd come home and there'd be some sort of part baking in the oven and its counterpart sitting in the freezer to chill. Mom loved it
Yeah, I'd imagine those paint fumes aren't something you'd want wafting through your home lol.
Let us know how the depower and install goes but I think you'll be happy with the end result! Also before and after pics of your forearms!
I'm probably too late with this, but if you haven't already replaced your alignment bolts, have a look at these: SPM HD alignment bolt thread
WRT de-powered steering, we've run ours that way for ~6 years on track, and it's not terrible but it can get tiring in a long session, depending on the track. My wife in particular wasn't overly happy about it, and I elected to go back to power steering (electric) with the K swap. We're both in our 50s, so YMMV depending on age and how many shoulder surgeries you've had...
For those of you that track regularly does everyone pretty much run brake ducts? Question for you guys on wider rubber like 245's is there any rubbing with 3" ducts? Can you not go full lock? Since I have a 99 I don't have a nice foglight mounting spot for brake ducts but getting around to the front suspension and brakes I'm debating adding them before installing the brakes.
Anyone used just brake air guides from honed? https://honeddevelopments.com/produc...air-guide-kit/ I think these work but I don't see many pictures on their website and haven't seen any reviews. They are more popular on hondas but based on the pictures it looks like they are mounted a bit lower and into the airflow on hondas. On the miata it's not clear.
Regarding the rear brakes. I got some remanned calipers and of course one has some issues. The allen adjuster screw for the piston somehow is stripped (as in the allen part) and stuck in the hole.. *smh* I can't rotate it nor get it out. My understanding is I can't retract the piston fully without loosening this adjuster correct? I'm not sure if I should try and remover the caliper piston, drill it out and use an extractor and try to remove it that way, or some other method. I thought about just running it as is but I don't want to be stuck down the road if I swap pads and can't retract the piston. Any thoughts are appreciated. Normally they are just loose and fall out but this one is stuck in there..
Edit: I went back in the garage and messed with it for a bit and no luck, it seems to be semi-seized in the hole which is bizarre. Aren't they all just free floating? I applied some pb blaster, hammered on a torx bit that was snug but it just strips it more..
The driver's side rear I got back together mostly.
I�m running 245 RT660s on 15x9�s on my car and don�t get rub at full lock. Routing is gonna be the biggest factor there, but it�s not hard to get them clear of the tires even with the intercooler tubing and everything else in the general vicinity.
Not sure what the general rule is for braking mods vs horsepower but I ran my Supermiata 11.75x1.1� BBK with no ducts at 210WHP, then added ducts once I bumped my power to ~250. Still haven�t run run into any squishy pedal issues so the systems seem to be doing their jobs. I think It�d be best to go BBK (especially because you can get ducts like Supermiata�s that are integrated and flow air right to where you want it) before adding brake ducts to stock brakes. Maybe others will chime in and say otherwise, though.
I�ve never tried retracting one of those rear caliper pistons without using an Allen, but don�t believe it�s possible. That�s a bummer about the caliper.
I�m running 245 RT660s on 15x9�s on my car and don�t get rub at full lock. Routing is gonna be the biggest factor there, but it�s not hard to get them clear of the tires even with the intercooler tubing and everything else in the general vicinity.
Not sure what the general rule is for braking mods vs horsepower but I ran my Supermiata 11.75x1.1� BBK with no ducts at 210WHP, then added ducts once I bumped my power to ~250. Still haven�t run run into any squishy pedal issues so the systems seem to be doing their jobs. I think It�d be best to go BBK (especially because you can get ducts like Supermiata�s that are integrated and flow air right to where you want it) before adding brake ducts to stock brakes. Maybe others will chime in and say otherwise, though.
Good to hear the ducting doesn't rub even at full lock. I am definitely installing the BBK now. I got the Afco F88 kit from SM. The only debate was whether to add ducting now. I'll cross that bridge later. Just curious did you keep the stock dustshields when going to the BBK or remove them?
With a turbo car, I would definitely go with brake ducts.
I don't have any issues with the ducting rubbing, but I'm running 225s... I zip tied the duct hose to the sway bar to route them as far inboard as possible, but I also don't have any intercooler tubing to get in the way. I use clear vinyl tubing over the zip ties to keep them from abrading the tubing.
Sorry to hear about your brake issues. I don't really have an answer for the retractor, it's been a long time since I messed with those. I considered 'Sport' calipers when upgrading my brakes (1.6 NA), but the diminishing availability and cost of the sport calipers led me to make the jump to FM's Powerlite rear brake kit. It was a little more money up front, but in the long run I've been very happy with them. The parking brake is kind of a joke, but the ease of pad swaps is fantastic.
Good to hear the ducting doesn't rub even at full lock. I am definitely installing the BBK now. I got the Afco F88 kit from SM. The only debate was whether to add ducting now. I'll cross that bridge later. Just curious did you keep the stock dustshields when going to the BBK or remove them?
Stock dust shields get removed when going to the BBK - nice because it saves you a step when you add ducts haha. Jealous you got the Afco kit. They dropped it right after I bought my SM F88 Wilwood kit haha.
Well it became pretty obvious that the caliper I got was a dud and it had to be replaced. Maybe I should have just kept the calipers I had? They seemed ok (although I'm pretty sure the driver's side ebrake mechanism didn't work properly). Don't fix what ain't broke as they say. I bought these remmaned calipers that appeared to be unused from someone who got them off Rockauto. Brand was Cardone and they were junk. That's what I get for trying to save a few bucks. I tested the ebrake mechanism on the driver's side and realized it wasn't working either.. great.
So, I just bought a couple remanned calipers from Advance auto parts. Nice thing is they're local and if they're ***** I can just bring them back. Well, good news is I got a good passenger side. The ebrake mechanism works perfectly as well as the 4mm allen adjusting mechanism. You snug the 4mm till the piston locks the rotor, then back it off a bit. Easy enough. Unfortunately the driver's side e brake mechanism doesn't seem to work. The 4mm allen seems finicky and sort of works, but the ebrake lever doesn't. Great.. At this point I'm about ready to run it as is since I'm tired of these stupid rear brakes. Mazda clearly chose a very crappy design and mechanism that is problematic. The rotating piston with the ebrake mechanism used on many other cars seems to be much more robust. I bet most companies that reman calipers don't even check the ebrake mechanism except for maybe that it's not seized. I asked a friend and he said spec miata guys just remove the ebrake.. I guess that's one solution. I'm not sure if I'll just leave it w/ one working ebrake or hunt for another fully functional caliper. I'm a bit annoyed and that's a good time to not think about it for a couple days. I guess the "best" solution would probably be to just rebuild the caliper myself.
I will get back to working on the front suspension. I yanked all the PS components so I will remove the rack and mail out the pinion to be welded.
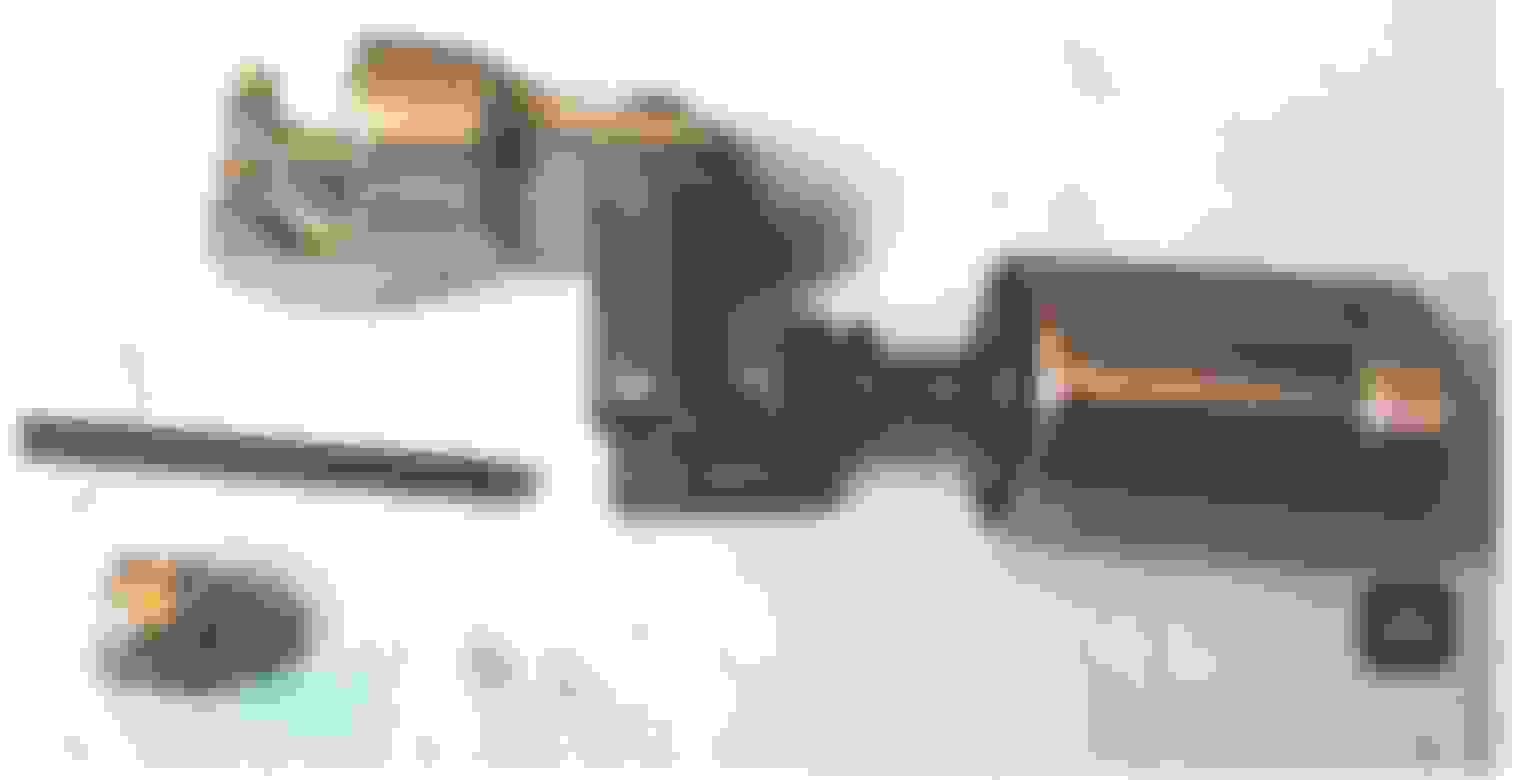
So in the hopes of fixing the caliper the first thing is understanding how it works. It's obviously not that complicated but I found a couple good pictures.
So looking at the picture it's pretty simple. The ebrake lever actuates a pin which pushes a threaded bolt that is in the piston. So, if the ebrake lever is not providing enough clamping force it's either not tight enough against the pin or most likely a worn groove/lever. I think the seals leak over time and some water enters the assembly which adds to further corrosion/wear. Looking at the caliper rebuild kits they don't look to replace the ebrake lever and 4mm allen so any corrosion over time could lead to unreliable operation of the ebrake..
So after some thought I went back out to the car to check the 4mm allen adjuster on the driver's side rear caliper. By operating the ebrake lever I could see the ebrake was engaging but only slightly. I removed the 4mm allen and inspected it. It had some metal shards so I cleaned it and applied fresh grease and put it back in the caliper. At a certain angle I could get the teeth to engage pretty well and I adjust the piston a little deeper. Now the ebrake lever works much better! I'm a little concerned about the allen tooth engagement being bad down the road but I'll cross that bridge later. It seems good enough for now and it's only the ebrake. It's definitely a finicky mechanism.
So quick question for you guys on the rear brakes. How in God's name do you get the spring clips to keep the pads pressing out..? I'm assuming no one runs them because they seemed like much too big a pita and wouldn't stay in place.. I left them out.
Anyway.. I'm getting a bit sick of wrenching on this damn car. I wanna drive it already. Soon enough I hope. I got all the bushings replaced and installed in the front and all the ball joints replaced as well. I bought everything from SM and went with the offset lower ball joints to get a little more camber in front. Got the front suspension mostly back together, just waiting on the stronger SM alignment bolts before I torque everything down. I got the BroFab hubs on and started on the front brakes. I've been working off the garage floor to replace a lot of the control arm bushings which isn't nice on my back.
My workbench is full of crap but I assembled the rotors on the workbench. We'll see how the paint holds up. The black is much nicer than the orange.
Next things to do are drop the steering rack and send off the pinion to get welded. I got a Wilwood MC to replace the stock one and prop valve as well. That'll go in when I finish the BBK install. So many darn things to do. For the 245 17x9.5 setup, do I need to do anything like relocate the front bumper tab or will a straight fender roll suffice? I'm looking fwd to driving this damn thing.
A bit late to influence any decisions but I'll give some feedback anyways.
I've had my steering depowered for most of my 8 years owning my NB2. The only time I don't like it is when parallel parking. I don't think it's great for autocross, at least for me. With high caster settings and turning the wheel almost 90*, I feel my steering inputs get to be less accurate. On the flip side, on track I've gone for up to an hour without feeling tired. The improvement in feel is absolutely worth it for me. I welded the pinion, but there's now a clicking sound when I turn the wheel stationary, so those welds may have broken. Oh well.
With respect to brake cooling, with that monster setup you won't run into any issues without ducts, at least until the turbo. My NB2 has the larger sport brakes and I ran Stoptech Sport pads almost down to the backing plate without issue with my full fat NB2 LS on 205/50R15 RT660s. Am I setting SM times? No, but I'm not at the back of the pack either. Pretty much any pad available for the Superlite/F88 shape should be more than capable of handling the heat. Cooling will help pad life though, so no need to delay it unnecessarily either. The matching Supermiata duct kit is the bulletproof option that will provide better cooling when the time comes, so why mess with half measures like deflectors? Much like the BBK has lower running costs on track than stock brakes, after a few sets of pads the ducts could pay for themselves if you can get more life out of the pads.
Rebuilt rear calipers are a crapshoot, but they're the same price as a rebuild kit so it can be a hard decision. One of my rebuilt calipers had issues with the parking brake constantly falling out of adjustment. It took me a few years to bite the bullet and get another one. No issues since. If you have any more issues and don't want to rebuild, maybe consider buying new?
 01-23-2024, 12:23 PM


 0
0


 Instructions are very straightforward for installation. I opted to leave the rear dustshields off in the rear mainly because I couldn't be bothered to put them on. I'm not sure they make a big difference with or without anyway since the car is not a daily driver.


 on the depowered rack is that you likely won’t notice the difference between welded and non-welded pinion unless you try them back to back. I ran a non-welded pinion with a looped line, and then properly depowered rack and never felt like the steering was sloppy during that time. I then ended up getting a newer rack for cheap and depowered/welded that one. IMO, the welded pinion feels better/more precise, but it wouldn’t be a dealbreaker if I had to drive a car without it. It’s easy enough to get done while the rack is already apart that I’d do it again, though.


 That's what I get for trying to save a few bucks. I tested the ebrake mechanism on the driver's side and realized it wasn't working either.. great.


 It's definitely a finicky mechanism.