Scaxx builds an E46
 01-06-2017, 12:52 PM
#421
Elite Member

Thread Starter
Join Date: Sep 2015
Location: Seattle, WA
Posts: 1,651
Total Cats: 884
Yeah they're ******* sweet. My buddy said "look at the wing on that stang dude" for a half a second I laughed and then immediately realized what it was so I had him drive around the block and stop so I could get pictures haha

Reply
 0
0

0
01-09-2017, 01:21 AM
#422
Elite Member
Thread Starter
Join Date: Sep 2015
Location: Seattle, WA
Posts: 1,651
Total Cats: 884
Well my break will be over in the morning and then it's officially my last semester and 4 months to graduation. Overall I'm happy with how the break went, I finished up the blue miata today, needed a fuel pump and then it started right up, I think it has a vacuum leak but I also didn't actually put clamps on any of the intake pieces so I don't really doubt that. Other than that it runs great, revs quick and is a little loud with an open header. When I get the chance I'll build a nice 2" stainless exhaust for it.
We also finished up my girlfriend's foxbody last night. It's back down on the ground with independent suspension in all four corners now as well as rear disc brakes and 5 lug rear. We're hoping to take it out and give it a test drive on Wednesday when it's not raining and we have a chance to burp the cooling system. Come spring I think we're gonna 5 lug swap the front and get some meaty tires on all 4 corners. The cobra wheels look sweet and now they need some meat to match.
Headlights are coming along and I had hoped to finish them today but I did a repair on my buddy's snowmobile and that took all day long. The actual repair didn't take long, it was tearing the entire snowmobile apart to get to the damn heat exchanger. However one side is pretty much done, it adjusts in all direction and now I'm just duplicating that on the other side. All in all I got a lot accomplished this break while still hanging out with family and friends so I guess it's back to the grind for a little while and then out into the real world. Starting to look for jobs now too which is fun.
Cars:

Headlights:
Snowmobile:
We also finished up my girlfriend's foxbody last night. It's back down on the ground with independent suspension in all four corners now as well as rear disc brakes and 5 lug rear. We're hoping to take it out and give it a test drive on Wednesday when it's not raining and we have a chance to burp the cooling system. Come spring I think we're gonna 5 lug swap the front and get some meaty tires on all 4 corners. The cobra wheels look sweet and now they need some meat to match.
Headlights are coming along and I had hoped to finish them today but I did a repair on my buddy's snowmobile and that took all day long. The actual repair didn't take long, it was tearing the entire snowmobile apart to get to the damn heat exchanger. However one side is pretty much done, it adjusts in all direction and now I'm just duplicating that on the other side. All in all I got a lot accomplished this break while still hanging out with family and friends so I guess it's back to the grind for a little while and then out into the real world. Starting to look for jobs now too which is fun.
Cars:

Headlights:

Snowmobile:

Reply
0
0
01-15-2017, 11:49 PM
#423
Elite Member
Thread Starter
Join Date: Sep 2015
Location: Seattle, WA
Posts: 1,651
Total Cats: 884
Driving down to Oregon tomorrow to buy a bender from Rogue Fab. Gonna need it for a fab project I'm most likely doing for one of the cities around here and I should be able to make some side cash with it doing rollcages/tube fronts for friends. Hoping it'll pay itself off in a year or so. Also I figure that's a hell of a resume builder for an engineer.
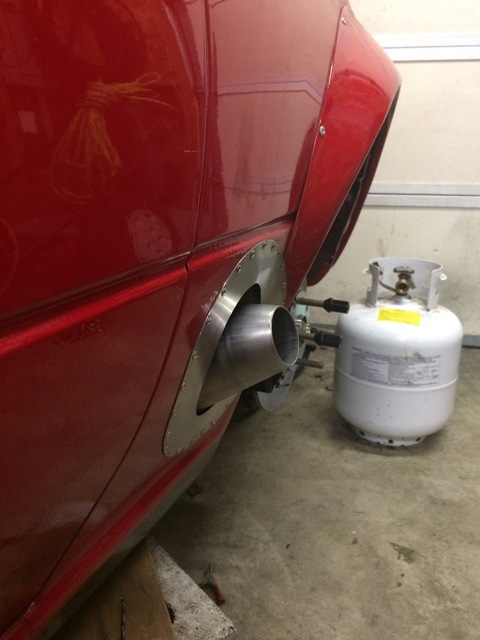
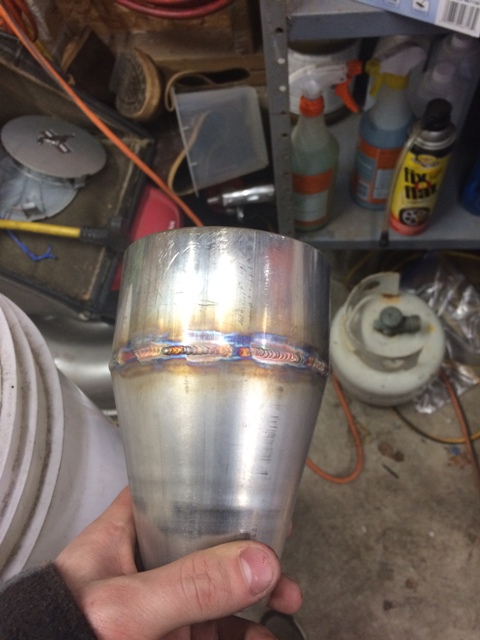
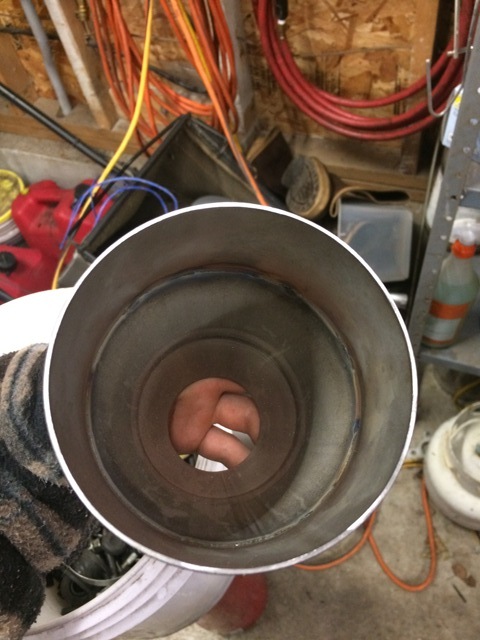
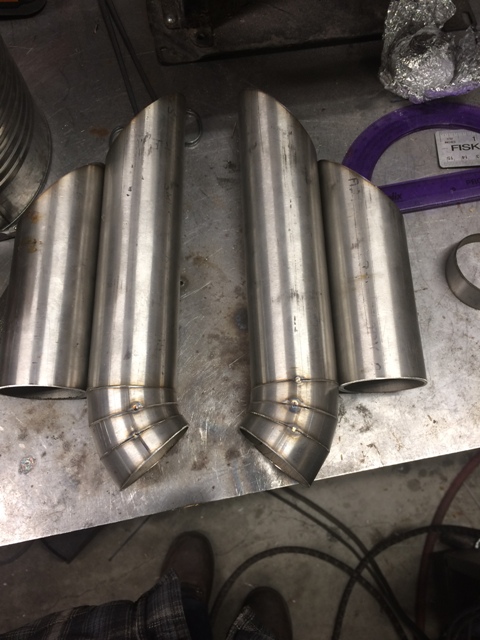
Finished my headlights, they're all wired up and shining bright. The real test will be when they're on the road but I'm officially legal. Also started the experiment of seeing if I can make it a little quieter for street driving, not sure if the cone will do much or anything at all but it was a christmas gift and it's worth a shot. This'll be my first test to see if I can get it quieter. The idea is to record the level with the normal tip, then put the cone tip on and see if it makes a difference. If so then start cutting the tip at an angle to both open the passage and match the angle of the exhaust. Then it will get placed inside one of the other tips so that it doesn't look stupid as **** like it does right now. Haven't welded or practiced on any stainless for a while so my consistency was a little off and there was a small area where the pen was a little lower than I would have liked but not horrible for just picking up the torch and going for it. Purge was real nice. Like I said, not sure if this will work or not, but it's worth a shot, if it doesn't there goes like ten minutes of my time so it's not like it's a big deal.
Last but not least I'm building a quad exit for my buddy's bike, he's always wanted one but didn't have the welding ability. So yeah, that's what I've been up to this week. School looks like less hw/tests this semester but way more work one projects and ****, trying to do as much car stuff as possible at the start cause I won't get much done for the rest.
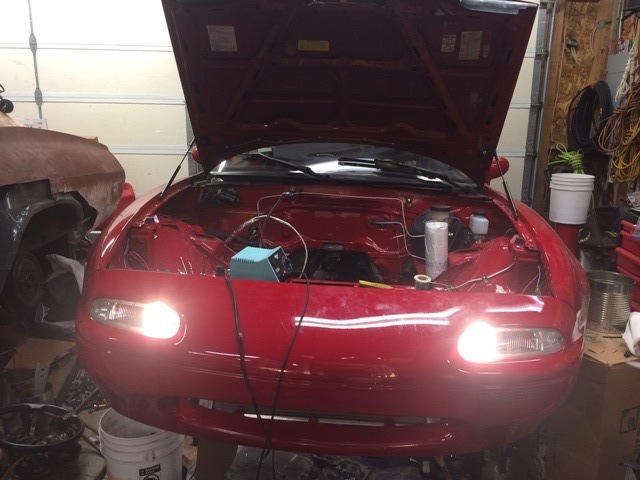
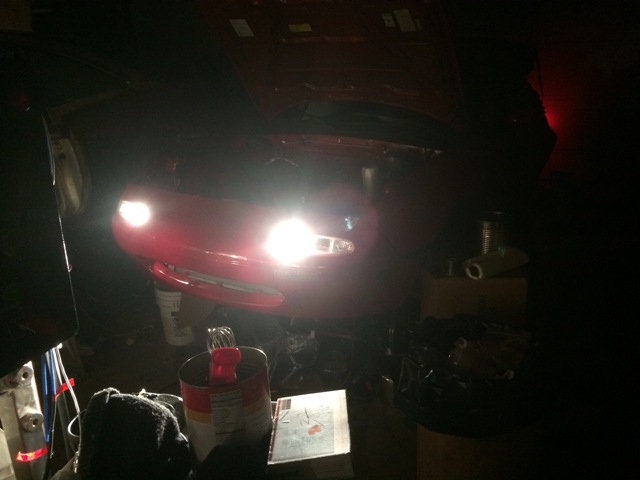


Reply
1
1

 01-16-2017, 10:56 AM
#426

i ordered the rouge fab bender a few years ago. Love it! you'll really enjoy that thing. top tip, mount it on wheels so you can move it around your shop. it's a heavy unit to move around.
__________________
OG Racing
Your Source For Motorsports Safety Equipment
WWW.OGRACING.COM
800.934.9112
703.430.3303
info@ogracing.com
OG Racing
Your Source For Motorsports Safety Equipment
WWW.OGRACING.COM
800.934.9112
703.430.3303
info@ogracing.com
Reply
0
0
01-18-2017, 12:02 AM
#428
Elite Member
Thread Starter
Join Date: Sep 2015
Location: Seattle, WA
Posts: 1,651
Total Cats: 884
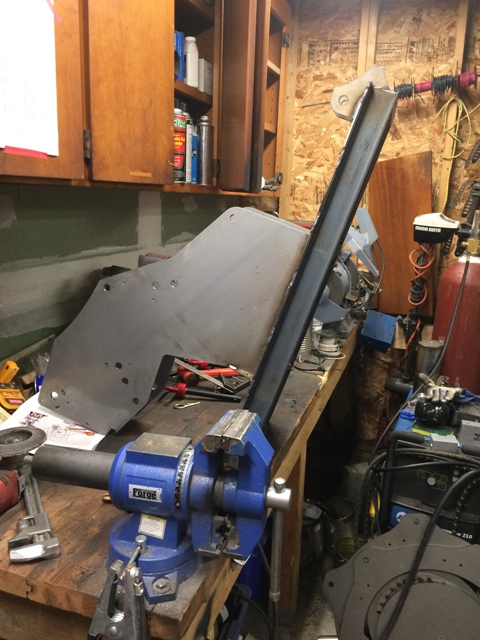
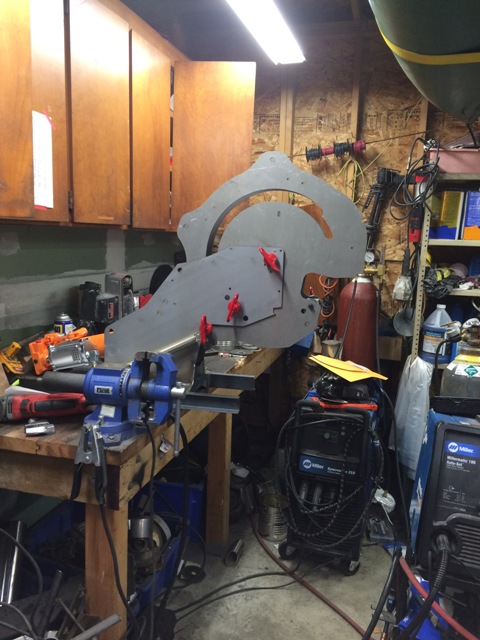
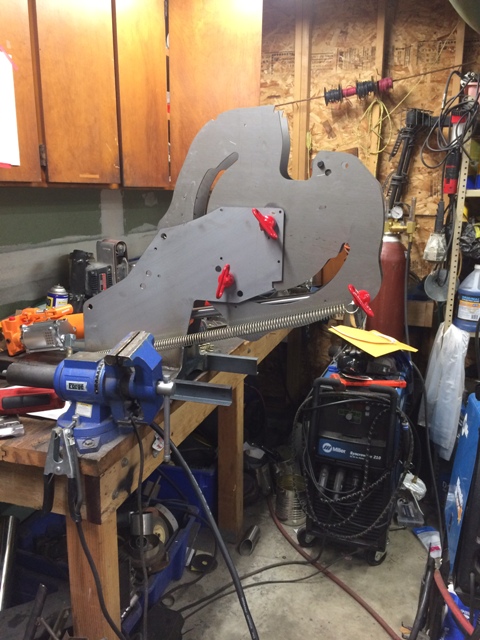
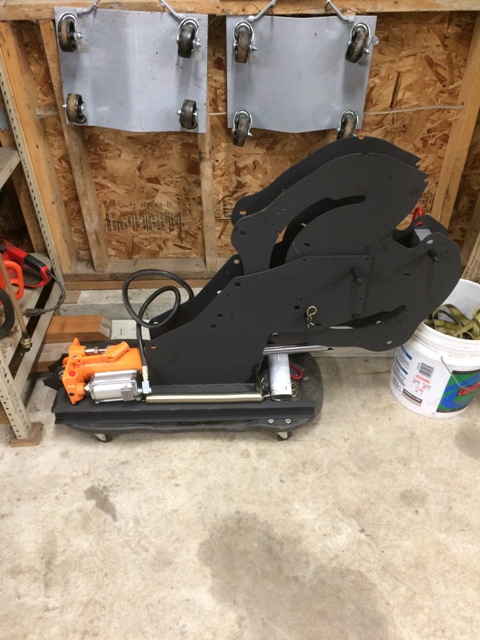
Picked up the tubing bender yesterday and it's pretty sweet. As my girlfriend put it, it's like IKEA for fabricators cause you kinda piece everything together and then weld it all up. Took about two hours and I probably could have done it quicker but I get really nervous about things not being perfect so it was a measure twenty times, weld once type of thing. First thing I noticed was how well it went together, it's built very well. The other thing that I'm looking forward to testing out is how far it can bend a tube in one setting. The last tubing bender that I used stopped just shy of 60* and this is supposed to go to 95*, that's gonna come real in handy for doing, well, anything.
Welding
All together
Extended
Welding

All together

Extended

Reply
0
0
01-18-2017, 10:06 AM
#429
you'll love it.
__________________
OG Racing
Your Source For Motorsports Safety Equipment
WWW.OGRACING.COM
800.934.9112
703.430.3303
info@ogracing.com
OG Racing
Your Source For Motorsports Safety Equipment
WWW.OGRACING.COM
800.934.9112
703.430.3303
info@ogracing.com
Reply
0
0
01-22-2017, 06:53 PM
#430
Elite Member
Thread Starter
Join Date: Sep 2015
Location: Seattle, WA
Posts: 1,651
Total Cats: 884
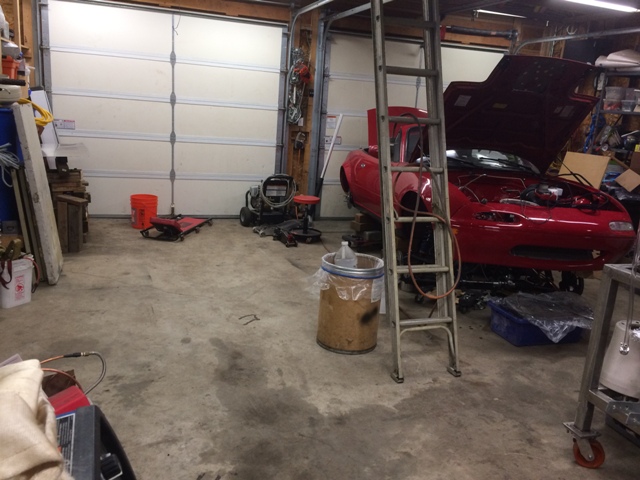
We sold the impala! Yes that massive heap of metal on the other side of the garage, it's all gone! Cleared up a ton of space and we're gonna do some reorganizing in the garage. Eventually the karmann ghia we have will go on that side but either way we got rid of a ton of parts as well as a massive body in the garage, pretty excited that it's gone.
Reply
0
0
02-03-2017, 12:58 AM
#431
Elite Member
Thread Starter
Join Date: Sep 2015
Location: Seattle, WA
Posts: 1,651
Total Cats: 884
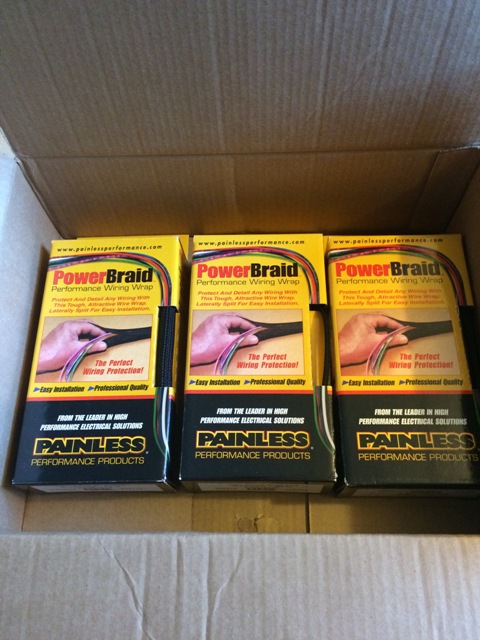
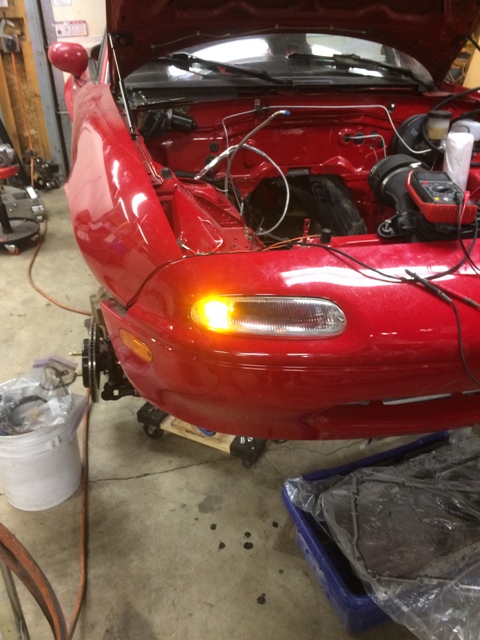
Well not a whole lot has happened. We got rid of the impala which was massive, freed up a ton of space in the garage and I've spent most my hours in the shop re-organizing and throwing things away. Still a long ways to go but it's getting better and I'm done cleaning for a little while. I got some of that powerbraid stuff from painless which is nice, I like the look of it and stray wires drive me off the walls. Note to people buying that stuff, the smallest and smaller stuff can be kinda useless, like it fits over 1, maybe two wires so it's a waste to buy that, just get the bigger stuff. Live and learn though I guess. I got some cheap LED lights off amazon, they're like $7 for two, the lens had to be glued on cause they fall off and the leads like to break but they're nice and bright and cheap enough that you can just buy multiple sets. Work perfectly for my turn signals. Tested those out tonight and you can definitely see them well.
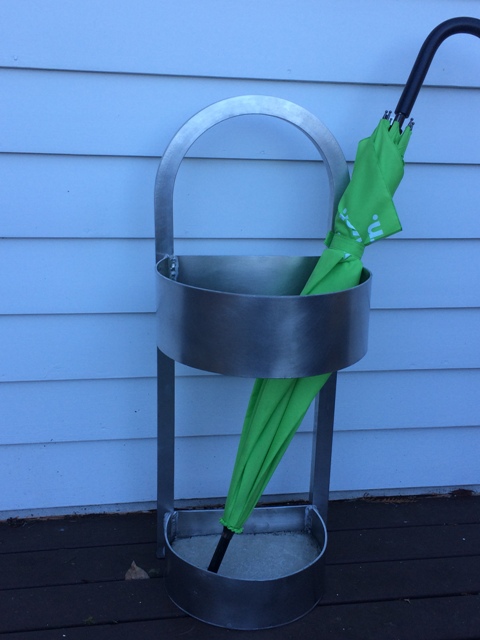
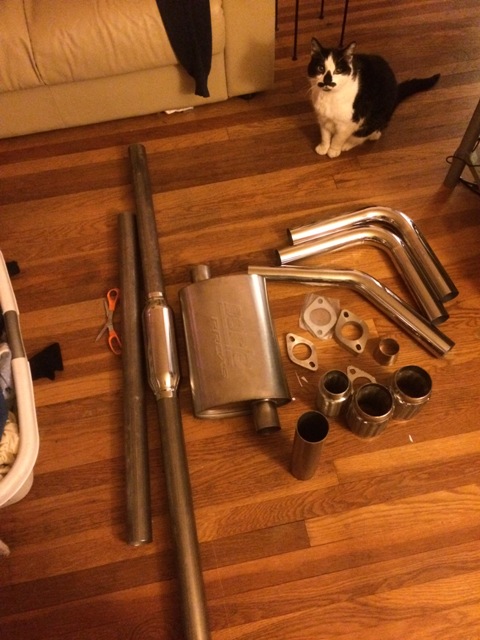
As for other stuff, I built an umbrella stand with the tubing bender and it came out pretty nice. I also painted it yesterday. And I got all the exhaust components for the blue car. All stainless, 2.25" from the header back, resonator and a borla muffler as well as a flex tube. Should be a pretty nice exhaust and I'm hoping it's sporty enough for my dad but quiet enough for my mom. Honestly kinda jealous of their miata now, gonna be a fun little run around town car. I have a bunch of other people's projects that I need to do before the miata's exhaust but the nice thing is I can pull cars into the garage now instead of working outside, really nice to not have the impala there anymore.
Trying to be patient with the engine but starting to get a little more impatient since the weather is getting into the high fourties/low fifties and soon enough it'll be warm enough to bring my tires back outside. Really wanna have the car running before that. Should only take me one, two days max to put it all back together once I have the engine.
Look at all the room for activities!
Umbrella Stand
Bender Painted
Ignore the alligator clips and stuff, it was for testing the turn signals
Working turn signals, bright too
Cat is not amused
As for other stuff, I built an umbrella stand with the tubing bender and it came out pretty nice. I also painted it yesterday. And I got all the exhaust components for the blue car. All stainless, 2.25" from the header back, resonator and a borla muffler as well as a flex tube. Should be a pretty nice exhaust and I'm hoping it's sporty enough for my dad but quiet enough for my mom. Honestly kinda jealous of their miata now, gonna be a fun little run around town car. I have a bunch of other people's projects that I need to do before the miata's exhaust but the nice thing is I can pull cars into the garage now instead of working outside, really nice to not have the impala there anymore.
Trying to be patient with the engine but starting to get a little more impatient since the weather is getting into the high fourties/low fifties and soon enough it'll be warm enough to bring my tires back outside. Really wanna have the car running before that. Should only take me one, two days max to put it all back together once I have the engine.
Look at all the room for activities!

Umbrella Stand

Bender Painted


Ignore the alligator clips and stuff, it was for testing the turn signals

Working turn signals, bright too

Cat is not amused

Reply
0
0
02-05-2017, 11:00 PM
#432
Elite Member
Thread Starter
Join Date: Sep 2015
Location: Seattle, WA
Posts: 1,651
Total Cats: 884
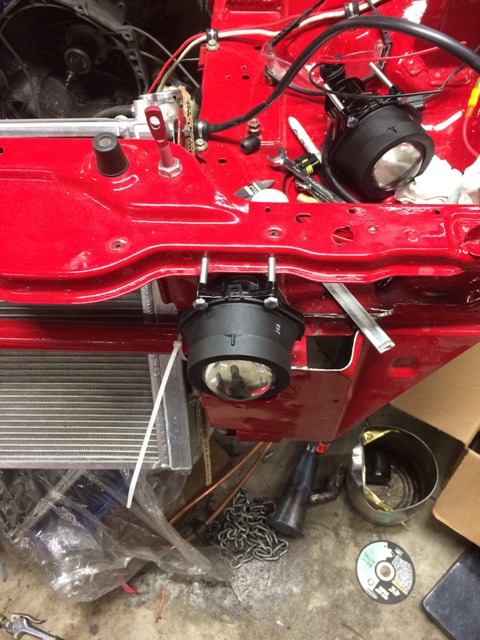
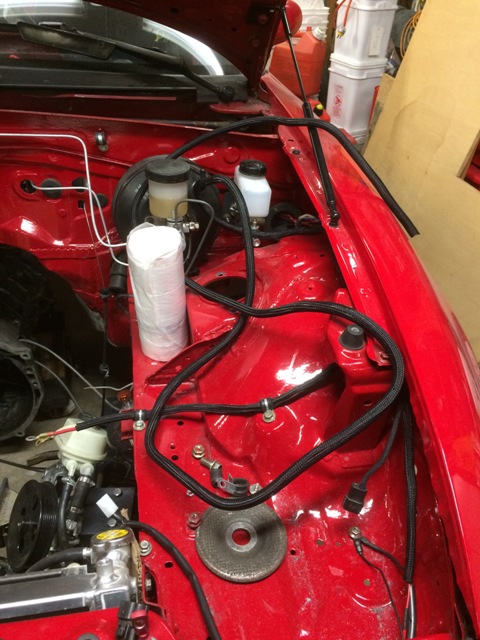
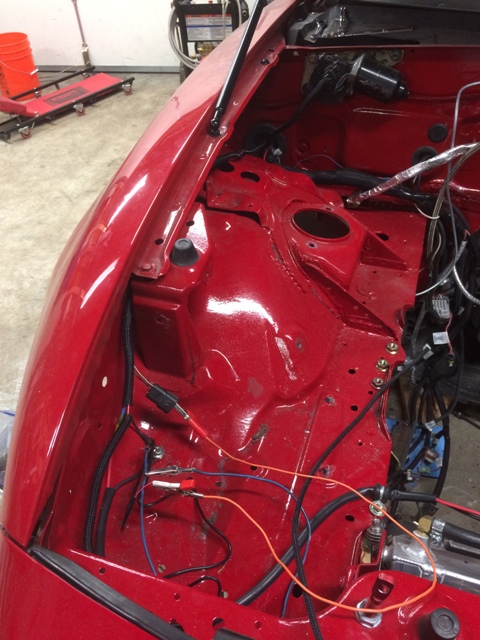
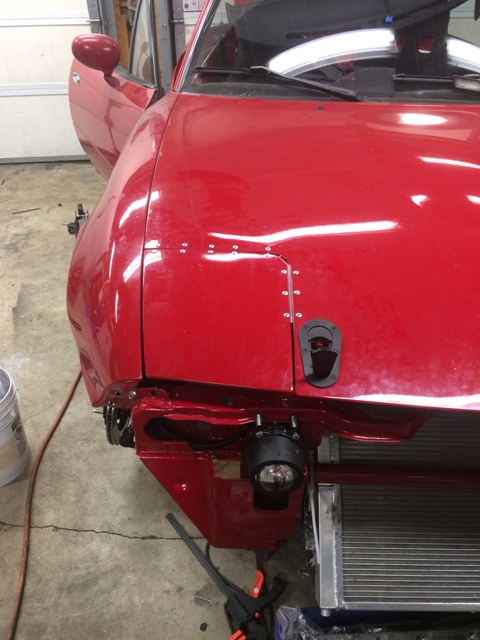
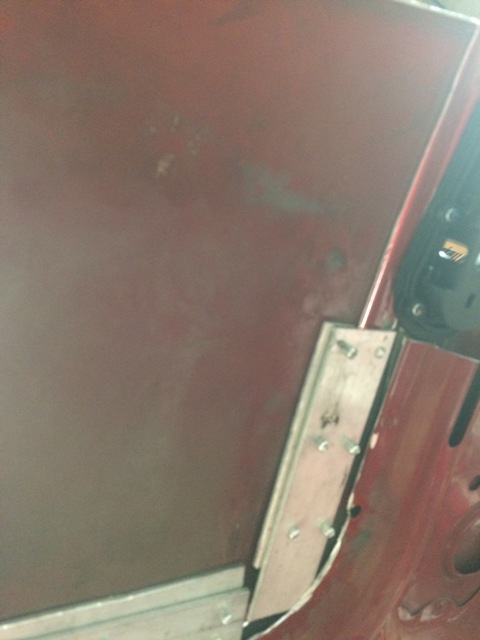
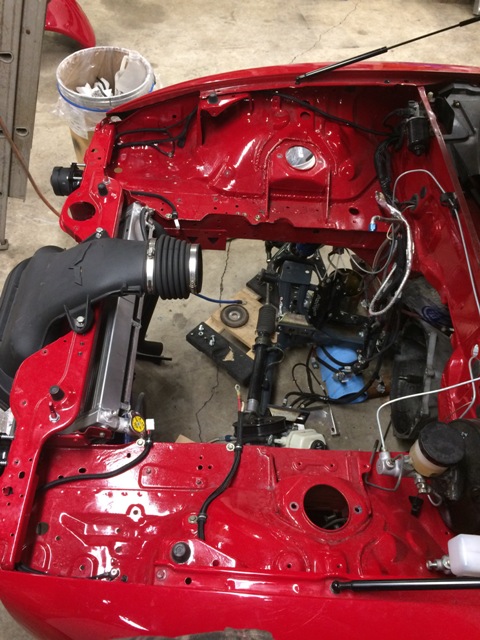
Made some light brackets for a dudes truck today and then got my passenger side headlight lid attached to the hood. Also finished the wire wrap in the engine bay yesterday, looks better than stray wires running around. The headlight lids came out alright, they could have come out better, trying to figure out a way to make them look a little less, I don't know, out of place on the underside? I used 1/8" aluminum and basically had it double stacked under the lid and then riveted it to the hood. I guess when I get the ccp hood it won't bother me anymore, still the underside kinda annoys me but I'm not sure how to make it look much better. Also ccp is making a fastback now, gonna be real tempting once I have a job, I've wanted a fastback for years. Also somehow my dumbass missed the line I drew by like a quarter inch for where I was gonna put a rivet so the space isn't completely even between two of the rivets, that's gonna bug the **** out of me everytime I look at it. Still don't know how I did that when I marked the hood for where to drill. Here's a couple pictures of what it looks like on top and bottom as well as the wiring.


Reply
0
0


 02-07-2017, 07:11 PM
#435
Elite Member
Thread Starter
Join Date: Sep 2015
Location: Seattle, WA
Posts: 1,651
Total Cats: 884
Also, just dropped by the machine shop to drop off the heads after getting off the phone with the guy. Looks like we're gonna aim for low 11s for the compression and since he's starting to work on the engine it should only be a few weeks until it's done. March was my original hope for when the engine gets here so hopefully that happens.

Strangely relevant all of a sudden since my buddies convinced to come with them to racewars. First weekend of April so I guess I'll get some experience drag racing. My buddy with the 1j 240 has $500 on a race, not sure how good of an idea that was, but it's not my money at least!
 There's also the highschool drags in early May and since they extended the age for eligibility to 23, a couple of my buddies and I are gonna show up and surprise our old autos teacher since he's been talking **** about me for the last 5 years. Should be kinda funny.
As far as driving in things that aren't straight lines, the first autox is the first weekend of march so I think I'm gonna miss that one but hopefully I'll get out to the next one and then you guys can watch my shitty driving make me do 360's lol. Also gonna sign up for MRLS when it opens.
Reply
0
0
02-07-2017, 07:26 PM
#437
Elite Member
Thread Starter
Join Date: Sep 2015
Location: Seattle, WA
Posts: 1,651
Total Cats: 884
I did need to trim down the sides of the cover a tiny bit so that the top piece of aluminum sat kinda flush with the edge but that just took a minute with the bench grinder/carbide bits
Reply
0
0
 02-12-2017, 01:52 PM
#439
Elite Member
Thread Starter
Join Date: Sep 2015
Location: Seattle, WA
Posts: 1,651
Total Cats: 884
Thanks man, I appreciate it, hopefully more progress in a few weeks!
Well, I got some good news, I just got asked to make 40 more of those umbrella stands for the city. The pay isn't amazing (for that type of project) and a decent chunk will be invested into tools for the project but it is a killer resume buffer for a starting engineer and it's also money that I wouldn't have otherwise. Luckily they don't need them right away so I can wait until the end of the school year until I start building them which is good. But this should give me some money for the engine and other stuff which is really helpful. Hoping to buy a die for 1.5" tubing and some tube after that project's done and start looking into building Audrey a cage.
Also started making a shift **** for Audrey since the one that came with the t56 blows, it's feather light and the shifter is already notchy enough. I guess maybe it's just from being spoiled with miata transmissions but the t56 sucks as far as shifter feel. I made a shift **** out of 304 one time and despite people telling me it was gonna be a total bitch to machine it actually wasn't bad at all and the surface finish came out beautiful, it was just slow going. Going to try 303 this time though just to see the differences.
Reply
0
0
02-13-2017, 12:31 AM
#440
Elite Member
Thread Starter
Join Date: Sep 2015
Location: Seattle, WA
Posts: 1,651
Total Cats: 884
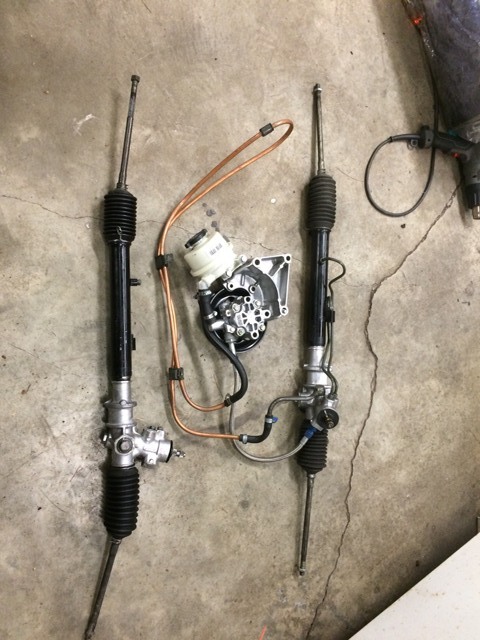
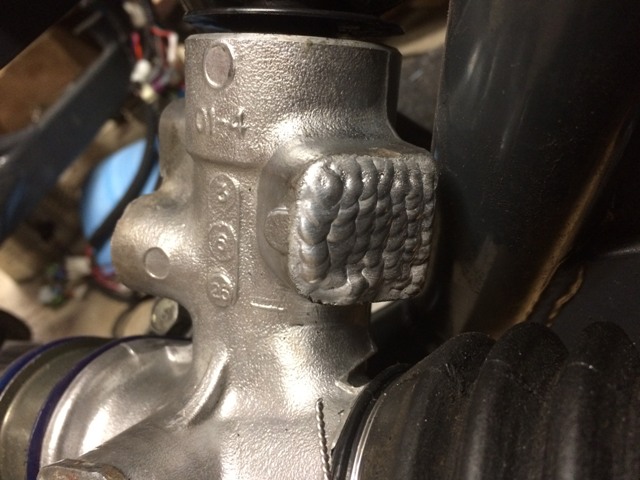
Got some work done today. I started a proper de-power on one of my spare steering racks a while back because when I was driving the car around the steering felt a little too light. I have manual steering in Brad and while I'm not fond of the higher ratio I do enjoy the improved steering feel. Long story short I was having a shitty day when I started to depower in and never finished so today I decided to go ahead and finish it. Pulled all the seals and welded the pinion. I'm keeping the whole power steering set up in another bin in case I don't like the depowered rack as much as I thought I would. I realize I'll probably miss it for autox but I can just deal with it I guess.
Another advantage is that the whole power steering pump and everything is heavy, with fluid in it the whole set up ways 13lb more than the depowered set up. If anyone was wondering, a power steering rack that's been depowered weighs 12 lb. Had some fun sealing the holes and ran some beads across the surface.
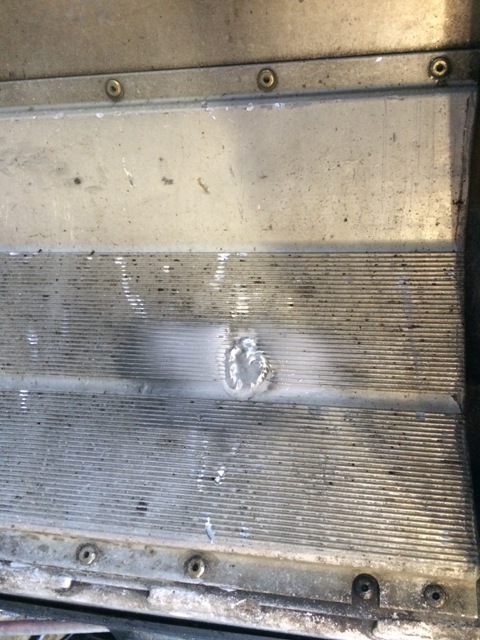
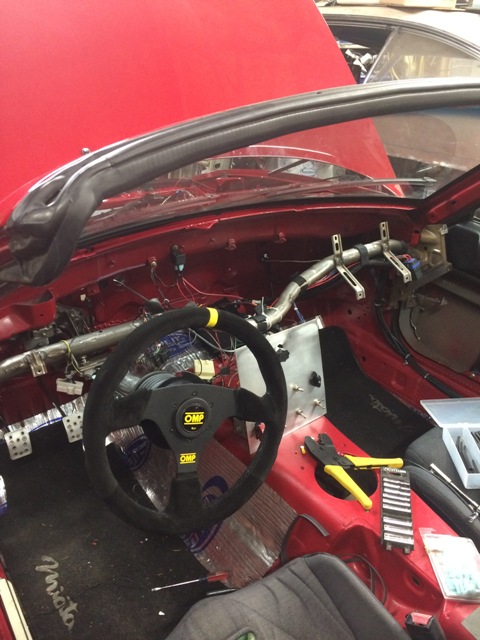
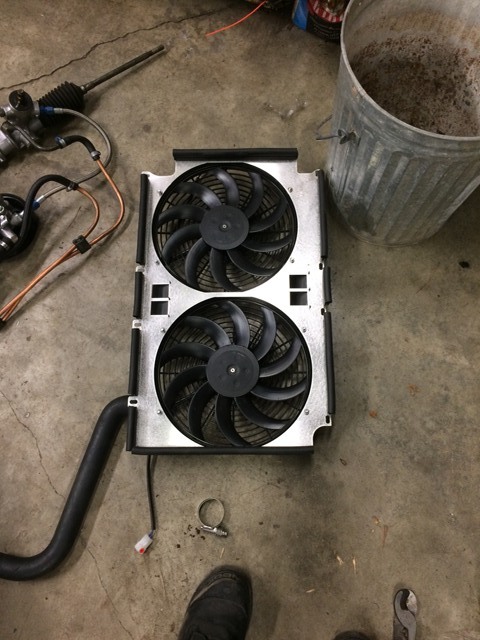
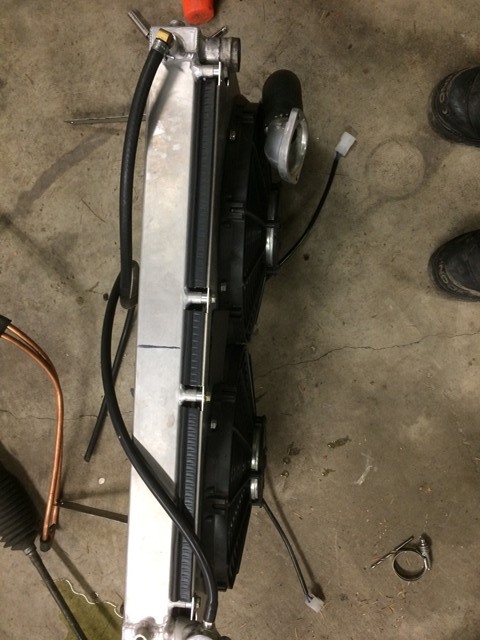
I also decided to add the weatherstripping to the radiator so the shroud is actually sealed. Something I skipped during mock up during the build and then never got around to. Just one more little thing. Feels good to be getting the stuff that I skipped originally done.
Another advantage is that the whole power steering pump and everything is heavy, with fluid in it the whole set up ways 13lb more than the depowered set up. If anyone was wondering, a power steering rack that's been depowered weighs 12 lb. Had some fun sealing the holes and ran some beads across the surface.


I also decided to add the weatherstripping to the radiator so the shroud is actually sealed. Something I skipped during mock up during the build and then never got around to. Just one more little thing. Feels good to be getting the stuff that I skipped originally done.


Reply
0
0


