When you click on links to various merchants on this site and make a purchase, this can result in this site earning a commission. Affiliate programs and affiliations include, but are not limited to, the eBay Partner Network.
I just got my hands on a 2012-2015 factory camaro service manual in pdf form that extensively covers the 3.6 lfx. PM me your email if anyone wants a copy.
A few things showed up today... Xida's with billet coaxial uppers, V8R oilpan, new front sway bar (smaller per 949's recommendation) and V8R rear lower control arms. The rear upper control arms should be coming soon along with the engine harness. This is plenty to keep me busy over the weekend and finally get the engine in the car.
Quick question on the brake booster hose... The old miata brake booster hose I pulled off has a check valve built into it and will not reach to the LFX manifold port for the brake booster. What is everyone using to replace this hose with the LFX swap?
If you are keeping the metal tub the booster hoses connect to on the firewall as in your earlier pic, then you can put whatever new hose you need to on the end opposite the booster to connect to the vacuum port on the engine.
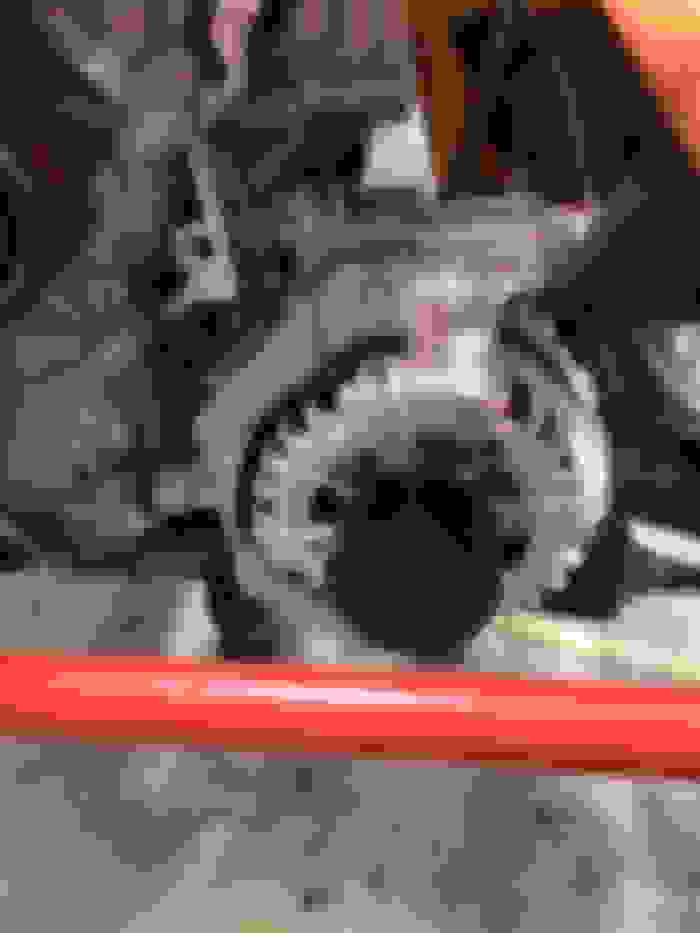
So I'm about to put the new oil pan on and the old Oil Pump Pickup Tube O-Ring looks quite a bit different than the new one. Normally I would send it, but I do not want to have to remove the pan again once the engine is in the car. The old one also has a decent indention in the top that makes me hesitant to reuse it. The part number on the bag is the new one, and the old one is on the left. They go to the oil pump inlet where it meets the block (pictured below them).
Everything I have seen confirms this is the correct part. Anyone who has done the oil pan swap, did you get a new o-ring?
Quick reference for anyone who might need this. The Luk LFX flywheel/clutch kit everyone uses from Summit does not come with flywheel or pressure plate bolts. The part numbers are below.
The flywheel bolts already come with blue thread locker on them, but the factory service manual calls for 262 red loctite to be used on the flywheel bolts and torqued to 49 ft/lbs.
Xida's and V8R rear upper and lower control arms are on. The uppers were a battle. Lowers went on without issue. Gawd damn those Xida's are pretty! Also got the flywheel on but still waiting for the clutch to flywheel bolts and they should be here Friday. If you aren't running power steering or ac and the factory balancer, I believe the proper belt length is 80". Have one on order and will confirm once I receive it. The belt I ordered is at the link below.
Anyone else have an issue with the lowest bolt on the passenger side engine mount (connects to oil pan) being too long? My engine is a 2015, so I'm thinking that might be it, but the bolt is bottoming out and needs to be 10mm shorter. Just wanted to confirm before I cut it.
Engine is finally in. Took three guys three hours to drop it in from above. Few recommendations for anyone doing this with an Exocet in the future...
1) Get the subframe bolts in and lower the subframe as much as you can while the bolts are loose but still attached.
2) Get a nice high lift floor jack on the rear of the transmission to help align everything.
3) Loosely attach the engine mounts to the subframe, not the engine.
4) Remove the alternator. It will not fit in the car attached to the engine.
My alternator isn't even close to clearing the Exo frame tubes. I hit up DJWade for his alternator bracket CAD plans, I'm going to need them.
Oh, and did a test fit on the hood... not even close to clearing the raised Overkill intake.
Anyone else have an issue with the lowest bolt on the passenger side engine mount (connects to oil pan) being too long? My engine is a 2015, so I'm thinking that might be it, but the bolt is bottoming out and needs to be 10mm shorter. Just wanted to confirm before I cut it.
Hey Luke, I just test fit my 2015 two weeks ago, but been out of town since. I know one bolt bottomed out too, not sure which one off the top of my head. I also need new bolts for the transmission (mv5) they are too long too. I�ll check when I get back home in a week and let you know for sure which bolt it is. (Also going to start a build thread soon, I believe you are a bit further along than me.). Also going to PM you about the manual, would love a copy. Fyi...your car looks great!
Hey Luke, I just test fit my 2015 two weeks ago, but been out of town since. I know one bolt bottomed out too, not sure which one off the top of my head. I also need new bolts for the transmission (mv5) they are too long too. I�ll check when I get back home in a week and let you know for sure which bolt it is. (Also going to start a build thread soon, I believe you are a bit further along than me.). Also going to PM you about the manual, would love a copy. Fyi...your car looks great!
Thanks! Yeah, I ended up cutting about 10mm off of the bolt that goes into the oil pan and it fit fine after that.
Just an fyi for anyone doing an exocet LFX, I'm working with a friend to do a CAD oem alternator bracket that flips the alternator 180 degrees to get the stud away from the subframe and drops it a couple inches to clear the exo frame. Once I get it finished I'll post the CAD file so anyone can have it made. It is the one part of the build there doesn't seem to be a good solution for yet.
Finally figured out what I'm doing with the exhaust. There were a few important criteria for me. I want an H pipe because I love the sound, I also want a single muffler (two won't fit) and I wanted a side exit. I originally wanted to use titanium, but the cost started getting ridiculous and the parts I needed didn't exist in many cases in titanium. Stainless on the other hand is the standard and I can get pretty much anything made fairly easily or off the shelf.
Called up Spintech in Cali and came up with a solution. There is no way I could fit mufflers or an H pipe with a front side exit, and I also didn't want to breath exhaust fumes. So I'm going to run the Keisler stainless downpipes to dual 2.5" tubes. Put the H pipe right after the trans in the tunnel and the muffler after that. Then run the dual exits from the muffler to 5"x1" stainless ovals that go under the exo floor and exit in front of the rear wheels. Spintech is making the ovals, muffler and transitions to the ovals from the round tube for me, so it should be fairly easy to weld up with some appropriate bends once I get all the pieces. I'll post pics as it comes together, but very excited to see the exhaust come to fruition.
Ended up doing a lot more custom fab on this build than I anticipated, but all good. Learning a ton as I go.
Tried finding a solution to mount the oem alternator on the passenger side. No way it was going to fit without a completely custom bracket and even then some cutting on the subframe. Decided to try the driver side and it fits like a charm. You can cut the factory alternator mount to make it pretty clean without a lot of fab. Still need to weld up the top bracket, but it aligns perfectly for the belt in this location.
That looks great (OEM for the engine) & best solution to your problem too. I know you have a little extra work with the wiring harness now, but I think you choose the simplest fix. Belt alignment and everything looks great! Nice Job!


 2
2