When you click on links to various merchants on this site and make a purchase, this can result in this site earning a commission. Affiliate programs and affiliations include, but are not limited to, the eBay Partner Network.
Keisler was nice enough to extend the alternator plug so I should have no problem moving it over to the passenger side. Engine harness gets here today, so it will be going on this weekend. The rest of the exhaust gets here next week.
Made progress on the Driver side downpipe and the passenger side is already mocked up and needs to be welded. Not thrilled with my stainless welds, but they are good enough. The Keisler downpipes are a work of art. Shame I had to cut them, but they were made for the RX8 and I wanted the 2.5" opening. Very happy with the trans mount I made. There were no off the shelf options since I'm using an MV7 trans and the exocet tunnel made it a bit challenging. Sent the trans mount out today for powdercoat. Just need to weld up the upper and lower coolant pipes and get the chassis wiring done and the car should be ready to run. I had my miata driveshaft cut and modified to adapt to the MV7. Ended up being only $350 so pretty happy with that versus a $1,000 new custom driveshaft.
That looks great (OEM for the engine) & best solution to your problem too. I know you have a little extra work with the wiring harness now, but I think you choose the simplest fix. Belt alignment and everything looks great! Nice Job!
Thanks! This is coming along nicely. It's been a **** ton of work, but that has actually made it a lot cooler since I'm fabricating a lot of parts.
Current to do list. Knocked a ton off of this recently and should be able to finish in the next 30 days hopefully!
To Do:
Weld Driver Side Exhaust Downpipe
Weld Exhaust Back Half
Mount Exhaust
Engine Wiring Harness
Chassis Wiring and Fuse Box
Clean Brake Rotors
Fabricate Clutch Mounting Plate
Change Spark Plugs
Transmission Fuild Fill
Weld Upper and Lower Coolant Pipes
Powdercoat Transmssion Mount
Install 6-Point Harnesses
Mount Coolant Overflow Can
Install MAF and Intake
Install Radiator
Fabricate Upper Bracket for Alternator
Order Front Driveshaft Bolts
Mount Drivehsaft
Get Shifter from V8R
Get Engine Cover from V8R
Making good progress this weekend. Engine harness is on, both downpipes are welded and on, alternator relocated with upper bracket, drive belt on, fresh oil in the motor, intake installed and driveshaft installed. I still need to finish the wiring and fabricate the upper and lower coolant pipes and then I think it is ready to test start. Pretty damn close!
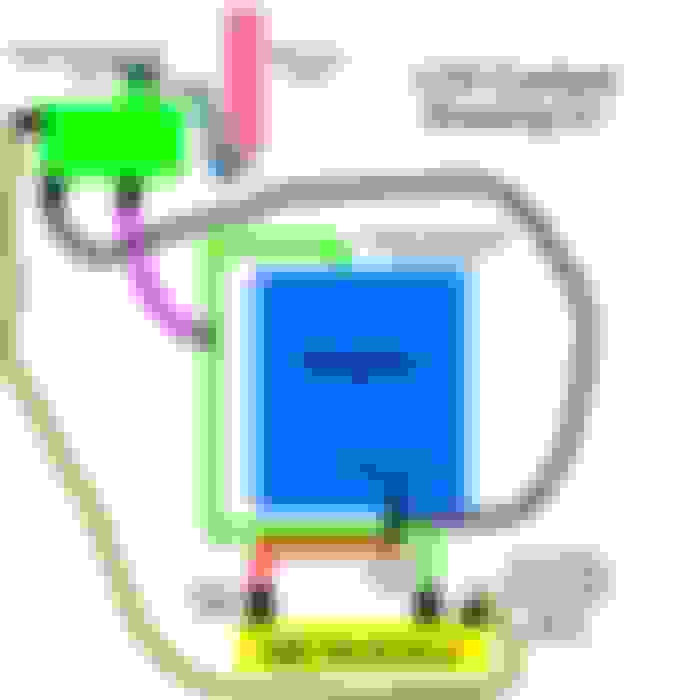
Looking for some feedback on my proposed coolant routing. I've talked with a few people now and I believe this is correct, but just want to be sure. The Radium expansion tank will have a 22psi cap.
Dark purple is the steam vent? Not sure what the mustard line is for.
Edit: Also, you'll need to cap off the miata radiator cap.
Sorry for the rainbow version. Just trying to differentiate all the lines. Radiator cap is removed and welded shut with a 6AN bung where the cap used to be for air to get out of the radiator (mustard line). And Dark Purple is the steam vent.
Don't think the line is required since expansion tanks are more or less self bleeding / the steam port does the exact same function since it's most likely higher than the cap.
Don't think the line is required since expansion tanks are more or less self bleeding / the steam port does the exact same function since it's most likely higher than the cap.
I was looking through Ryan's build thread and he had added the bleed to the radiator so I figured it was necessary. Any idea why he would have it on there?
Edit: After looking at it again I think he has it because the coolant hoses sit lower than the top and wouldn't be removing air from the top of the radiator.
My guess is because he has that substantial rake and the upper hose position is much lower than it would be normally it'd be a bitch to purge naturally.
My guess is because he has that substantial rake and the upper hose position is much lower than it would be normally it'd be a bitch to purge naturally.
Awesome, thanks Brother! You just saved me some time and work.
How does the purple line attach to the green line? The green line is the metal tube that comes out on top of the alternator correct? (I believe gooflophaze found a different one that gives more room and exits below) Are you adding a fitting to the tube to connect purple line or does it attach some other way?
Also, is a recovery tank needed? or are you using that as an extra precaution since track car? I thought (probably wrongly) that the expansion tank also filled the role as the recovery tank.
And thanks for diagraming this out. That has already helped me with thinking about all of this / understanding it.
If I had to do ours over again, I'd just lop off and weld the rad cap neck closed (we didn't have the ability to weld aluminum during the build) - and we'd start with an aluminum expansion tank instead of the Cadillac plastic tank I documented but have since upgraded. Every time I've opened the cap since, our coolant is at the very top of the radiator.
How does the purple line attach to the green line? The green line is the metal tube that comes out on top of the alternator correct? (I believe gooflophaze found a different one that gives more room and exits below) Are you adding a fitting to the tube to connect purple line or does it attach some other way?
Also, is a recovery tank needed? or are you using that as an extra precaution since track car? I thought (probably wrongly) that the expansion tank also filled the role as the recovery tank.
And thanks for diagraming this out. That has already helped me with thinking about all of this / understanding it.
If you have the expansion tank overfilled, it'll purge - generally just the first time it's filled. If you have a loss of pressure, the coolant will boil and that's what the overflow catches - instead of laying coolant down on the track. We just ran a hose down to the subframe to purge it out of the engine bay (since it's right next to the fuseboxes). And I think tech inspectors want to see an catch for the track..
Purple and green don't mix - purple and red exit from the same point though - mixing manifold on the front of the engine.
The radium tank I'm using is pretty bad *** but not cheap. Looks like an excellent solution for this swap paired with the recovery tank I'm getting off of summit.
That's a real nice looking piece, but I'm a little leery of the "vortex" claims. Optimally the expansion tank shouldn't see any "flow", just expansion and somewhere for the steam to condense edit: (at least in the LFX application. In my LS3 I've a repurposed FM Moreoso overflow tank I've welded bungs in that see heater core flow).
OK, we are on the same page with the expansion tank. Thanks for the explanation! I was going to just run the purge hose, but I need to put in a recovery tank too, since building for track. That's a smart move.
I still don't get the Light Purple & Green lines. They look like they are being "T" off from each other in the diagram. How are you attaching the Light Purple line from the expansion tank to the Green line (which is the black metal tube that runs from the back of the block to the front if I'm understanding this correctly.) <-- If this is starting to become a thread jack because of my ignorance, let me know and we can start a new one / discuss when I finally get to this point.
@LukeG -- I like the looks of both of those tanks...They will look great in your car.
All good. Sorry for the chaos on the diagram, but if the lines are a different color they do not touch or connect in any way, unless there is a black connection block on the image.
The light purple line will go to an 8AN steel bung that will be welded on the LFX steel coolant pipe that comes out of the back of the engine. Check the Portabull build thread (link below) for pics showing this. Got the idea from him.


 0
0