The Project In My Garage...
 04-20-2011, 10:27 PM
#41
Elite Member
Thread Starter
iTrader: (33)
Join Date: Jan 2007
Location: Newnan, GA
Posts: 2,518
Total Cats: 30
Front RB sway bar and adjustable end links...installed.
Hydra's knock sensor...installed.
Stock tow hooks...removed.
Carbing tow hooks...installed.
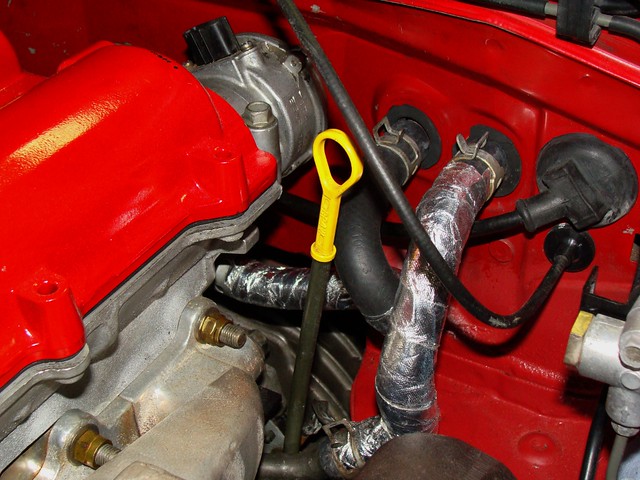
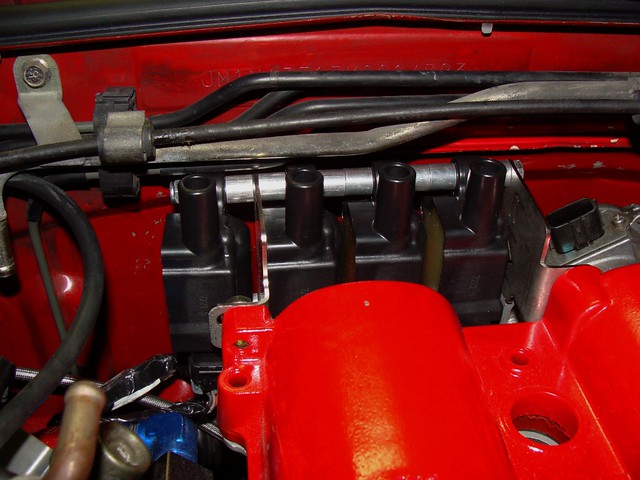
Wrapped the heater hoses and installed them along with the CAS:
Because we needed it out of the way, I removed the alarm system that someone had disabled by just cutting some wires. This one almost took home first prize for worst installation ever too, it was a complete mess. Anyway, I got it all out, patched up the car's wiring, and now there are no more orange wires running across the firewall and green and white wires running all over everywhere else. *sigh*
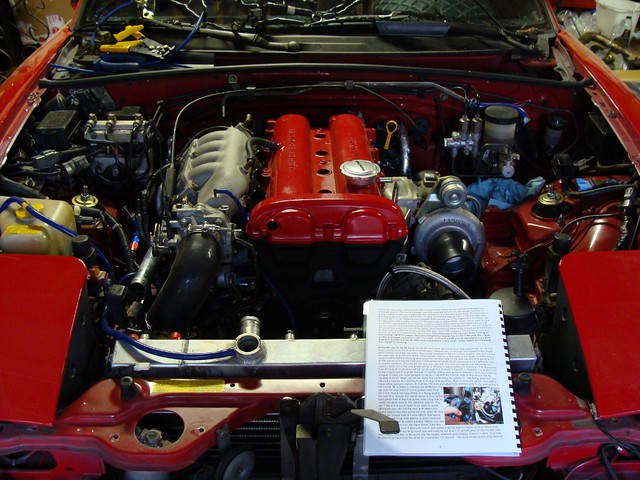
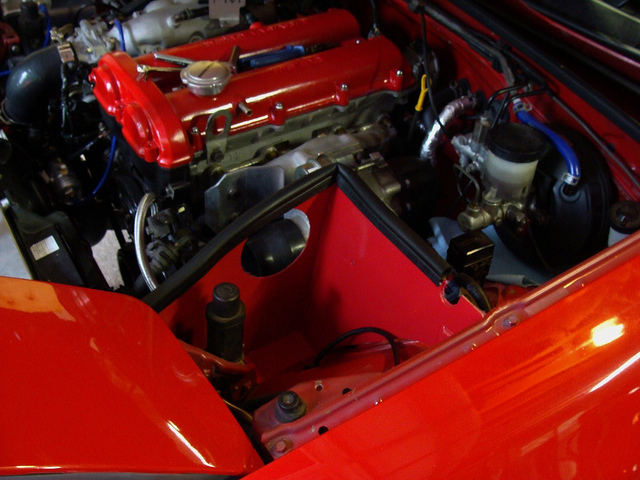
It might be a busy engine bay, but only the things that are required are there:
Quick shot of the Carbing tow hook that I installed the other night, there's one in the back as well, but I didn't take a picture of it:
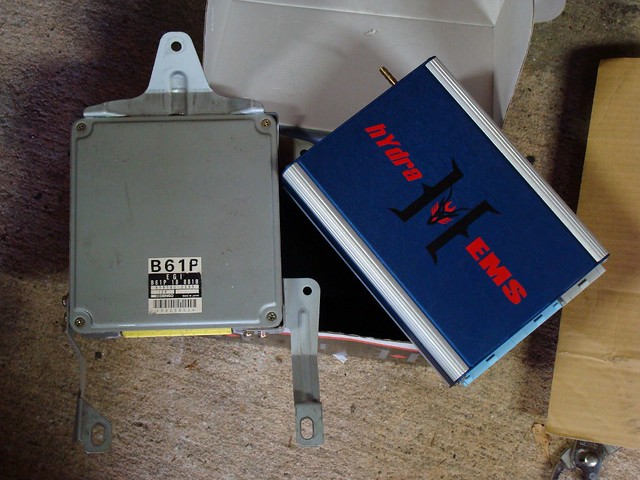
Here's the old ecu vs. the new:
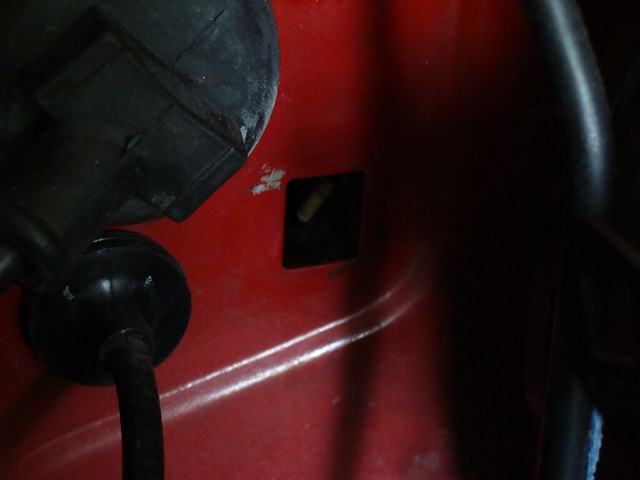
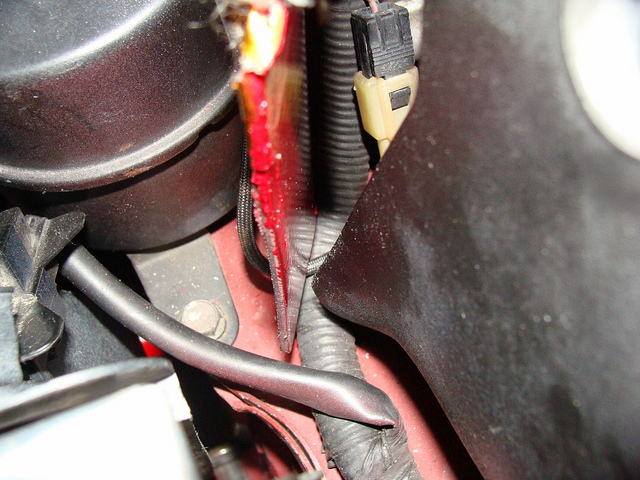
Decided that I wanted to use this pre-existing hole in the firewall to run the Hydra's MAP reference line to the intake manifold:

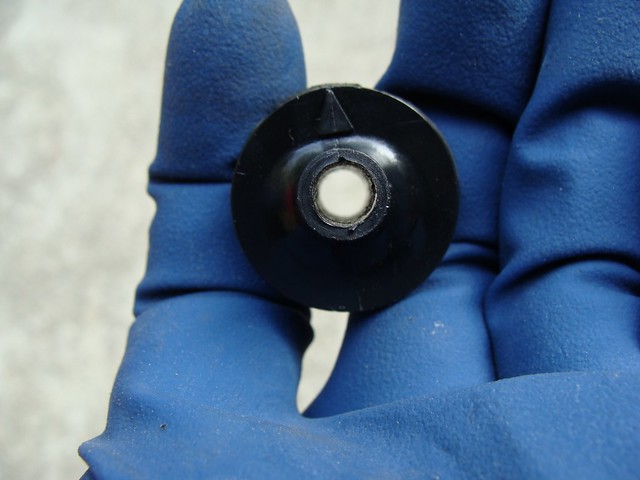
So I drilled out the grommet to match the outer diameter of the vacuum line:
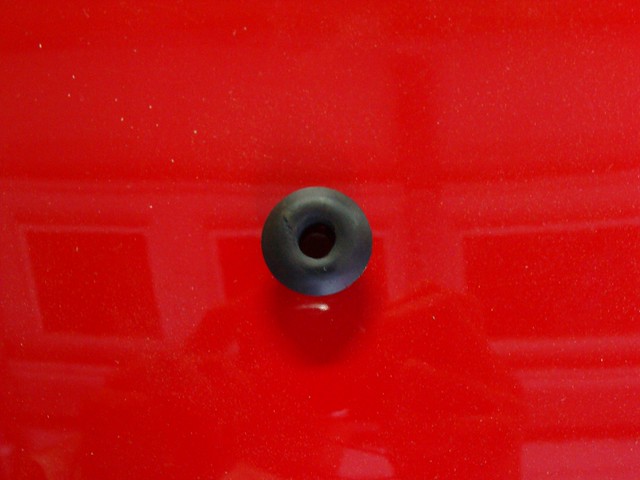
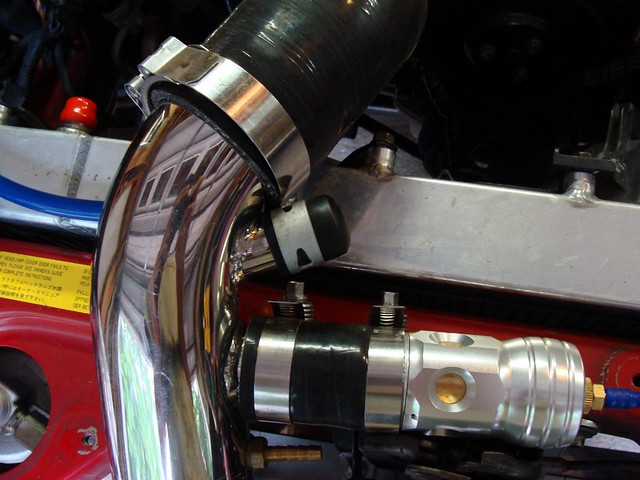
Reinstalled the grommet and ran the vacuum line through the firewall:
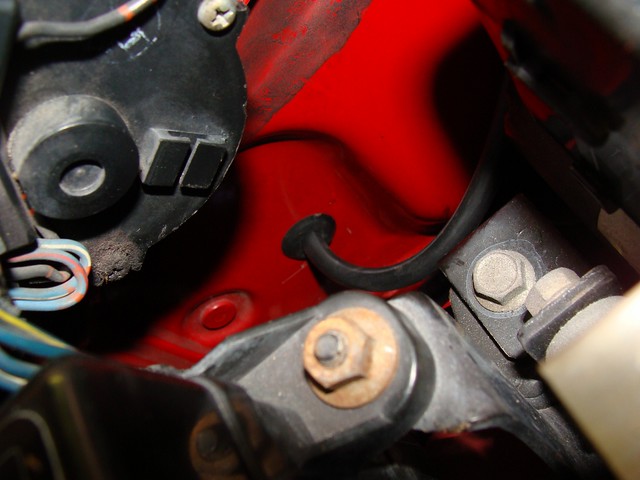
And the line is run to the Hydra:
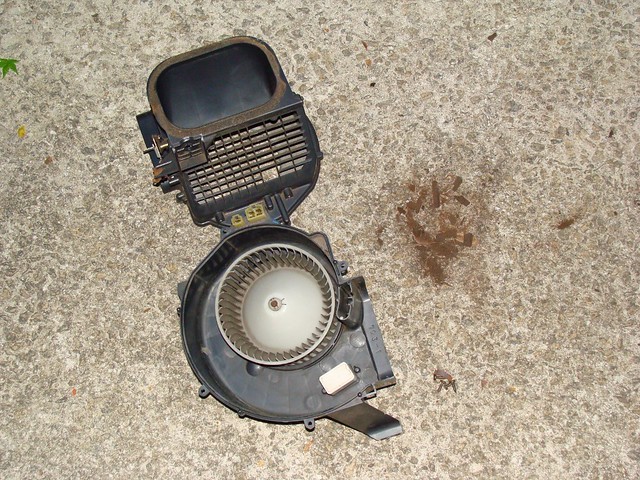
I had to take out the blower fan in order to get to all this, so I cleaned it out at the same time, yuck:
And I installed the RS Products HVAC faceplate and ***** that the owner had brought over:
I'm going to have to ask what FM normally does with Hydra installs when the ABS computer is in place, they both don't fit under the protective plate (since the computers are in the passenger side footwell). I have a couple ideas though.
Hydra's knock sensor...installed.
Stock tow hooks...removed.
Carbing tow hooks...installed.
Wrapped the heater hoses and installed them along with the CAS:
Because we needed it out of the way, I removed the alarm system that someone had disabled by just cutting some wires. This one almost took home first prize for worst installation ever too, it was a complete mess. Anyway, I got it all out, patched up the car's wiring, and now there are no more orange wires running across the firewall and green and white wires running all over everywhere else. *sigh*
It might be a busy engine bay, but only the things that are required are there:
Quick shot of the Carbing tow hook that I installed the other night, there's one in the back as well, but I didn't take a picture of it:
Here's the old ecu vs. the new:
Decided that I wanted to use this pre-existing hole in the firewall to run the Hydra's MAP reference line to the intake manifold:
So I drilled out the grommet to match the outer diameter of the vacuum line:
Reinstalled the grommet and ran the vacuum line through the firewall:
And the line is run to the Hydra:
I had to take out the blower fan in order to get to all this, so I cleaned it out at the same time, yuck:
And I installed the RS Products HVAC faceplate and ***** that the owner had brought over:
I'm going to have to ask what FM normally does with Hydra installs when the ABS computer is in place, they both don't fit under the protective plate (since the computers are in the passenger side footwell). I have a couple ideas though.

Reply
 0
0

0
 04-28-2011, 01:10 AM
#43
Elite Member
Thread Starter
iTrader: (33)
Join Date: Jan 2007
Location: Newnan, GA
Posts: 2,518
Total Cats: 30
^Thanks! Things moving in your pants, I'll let you handle that...
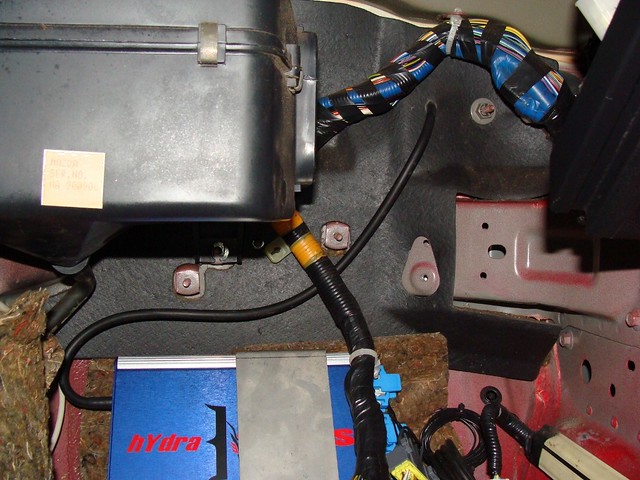
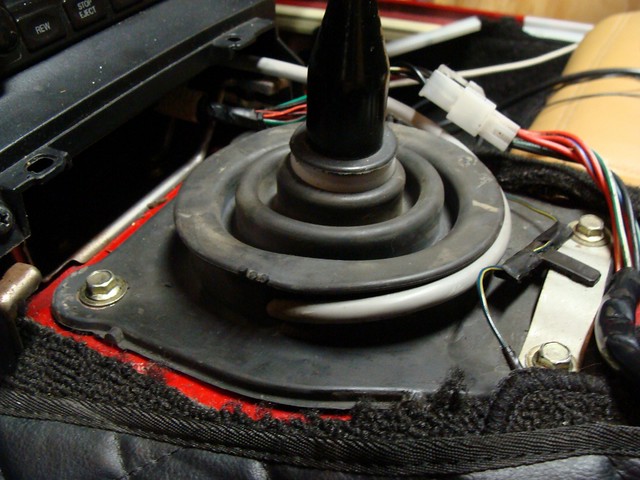
This used to be where the cruise control cable went through the firewall and since we deleted the cruise control it will come in quite handy for running some wiring for a couple of gauges. I was going to use it for some other ECU wiring, but those will go through the passenger side main harness boot.
I cut the cable out of this grommet and drilled it out so that it will accept some wiring, might have to drill it some more depending on what is going to go through it. Or if it ends up being too small I'll just make a new grommet to protect the wiring from the edges of the firewall.
Put it back in place and left it for when it's needed. Moving on, I got a cap for where the IAC hose would normally go because we're using a '99-'00 throttle body (IAC is contained within the TB), so it's no longer needed:
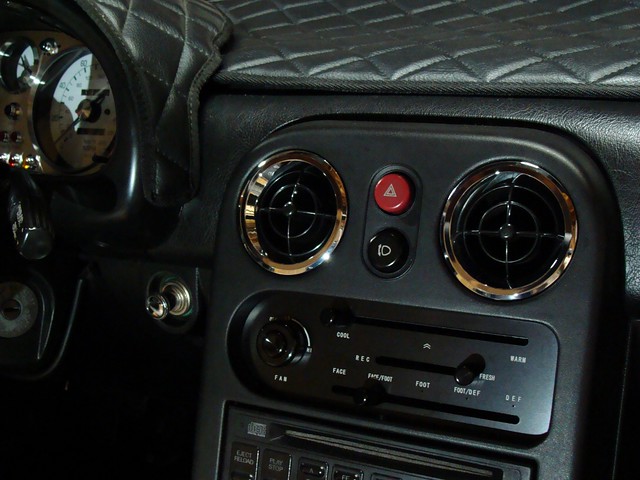
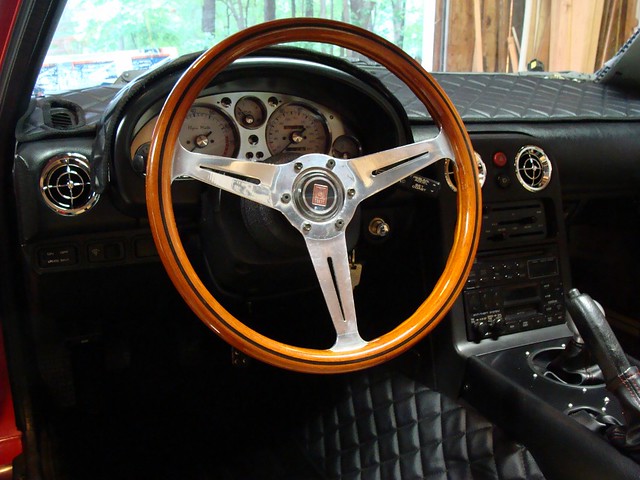
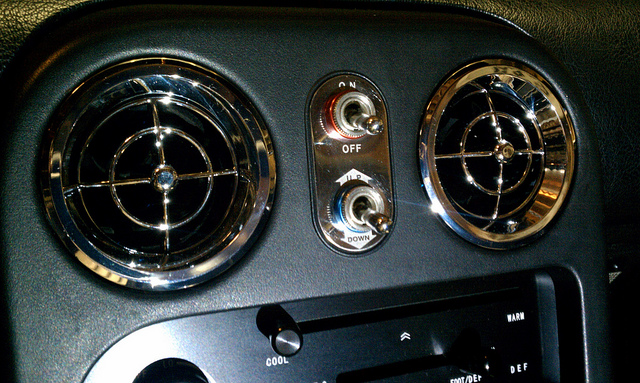
The owner came down today for a bit and installed his new Nardi wheel and while I was taking a break from wiring I installed the chrome "eyeball" vents:
Got under the car and lightly installed the Hydra wideband o2 sensor (has to come back out of the pipe for initial free air calibration) and secured the wiring:
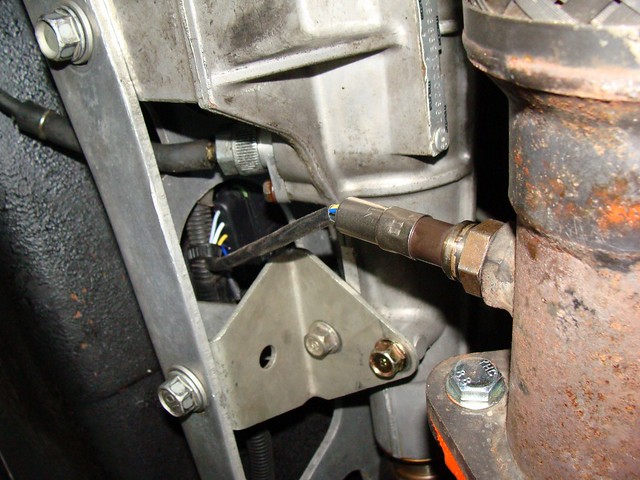
And ran it up into the cabin, through the dash, and to the Hydra:
That's all for now...
This used to be where the cruise control cable went through the firewall and since we deleted the cruise control it will come in quite handy for running some wiring for a couple of gauges. I was going to use it for some other ECU wiring, but those will go through the passenger side main harness boot.
I cut the cable out of this grommet and drilled it out so that it will accept some wiring, might have to drill it some more depending on what is going to go through it. Or if it ends up being too small I'll just make a new grommet to protect the wiring from the edges of the firewall.
Put it back in place and left it for when it's needed. Moving on, I got a cap for where the IAC hose would normally go because we're using a '99-'00 throttle body (IAC is contained within the TB), so it's no longer needed:
The owner came down today for a bit and installed his new Nardi wheel and while I was taking a break from wiring I installed the chrome "eyeball" vents:
Got under the car and lightly installed the Hydra wideband o2 sensor (has to come back out of the pipe for initial free air calibration) and secured the wiring:
And ran it up into the cabin, through the dash, and to the Hydra:
That's all for now...
Reply
1
1
 05-24-2011, 09:16 AM
#45
Elite Member
Thread Starter
iTrader: (33)
Join Date: Jan 2007
Location: Newnan, GA
Posts: 2,518
Total Cats: 30
Another few updates wrapped into one:
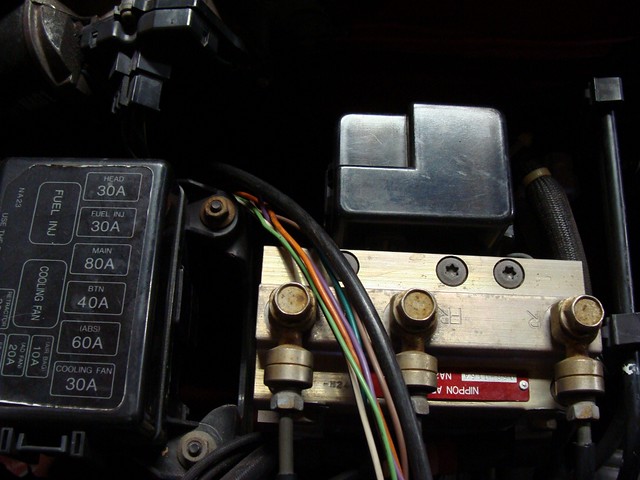
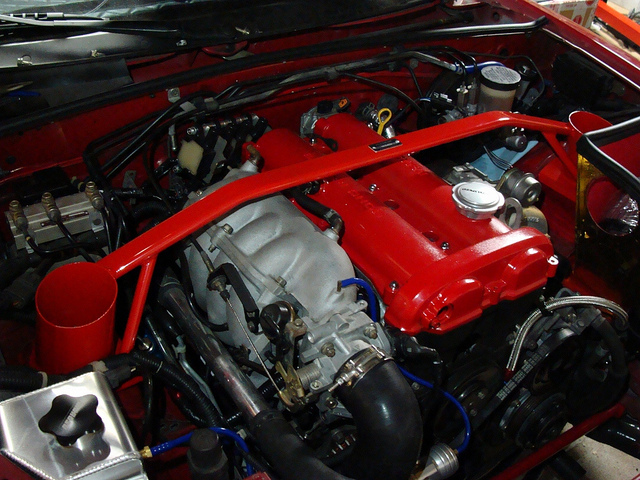
I got the wiring for the injectors, coils, and fans through the firewall, they're ready to go to their respective harnesses and the thick one is for the knock sensor:
And did a test fit of the LS3 coils so I could assess where the wiring would need to go, while also finding out that the 1.6 CAS doesn't play well with the coil pack:
While it appears that the coils go up into the brake booster hardline, such is not the case. Once everything is mocked up I'll go to town on finishing the connections.
---------------
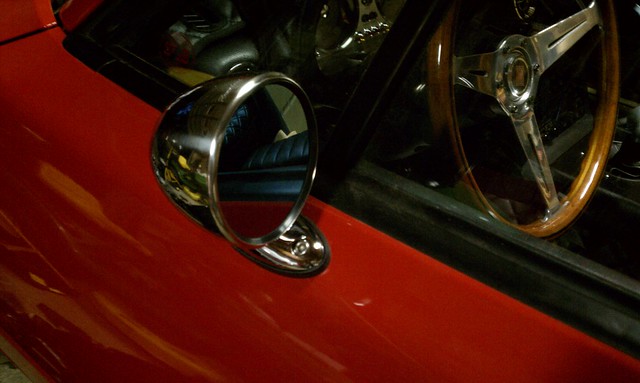
Wiring = boring update, so how about some more aesthetic parts? Sorry, had to use the cell for this update, the camera was dead after The Mitty.
First off, Runabout mirrors:
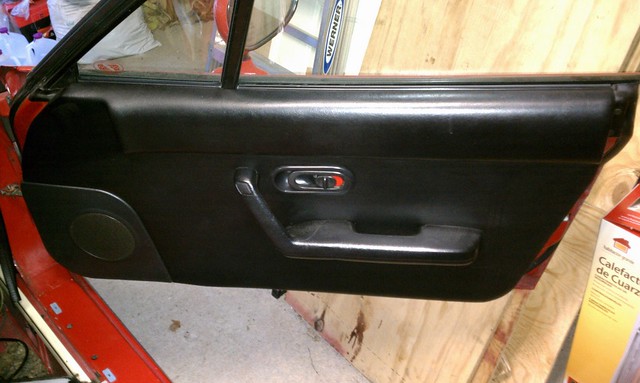
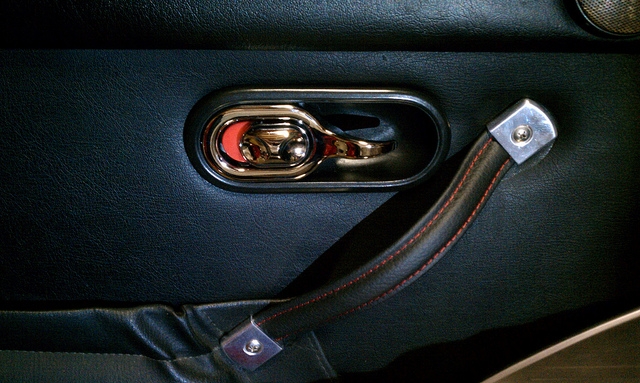
Here's the old door panel:
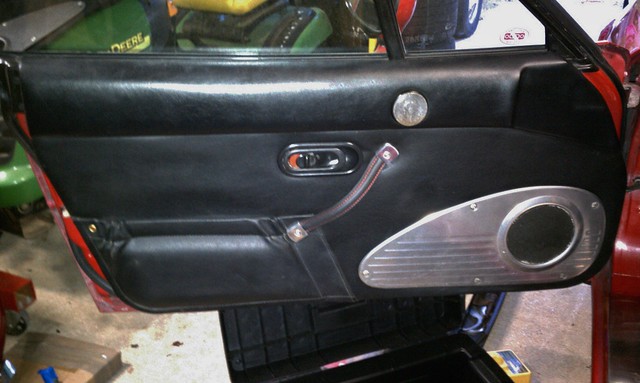
And the new 1-piece door panel with a Nakamae pull:
---------------
Things are about to change back here:
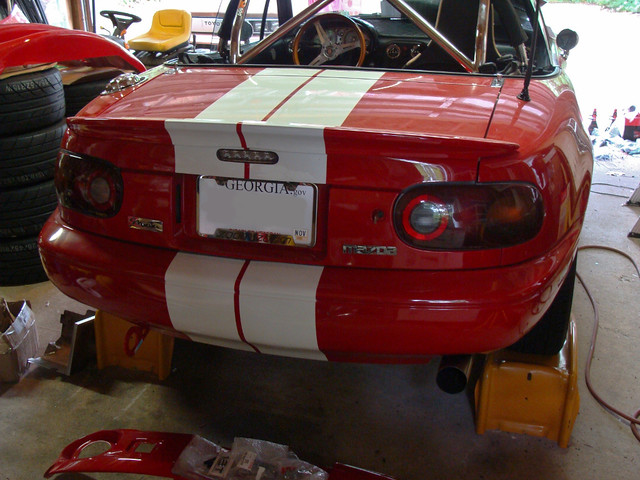
Got the OEM finish panel out without a problem:
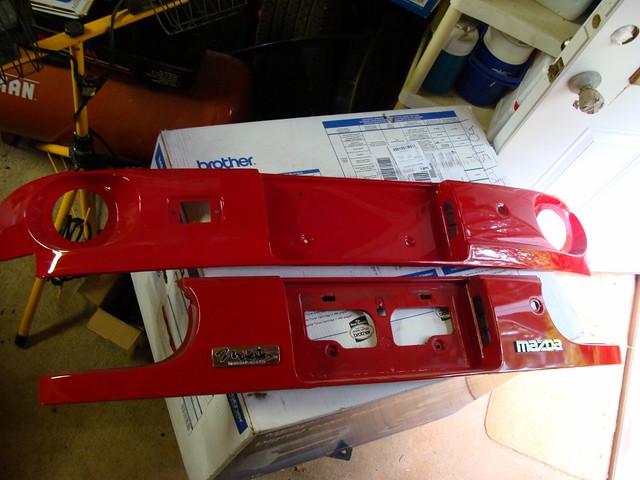
Quick test fit of the new panel:

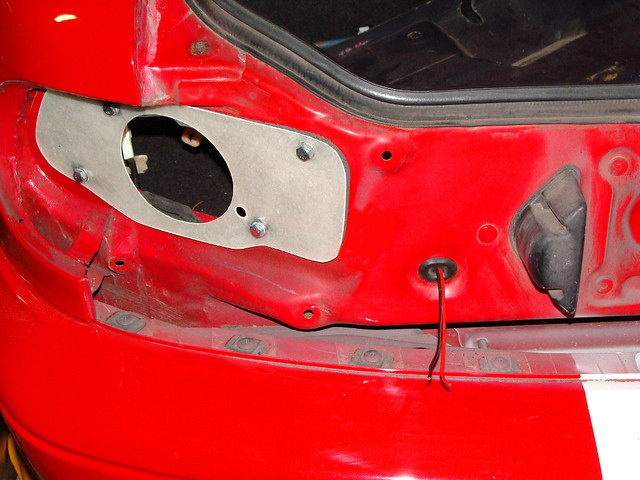
Installed the light "brackets/panels" and ran wiring through the OEM grommet for the reverse light:
And done. I hooked up the battery for this part (and in case you're wondering about the gap, the trunk wasn't closed all the way):

The turn signals are bright:
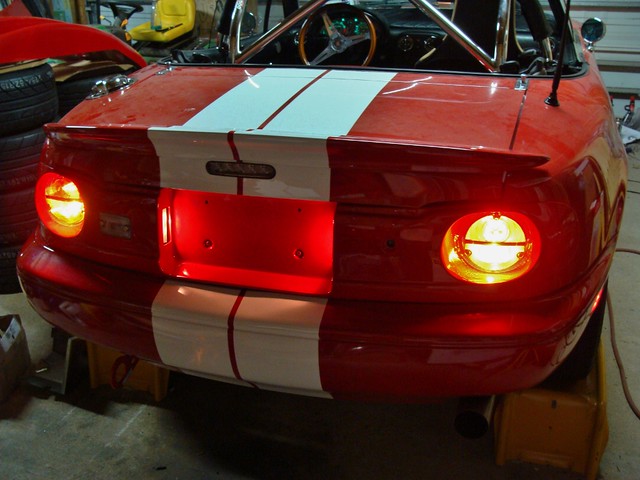
Now the trunk is closed:
And here's what the gauge panel looks like all lit up:
The wiring in the engine bay is complete, wrapped, and secured. Just have to finish wiring up everything to the ECU. Pretty much all that remains are a few odds and ends, like getting an upper radiator hose for the reroute, installing the turbo heat shielding, installing the intake, and stuff like that.
I got the wiring for the injectors, coils, and fans through the firewall, they're ready to go to their respective harnesses and the thick one is for the knock sensor:
And did a test fit of the LS3 coils so I could assess where the wiring would need to go, while also finding out that the 1.6 CAS doesn't play well with the coil pack:
While it appears that the coils go up into the brake booster hardline, such is not the case. Once everything is mocked up I'll go to town on finishing the connections.
---------------
Wiring = boring update, so how about some more aesthetic parts? Sorry, had to use the cell for this update, the camera was dead after The Mitty.
First off, Runabout mirrors:
Here's the old door panel:
And the new 1-piece door panel with a Nakamae pull:
---------------
Things are about to change back here:
Got the OEM finish panel out without a problem:
Quick test fit of the new panel:
Installed the light "brackets/panels" and ran wiring through the OEM grommet for the reverse light:
And done. I hooked up the battery for this part (and in case you're wondering about the gap, the trunk wasn't closed all the way):
The turn signals are bright:
Now the trunk is closed:
And here's what the gauge panel looks like all lit up:
The wiring in the engine bay is complete, wrapped, and secured. Just have to finish wiring up everything to the ECU. Pretty much all that remains are a few odds and ends, like getting an upper radiator hose for the reroute, installing the turbo heat shielding, installing the intake, and stuff like that.
Reply
1
1
05-24-2011, 04:36 PM
#47
Elite Member
Thread Starter
iTrader: (33)
Join Date: Jan 2007
Location: Newnan, GA
Posts: 2,518
Total Cats: 30
If you're referring to the gauge cluster, sorry, but no. The owner of the car bought it from someone overseas as it is now. If you're referring to the rest of the actual dash parts, it's all listed in this thread.
Reply
0
0
05-24-2011, 09:27 PM
#49
Elite Member
Thread Starter
iTrader: (33)
Join Date: Jan 2007
Location: Newnan, GA
Posts: 2,518
Total Cats: 30
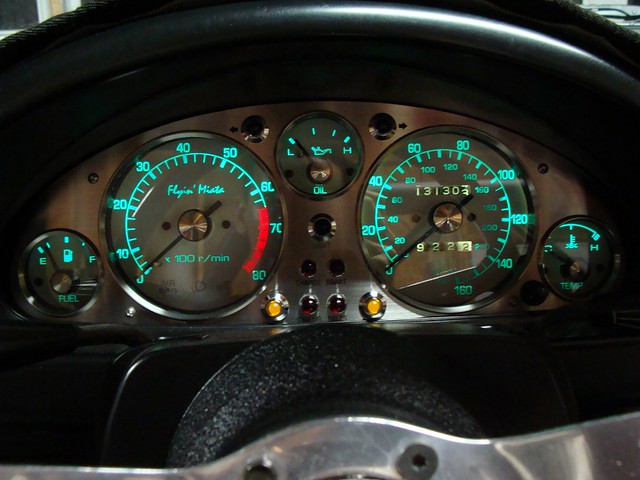
Sorry, work got busy right as I was writing my reply, so I wasn't able to complete the post the way I wanted. To continue, I don't have a definite list, but I'm almost 100% certain that the metal portion of the cluster (with the trim rings and individual glass pieces) is KG Works. The faces are obviously from Flyin' Miata. I'm not sure about the needle caps, but those are pretty simple to find from a few manufacturers. Hope that helps!
Reply
0
0
 05-25-2011, 07:04 AM
#51
Newb

Join Date: Apr 2011
Location: Douglassville, PA
Posts: 27
Total Cats: 0
Sorry, work got busy right as I was writing my reply, so I wasn't able to complete the post the way I wanted. To continue, I don't have a definite list, but I'm almost 100% certain that the metal portion of the cluster (with the trim rings and individual glass pieces) is KG Works. The faces are obviously from Flyin' Miata. I'm not sure about the needle caps, but those are pretty simple to find from a few manufacturers. Hope that helps!
Bill S.
Reply
0
0
 11-11-2011, 10:29 AM
#53
Elite Member
Thread Starter
iTrader: (33)
Join Date: Jan 2007
Location: Newnan, GA
Posts: 2,518
Total Cats: 30
I have long neglected to update this thread, so here goes another lump update. My fiancee and I bought a house since the last update, so a lot of time was taken from the car and invested into the purchase of it and a few large projects, such as pulling the carpet and linoleum and installing hardwood and tile. The owner of this car didn't mind a bit since he was in the midst of playing with a couple of other cars.
Disclaimer: Please pardon the quality of some of the photos, I was reduced to only having my cell phone on hand for most of them, and while it's an Android with an 8mp camera, it's still not as good as the real thing.
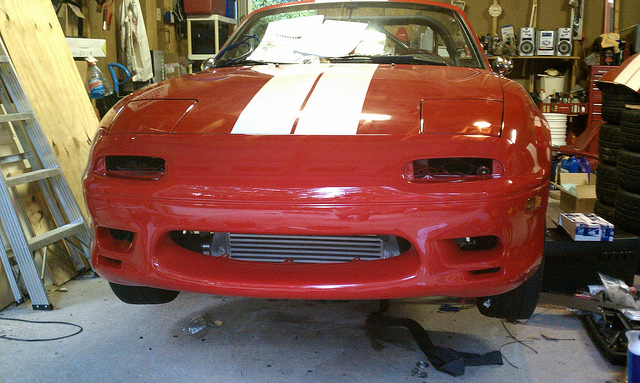
In any case, at the time, the car without a front bumper in place made it look extremely unfinished and kinda sad. Since I was pretty much done leaning into the engine bay I decided to go ahead and mount the Racing Beat Type II bumper. I had to do some "body work" on the bumper to get things to fit properly.
-------
Dave came over and we installed his new Simpson hood and Autokonexion trunk lid and reinstalled the stock turn signals we thought we weren't going to use. I replaced a couple of wheel studs that were not cooperating and installed the 6ULs. Starting to look like a complete car at this point, so we're getting there...
-------
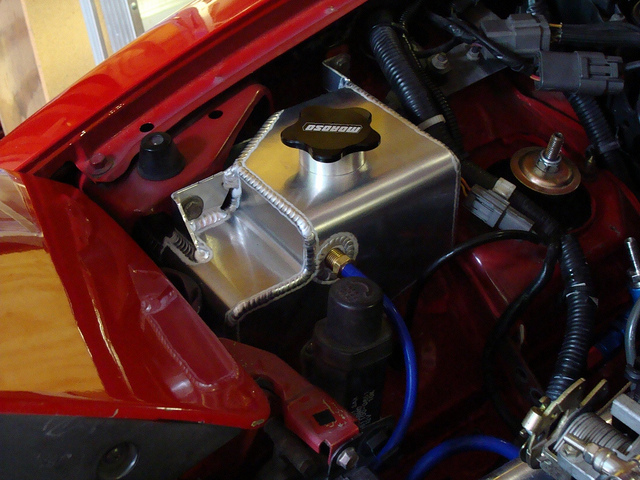
Little more progress, Dave didn't like the dirtiness of the stock overflow tank, didn't want it to fail, and wanted something nice to match the rest of the engine bay (I don't blame him):
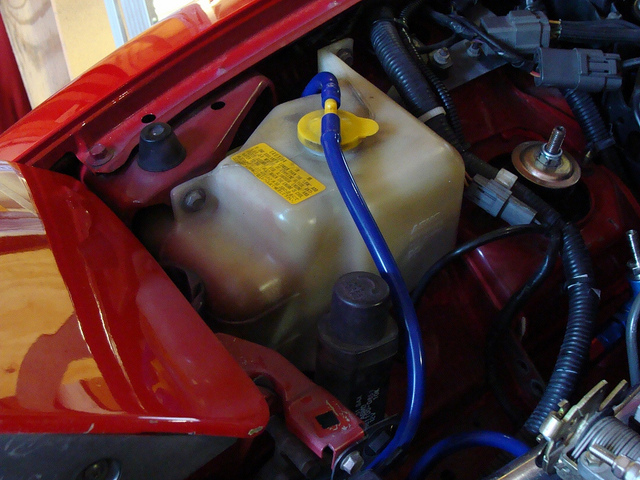
So out that went and in went:
I cleaned up the intake box and repainted it as it had been through a lot over the years (got a pretty close match by mixing a couple of paints), then installed it:
And had to make a minor modification for it to properly fit around the power steering reservoir and still clear the headlight when it's closed:
Also finished wrapping the downpipe, this should help control the majority of the heat coming into the cabin. Wrapping that while it was installed was a major b**ch and I don't recommend the job to anyone.
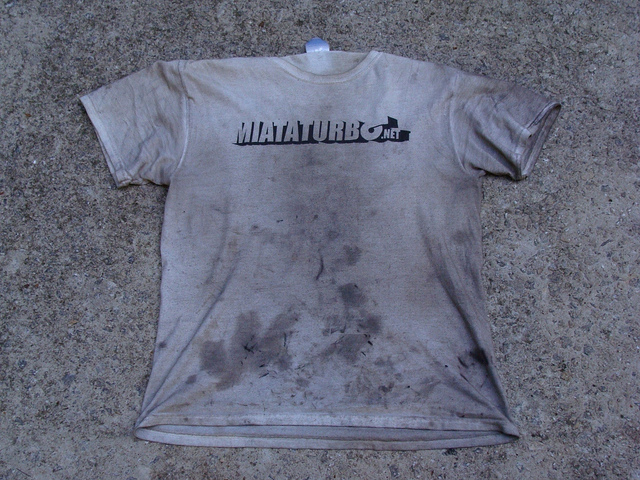
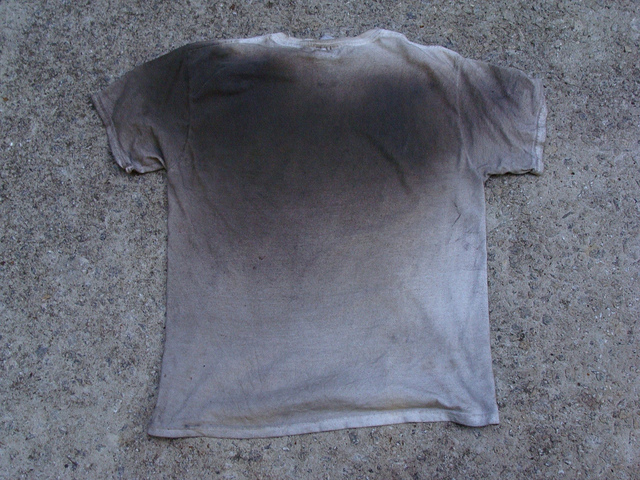
Had to retire my favorite work shirt tonight, it finally has enough metal shards and fiberglass hairs in it that it's no longer fun to wear, lol:
-------
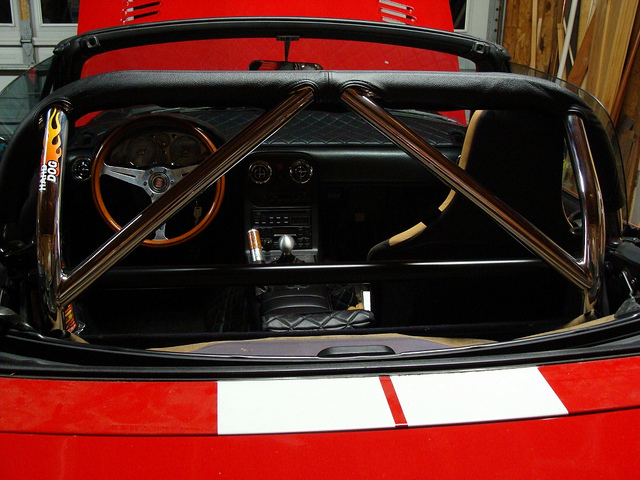
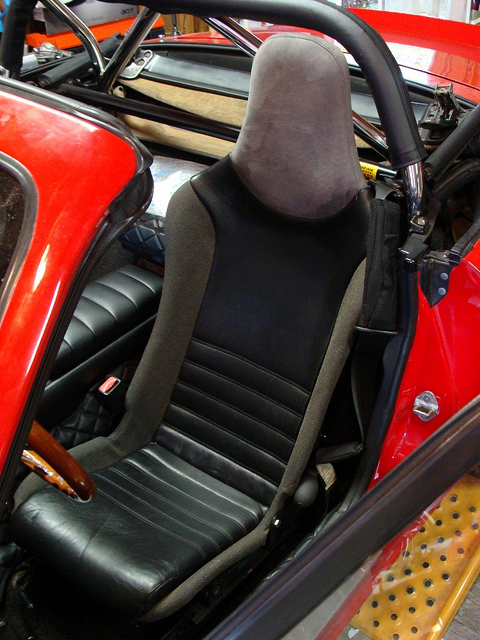
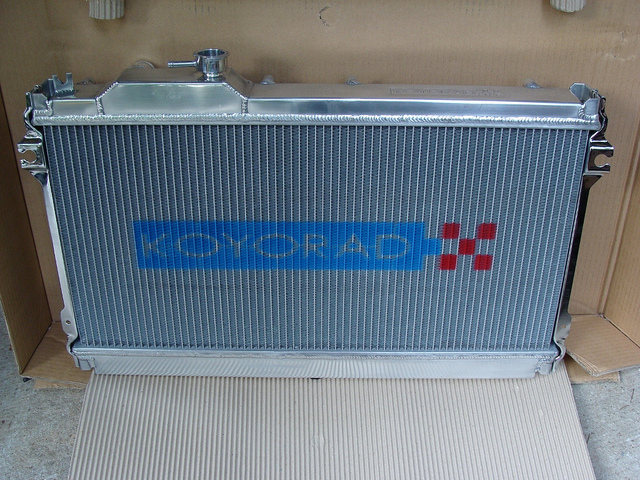
In any case, the FM TwinCooler radiator is getting replaced with a Koyo which will have FM's newest shroud and SPAL fans, so it came out. The Koyo will also make finishing the coolant reroute a lot easier. The parchment cloth top came out in favor of a black cloth top, the Hard Dog harness bar went in, and as soon as Dave gets them done, the black Lotus seats will go in.
Now on to the pictures, harness bar:
Soft top:

-------
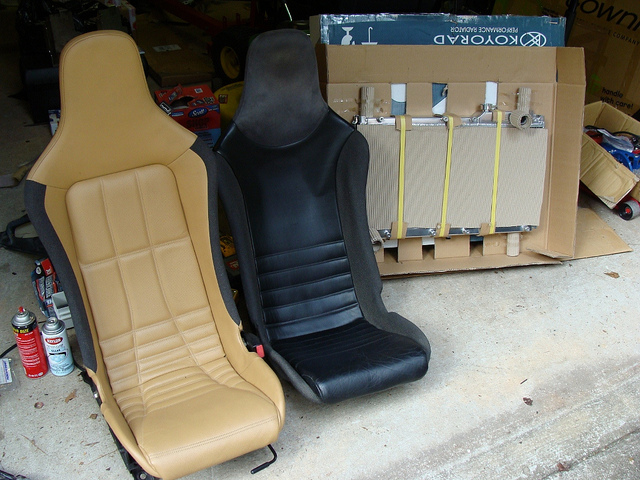
Dave came by last week and removed the tan Lotus seats and is replacing them with a pair of these:
Lotus seats (and aluminum radiators) everywhere!
And this is going in along with one of the new FM shrouds:
But more on that later. A few details have to be worked out due to the coolant reroute and such before it's installed.
-------
So we ended up doing some QC work for FM when I found that the hardware they sent out did not fit the shroud, turns out it wasn't just limited to this one. Armed with the correct information I went to Home Depot and got the right hardware. Got the shroud mostly together, it's just missing the main SPAL fan, which Dave is bringing me tomorrow. But the secondary fan is installed and I fitted and trimmed the seal. It'll be ready to drop in once the other fan is on.

Tinkered on the interior some and installed the KGWorks interior latches and the Nielex switches:
--------
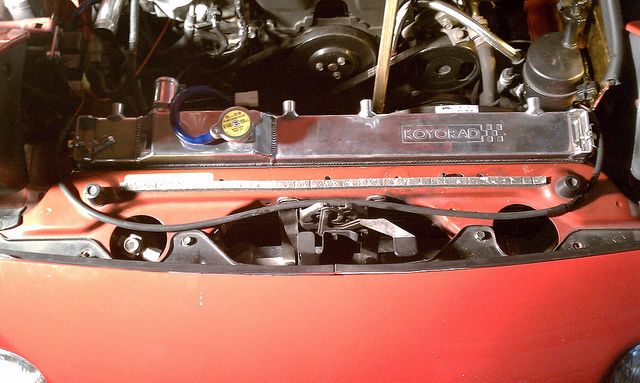
95% of the wiring is now done, I just have to get the WBo2 and NBo2 sensors wired up, jumper two wires with a diode so the a/c works, and install the shroud and fans. Upgrading the a/c fan to a Spal fan on the 90-93 cars requires wiring directly to the alternator and adding a relay, so a little extra work, but nothing too difficult. Fortunately FM included all the parts to take care of that. I'm planning to install the Ohlins before setting the car down and there are a few other minor bits and pieces to take care of before the first start up, but it's mostly just tightening bolts, rechecking everything, and adding fluids. Was a slowed process due to waiting on needed parts and me working on the new house, but things are finally coming together.
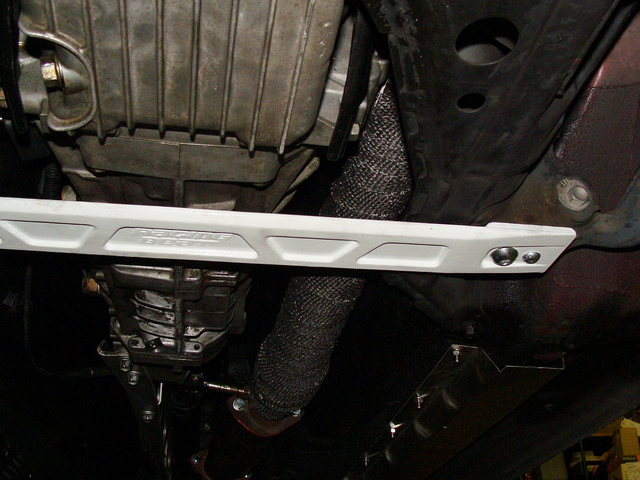
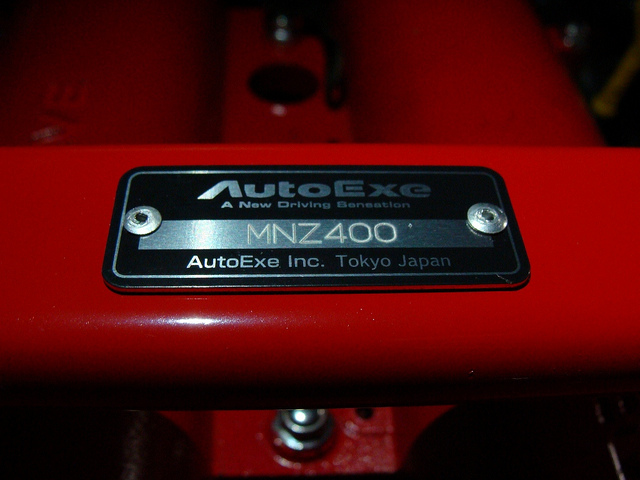
Dave bought an AutoExe shock tower brace and brought it over today. This thing is very light but strong and eliminates the need to find something to clear the ABS block. Here it's just loosely mounted after I had to move some small components out of its way to check fitment:
Dave also had bought the Wilwood 11" BBK from 949Racing but shortly after TrackSpeed Engineering had come out with an 11.75" upgrade kit (basically everything minus the calipers), so he upgraded to that. The TSE kit is impressive right out of the box, they have more mounting points between the rotor and the hat, and they are also hubcentric. Here they are sitting next to the 11" kit:
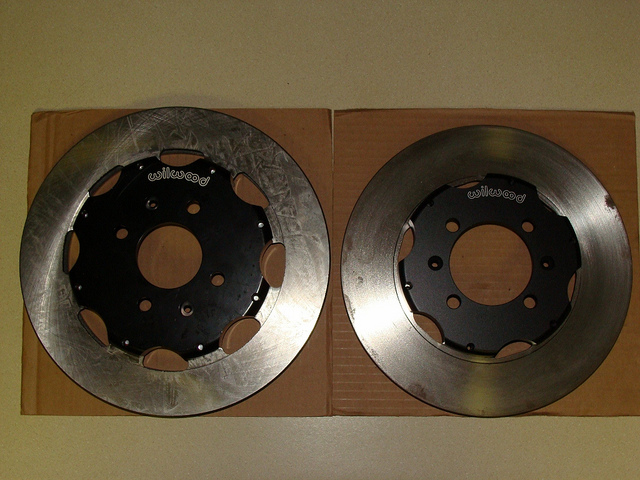
And TSE preassembles the rotors for you, including safety wiring the bolts, great customer service:
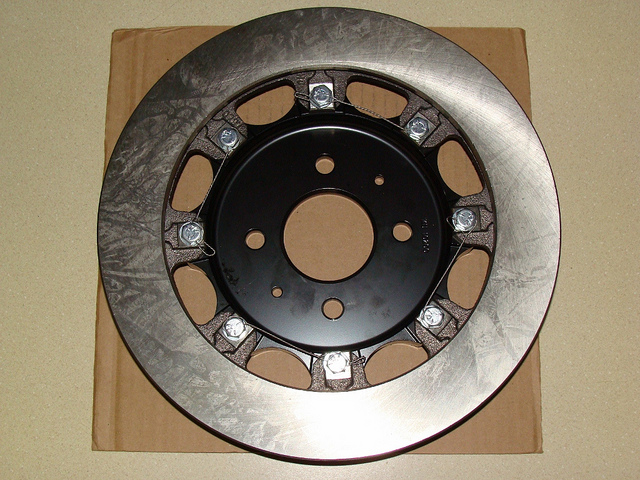
I think they will definitely get the stopping job done.
-------
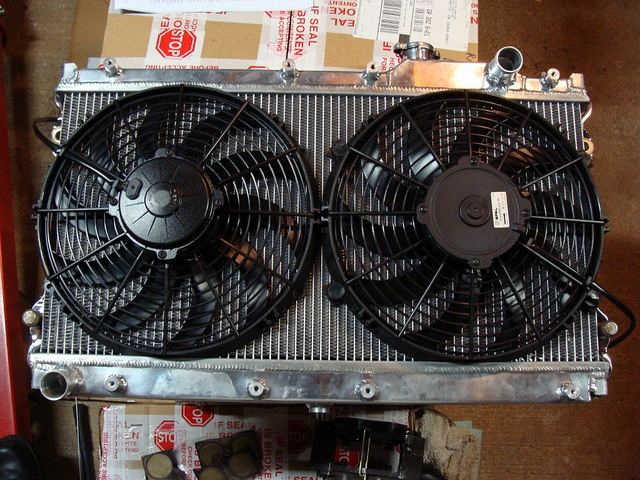
We had some unexpected delays with the parts, Dave switched to the newest FM revision of their shroud due to fan fitment issues with the first shroud, but then the new Koyo/fan/FM shroud assembly would not fit, the fans were either hitting the sway bar, or when the sway bar was moved, it was hitting the a/c compressor. Losing a/c was an unacceptable compromise and there also was not room for the intercooler piping to come up to the throttle body. The Koyo being rather thick and the Spal fans being large themselves didn't help this situation. So after many attempts at making it work, it was finally decided to ditch the shroud and now the Spal fans are mounted directly to the radiator. Not optimal, but when the fans run they hold a piece of paper firmly on the front of the intercooler. I think when the mouth is sealed up properly everything will work just fine on the street and on the occasional track run.
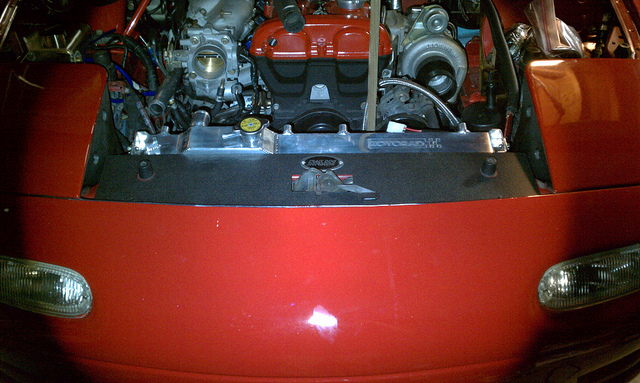
Last night I finished running the relay, circuit breaker, and wiring to power the secondary fan. I also connected the lower radiator hose and tightened up all the intercooler piping connections and the BOV. Now I need to finish running the new fuel lines, the upper radiator hose from the reroute hardpipe to the radiator, and throw in the new spark plugs and wires for the LSx coils. I still have to wire the o2 sensors up to the Hydra, modify and mount the turbo heat shield, and double check everything with the wiring and all the nuts and bolts in the engine bay, but after that I should be ready to load the map FM provided for the Hydra, hope and pray the car starts, set the initial timing, and hopefully go from there...
The fans cover most of the radiator surface:
I had to run a trigger wire from the secondary fan relay over to the power wire on the main fan. I didn't want it hanging out in the engine bay but running it on top of the core support exposed it to many sharp edges, fans that work is a good idea so that made me uncomfortable. My solution was to slide some silicone vacuum line over the wire to keep it strong, compact, and under the cowl cover. So now it's all protected and won't let the wiring get cut up. This wasn't the finished solution, but it gives an idea of what was done:
TDR Cowl Cover in place:
-------
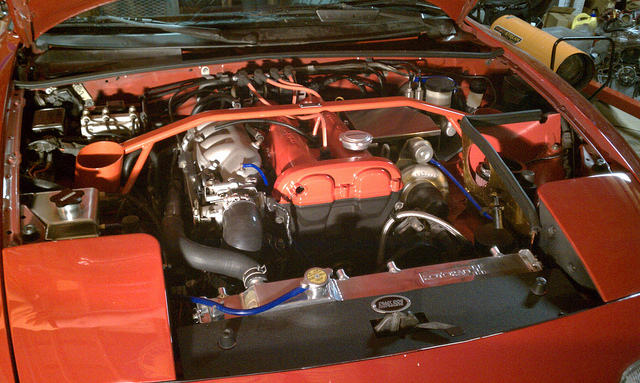
All of the wiring is done! The engine bay, minus having no intake pipe, is complete. Tomorrow I'll be adding fluids, checking a few random nuts and bolts, loading the base map, and firing it up to set timing, etc. I think that's all that's left.
-------
On 10/27, the car officially ran for the first time after all of this work. Started up on the first attempt. Just to recap, here's what I can think of that required wiring above and beyond simply plugging it in:
- 1.8 engine (relocation of a couple of sensors and extensions for CAS)
- AFM delete
- IAT sensor
- Fan control for Hydra
- Sequential injection
- Add 4-wire NBo2 sensor
- Knock sensor
- Wiring for Hydra a/c control
- WBo2
- '99 throttle body (IAC/TPS)
- LSx coils (includes 1.6 ignitor delete)
- SPAL fans
-------
Before I could even get the car down and on the road we started having misfire issues with the Venom 550cc injectors that were in the car. After some internet searching, problems with the Venoms seems to be pretty widespread. So we opted for pulling them in favor of the ID1000cc injectors. I had a hell of a time getting the car to even catch after installing the ID1000s. Finally I looked at the plugs closely rather than just glancing at them to see if they were wet and noticed they had some decent carbon build up. Cleaned them up and reinstalled and then the car would fire, catch, run up for a second and then immediately die. No matter what I did, the car would not stay running. This was on 11/8. I had some other things to do after work on 11/9 so I figured I'd do some research and reading in the meantime and get back to the car after work yesterday.
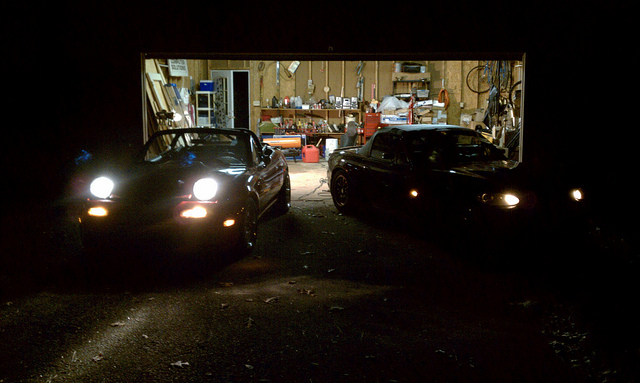
Turns out I just needed to change the injector response settings, but after reading up on them and trying to find some decent settings, I decided that the IDs are just too new in the Miata world and no one has anything. So I called FM for their settings for the Hydra 2.7 and last night I loaded the settings they gave me as closely as I could (because the 2.5 can't go any higher than 1.275) and it worked! The car fires, starts, runs, heats up, doesn't die when the lights are on and the SPALs kick on (and they draw some crazy power), and drives! I took it up and down my road tonight, no boost and low power, but she doesn't stall, the cells that I was in provided smooth power, no idle droop, and she definitely wants to go. A little rich, but that's going to be taken care of. This car is definitely not the car I started with in terms of handling either. It is stout and strong, all the bracing is working together to make for a very strong chassis, I could tell a huge difference after getting back into my NB which has some extra bracing but not as much. It's on the H&R coilovers now but he has a set of Ohlins DFV coilovers to replace them with.
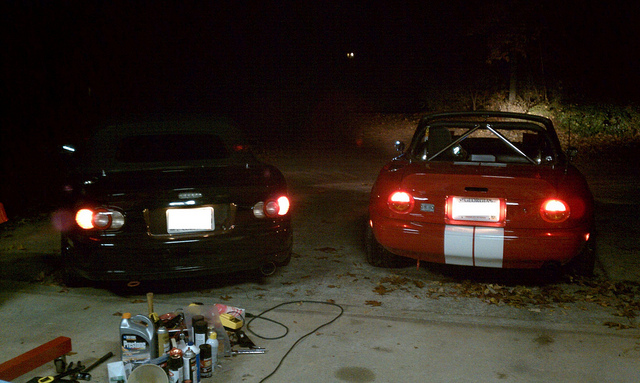
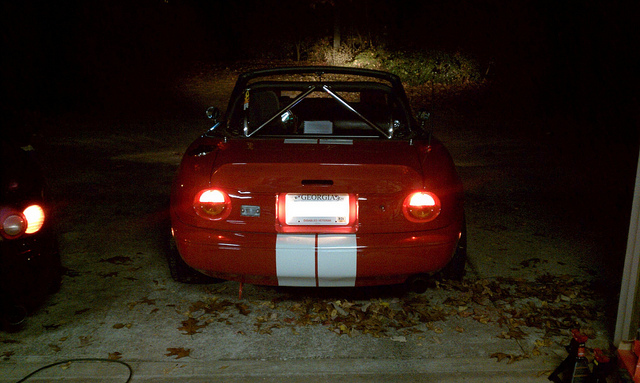
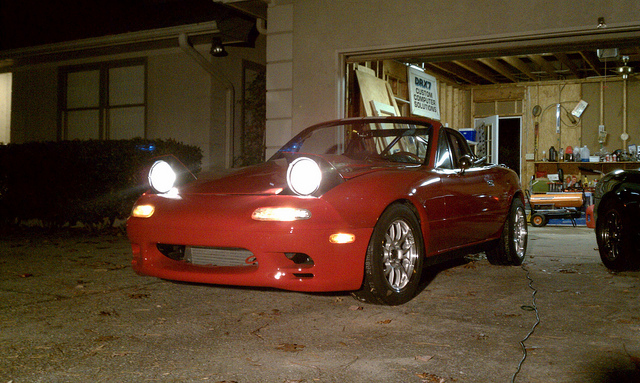
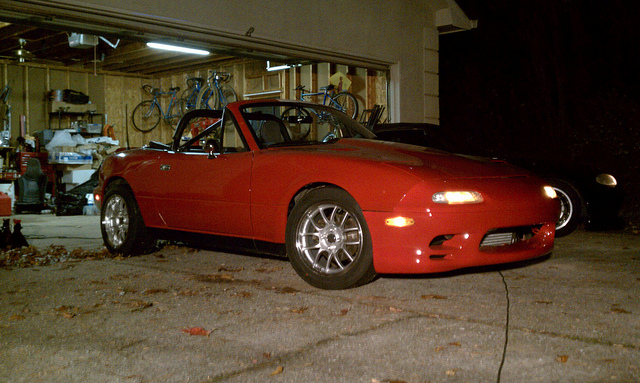
I took a crappy video walkaround, just to mark the moment:
And some quick pictures:
What's left now is some adjustments and road tuning in the Hydra, clearancing the intake box a bit so the hood strut clears it, trimming and installing the undertrays, adding the MSM intake cam, adding a set of Frog Arms, and a few other bits. Then it goes to the dyno for a proper tune and numbers. Then it'll come off and we'll be installing the BEGi intake manifold and it'll go back on for a touch-up tune and new numbers. Then I'll be installing gauges and some new sound equipment and it'll get its stripes readded.
Disclaimer: Please pardon the quality of some of the photos, I was reduced to only having my cell phone on hand for most of them, and while it's an Android with an 8mp camera, it's still not as good as the real thing.
In any case, at the time, the car without a front bumper in place made it look extremely unfinished and kinda sad. Since I was pretty much done leaning into the engine bay I decided to go ahead and mount the Racing Beat Type II bumper. I had to do some "body work" on the bumper to get things to fit properly.
-------
Dave came over and we installed his new Simpson hood and Autokonexion trunk lid and reinstalled the stock turn signals we thought we weren't going to use. I replaced a couple of wheel studs that were not cooperating and installed the 6ULs. Starting to look like a complete car at this point, so we're getting there...
-------
Little more progress, Dave didn't like the dirtiness of the stock overflow tank, didn't want it to fail, and wanted something nice to match the rest of the engine bay (I don't blame him):
So out that went and in went:
I cleaned up the intake box and repainted it as it had been through a lot over the years (got a pretty close match by mixing a couple of paints), then installed it:
And had to make a minor modification for it to properly fit around the power steering reservoir and still clear the headlight when it's closed:
Also finished wrapping the downpipe, this should help control the majority of the heat coming into the cabin. Wrapping that while it was installed was a major b**ch and I don't recommend the job to anyone.
Had to retire my favorite work shirt tonight, it finally has enough metal shards and fiberglass hairs in it that it's no longer fun to wear, lol:
-------
In any case, the FM TwinCooler radiator is getting replaced with a Koyo which will have FM's newest shroud and SPAL fans, so it came out. The Koyo will also make finishing the coolant reroute a lot easier. The parchment cloth top came out in favor of a black cloth top, the Hard Dog harness bar went in, and as soon as Dave gets them done, the black Lotus seats will go in.
Now on to the pictures, harness bar:
Soft top:
-------
Dave came by last week and removed the tan Lotus seats and is replacing them with a pair of these:
Lotus seats (and aluminum radiators) everywhere!
And this is going in along with one of the new FM shrouds:
But more on that later. A few details have to be worked out due to the coolant reroute and such before it's installed.
-------
So we ended up doing some QC work for FM when I found that the hardware they sent out did not fit the shroud, turns out it wasn't just limited to this one. Armed with the correct information I went to Home Depot and got the right hardware. Got the shroud mostly together, it's just missing the main SPAL fan, which Dave is bringing me tomorrow. But the secondary fan is installed and I fitted and trimmed the seal. It'll be ready to drop in once the other fan is on.
Tinkered on the interior some and installed the KGWorks interior latches and the Nielex switches:
--------
95% of the wiring is now done, I just have to get the WBo2 and NBo2 sensors wired up, jumper two wires with a diode so the a/c works, and install the shroud and fans. Upgrading the a/c fan to a Spal fan on the 90-93 cars requires wiring directly to the alternator and adding a relay, so a little extra work, but nothing too difficult. Fortunately FM included all the parts to take care of that. I'm planning to install the Ohlins before setting the car down and there are a few other minor bits and pieces to take care of before the first start up, but it's mostly just tightening bolts, rechecking everything, and adding fluids. Was a slowed process due to waiting on needed parts and me working on the new house, but things are finally coming together.
Dave bought an AutoExe shock tower brace and brought it over today. This thing is very light but strong and eliminates the need to find something to clear the ABS block. Here it's just loosely mounted after I had to move some small components out of its way to check fitment:
Dave also had bought the Wilwood 11" BBK from 949Racing but shortly after TrackSpeed Engineering had come out with an 11.75" upgrade kit (basically everything minus the calipers), so he upgraded to that. The TSE kit is impressive right out of the box, they have more mounting points between the rotor and the hat, and they are also hubcentric. Here they are sitting next to the 11" kit:
And TSE preassembles the rotors for you, including safety wiring the bolts, great customer service:
I think they will definitely get the stopping job done.
-------
We had some unexpected delays with the parts, Dave switched to the newest FM revision of their shroud due to fan fitment issues with the first shroud, but then the new Koyo/fan/FM shroud assembly would not fit, the fans were either hitting the sway bar, or when the sway bar was moved, it was hitting the a/c compressor. Losing a/c was an unacceptable compromise and there also was not room for the intercooler piping to come up to the throttle body. The Koyo being rather thick and the Spal fans being large themselves didn't help this situation. So after many attempts at making it work, it was finally decided to ditch the shroud and now the Spal fans are mounted directly to the radiator. Not optimal, but when the fans run they hold a piece of paper firmly on the front of the intercooler. I think when the mouth is sealed up properly everything will work just fine on the street and on the occasional track run.
Last night I finished running the relay, circuit breaker, and wiring to power the secondary fan. I also connected the lower radiator hose and tightened up all the intercooler piping connections and the BOV. Now I need to finish running the new fuel lines, the upper radiator hose from the reroute hardpipe to the radiator, and throw in the new spark plugs and wires for the LSx coils. I still have to wire the o2 sensors up to the Hydra, modify and mount the turbo heat shield, and double check everything with the wiring and all the nuts and bolts in the engine bay, but after that I should be ready to load the map FM provided for the Hydra, hope and pray the car starts, set the initial timing, and hopefully go from there...
The fans cover most of the radiator surface:
I had to run a trigger wire from the secondary fan relay over to the power wire on the main fan. I didn't want it hanging out in the engine bay but running it on top of the core support exposed it to many sharp edges, fans that work is a good idea so that made me uncomfortable. My solution was to slide some silicone vacuum line over the wire to keep it strong, compact, and under the cowl cover. So now it's all protected and won't let the wiring get cut up. This wasn't the finished solution, but it gives an idea of what was done:
TDR Cowl Cover in place:
-------
All of the wiring is done! The engine bay, minus having no intake pipe, is complete. Tomorrow I'll be adding fluids, checking a few random nuts and bolts, loading the base map, and firing it up to set timing, etc. I think that's all that's left.
-------
On 10/27, the car officially ran for the first time after all of this work. Started up on the first attempt. Just to recap, here's what I can think of that required wiring above and beyond simply plugging it in:
- 1.8 engine (relocation of a couple of sensors and extensions for CAS)
- AFM delete
- IAT sensor
- Fan control for Hydra
- Sequential injection
- Add 4-wire NBo2 sensor
- Knock sensor
- Wiring for Hydra a/c control
- WBo2
- '99 throttle body (IAC/TPS)
- LSx coils (includes 1.6 ignitor delete)
- SPAL fans
-------
Before I could even get the car down and on the road we started having misfire issues with the Venom 550cc injectors that were in the car. After some internet searching, problems with the Venoms seems to be pretty widespread. So we opted for pulling them in favor of the ID1000cc injectors. I had a hell of a time getting the car to even catch after installing the ID1000s. Finally I looked at the plugs closely rather than just glancing at them to see if they were wet and noticed they had some decent carbon build up. Cleaned them up and reinstalled and then the car would fire, catch, run up for a second and then immediately die. No matter what I did, the car would not stay running. This was on 11/8. I had some other things to do after work on 11/9 so I figured I'd do some research and reading in the meantime and get back to the car after work yesterday.
Turns out I just needed to change the injector response settings, but after reading up on them and trying to find some decent settings, I decided that the IDs are just too new in the Miata world and no one has anything. So I called FM for their settings for the Hydra 2.7 and last night I loaded the settings they gave me as closely as I could (because the 2.5 can't go any higher than 1.275) and it worked! The car fires, starts, runs, heats up, doesn't die when the lights are on and the SPALs kick on (and they draw some crazy power), and drives! I took it up and down my road tonight, no boost and low power, but she doesn't stall, the cells that I was in provided smooth power, no idle droop, and she definitely wants to go. A little rich, but that's going to be taken care of. This car is definitely not the car I started with in terms of handling either. It is stout and strong, all the bracing is working together to make for a very strong chassis, I could tell a huge difference after getting back into my NB which has some extra bracing but not as much. It's on the H&R coilovers now but he has a set of Ohlins DFV coilovers to replace them with.
I took a crappy video walkaround, just to mark the moment:
And some quick pictures:
What's left now is some adjustments and road tuning in the Hydra, clearancing the intake box a bit so the hood strut clears it, trimming and installing the undertrays, adding the MSM intake cam, adding a set of Frog Arms, and a few other bits. Then it goes to the dyno for a proper tune and numbers. Then it'll come off and we'll be installing the BEGi intake manifold and it'll go back on for a touch-up tune and new numbers. Then I'll be installing gauges and some new sound equipment and it'll get its stripes readded.
Last edited by RotorNutFD3S; 11-11-2011 at 10:40 AM.
Reply
0
0
11-12-2011, 04:05 AM
#54
Senior Member

Join Date: Oct 2011
Location: The Race Track & St Pete FL
Posts: 638
Total Cats: 57
I have a few questions
Can you ask him if the Lotus seats were comfortable and what Lotus did they come out of? Did he get the weight of the seats and how much did he get them for?
Can you ask him if the Lotus seats were comfortable and what Lotus did they come out of? Did he get the weight of the seats and how much did he get them for?
Reply
0
0
 11-12-2011, 06:24 PM
#56
Elite Member
Thread Starter
iTrader: (33)
Join Date: Jan 2007
Location: Newnan, GA
Posts: 2,518
Total Cats: 30
I know the Lotus seats are comfortable, I've been able to use them.  They're extremely lightweight, however, I didn't put them on a scale. I don't know what Elise they came from (richyvrlimited is probably correct), I just know they are not Probax as they have the adjustable lumbar support. He has a set of black Exige Probax seats on the way to replace these. Cost? IDK either, I've seen similar ones go for $600-900/set (or sometimes more) easy on other forums.
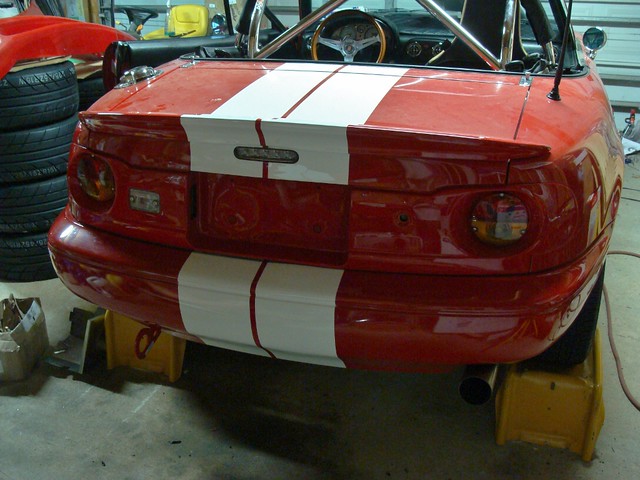
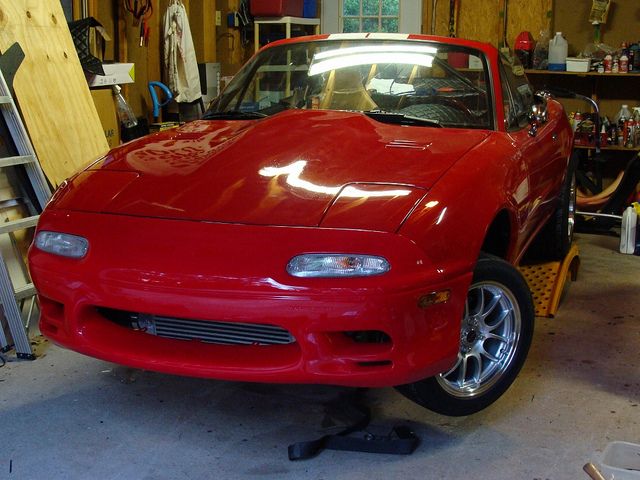
Anyway, the car went home today. Aside from the Hydra 2.5 not having great control of the ID1000s at idle when the fans kick on (this was expected), the car drove great and went into boost very smoothly. No full throttle runs, just checking how it transitions from cruise to boost and how well it was auto-tuning. Now the Hydra is actually back out and will be sent in for the 2.7 upgrade, then we'll be in great shape for controlling the injectors and further tuning.
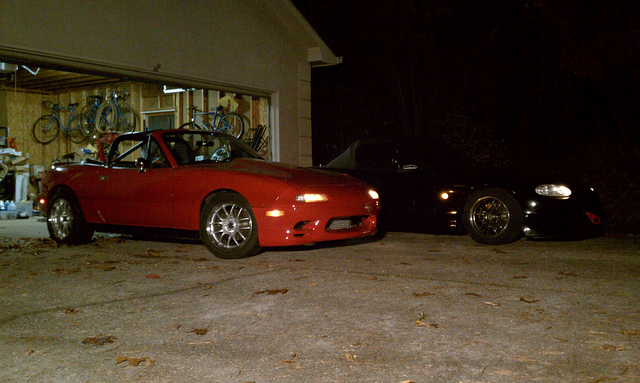
Few pictures in the light:
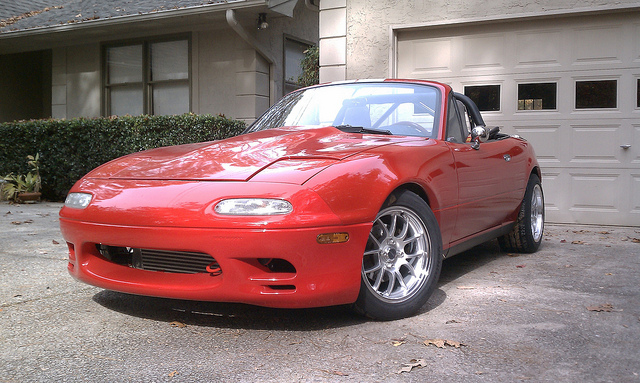
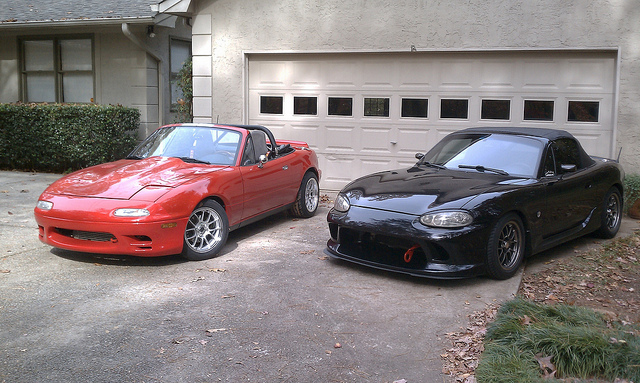
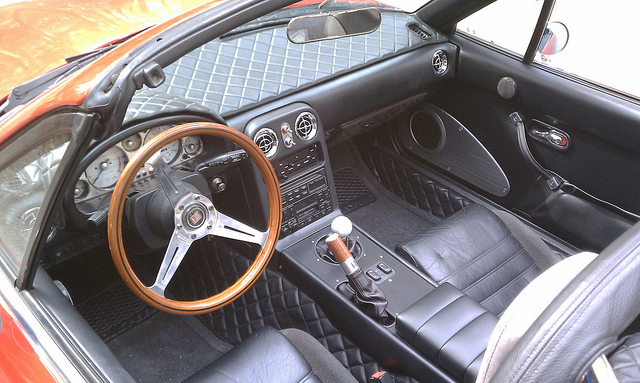
Interior all put back together again:
And all buttoned up (minus the intake filter, and yes, there was one on the car when it was driven):

They're extremely lightweight, however, I didn't put them on a scale. I don't know what Elise they came from (richyvrlimited is probably correct), I just know they are not Probax as they have the adjustable lumbar support. He has a set of black Exige Probax seats on the way to replace these. Cost? IDK either, I've seen similar ones go for $600-900/set (or sometimes more) easy on other forums.Anyway, the car went home today. Aside from the Hydra 2.5 not having great control of the ID1000s at idle when the fans kick on (this was expected), the car drove great and went into boost very smoothly. No full throttle runs, just checking how it transitions from cruise to boost and how well it was auto-tuning. Now the Hydra is actually back out and will be sent in for the 2.7 upgrade, then we'll be in great shape for controlling the injectors and further tuning.
Few pictures in the light:
Interior all put back together again:
And all buttoned up (minus the intake filter, and yes, there was one on the car when it was driven):
Reply
1
1
 11-12-2011, 07:50 PM
#58
Tour de Franzia

iTrader: (6)
Join Date: Jun 2006
Location: Republic of Dallas
Posts: 29,085
Total Cats: 375
Get rid of that silvery hose wrap stuff on the heater hoses and get some Fire Sleeve and silicone tape. It will work exponentially better, look better, and make the hoses lifetime.
Reply
0
0

Thread
Thread Starter
Forum
Replies
Last Post


