
Rebuild all the salvage Miatas! ASS!

Thread Starter


Joined: Sep 2010
Posts: 8,157
Total Cats: 1,094
From: Lake Forest, CA
Yes, I have zerk fittings. I'll be working about it more later. Not a top concern right now.
<br />
<br />Got the other rear side put together. Hoping to get a lot done this weekend, haven't had any time in the evenings like I had hoped.
<br />
<br />Got the other rear side put together. Hoping to get a lot done this weekend, haven't had any time in the evenings like I had hoped.
Reply
 0
0

0

One thing with the zerks, when you first grease them, they basically grease a channel from the zerk to the point where the grease squirts out (path of least resistance). You need to do some driving to spread the grease around. I use regular old hardware store marine grease in mine -- hit them before NASA TT events.
Reply
0
0

I came here to see progress and I wasn't disappointed. Torquing the diff mounts isn't that hard, you will have to reapply thread locker though when you tighten them more.
Reply
0
0
Thread Starter
Joined: Sep 2010
Posts: 8,157
Total Cats: 1,094
From: Lake Forest, CA
Muhahaha....
<br />
<br />Had to clearance the spindle where the tie rod end mounts in order to fit the singular brackets. Will take pics while I do the other side.
<br />
<br />
<br />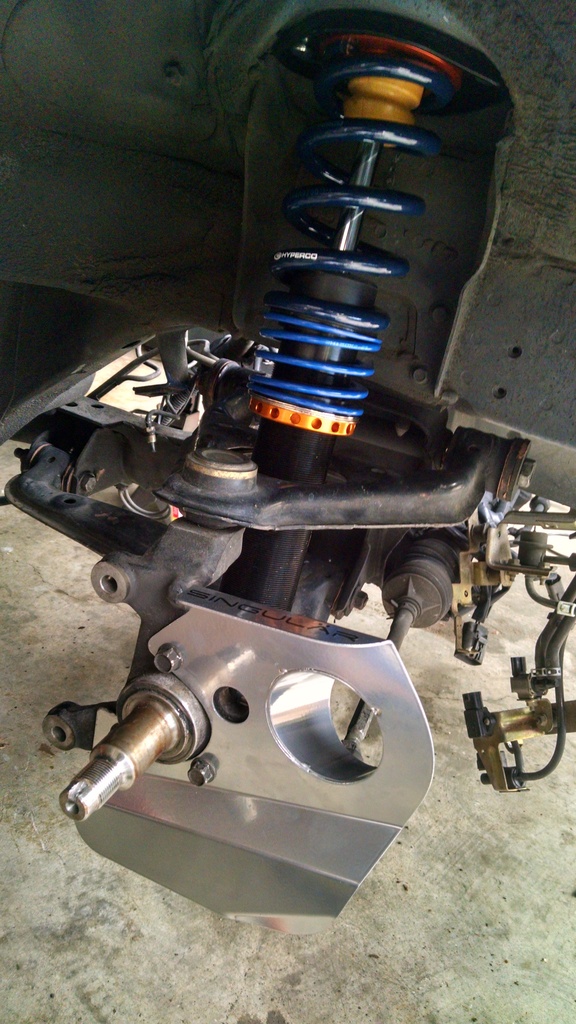
<br />
<br />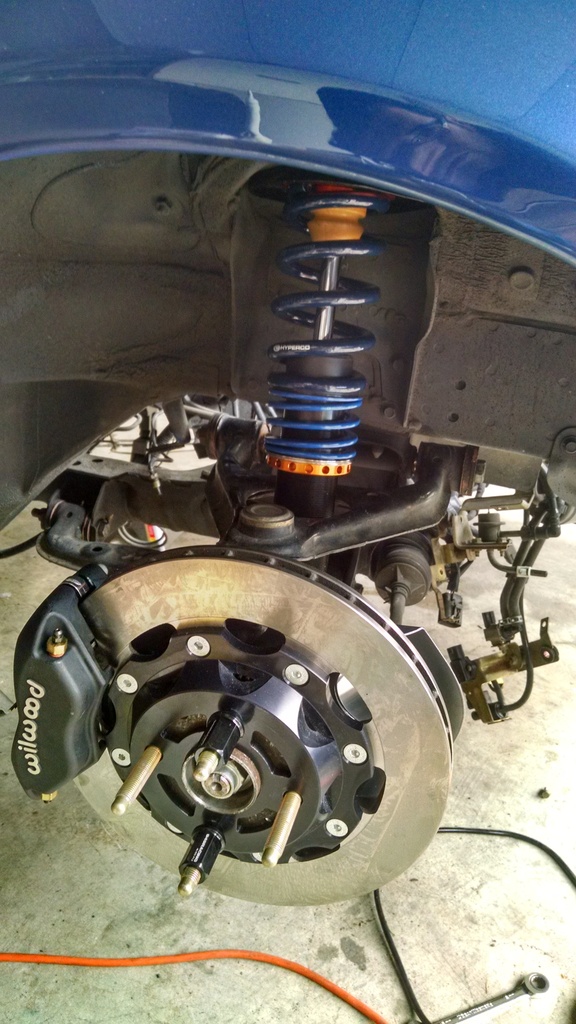
<br />
<br />Had to clearance the spindle where the tie rod end mounts in order to fit the singular brackets. Will take pics while I do the other side.
<br />
<br />
<br />
<br />
<br />
Reply
0
0


Thread Starter
Joined: Sep 2010
Posts: 8,157
Total Cats: 1,094
From: Lake Forest, CA
<p></p><p>Wouldn't letting you drive it be doing something bad to it?</p>
Reply
0
0
Thread Starter
Joined: Sep 2010
Posts: 8,157
Total Cats: 1,094
From: Lake Forest, CA
<p>Some documentation on the brake duct install. These are the 2.5" Singular ducts, purchased from Trackspeed.</p><p>This is the passenger side, which didn't have as much interference as the driver side.</p><p><img src="http://cimg0.ibsrv.net/gimg/www.miataturbo.net-vbulletin/576x1024/80-img_20150802_155813856_hdr_cf7d529719de68b45d88dc8 dd3925fa91c4c4b9c.jpg" title="" /></p><p>Took a little off....</p><p><img src="http://cimg1.ibsrv.net/gimg/www.miataturbo.net-vbulletin/1024x576/80-img_20150802_160050769_hdr_fc82b2d7bffc2192c54febd 1ef79afbf48f253b3.jpg" title="" /><br /><br />Much better.</p><p><img src="http://cimg2.ibsrv.net/gimg/www.miataturbo.net-vbulletin/576x1024/80-img_20150802_160122317_hdr_28ea5363e494e1eddce88d3 a44000ac0df1280b4.jpg" title="" /></p><p>Took a little more off after that photo, but you get the idea. Hit it with some paint before reassembly, and done. After mounting the rotor, I found that there was one little spot towards the bottom of the duct that needed to be tweaked out so it wouldn't rub the rotor.</p><p><img src="http://cimg3.ibsrv.net/gimg/www.miataturbo.net-vbulletin/1024x576/80-img_20150802_160700569_hdr_7e56520a4dd081c5c448632 670096f15b7669a65.jpg" title="" /><br /><br /> </p>
Reply
0
0
Thread Starter
Joined: Sep 2010
Posts: 8,157
Total Cats: 1,094
From: Lake Forest, CA
<p>Then I installed the other wheels and rolled it outside to wash the engine bay. Course had to take a couple pics. Pardon the clubroadster stance, the rear wheel was up on the curb and I haven't made any sort of attempt at ride height adjustment or alignment.</p><p><img src="https://cimg4.ibsrv.net/gimg/www.miataturbo.net-vbulletin/1024x576/80-img_20150802_175827434_hdr_efff6d24eb5285bb6b5e345 4de755e1557ed84e0.jpg" title="" /><br /><br /><img src="http://cimg3.ibsrv.net/gimg/www.miataturbo.net-vbulletin/1024x576/80-img_20150802_175847601_05f019d8fad8dbb29956de4bd95 a494ded81ed73.jpg" title="" /><br /><br /> </p><p>And that was fun. BUT... I decided to mount up the rear bumper. And there's a wee surprise here...</p><p><img src="http://cimg1.ibsrv.net/gimg/www.miataturbo.net-vbulletin/1024x576/80-img_20150802_185410102_b9f4d85b78faf858581c3c7cfcb 1bd73749082b6.jpg" title="" /><br /><br /><img src="http://cimg2.ibsrv.net/gimg/www.miataturbo.net-vbulletin/1024x576/80-img_20150802_185400048_hdr_772a1d5fe0fc5c708854093 8929d9ed7fb440d9c.jpg" title="" /><br /><br /><img src="http://cimg3.ibsrv.net/gimg/www.miataturbo.net-vbulletin/1024x576/80-img_20150802_185628326_hdr_f35d8cd218e920fe6b612ec e184df9512db33032.jpg" title="" /><br /><br />I am REALLY happy with how it's looking. I need to adjust the trunk latch -- when this car got stolen (the reason it was at the salvage auction), the thieves tried to pry open the trunklid so even though it closes securely, it sits a little higher. I also need to sort the pigtails for the taillights and a few other things. But things are coming together rather quickly.</p><p>For tomorrow, I'm going to finish running the brake lines and mounting the ABS module, and install the frame rails. I'll also work on installing the driver seat. Eh Josh?</p><p>So anyway, I'm having fun now, even though I hurt my back last night.</p><p>I need to figure out how I'm doing the return fuel system.</p>
Reply
0
0

Looks great Ed, MSM bumper and NB2 tails really make this look less like an NB1, which is always good.
I don't know if I've mentioned it, but PLEASE leave the windshield out until the last possible minute, it's really nice having it out for interior work.
As for the return setup, I think you need a 94-97 (90-97?) fuel pump assembly, a 90-97 FPR, and a SS line ran along your new frame rails to connect the two.
Contact me for any parts you need, you know I have them.
Reply
1
1

Thread Starter
Joined: Sep 2010
Posts: 8,157
Total Cats: 1,094
From: Lake Forest, CA
Thanks guyths.
<br />
<br />Josh, I've also heard that I can just make use of an extra NB fuel line to run the length of the car, which I have. I've just heard a lot of things, but frankly I'm not smart enough to understand the flow and theory behind it so I'm just left asking for a shopping list. This week I'll spend some more time going through the conversion threads and try to figure out what exactly I need to do. Have you done a return conversion on an NB yet?
<br />
<br />As for the looks, it's kinda funny really... Most people do the NB2 front bumper and headlights. I am doing the rear, with stock NB1 front stuff. I dunno, I like it. Whatever.
<br />
<br />Josh, I've also heard that I can just make use of an extra NB fuel line to run the length of the car, which I have. I've just heard a lot of things, but frankly I'm not smart enough to understand the flow and theory behind it so I'm just left asking for a shopping list. This week I'll spend some more time going through the conversion threads and try to figure out what exactly I need to do. Have you done a return conversion on an NB yet?
<br />
<br />As for the looks, it's kinda funny really... Most people do the NB2 front bumper and headlights. I am doing the rear, with stock NB1 front stuff. I dunno, I like it. Whatever.
Reply
0
0

How much of the factory plumbing around the tank do you want to keep?
If I may...

I think Joe posted this to M.net some time ago, and I had to save it via screen cap of google images due his hosting service being out of bandwidth
So I'm thinking that the easiest way to do this is to use the existing fuel line as a return and the new fuel line as a feed to the underhood regulator. If I disconnect the "out" side from the fuel filter and connect that to the new fuel line, and then plug up that connector, I should be good to go.
Thats way too many words. Time forshitty pretty picture:
 My reason for keeping the factory lines is my regional biennial complications, but you can simplify this A LOT by just chucking the factory stuff and installing appropriate aftermarket lines. Once you remove the in-tank regulator you can use that port as the return, you shouldn't need a NA tank lid at all.
My "ideal" system looks like thus...
Feed: Pump -> top tank fitting -> aftermarket line -> filter -> aftermarket line -> original chassis fuel line
Return: Regulator -> aftermarket line -> scavenged NB main line -> aftermarket line -> top tank fitting
The underhood plumbing and routing stuff is up to you, I've seen at least 3 different ways to plumb in the regulator depending on how you set it up.
Good luck sir! Try not to get fuel all over that nice fresh paint
If I may...
I think Joe posted this to M.net some time ago, and I had to save it via screen cap of google images due his hosting service being out of bandwidth
So I'm thinking that the easiest way to do this is to use the existing fuel line as a return and the new fuel line as a feed to the underhood regulator. If I disconnect the "out" side from the fuel filter and connect that to the new fuel line, and then plug up that connector, I should be good to go.
Thats way too many words. Time for
My "ideal" system looks like thus...
Feed: Pump -> top tank fitting -> aftermarket line -> filter -> aftermarket line -> original chassis fuel line
Return: Regulator -> aftermarket line -> scavenged NB main line -> aftermarket line -> top tank fitting
The underhood plumbing and routing stuff is up to you, I've seen at least 3 different ways to plumb in the regulator depending on how you set it up.
Good luck sir! Try not to get fuel all over that nice fresh paint
Reply
1
1
Thread Starter
Joined: Sep 2010
Posts: 8,157
Total Cats: 1,094
From: Lake Forest, CA
Thanks Ben.
<br />
<br />A new question. I bought a rear passenger side hub/spindle assembly for ABS. When I got it, the hub wiggled so... Bad bearing, right? Bought a new bearing. Had it installed. Didn't really pay that close attention to how it felt afterwards.
<br />
<br />After installing it and mounting the wheel it still has all kinds of slop. Took it off again and it feels like it's in the bearing.
<br />
<br />Wtf? This was a new OEM bearing. Anyone else experienced this?
<br />
<br />A new question. I bought a rear passenger side hub/spindle assembly for ABS. When I got it, the hub wiggled so... Bad bearing, right? Bought a new bearing. Had it installed. Didn't really pay that close attention to how it felt afterwards.
<br />
<br />After installing it and mounting the wheel it still has all kinds of slop. Took it off again and it feels like it's in the bearing.
<br />
<br />Wtf? This was a new OEM bearing. Anyone else experienced this?
Reply
0
0
I have not.
Don't over complicated it. The stock setup sends fuel through a filter, to the rail. All you're doing is removing the pulse damper and replacing it with a FPR, which has a vacuum reference, and hose barb. Run this hose barb all the way back to the tank. I'm looking at Richard's fuel pump assembly from his NB2 right now, it has an extra bung for the return line. Your job is just to eliminate whatever that bung was previously used for.
Personally, I'd eliminate every stock plastic NB fuel line and replace with standard fuel injection hose, using the quick release fuel clips, you should have plenty. The NA FPR will obviously just have fuel hose slipped on with a clamp.
Personally, I'd eliminate every stock plastic NB fuel line and replace with standard fuel injection hose, using the quick release fuel clips, you should have plenty. The NA FPR will obviously just have fuel hose slipped on with a clamp.
Reply
0
0

The NB pumps out the tank, through the filter and then hits a T. One side of the T goes to the engine where it dead ends into the fuel rail, the other side goes back into the tank via the second 'bung' and hits the regulator, then bleeds back into the tank. The tank lid is set up exactly like the NA except that the tubes come out at different angles and they use fuel injection quick clips rather than hose clamps.
Like everyone keeps saying, don't overthink it.
Reply
0
0
Joined: Apr 2014
Posts: 18,643
Total Cats: 1,870
From: Beaverton, USA
Reply
0
0


