
RWyatt's "It's takin forever" Build Thread


Thread Starter
Senior Member
Joined: Dec 2007
Posts: 1,467
Total Cats: 132
From: ATL
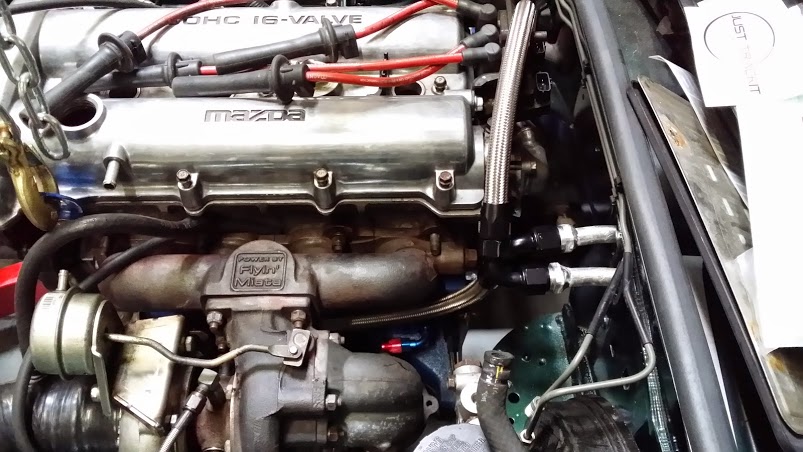
Didn't do too much this past weekend, just mounted new rear rotors and fitted up the calipers all around. I took the water mixing manifold and pipes for the heater core to have -10 AN fittings welded and brazed on (respectively)
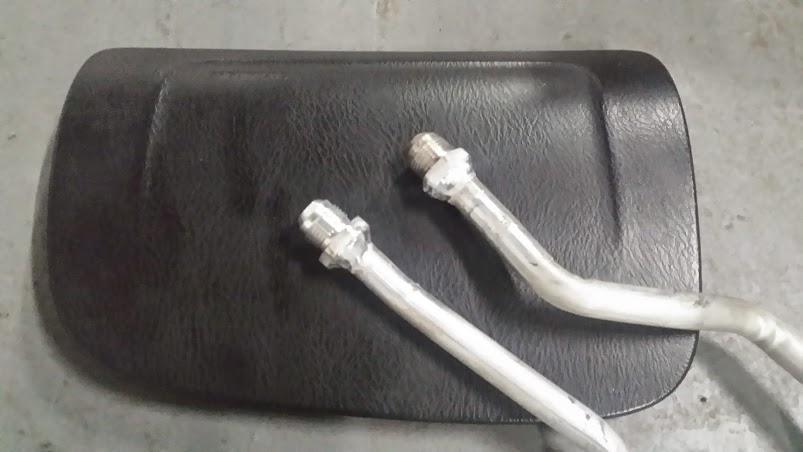
So while I'm waiting for those to come back I test-fitted the water return spacer on the back of the head. Or, more properly, figuring out the orientation of the BEGI spacer so that the AN fittings don't interfere with anything. What I'm going with is this;
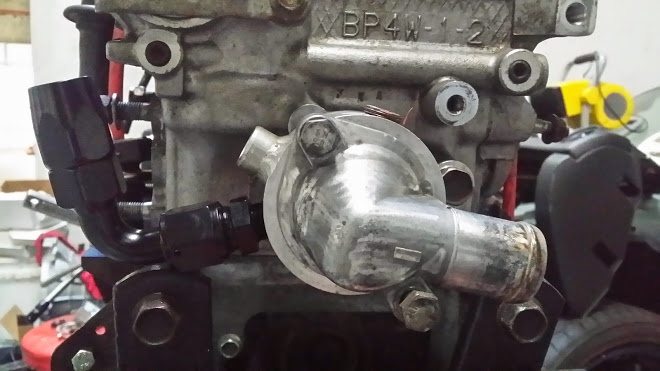
What you can see is a -10 AN, 90-degree hose end that'll feed the heater core. What you can't see is a -6 AN fitting that sits directly behind the main hose connection. That's the water feed for the turbo.
The problem is that this fitting would hit this;
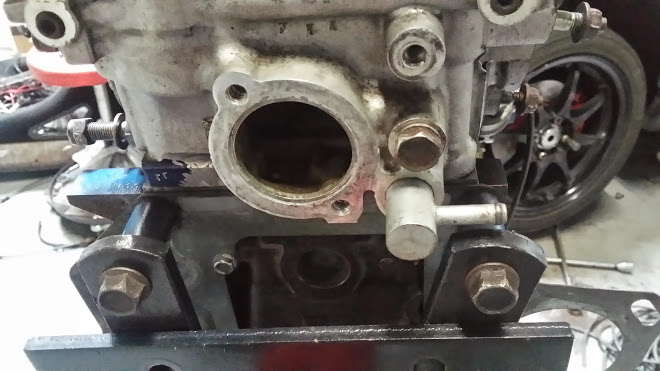
Since I'm not using the oil warmer, this was redundant so I cut that puppy off and will tap the hole for a NPT plug. Problem solved.
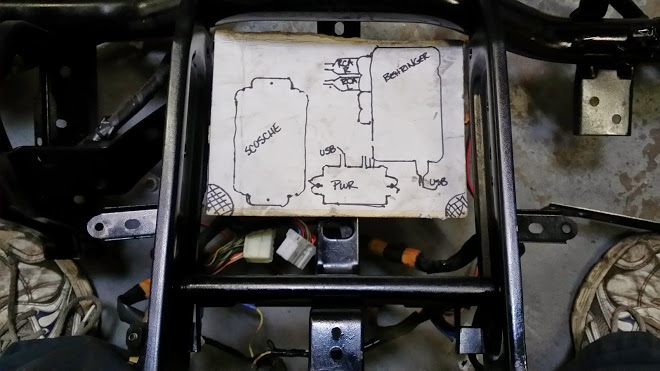
Sunday I decided to figure out how to place the "stuff" that I'm going to use for the in-dash tablet. I could just cram it into the place where the radio/CD player went but I decided to be a bit neater since I have the whole dash out. A little bit of cardboard and a Sharpie and this it the template I came up with.
The plan is to make a mounting plate out of some sheet metal, attach the components onto the metal, then mount the plate to the dash subframe and run the wires from that. It should be a little bit neater than the rat's nest that was there.
FYI (in case you didn't know);
The Behringer is a USB DAC to convert the digital audio signals from the tablet into an analog signal for the amp (I'm going to be using the stock Bose amp and speakers - yes, blasphemy, but if you heard how my car sounded you'd know that audio quality is not of primary concern). The Scosche is basically a pot for adjusting the gain of the audio signal to suit the amplifier (I'm sure there's a better explanation, but that works for me). And "PWR" is a RioRand dual-USB outlet 12v - USB 5v converter. This puppy will power the whole kit and kaboodle.
Of course there's the tablet, a Nexus 7 (the older model) that's been rooted and Timur's ROM installed over CyanogenMod. That'll get the audio to the USB as well as other cool stuff such as putting the tablet into deep sleep when the USB power is off. Of course, I've already got ShadowDash installed and the obligatory Waze (for GPS) and Spotify (for music). I'll be working through all the wiring for that this week.
Reply
 0
0

0
Thread Starter
Senior Member
Joined: Dec 2007
Posts: 1,467
Total Cats: 132
From: ATL
I got the stuff back from the welder;
- Mixing manifold:
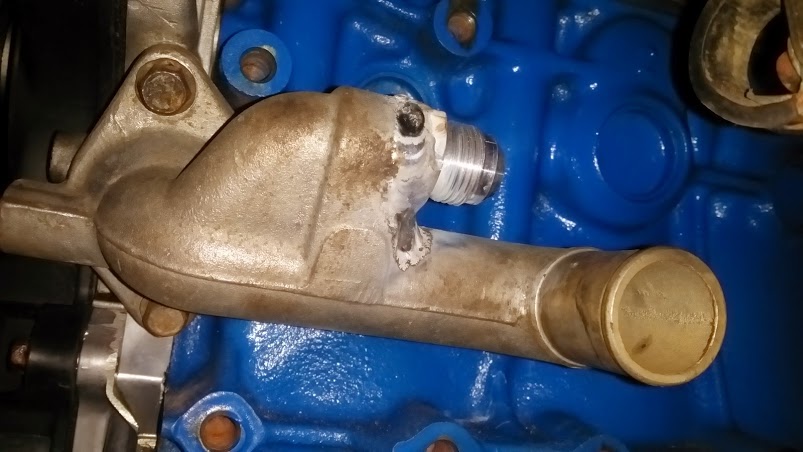
- Heater core pipes:
Got some measuring to do to get the routing and length of the braided lines for the heater core feed and return lines. I'll lift the engine into place this weekend and measure (rather than making an "educated guess" and failing as I so often do).
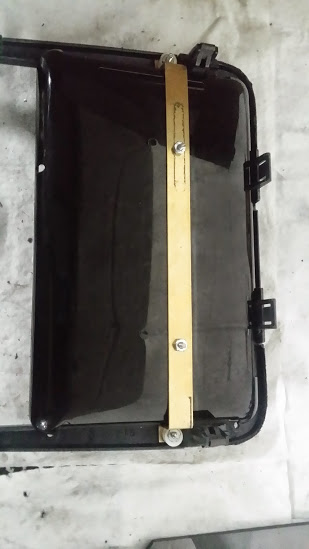
I also cut a metal plate and mounted the "stuff" for the tablet onto it;

Right now it's all loose wires. I'll make the appropriate connections and clean it all up tonight; then I'll paint the plate and mount it tomorrow.
Here's how the tablet will mount:
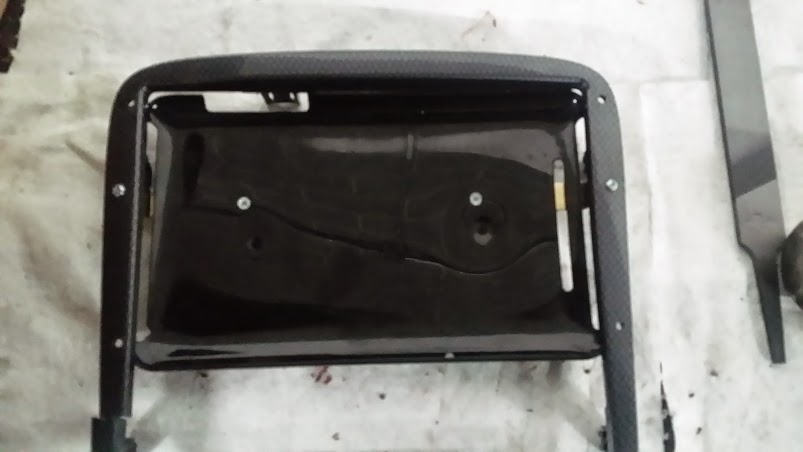
...back side...
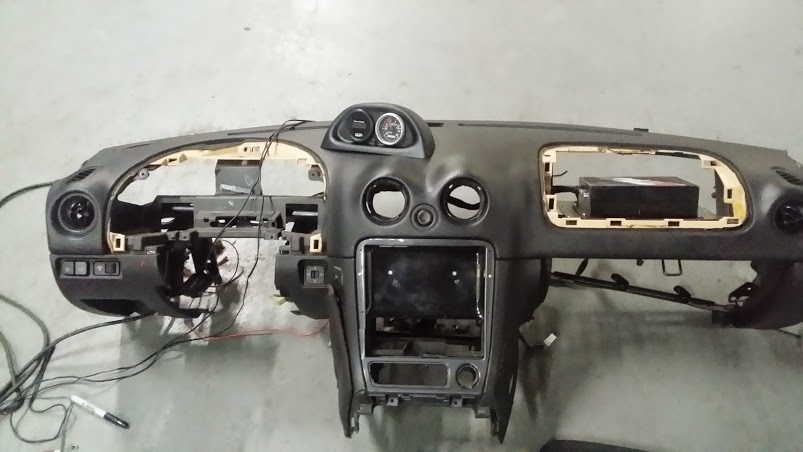
...and here's the whole dash with the gauge pod mounted, the tablet mount in the console and the MS in the airbag cubby:
Slow and steady...
- Mixing manifold:
- Heater core pipes:
Got some measuring to do to get the routing and length of the braided lines for the heater core feed and return lines. I'll lift the engine into place this weekend and measure (rather than making an "educated guess" and failing as I so often do).
I also cut a metal plate and mounted the "stuff" for the tablet onto it;
Right now it's all loose wires. I'll make the appropriate connections and clean it all up tonight; then I'll paint the plate and mount it tomorrow.
Here's how the tablet will mount:
...back side...
...and here's the whole dash with the gauge pod mounted, the tablet mount in the console and the MS in the airbag cubby:
Slow and steady...
Reply
0
0


Thread Starter
Senior Member
Joined: Dec 2007
Posts: 1,467
Total Cats: 132
From: ATL
I'm using ShadowTuner and a Bluetooth transmitter on the serial cable from the MS. That worked like a boss! The only thing I couldn't figure out was how to make custom displays (the stock ShadowTuner displays are kinda lame). Other than that, it's a great tool and the inclusion of MPH in the logs is useful.
There are two things I have yet to figure out;
1) Making a "cover" for the tablet that's easy to deploy when the car is parked (to protect from the sun and to hide from prying eyes).
2) A hinge (or hinges) for the cover where the MS and stock ECU will live (where the passenger airbag was). I spent the day, yesterday, looking at hinges online and couldn't find anything suitable. I'm looking for something that will open about 120 degrees, lock in an open position and has enough spring tension to keep the cover shut when closed .
Reply
0
0
Thread Starter
Senior Member
Joined: Dec 2007
Posts: 1,467
Total Cats: 132
From: ATL
So, I test fit the -AN hoses for the heater core and this is what I got;
I'm not really happy with the return to the heater spacer. It's pretty tight around the coip pack. I've got two alternatives:
1) Lengthen the line a bit (as in re-make the hose) to get more arc on the hose to get more clearance. Simple, easy but might rub on the hood if I give it too much arc.
2) Come out of the driver's side of the spacer with a straight hose end and loop the hose under and around the heater core pipes and come in from the bottom. Costly (more hose to buy), but avoids the hood-clearance issue.
Opinions?
Reply
0
0

Joined: Apr 2014
Posts: 18,643
Total Cats: 1,870
From: Beaverton, USA
So, I test fit the -AN hoses for the heater core and this is what I got;
I'm not really happy with the return to the heater spacer. It's pretty tight around the coip pack. I've got two alternatives:
1) Lengthen the line a bit (as in re-make the hose) to get more arc on the hose to get more clearance. Simple, easy but might rub on the hood if I give it too much arc.
2) Come out of the driver's side of the spacer with a straight hose end and loop the hose under and around the heater core pipes and come in from the bottom. Costly (more hose to buy), but avoids the hood-clearance issue.
Opinions?
I'm not really happy with the return to the heater spacer. It's pretty tight around the coip pack. I've got two alternatives:
1) Lengthen the line a bit (as in re-make the hose) to get more arc on the hose to get more clearance. Simple, easy but might rub on the hood if I give it too much arc.
2) Come out of the driver's side of the spacer with a straight hose end and loop the hose under and around the heater core pipes and come in from the bottom. Costly (more hose to buy), but avoids the hood-clearance issue.
Opinions?
Reply
0
0
Thread Starter
Senior Member
Joined: Dec 2007
Posts: 1,467
Total Cats: 132
From: ATL
COP's would be ideal, but I'm cash-limited right now. Maybe next year?
Reply
0
0
Thread Starter
Senior Member
Joined: Dec 2007
Posts: 1,467
Total Cats: 132
From: ATL
Did some test-fitting inside yesterday:
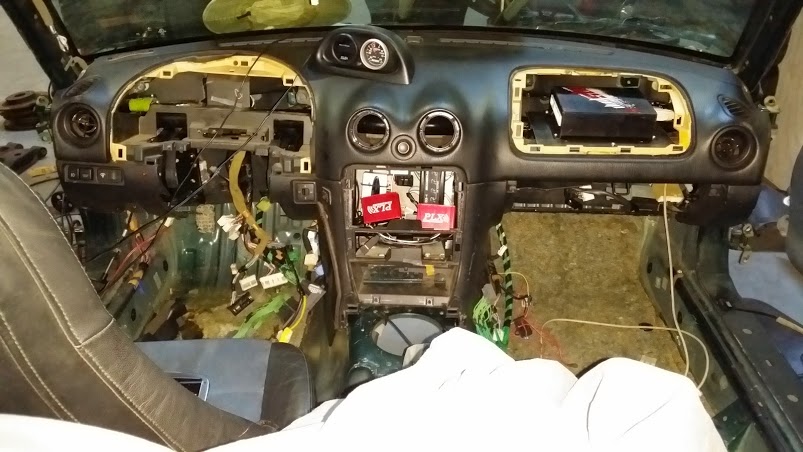
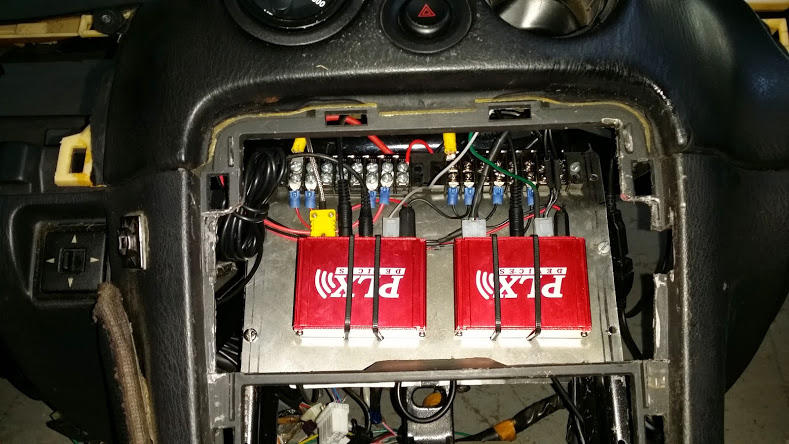
The MS where the passenger airbag was will do quite nicely. The green/black wire bundle to the right of the center console is the Boomslang extension - that'll get fished up to the ECU. The stock ECU will be velcro'ed to the top of the MS so I can swap between the two without breaking a sweat.
The "audio stuff" is tucked back in the space where the radio and CD player used to fit. The two red PLX boxes are for WBO2 and EGT controllers. There will be another panel in front of the audio mount that those boxes will mount to. I've got to figure out a quick mounting solution for the plate that the PLX modules will attach to - so that I can get to the audio stuff quickly when/if I need to.
I also gutted the box where the A/C heat exchanger was - no A/C, so no need for that. I'm toying with the idea of replacing that big-ole black box with some heating duct from Lowes Racing Supply ;-) If it weren't for the strange triangular shape of the inlet to the center "air-mixing box", I'd do it in a second.
On a side note, I was surprised (shocked) at the amount of CRAP that came out of the fan unit! Seeds, bugs, leaves, dust-bunnies! I'm surprised that any air was being moved by that unit at all!! If it weren't so inaccessible I'd consider an annual cleaning.
Reply
0
0
Thread Starter
Senior Member
Joined: Dec 2007
Posts: 1,467
Total Cats: 132
From: ATL
More wiring (sorry for the sucky cellphone pics)...
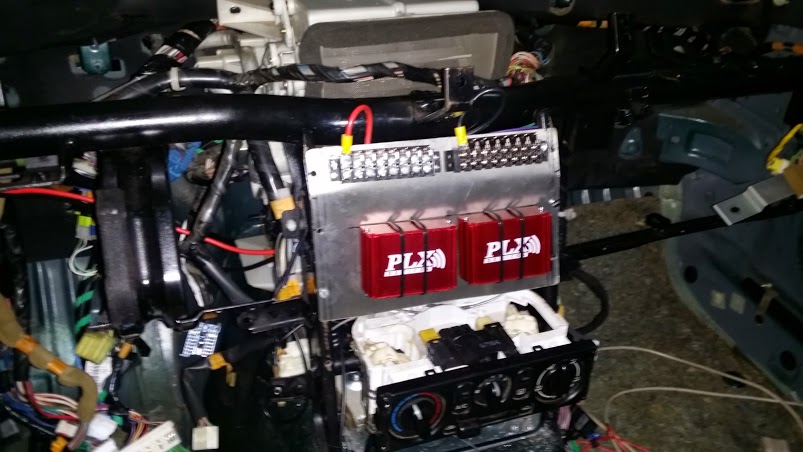
I'm using the distribution blocks to centralize and organize power taps for "stuff" (no more under-dash rat's nest for me!). One block will be for switched 12v, the other for ground. Both of these will tap off the main wiring harness (fused, of course).
Underneath is where the PLX modules will go for the WBO2 and EGT sensors. Right now the mounting plate is screwed on, but the plan is to use these
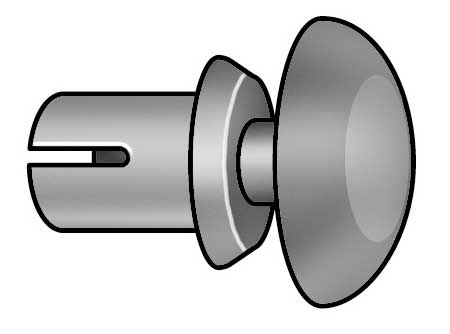
as quick-release fasteners for easy access to the audio stuff underneath.
I've got some more wiring to do tonite (dual-fan mod w/ manual over-ride, fuel pump manual on, main relay bypass, NA alternator in NB mod, PLX modules, etc).
My next sub-projects are;
- Full-return fuel system mod
- ABS delete
Damn! This is taking FOREVER!!
I'm using the distribution blocks to centralize and organize power taps for "stuff" (no more under-dash rat's nest for me!). One block will be for switched 12v, the other for ground. Both of these will tap off the main wiring harness (fused, of course).
Underneath is where the PLX modules will go for the WBO2 and EGT sensors. Right now the mounting plate is screwed on, but the plan is to use these
as quick-release fasteners for easy access to the audio stuff underneath.
I've got some more wiring to do tonite (dual-fan mod w/ manual over-ride, fuel pump manual on, main relay bypass, NA alternator in NB mod, PLX modules, etc).
My next sub-projects are;
- Full-return fuel system mod
- ABS delete
Damn! This is taking FOREVER!!
Reply
0
0
Thread Starter
Senior Member
Joined: Dec 2007
Posts: 1,467
Total Cats: 132
From: ATL
...and I'm seriously considering a BRB push-to-start button. I'm going to blatantly plagiarize this write-up and attempt to copy this installation;
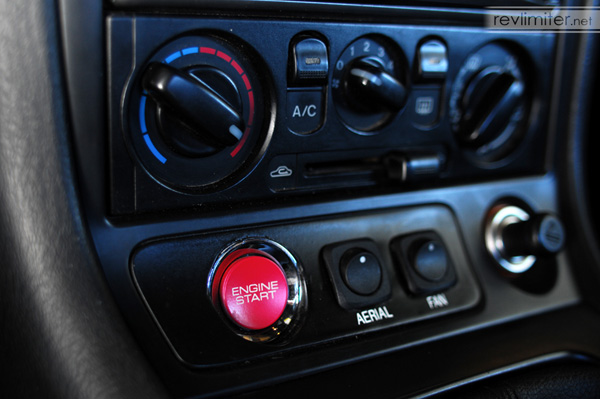
Because; a) it looks cool, b) it's totally non-standard, and c) I want to!
Since I won't have ABS in the new chassis (and haven't had active ABS in the old one for over 5 years) - why not?
Because; a) it looks cool, b) it's totally non-standard, and c) I want to!
Since I won't have ABS in the new chassis (and haven't had active ABS in the old one for over 5 years) - why not?
Reply
0
0
Thread Starter
Senior Member
Joined: Dec 2007
Posts: 1,467
Total Cats: 132
From: ATL
Too many honey-do projects this weekend. Was only able to do a "real" steering rack de-power (without the pinion weld - I'll do that later if the steering feels too sloppy), no pics.
Started to do some wiring;

I'll probably flip the PLX modules upside-down to get more clearance for the connectors. But it'll all fit nicely under the dash.
Also started on re-facing the airbag faceplate in preparation for the BRB.
Started to do some wiring;
I'll probably flip the PLX modules upside-down to get more clearance for the connectors. But it'll all fit nicely under the dash.
Also started on re-facing the airbag faceplate in preparation for the BRB.
Reply
0
0

Newb
Joined: Sep 2014
Posts: 33
Total Cats: 0
From: Tualatin
I stumbled upon this looking for tablet mount information and ended up catching up on the whole thread.
Roger you deserve a hearty "Bravo good sir, bravo" for you perseverance both in the onslaught of poor luck/mechanical|electrical shenanigans and in the post/feedback ratio in this thread.
I guess I should start a build thread on my 5th 5 year winter refurbishment at some point soon. (yes that would coincide with the 25 years the Miata has been around) In the mean time parts collection...good for the soul if not the pocket book.
--Miq
Reply
0
0
Thread Starter
Senior Member
Joined: Dec 2007
Posts: 1,467
Total Cats: 132
From: ATL
I stumbled upon this looking for tablet mount information and ended up catching up on the whole thread.
Roger you deserve a hearty "Bravo good sir, bravo" for you perseverance both in the onslaught of poor luck/mechanical|electrical shenanigans and in the post/feedback ratio in this thread.
Roger you deserve a hearty "Bravo good sir, bravo" for you perseverance both in the onslaught of poor luck/mechanical|electrical shenanigans and in the post/feedback ratio in this thread.
I guess I should start a build thread on my 5th 5 year winter refurbishment at some point soon. (yes that would coincide with the 25 years the Miata has been around) In the mean time parts collection...good for the soul if not the pocket book.
--Miq
--Miq
Reply
0
0
Thread Starter
Senior Member
Joined: Dec 2007
Posts: 1,467
Total Cats: 132
From: ATL
This weekend's fun;
You can see the "Dremel mods" necessary to clear the bracket for the tablet on the left and right of the dash opening, as well as the cut on the right side for the tablet power.
I flipped the PLX modules upside-down and wired the gauges. Now I see that I have to move the modules down about 1/2 inch to gain clearance for the wires going to the terminal strips - no biggie. The gauges in the pod on top of the dash are boost and AFR/EGT (that's in a PLX DM-100 module that can read from multiple gauges). Then there's oil temp in the left eyeball vent hole (it almost seems like it was made for that spot).
Anyway, here's a "dry-fit" of the tablet in the dash and the re-faced airbag switch (just below the HVAC controls).

I've already mounted a switch to manually control the radiator fans and a warning light for low oil pressure (if you read the whole thread you know why I need that!). To the left of the warning light is a space for the Engine Start BRB (yet to be acquired).
Wonder why there's writing on the new face of the airbag switch. Well it's plastic from a "No Parking" sign from my favorite hi-performance shop, Lowes Racing Supply. Yeah, I could have cut it from the blank side but who cares, it's going to be painted anyway.
You can see the "Dremel mods" necessary to clear the bracket for the tablet on the left and right of the dash opening, as well as the cut on the right side for the tablet power.
I flipped the PLX modules upside-down and wired the gauges. Now I see that I have to move the modules down about 1/2 inch to gain clearance for the wires going to the terminal strips - no biggie. The gauges in the pod on top of the dash are boost and AFR/EGT (that's in a PLX DM-100 module that can read from multiple gauges). Then there's oil temp in the left eyeball vent hole (it almost seems like it was made for that spot).
Anyway, here's a "dry-fit" of the tablet in the dash and the re-faced airbag switch (just below the HVAC controls).
I've already mounted a switch to manually control the radiator fans and a warning light for low oil pressure (if you read the whole thread you know why I need that!). To the left of the warning light is a space for the Engine Start BRB (yet to be acquired).
Wonder why there's writing on the new face of the airbag switch. Well it's plastic from a "No Parking" sign from my favorite hi-performance shop, Lowes Racing Supply. Yeah, I could have cut it from the blank side but who cares, it's going to be painted anyway.
Reply
0
0


