Something about GLTC/ST5/TT5
 04-10-2019, 02:23 PM
#261
Elite Member
Thread Starter
iTrader: (7)

Join Date: Jan 2008
Location: Statesville, NC
Posts: 2,738
Total Cats: 319
Copying from DiY aero thread....
Dollars spent: $250ish
Hours spent: 16+
How effective: 2
0=slower, 1, no improvement, 2 =slightly better,3= big improvement
Materials used: 0.100" HDPE, 10mm alumalite, turn-buckles/wires, 6x nuts/bolt/fender washers and rivets.......lots of rivets
Bracket location: Hard-mount in OEM holes for rear of under-tray. Cable-wire/turn-buckles for front and side mounting points. L-brackets on splitter for air-dam to rest on.
Tracks tested on: Roebling Road
Race/TT class built for: ST5/TT5/GLTC
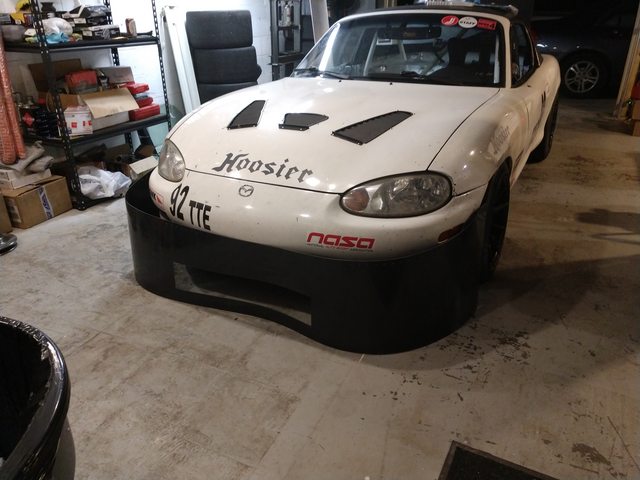
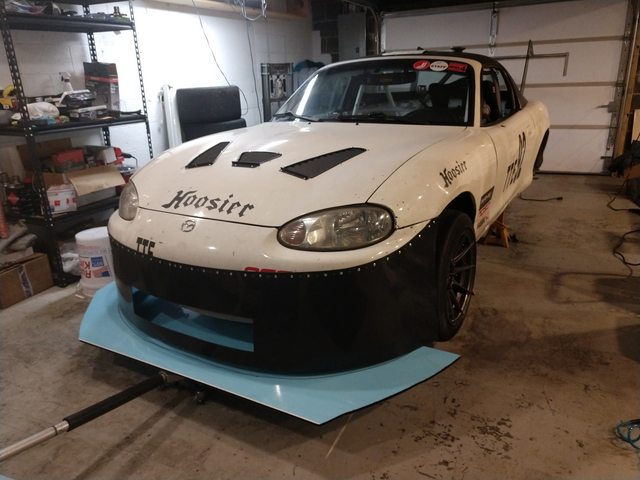
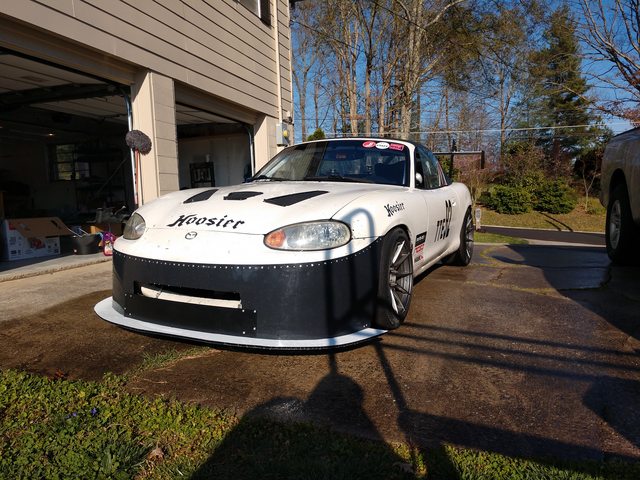
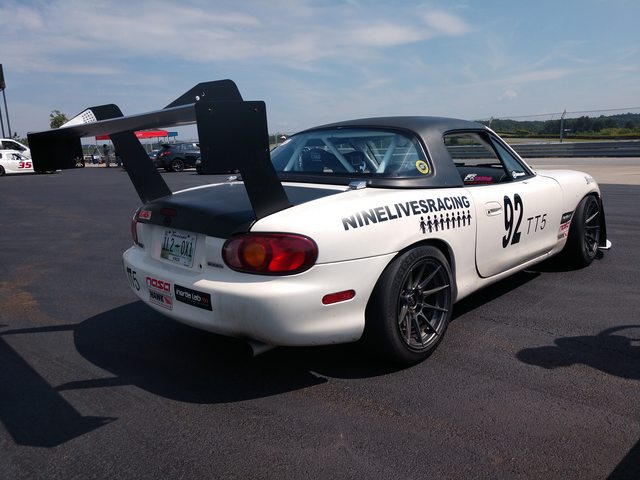
Admittedly, a buddy and me slapped this together in a hurry. Did my best to off-set the rear downforce of the 9LR 64" swan-neck, even at 0 AOA.
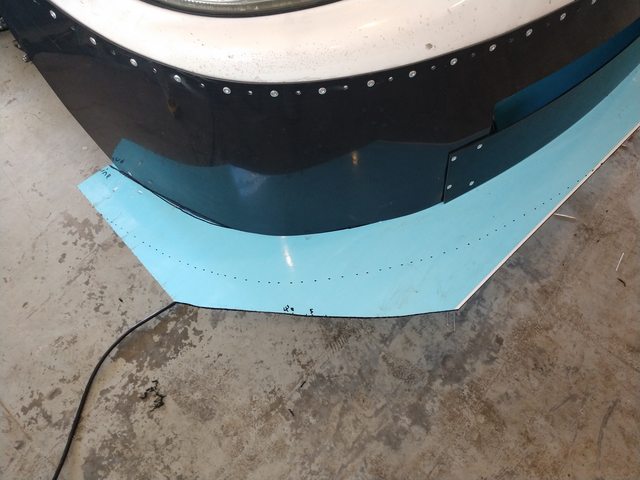
This was put together with 9LR prototype air-dam made out of 0.100" HDPE. It has about 3x as many rivet holes as needed, I needed up using every other hole, which is still 40 rivets across the top of it. Thank god for air rivet gun!
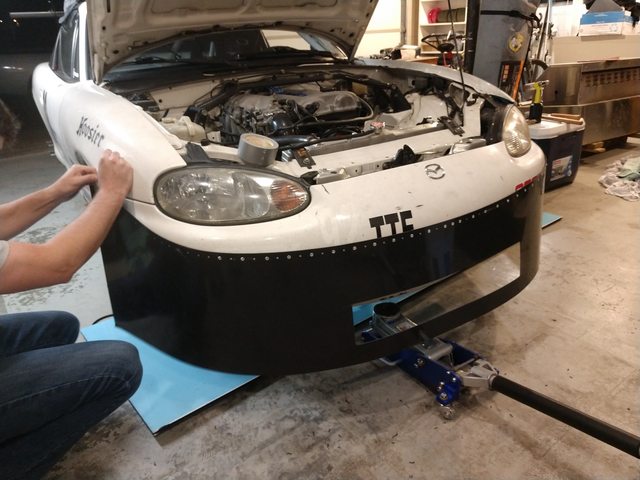
Mocking the air-dam up, I attempted to mount it on the furthest edge possible on the front bumper. Lining up this pre-cut prototype up with the very top of the bumper edge where it meets the fenders. I figured I didn't want it to be riveted to the fender in case of contact and for ease of disassembly on the fenders.
Once mounted, we realized it was low as damnit. So we'll have to do some custom fab work with box-cutter later. 2x4 for reference.......

Got the left-over alumalite mocked up as well..... quickly noticed if this piece is mounted level with the subframe it'll point straight at the opening of the mouth of the air-dam. OR have so much AOA that'll dig into anything it gets near like..... sand, dirt, grass, curbs, or even loading ramps
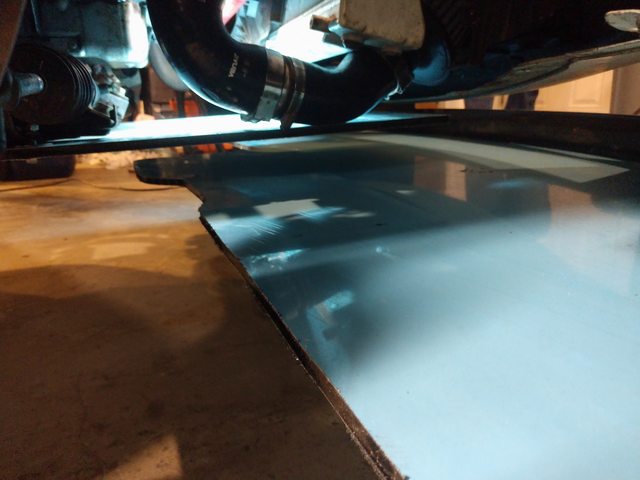
Also noted the left-over piece doesn't quite reach the sub-frame if I intended to do a ~3" splitter lip.
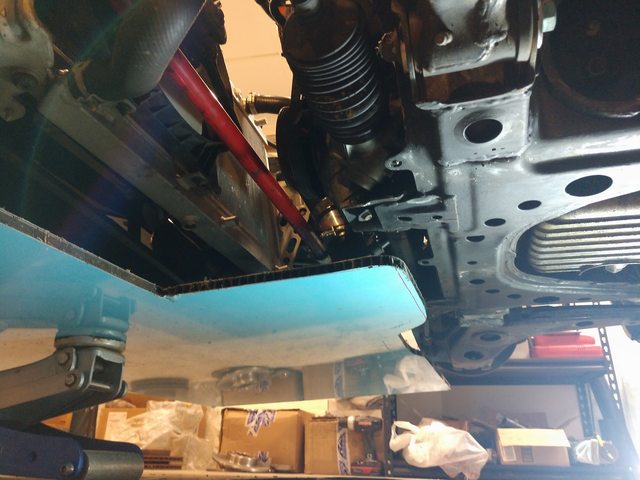
So we opted for a uuhhh..... "modular" design here. Cut the very edge of this alumalite, drilled holes for sub-frame, mocked it onto main piece, drilled a few more holes, and fastened it together.
Thankfully during mock-up and I had the fore-sight to make sure the holes were 1. accessible from the top to tighten 2. don't send the drill-bit into something important, like the steering rack or oil-pan
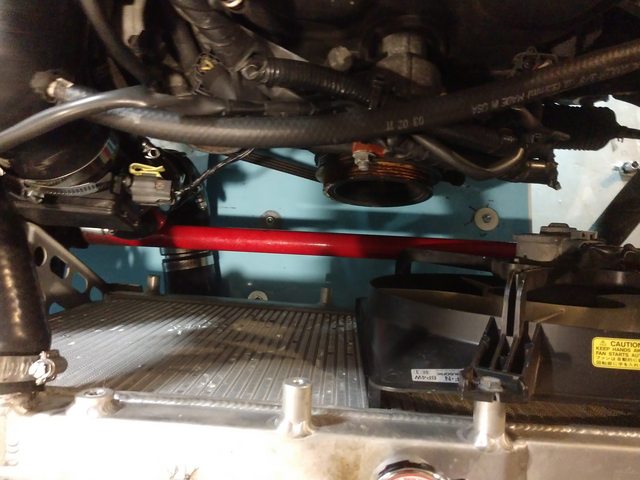
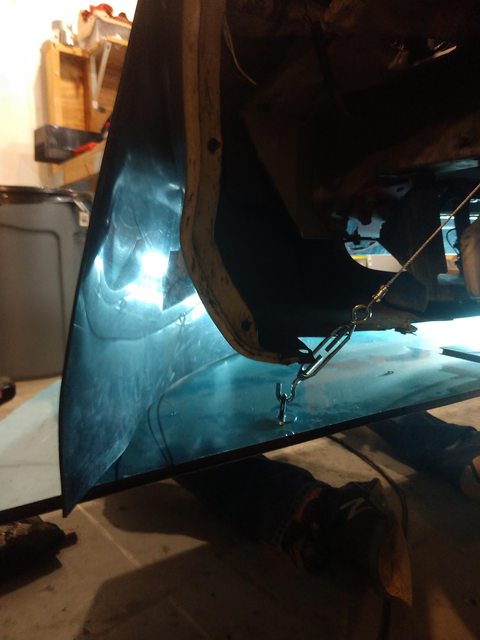
Used some cable-wire, turn-buckles with J-hooks on one side, and eye-lit bolts with bigass washers. Mounted two in the front to the edge of the mouth, using the two bolts on the bumper support. Two others mounted on the sides using two bolts right off the frame.
(Note: I stole this idea from Dan ) This actually works out pretty damn well and I'd recommend it. I would like to find a way to get the bottom of the eye-lit bolts counter-sunk or flush with the under-tray though. Maybe version 2 will have that?
As you can see here, after cutting the bottom of the air-dam to line up with the "modular" splitter there's not much material of the air-dam at the bottom of the mouth opening. It's also super low, so not ideal for air-flow since I did not do/have time for proper ducting.
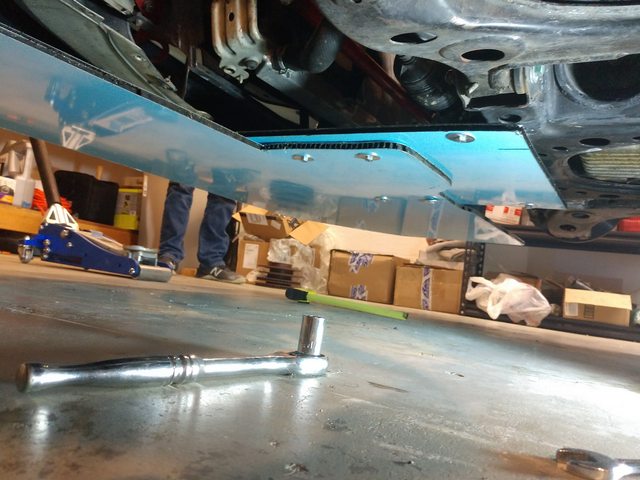
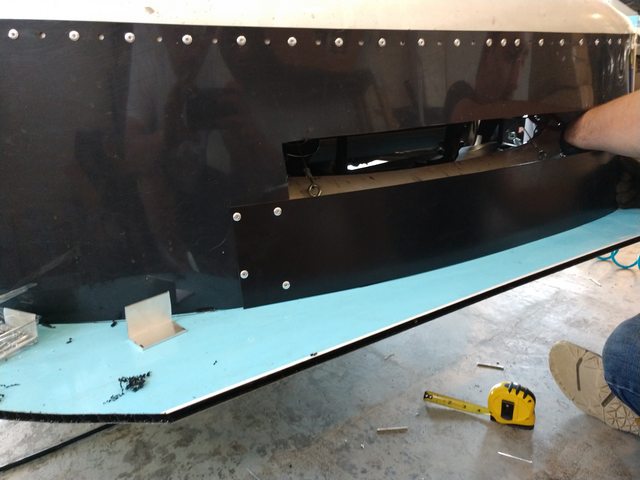
We cut the mouth higher and added a spare piece of ABS to cover the bottom and of course.... more rivets! Also pictured, is one of the L-brackets. I got some 1.5" aluminum angle stock and cut it into multiple 2", 1", and 1/2" slivers. Drilled holes into one side and riveted them onto the splitter following a tight path around the airdam. Carefully not surpassing 5* of air-dam angle
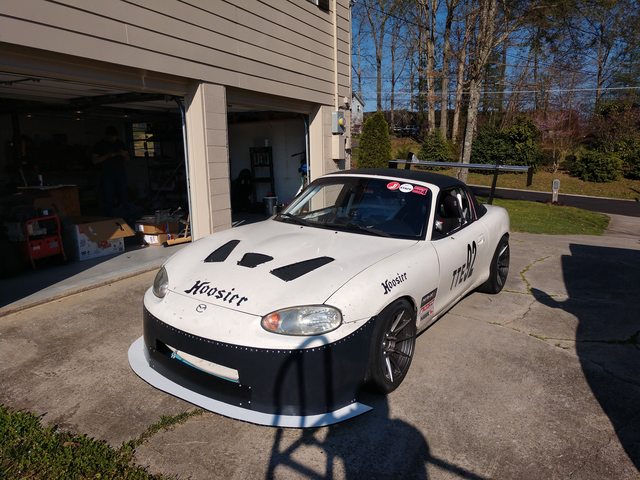
Marked the 3" lip with super precision and took the air-saw to it.
Relatively finished here. Ended up doing some more cutting on the air-dam to prevent the bulging on the sides in front of the wheels.
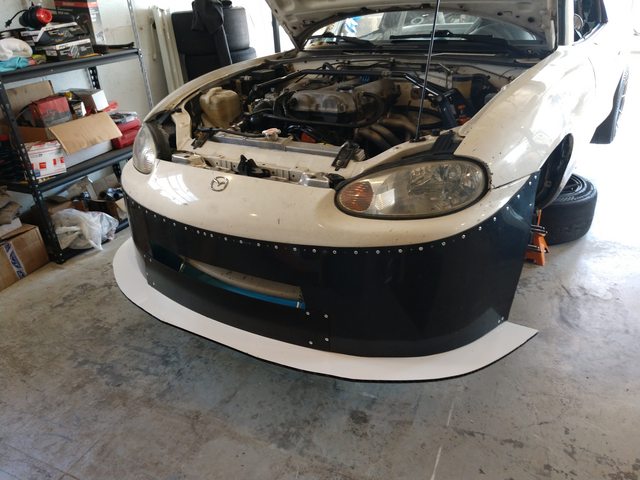
And on the ground!
Additional notes:
The mouth turned out to be too small for drafting. Car crept up to 3/4 on OEM temp gauge while drafting for 1/4 of a lap(2.2mile course) while it was slight over-cast and ~75* ambient. My miata has 37mm Koyo v-core and Qmazxreroute. Ducting would resolve this problem while in a draft with this size of an opening, IMO.
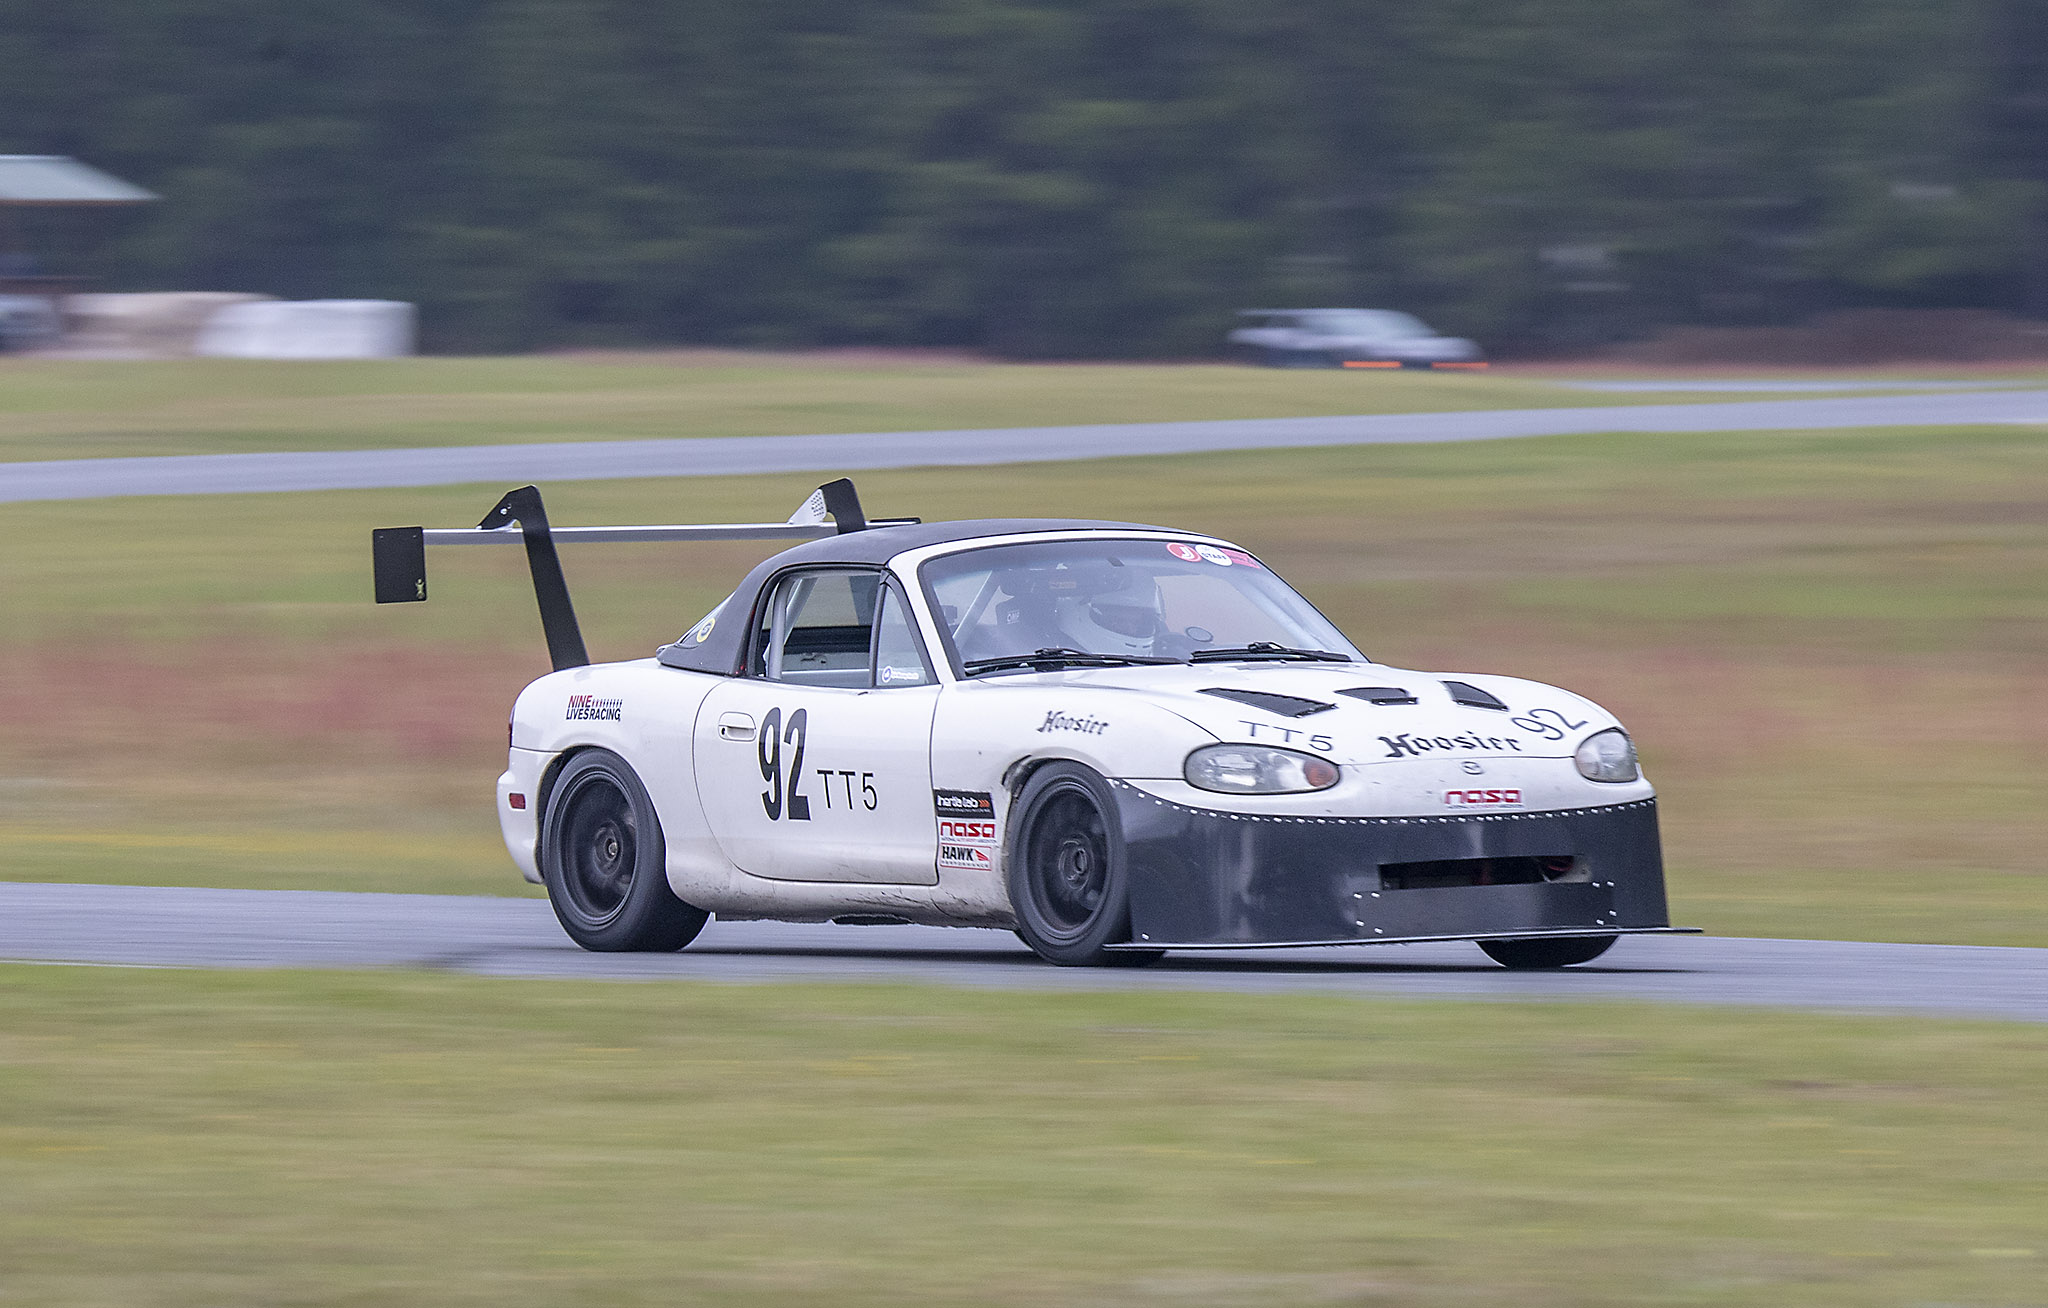
The car gained 5hp, lost ~150lbs, and added this aero package since the last time I was at Roebling.
Previous times in TTE trim of 130rwhp, 2440lbs,Xida800/500,RB1.125"/14mm, 205 R7s, 15x9s - 1:21.7xx - 1:23.0xx
New times in TT5 trim of 135rwhp, 2300lbs, Xida800/500,RB1.125"/14mm, 205 R7s, 15x8s - 1:19.4xx - 1:21.7xx
The largest difference with this aero both my co-driver and I noticed was how settled it was on a slip-angle. It required smaller inputs to correct to squiggle thru. Unfortunately I was not running AiM data two years when I was at Roebling last :(
This comparison actually does a decent job of showing the difference of inputs:
NASA TT5 Track Record Lap Roebling Road - 1:19.499 vs. NASA TTE Roebling unofficial track record - James Cathers by VJ why we slap | YouTube Doubler | Mashup Helper
New TT5 record with TT6 power..... I'm a believer in aero.
Dollars spent: $250ish
Hours spent: 16+
How effective: 2
0=slower, 1, no improvement, 2 =slightly better,3= big improvement
Materials used: 0.100" HDPE, 10mm alumalite, turn-buckles/wires, 6x nuts/bolt/fender washers and rivets.......lots of rivets
Bracket location: Hard-mount in OEM holes for rear of under-tray. Cable-wire/turn-buckles for front and side mounting points. L-brackets on splitter for air-dam to rest on.
Tracks tested on: Roebling Road
Race/TT class built for: ST5/TT5/GLTC
Admittedly, a buddy and me slapped this together in a hurry. Did my best to off-set the rear downforce of the 9LR 64" swan-neck, even at 0 AOA.
This was put together with 9LR prototype air-dam made out of 0.100" HDPE. It has about 3x as many rivet holes as needed, I needed up using every other hole, which is still 40 rivets across the top of it. Thank god for air rivet gun!
Mocking the air-dam up, I attempted to mount it on the furthest edge possible on the front bumper. Lining up this pre-cut prototype up with the very top of the bumper edge where it meets the fenders. I figured I didn't want it to be riveted to the fender in case of contact and for ease of disassembly on the fenders.
Once mounted, we realized it was low as damnit. So we'll have to do some custom fab work with box-cutter later. 2x4 for reference.......
Got the left-over alumalite mocked up as well..... quickly noticed if this piece is mounted level with the subframe it'll point straight at the opening of the mouth of the air-dam. OR have so much AOA that'll dig into anything it gets near like..... sand, dirt, grass, curbs, or even loading ramps
Also noted the left-over piece doesn't quite reach the sub-frame if I intended to do a ~3" splitter lip.
So we opted for a uuhhh..... "modular" design here. Cut the very edge of this alumalite, drilled holes for sub-frame, mocked it onto main piece, drilled a few more holes, and fastened it together.
Thankfully during mock-up and I had the fore-sight to make sure the holes were 1. accessible from the top to tighten 2. don't send the drill-bit into something important, like the steering rack or oil-pan
Used some cable-wire, turn-buckles with J-hooks on one side, and eye-lit bolts with bigass washers. Mounted two in the front to the edge of the mouth, using the two bolts on the bumper support. Two others mounted on the sides using two bolts right off the frame.
(Note: I stole this idea from Dan
) This actually works out pretty damn well and I'd recommend it. I would like to find a way to get the bottom of the eye-lit bolts counter-sunk or flush with the under-tray though. Maybe version 2 will have that?As you can see here, after cutting the bottom of the air-dam to line up with the "modular" splitter there's not much material of the air-dam at the bottom of the mouth opening. It's also super low, so not ideal for air-flow since I did not do/have time for proper ducting.
We cut the mouth higher and added a spare piece of ABS to cover the bottom and of course.... more rivets! Also pictured, is one of the L-brackets. I got some 1.5" aluminum angle stock and cut it into multiple 2", 1", and 1/2" slivers. Drilled holes into one side and riveted them onto the splitter following a tight path around the airdam. Carefully not surpassing 5* of air-dam angle
Marked the 3" lip with super precision and took the air-saw to it.
Relatively finished here. Ended up doing some more cutting on the air-dam to prevent the bulging on the sides in front of the wheels.
And on the ground!
Additional notes:
The mouth turned out to be too small for drafting. Car crept up to 3/4 on OEM temp gauge while drafting for 1/4 of a lap(2.2mile course) while it was slight over-cast and ~75* ambient. My miata has 37mm Koyo v-core and Qmazxreroute. Ducting would resolve this problem while in a draft with this size of an opening, IMO.
The car gained 5hp, lost ~150lbs, and added this aero package since the last time I was at Roebling.
Previous times in TTE trim of 130rwhp, 2440lbs,Xida800/500,RB1.125"/14mm, 205 R7s, 15x9s - 1:21.7xx - 1:23.0xx
New times in TT5 trim of 135rwhp, 2300lbs, Xida800/500,RB1.125"/14mm, 205 R7s, 15x8s - 1:19.4xx - 1:21.7xx
The largest difference with this aero both my co-driver and I noticed was how settled it was on a slip-angle. It required smaller inputs to correct to squiggle thru. Unfortunately I was not running AiM data two years when I was at Roebling last :(
This comparison actually does a decent job of showing the difference of inputs:
NASA TT5 Track Record Lap Roebling Road - 1:19.499 vs. NASA TTE Roebling unofficial track record - James Cathers by VJ why we slap | YouTube Doubler | Mashup Helper
New TT5 record with TT6 power..... I'm a believer in aero.

Reply
 1
1

1
04-10-2019, 02:41 PM
#262
Elite Member
Thread Starter
iTrader: (7)
Join Date: Jan 2008
Location: Statesville, NC
Posts: 2,738
Total Cats: 319
New PB, but I'm a wimp in T3. Data shows I lost ~0.5 seconds in T3 alone by that slight lift O_O. Lap 10 on this longer TT session, ~85* ambient, ~2:00PM, not much over-cast. Benchracing/data shows this pace would have been mid 1:20s in the 10:45 session, but that session got cancelled from delays/quiet hour.
Running my TT6 car with ~120lbs less and aero in TT5.
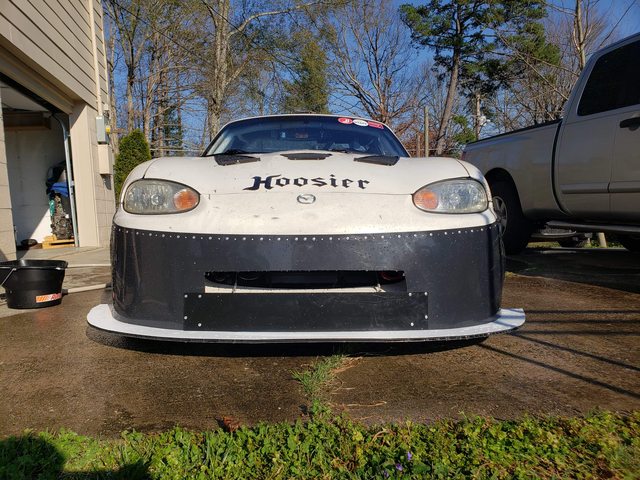
99 Miata 2330lbs 135rwhp peak
9livesracing.com 64" Swan-Neck Big **** at 0 AOA
9livesracing.com proto-type air-dam
DiY 3" splitter
Xidas 800/500 RB 1.125"/14mm
205 R7 on 15x8
Reply
0
0
04-10-2019, 03:09 PM
#263
Elite Member
Thread Starter
iTrader: (7)
Join Date: Jan 2008
Location: Statesville, NC
Posts: 2,738
Total Cats: 319
TT5 Roebling record. Superior driving and good conditions yielded 1:19.49x. At my current weight I could actually run 146rwhp avg instead of the current 130rwhp...... Optimal TT5 laps at Roebling will be low 1:18s/high 1:17s.
Reply
1
1
 09-10-2019, 09:01 AM
#265
Elite Member
Thread Starter
iTrader: (7)
Join Date: Jan 2008
Location: Statesville, NC
Posts: 2,738
Total Cats: 319
I'm way behind!
Did NASA TT5 at Road Atlanta in June, still 135rwhp 2320ish lbs, aero, etc. Managed the win, woot. But still went same pace :(
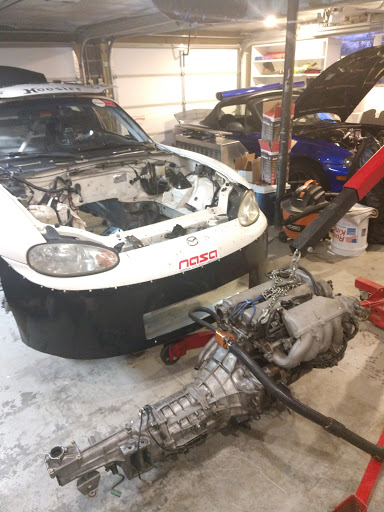
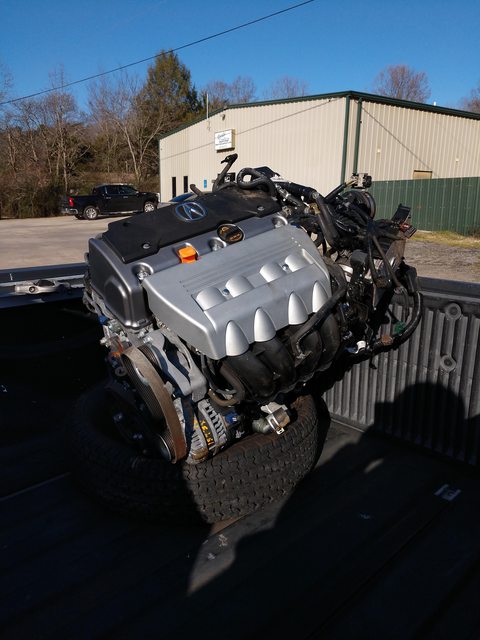
Then did the Miatas Before the Gap event I help with as well and it went great! Also...... David with Kmiata let me drive one their cars, the K24Z3 setup. I am officially ruined.
My boi @jcoupe got me situated with some Nine Lives Racing stickies!
Here's a session while playing around with @vteckiller2000
The car with the aero is way easier to drive, making me feel like I'm under-driving it. I'll be working on this part.
It's 100% time for more power....
Did NASA TT5 at Road Atlanta in June, still 135rwhp 2320ish lbs, aero, etc. Managed the win, woot. But still went same pace :(
Then did the Miatas Before the Gap event I help with as well and it went great! Also...... David with Kmiata let me drive one their cars, the K24Z3 setup. I am officially ruined.
My boi @jcoupe got me situated with some Nine Lives Racing stickies!
Here's a session while playing around with @vteckiller2000
The car with the aero is way easier to drive, making me feel like I'm under-driving it. I'll be working on this part.
It's 100% time for more power....
Last edited by flier129; 09-10-2019 at 09:12 AM.
Reply
1
1
09-10-2019, 10:00 AM
#266
Elite Member
Thread Starter
iTrader: (7)
Join Date: Jan 2008
Location: Statesville, NC
Posts: 2,738
Total Cats: 319
Next event was best event........

Despite being bummed out about several things in life and being under-prepped, the GLTC guys kept me motivated and I did my first official race with them at Road Atlanta at the end of August. It was a blast and I'm very glad I went through with it!
My car this event was.....
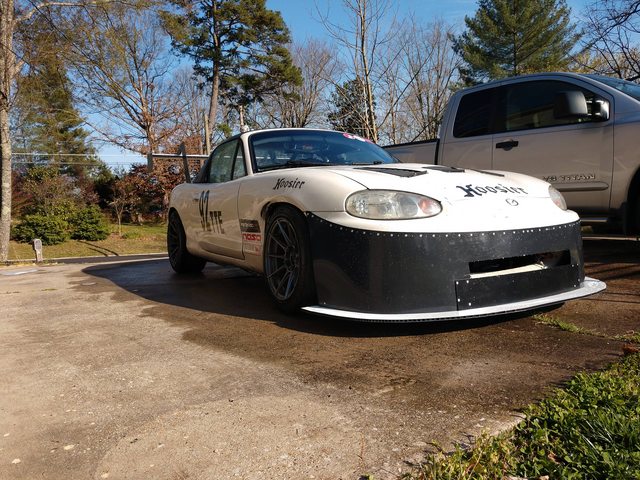
2320lbs 135rwhp peak
9LR proto-type NB aero kit, air-dam, 3" splitter, ducting/mounts, swan-neck 64" Big W�ng
SPM Xidas 800/500 1.125"F/14mmR
15x9s 205 R7s
6spd/4.3
GLTC ratio for my setup should be 13.25:1, so at my current weight of 2320 I'd want 175rwhp peak. I'm a ways off at 17.18:1
I can't recall every detail of each race, but I got them all on video! My main goal was to complete the entire weekend clean. I did have some throttle cable issues during practice and qualifying Friday night. The rubber grommet kept coming off the bracket, thankfully I got it resolved for the races. It left me with a horrible qualifying time, though.
Race 1
Starting like 26th, which is better than the very back like initially intended as a rookie driver. Scott(rookie "chief") was kind enough to let me start from qualifying position. We were all trying to get through concrete valley clean and calm, which happened every race! My main problem this race, imo, I kept "presenting" myself for a pass when I definitely should have not. Kept killing sections because I would show myself on the inside and I was no where near the opportunity. Ended up running with an e36(also under-prepped) and a TCA Civic, it was really a great first race for me once I got past the "don't **** it up" thoughts.
Race 2
Moved to starting around 22nd, Cody Mason behind me at the start with his rear-mount turbo setup. He uhhhhh *ahem* got a good start. I also learned the Fiero that passes me on the back straight is 170rwhp at 2200lbs, so that makes sense of why he motors by me. Spent the race running around with Sally in the TCA Civic again. I also had to deal with a standard power vs grip battle at Road Atlanta with a ITS mustang. Got around him eventually in the right spot and made up some ground.
Race 3
Sunday morning now. Yes that's a mini-van, yes he waxed me, no I couldn't see around him at all. It was actually pretty entertaining seeing that thing out there, 280whp/3400lbs iirc. TomO is in the silver E36 at this point, which I didn't know until after the race. Makes sense why the driver got more aggressive all of the sudden, lol. On the first lap you'll note a bump to the e36 and I'm peddling as hard as I can on the back straight At the end of the race Sally figures out the TCA car and rips past me on the last lap, lol. I was told 2800lbs/200whp on that car +\-. Our times this session were mid-high 1:43s- low 1:44s.
Race 4
Better start, but I still need to work on them for sure. Mostly by myself, which allows me to run down the FCP Benz. Their TCR driver was in it, I have no idea on the setup for that car. First thing I noticed while following him is that his braking points were late, basically the same as mine. So I knew passing him under braking wasn't happening. Noticed he was slow up T1, so the plan was to squeeze by him in T12 and keep him behind me going into T1. Then I knew I could keep him back there. Surprisingly enough, the plan worked after he made a mistake in T10A. It was a good match between us and I really enjoyed this race. Racecraft is neat and it's definitely given me the motivation I needed.
Despite being bummed out about several things in life and being under-prepped, the GLTC guys kept me motivated and I did my first official race with them at Road Atlanta at the end of August. It was a blast and I'm very glad I went through with it!
My car this event was.....
2320lbs 135rwhp peak
9LR proto-type NB aero kit, air-dam, 3" splitter, ducting/mounts, swan-neck 64" Big W�ng
SPM Xidas 800/500 1.125"F/14mmR
15x9s 205 R7s
6spd/4.3
GLTC ratio for my setup should be 13.25:1, so at my current weight of 2320 I'd want 175rwhp peak. I'm a ways off at 17.18:1
I can't recall every detail of each race, but I got them all on video! My main goal was to complete the entire weekend clean. I did have some throttle cable issues during practice and qualifying Friday night. The rubber grommet kept coming off the bracket, thankfully I got it resolved for the races. It left me with a horrible qualifying time, though.
Race 1
Starting like 26th, which is better than the very back like initially intended as a rookie driver. Scott(rookie "chief") was kind enough to let me start from qualifying position. We were all trying to get through concrete valley clean and calm, which happened every race! My main problem this race, imo, I kept "presenting" myself for a pass when I definitely should have not. Kept killing sections because I would show myself on the inside and I was no where near the opportunity. Ended up running with an e36(also under-prepped) and a TCA Civic, it was really a great first race for me once I got past the "don't **** it up" thoughts.
Race 2
Moved to starting around 22nd, Cody Mason behind me at the start with his rear-mount turbo setup. He uhhhhh *ahem* got a good start
. I also learned the Fiero that passes me on the back straight is 170rwhp at 2200lbs, so that makes sense of why he motors by me. Spent the race running around with Sally in the TCA Civic again. I also had to deal with a standard power vs grip battle at Road Atlanta with a ITS mustang. Got around him eventually in the right spot and made up some ground.Race 3
Sunday morning now. Yes that's a mini-van, yes he waxed me, no I couldn't see around him at all. It was actually pretty entertaining seeing that thing out there, 280whp/3400lbs iirc. TomO is in the silver E36 at this point, which I didn't know until after the race. Makes sense why the driver got more aggressive all of the sudden, lol. On the first lap you'll note a bump to the e36 and I'm peddling as hard as I can on the back straight
At the end of the race Sally figures out the TCA car and rips past me on the last lap, lol. I was told 2800lbs/200whp on that car +\-. Our times this session were mid-high 1:43s- low 1:44s.Race 4
Better start, but I still need to work on them for sure. Mostly by myself, which allows me to run down the FCP Benz. Their TCR driver was in it, I have no idea on the setup for that car. First thing I noticed while following him is that his braking points were late, basically the same as mine. So I knew passing him under braking wasn't happening. Noticed he was slow up T1, so the plan was to squeeze by him in T12 and keep him behind me going into T1. Then I knew I could keep him back there. Surprisingly enough, the plan worked after he made a mistake in T10A. It was a good match between us and I really enjoyed this race. Racecraft is neat and it's definitely given me the motivation I needed.
Reply
1
1
09-10-2019, 10:23 AM
#267
Elite Member
Thread Starter
iTrader: (7)
Join Date: Jan 2008
Location: Statesville, NC
Posts: 2,738
Total Cats: 319
In regards to the car.
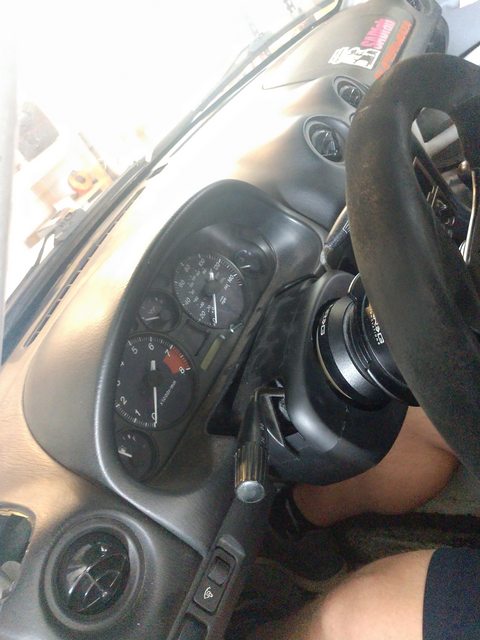
I got a 2" wheel spacer, it helps more than I thought it would. My seat is at a good spot for my legs, but I wanted the wheel to be closer. Also helps other drivers, like my dad, who are shorter than me.
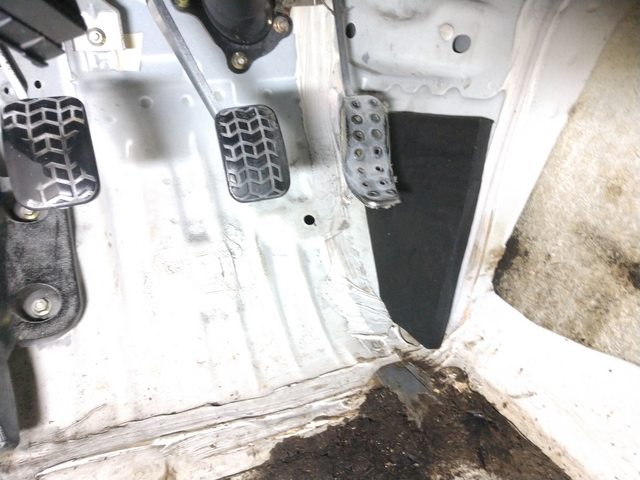
To resolve my trans tunnel heat issues I bought some DEI heat shielding to put on the under-side. For the foot-well side I opted for some..... horse-stall mat! No more foot blisters! I consider this a win.
I'll be taking a break from events to save money for some mo' powah. More details on that to come as I move along in that process.
I got a 2" wheel spacer, it helps more than I thought it would. My seat is at a good spot for my legs, but I wanted the wheel to be closer. Also helps other drivers, like my dad, who are shorter than me.
To resolve my trans tunnel heat issues I bought some DEI heat shielding to put on the under-side. For the foot-well side I opted for some..... horse-stall mat! No more foot blisters! I consider this a win.
I'll be taking a break from events to save money for some mo' powah. More details on that to come as I move along in that process.
Reply
0
0
09-10-2019, 10:44 AM
#268
Elite Member
Thread Starter
iTrader: (7)
Join Date: Jan 2008
Location: Statesville, NC
Posts: 2,738
Total Cats: 319
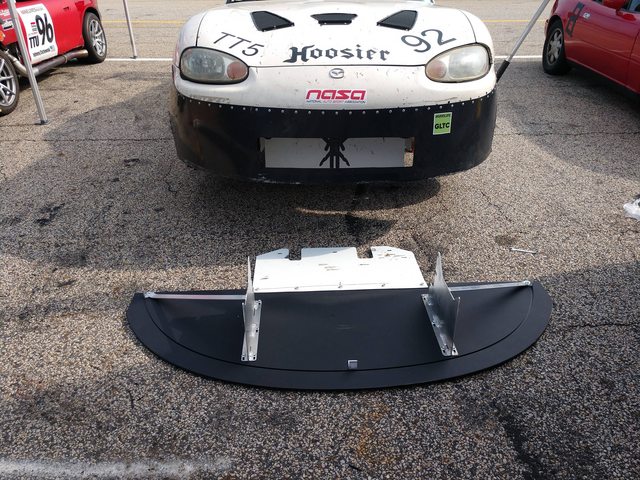
In much more exciting news, we(9LR) are developing a front aero kit for NA/NB!

We've been doing CFD tests for this, so these designs are actually backed from data too! Not surprising to most here, the typical combination of air-dam, 3-4" splitter, ducting, and low drag rear wing makes for a good aero balance on a NA/NB. So the wheel isn't being completely reinvented on this configuration. Though it is improved upon, backed with testing, and most importantly..... making it easier to bring this type of aero to the masses.
The goal of this kit is to be a bolt-on install process, no fabrication required, and sturdy enough to hold up to your typical track abuse within reason!!
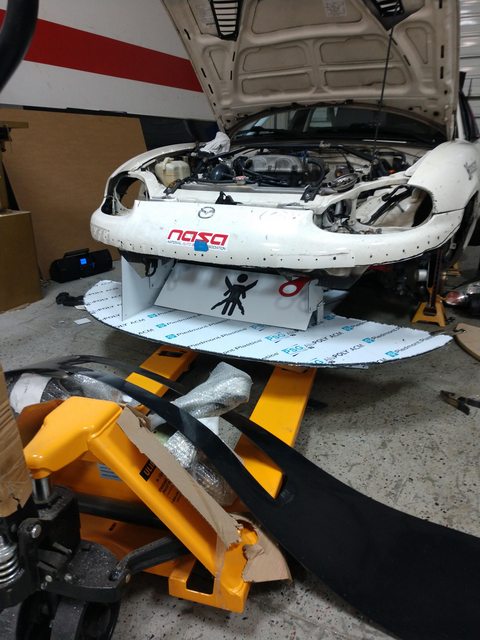
The kit will include air-dam pre-cut, radiator ducting, splitter, and splitter mounts. Prototype version 1 here, changes have already happened and will likely continue.
The kit is modular, meaning you won't have to run the air-dam if you don't want to. The splitter can be specified in it's size, so it can flush with the air-dam or entirely behind the bumper line to be an "under-tray". It fits with OEM bumpers, NB pictured here.
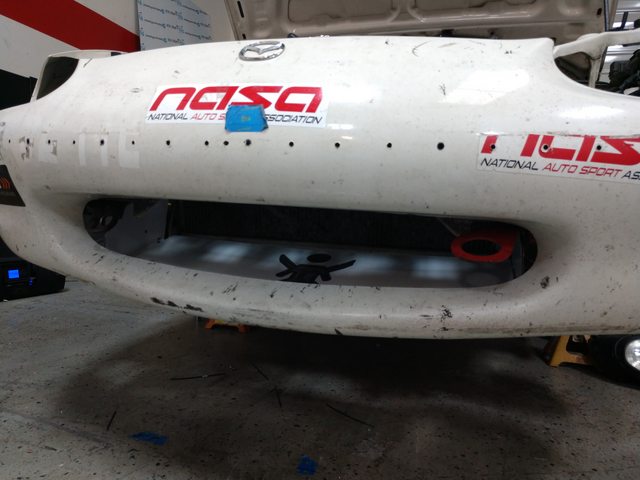
It even works with the tow-hooks.

Additional testing with different materials for both the mounts/ducting and the splitter this weekend at Road Atlanta. Once this is completed we'll have an actual idea of time-lines for release or maybe additional testers, we shall see.
Once finalized we'll have entire aero packages, including this front-aero kit and a rear w�ng. High, medium, and low down-force options will be available. The one on my car is the medium config and likely the most popular option. The entire medium option package will have a price-point lower than your typical carbon-fiber wing kit.
We've been doing CFD tests for this, so these designs are actually backed from data too! Not surprising to most here, the typical combination of air-dam, 3-4" splitter, ducting, and low drag rear wing makes for a good aero balance on a NA/NB. So the wheel isn't being completely reinvented on this configuration. Though it is improved upon, backed with testing, and most importantly..... making it easier to bring this type of aero to the masses.
The goal of this kit is to be a bolt-on install process, no fabrication required, and sturdy enough to hold up to your typical track abuse within reason!!
The kit will include air-dam pre-cut, radiator ducting, splitter, and splitter mounts. Prototype version 1 here, changes have already happened and will likely continue.
The kit is modular, meaning you won't have to run the air-dam if you don't want to. The splitter can be specified in it's size, so it can flush with the air-dam or entirely behind the bumper line to be an "under-tray". It fits with OEM bumpers, NB pictured here.
It even works with the tow-hooks.
Additional testing with different materials for both the mounts/ducting and the splitter this weekend at Road Atlanta. Once this is completed we'll have an actual idea of time-lines for release or maybe additional testers, we shall see.
Once finalized we'll have entire aero packages, including this front-aero kit and a rear w�ng. High, medium, and low down-force options will be available. The one on my car is the medium config and likely the most popular option. The entire medium option package will have a price-point lower than your typical carbon-fiber wing kit.
Reply
1
1


 09-14-2019, 04:44 AM
#272
Junior Member

Join Date: Jul 2019
Location: Troy NY
Posts: 236
Total Cats: 31
Just read through the entire thread. I loved reading and watching all the progression.
I toyed around with starting my own racing diary. I am still in the early stages of HPDE1, but I have Watkins Glen coming up in Oct as my 2 and last even this fall.
I toyed around with starting my own racing diary. I am still in the early stages of HPDE1, but I have Watkins Glen coming up in Oct as my 2 and last even this fall.
Reply
0
0
09-18-2019, 11:30 AM
#273
Elite Member
Thread Starter
iTrader: (7)
Join Date: Jan 2008
Location: Statesville, NC
Posts: 2,738
Total Cats: 319
As it turns out, building an aero setup for your own car is much quicker than designing to the product for the masses. Who knew! (I'm joking)Dang, that's a long read haha. I'd be happy if my journey can somehow help motivate yours.
Reply
1
1
09-18-2019, 11:58 AM
#274
Elite Member
Thread Starter
iTrader: (7)
Join Date: Jan 2008
Location: Statesville, NC
Posts: 2,738
Total Cats: 319
So back from more front-aero testing at Road Atlanta with my car. We confirmed some improvements and also discovered more details to fix. We're still not completely happy with it yet, so additional revisions will be coming.
Besides the new splitter material my setup hasn't changed much. Same power, suspension/alignment, weight, but the tires were worn out with 28-32 heat-cycles through-out the weekend. I usually consider R7s done around 25 heat-cycles and I've had several cord by that point.
So the new material is better, much stiffer than the previous 8mm alupoly. You can even drill/tap this material! Major down-falls, it's heavier than alupoly or alumalite and it's not as stiff as birch. Some typical trade-offs on that, but we're still on the hunt for an improvement.
I installed and removed the setup via quick disconnect several times by myself. Though, it is much easier with two people! Once lined up, it slots in, somewhat wedges itself, and then you can run a pin or bolt/nut through the "lock" hole from the mouth of the airdam. Not too bad even for myself...... during my first attempts Johnny said "it's like watching a monkey **** a football"
The material was stout enough to have Johnny stand on it at the front near the main mounts. However, we needed to provision some additional bracing on the outside since we had too much flex on the ends. We also are needing to keep the additional bracing in a config to keep quick-disconnect capability. This bracing helped, but it didn't resolve the side flex issue. It actually pulled/flexed on the main mounts. We have additional ideas for side mounting that I think will resolve the problem. We're also not confirmed on the material yet either.
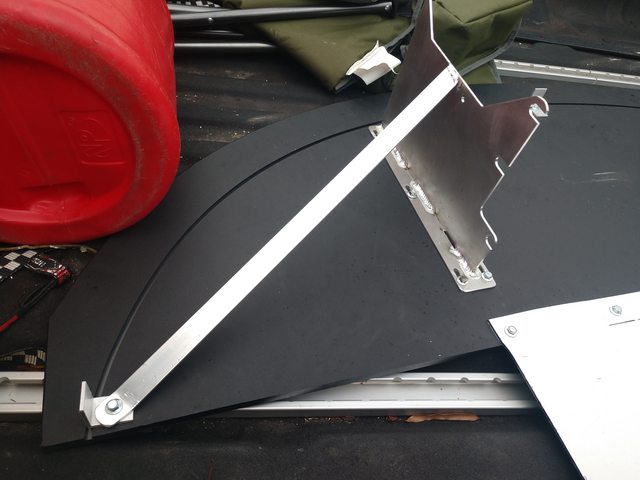
To everyone that we've talked to face to face, on FB, here, or where ever.. we greatly appreciate the interest and the feedback! We believe being open about our process also helps the end result!
Besides the new splitter material my setup hasn't changed much. Same power, suspension/alignment, weight, but the tires were worn out with 28-32 heat-cycles through-out the weekend. I usually consider R7s done around 25 heat-cycles and I've had several cord by that point.
So the new material is better, much stiffer than the previous 8mm alupoly. You can even drill/tap this material! Major down-falls, it's heavier than alupoly or alumalite and it's not as stiff as birch. Some typical trade-offs on that, but we're still on the hunt for an improvement.
I installed and removed the setup via quick disconnect several times by myself. Though, it is much easier with two people! Once lined up, it slots in, somewhat wedges itself, and then you can run a pin or bolt/nut through the "lock" hole from the mouth of the airdam. Not too bad even for myself...... during my first attempts Johnny said "it's like watching a monkey **** a football"
The material was stout enough to have Johnny stand on it at the front near the main mounts. However, we needed to provision some additional bracing on the outside since we had too much flex on the ends. We also are needing to keep the additional bracing in a config to keep quick-disconnect capability. This bracing helped, but it didn't resolve the side flex issue. It actually pulled/flexed on the main mounts. We have additional ideas for side mounting that I think will resolve the problem. We're also not confirmed on the material yet either.
To everyone that we've talked to face to face, on FB, here, or where ever.. we greatly appreciate the interest and the feedback! We believe being open about our process also helps the end result!
Reply
3
3