SSM car to spoon Leafy with
 03-10-2020, 09:08 AM
#262
Junior Member
Thread Starter

Join Date: Nov 2013
Posts: 286
Total Cats: 28
Progress is much slower than it really needs to be here. Tried to get the coils wired with Bob Day but turned out the DB37 connector on the MS didn't have the pins set up for sequential ignition. So, had to email Reverant to find out what pins they were. Will attempt to get that finished this weekend.
Going to abort on replacing the clutch before the first event this year as I simply don't have time. Will probably do it in May.
Still need to put the new engine mounts in.
Make new radiator brackets.
And the big one. Making a new splitter. Have made a couple test pieces over the last couple days trying out resin infusion.
The setup:

First test piece came out kind of crappy. I think the vacuum bag had a tiny pin hole that I couldn't find, which resulted in a bunch of air bubbles. That ruined the surface finish, and resulted in a couple of dry spots. I will still probably use this as a radiator finish panel (or whatever that piece is called).

And last night, a test layup for a new splitter. The whole point of this endeavor:

I feel pretty good about that piece. That is like 20sq in. The splitter is 1.2sq meters. Definitely nervous.
Going to abort on replacing the clutch before the first event this year as I simply don't have time. Will probably do it in May.
Still need to put the new engine mounts in.
Make new radiator brackets.
And the big one. Making a new splitter. Have made a couple test pieces over the last couple days trying out resin infusion.
The setup:
First test piece came out kind of crappy. I think the vacuum bag had a tiny pin hole that I couldn't find, which resulted in a bunch of air bubbles. That ruined the surface finish, and resulted in a couple of dry spots. I will still probably use this as a radiator finish panel (or whatever that piece is called).
And last night, a test layup for a new splitter. The whole point of this endeavor:
I feel pretty good about that piece. That is like 20sq in. The splitter is 1.2sq meters. Definitely nervous.

Reply
 1
1

1
03-11-2020, 08:13 AM
#263
Junior Member
Thread Starter
Join Date: Nov 2013
Posts: 286
Total Cats: 28
Andddd did another test last night - this time much bigger and doing what I planned to do on the actual splitter. Huge success. This piece is two layers total, one on top, one on bottom. Holy christ. I can hardly deflect it trying to bend it over my knee. The real one will be 2 and 2.
Link to photos as I took a bunch: https://photos.app.goo.gl/X9gwWinzsi6S5yUz8

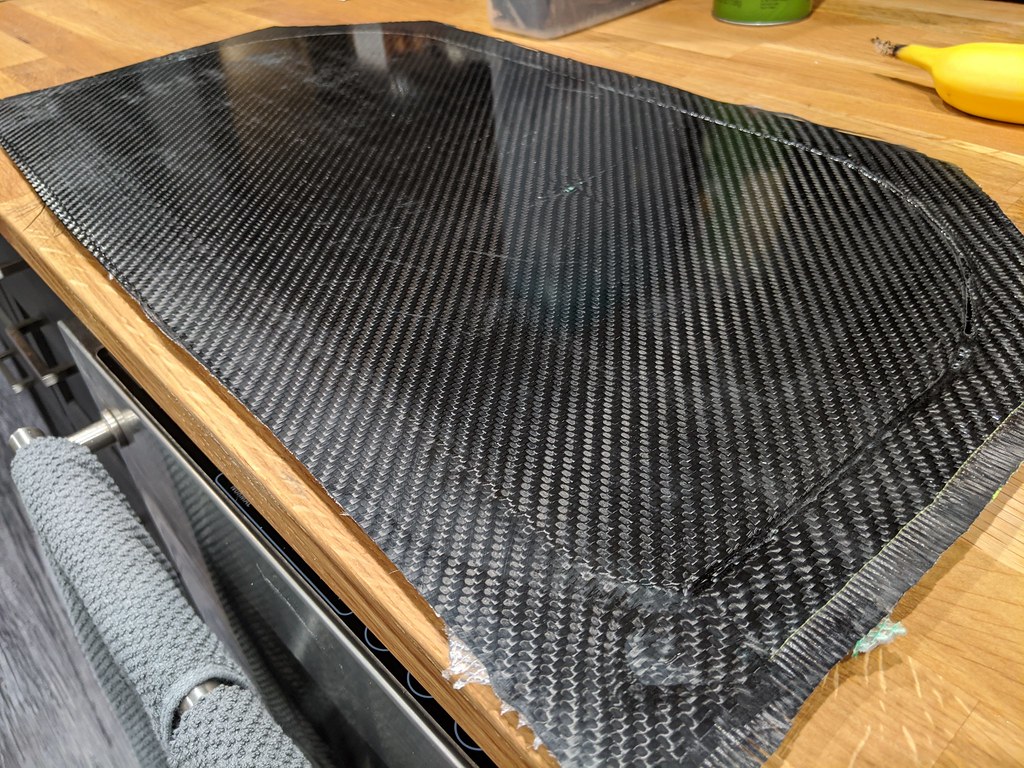
The only real issue with it at all is this:

I wrapped one layer around the edge, using spray adhesive to hold it in place. For the top/finish layer, I let it just flow over the edge and have the vacuum bag do the work. You can see how it didn't fully close that gap and there's a little void there. I think it would trim/sand fine, but that's a lot of work.
The right plan is to spray glue that in place and trim it flush.
I wish I could have gotten a video of this infusing. It's so fricken cool.
Link to photos as I took a bunch: https://photos.app.goo.gl/X9gwWinzsi6S5yUz8
The only real issue with it at all is this:
I wrapped one layer around the edge, using spray adhesive to hold it in place. For the top/finish layer, I let it just flow over the edge and have the vacuum bag do the work. You can see how it didn't fully close that gap and there's a little void there. I think it would trim/sand fine, but that's a lot of work.
The right plan is to spray glue that in place and trim it flush.
I wish I could have gotten a video of this infusing. It's so fricken cool.
Reply
2
2
03-11-2020, 10:55 AM
#264
Junior Member

Join Date: Feb 2012
Location: Quebec city, Canada
Posts: 172
Total Cats: 2
Infusion process is cool, but it needs a lot of trials and errors before you get it right. I would had a bigger chamfer to that core piece, it'll help getting the top and bottom layer blend together and avoid that gap. We didn't use to much glue, as it prevents the layers moving properly under the vaccum bag.
I would leave a small flat section when you trim, it'll prevent it from delaminating.
Good work!
I would leave a small flat section when you trim, it'll prevent it from delaminating.
Good work!
Reply
1
1
03-12-2020, 07:30 AM
#266
Junior Member
Thread Starter
Join Date: Nov 2013
Posts: 286
Total Cats: 28
This trimmed up nicely. And, weighs under a pound. Scaling this to the full splitter, it would weight about 7.5lbs, but I will be using two more layers. That should result in something that weighs less than 10lbs still.
I dropped this piece onto the edge from ceiling height onto the cement floor. It just laughed at me. Pretty sure with 2 more layers it'll survive a conemageddon on course.


Did discover this tool: https://compositeenvisions.com/radiu...idth-2019.html. That, or similar (had the thought of using a plastic trim removal tool), seems useful to help get the corners to bond properly. Interestingly, the 90* corner along the back edge was almost perfect. The one that I (partially) chamfered is the one with issues. Maybe the composite people here can explain why that might be?
I dropped this piece onto the edge from ceiling height onto the cement floor. It just laughed at me. Pretty sure with 2 more layers it'll survive a conemageddon on course.
Did discover this tool: https://compositeenvisions.com/radiu...idth-2019.html. That, or similar (had the thought of using a plastic trim removal tool), seems useful to help get the corners to bond properly. Interestingly, the 90* corner along the back edge was almost perfect. The one that I (partially) chamfered is the one with issues. Maybe the composite people here can explain why that might be?
Reply
0
0
04-08-2020, 09:16 AM
#267
Junior Member
Thread Starter
Join Date: Nov 2013
Posts: 286
Total Cats: 28
Not much progress given the current situation, and the car is at my parents house. But, I did make the splitter!
Pictures first, then story.


Overall rating: Success
The not shown on TV part:
Start of the infusion went super well. It was definitely a two person job (girlfriend was helping) between mixing resin and keeping the supply cup filled so it wouldn't suck in air. I measured, she mixed and poured into the supply cup.
Then, tragedy struck. The bag got punctured by (presumably) the spiral tube where I had cut it - right at one of the tees feeding the resin. This meant a **** ton of air got in, and the bag obviously lost vacuum. <many curse words later> I managed to glob on enough tacky tape to seal it back up. Disaster mostly averted. Then, it happened again at the other supply tee. And then again at the tee on the vacuum side. Ughhhhhhhhhhhhhhhhhhh. Figures this did not happen when I did the test piece, which had the exact same layup. Note to future self: put some regular breather cloth or infusion mesh over the tees/cut spiral to protect the bag.
Those issues definitely lead to some problems in the finished product. The print from the foam core is definitely more visible than it should be, and there was one small dry spot on the front edge, where there was an air pocket from one of the bag tears. Thankfully, that dry spot mostly sanded away when I trimmed it. I still need to dab a little epoxy in a few spots before calling it done though. None of the issues seem like they would be structural, though.
The part itself:
For the first two layers (one top, one bottom), I wrapped the excess over the front edge. For the remaining layers (1 top, 2 bottom) I just draped them on, and let the excess hang over. Each layer was lightly spray glued in place.
The bagging setup:
I applied a few coats of Partall Paste Wax to the melamine, and then coated it with 2 layers of brushed on PVA. I'm not sure the PVA was necessary. I had resin feeding in from one bucket that was split into two lines into the bag, with spiral spanning the entire leading edge. On the vacuum side, I used a piece of spiral the width of the splitter and into one exit from the bag.
I can dig up all of the consumables/fabric/etc if people want a full list.
Overall, I think this cost about $500 (excluding the vacuum pump stuff, which I had from doing the wing).
Pictures first, then story.
Overall rating: Success
The not shown on TV part:
Start of the infusion went super well. It was definitely a two person job (girlfriend was helping) between mixing resin and keeping the supply cup filled so it wouldn't suck in air. I measured, she mixed and poured into the supply cup.
Then, tragedy struck. The bag got punctured by (presumably) the spiral tube where I had cut it - right at one of the tees feeding the resin. This meant a **** ton of air got in, and the bag obviously lost vacuum. <many curse words later> I managed to glob on enough tacky tape to seal it back up. Disaster mostly averted. Then, it happened again at the other supply tee. And then again at the tee on the vacuum side. Ughhhhhhhhhhhhhhhhhhh. Figures this did not happen when I did the test piece, which had the exact same layup. Note to future self: put some regular breather cloth or infusion mesh over the tees/cut spiral to protect the bag.
Those issues definitely lead to some problems in the finished product. The print from the foam core is definitely more visible than it should be, and there was one small dry spot on the front edge, where there was an air pocket from one of the bag tears. Thankfully, that dry spot mostly sanded away when I trimmed it. I still need to dab a little epoxy in a few spots before calling it done though. None of the issues seem like they would be structural, though.
The part itself:
For the first two layers (one top, one bottom), I wrapped the excess over the front edge. For the remaining layers (1 top, 2 bottom) I just draped them on, and let the excess hang over. Each layer was lightly spray glued in place.
The bagging setup:
I applied a few coats of Partall Paste Wax to the melamine, and then coated it with 2 layers of brushed on PVA. I'm not sure the PVA was necessary. I had resin feeding in from one bucket that was split into two lines into the bag, with spiral spanning the entire leading edge. On the vacuum side, I used a piece of spiral the width of the splitter and into one exit from the bag.
I can dig up all of the consumables/fabric/etc if people want a full list.
Overall, I think this cost about $500 (excluding the vacuum pump stuff, which I had from doing the wing).
Reply
1
1
04-13-2020, 07:02 AM
#268
Junior Member
Thread Starter
Join Date: Nov 2013
Posts: 286
Total Cats: 28
Splitter mocked up.
First, I put the wear rails (skateboard grind rails) on. These will be more than just rub rails - the intent is to also prevent it from ever stalling.

The rear retained the previous mounting system - angle iron with notches that slide onto a bar welded onto the sub frame. Redid the front mounts to be just inside the eventual air dam. I think I might replace these with struts. John, if you're reading this, could you link what you used? Are they something from McMaster, or some random hood strut?

First, I put the wear rails (skateboard grind rails) on. These will be more than just rub rails - the intent is to also prevent it from ever stalling.
The rear retained the previous mounting system - angle iron with notches that slide onto a bar welded onto the sub frame. Redid the front mounts to be just inside the eventual air dam. I think I might replace these with struts. John, if you're reading this, could you link what you used? Are they something from McMaster, or some random hood strut?
Reply
0
0
04-13-2020, 07:26 AM
#269

Adjustable fender braces, it's a circle track part. Got them from Speedway I think. The normally have set screws so you'll need to go to the hardware store or mcmaster and buy thumb screws if you want to make install tool-less.
You're gonna blow through those delrin rub strips in like 2 events, unless your splitter is higher than mine was.
You're gonna blow through those delrin rub strips in like 2 events, unless your splitter is higher than mine was.
Reply
0
0
04-13-2020, 08:37 AM
#275
Except this is a complete package, just rivet the mounts to your splitter and screw the other side into your bumper. WIth the gas struts you got to grab them at 2x $15 + 4x clevis $6 + designing your own mount. ($54 total + mounts). And then the gas struts are going to HATE this loading and probably break in a couple seasons and need to be replaced. If you just want to do the front mounts cheap cheap use cables like the road race guys.
Reply
0
0

 04-20-2020, 09:38 AM
#278
Senior Member

iTrader: (1)
Join Date: Jan 2011
Location: Chattanooga, Tn
Posts: 1,234
Total Cats: 283
I think splitter support rods are the most over engineered solution Autocrossers obsess over.
I went to ACE hardware, picked up a 4' section of 3/8" all thread which I cut to length, and 4x female threaded 3/8" heim joints. Total cost was less than $20. They have been on my car since 2012.
I went to ACE hardware, picked up a 4' section of 3/8" all thread which I cut to length, and 4x female threaded 3/8" heim joints. Total cost was less than $20. They have been on my car since 2012.
Reply
0
0
06-22-2020, 07:35 AM
#279
Junior Member
Thread Starter
Join Date: Nov 2013
Posts: 286
Total Cats: 28
Pretty much done at this point.
Corner balanced with me in it:


Taking it for alignment today. First event the 28th.
Still to do: make the splitter mounting better. Also still need to make spats to cover the tires.
Corner balanced with me in it:
Taking it for alignment today. First event the 28th.
Still to do: make the splitter mounting better. Also still need to make spats to cover the tires.
Reply
0
0
08-03-2020, 07:17 AM
#280
Junior Member
Thread Starter
Join Date: Nov 2013
Posts: 286
Total Cats: 28
Been a bit eventful since the last post. Fought a bunch of overheating issues, which ended up seeming to be air in the system. Installed two SPAL fans to replace the single OEM fan I was running, which seemed to help a lot yesterday.
Car feels really good. That was FTD with cords showing on 2016 date code A7's that I haven't run since 2016. Handling wise, this is the best the car has ever been I think. There's still room for improvement, though. It definitely has a push, especially in lower speed stuff. Was hoping to switch to softer front springs, but I don't think I have the ones I wanted to use anymore.
Car feels really good. That was FTD with cords showing on 2016 date code A7's that I haven't run since 2016. Handling wise, this is the best the car has ever been I think. There's still room for improvement, though. It definitely has a push, especially in lower speed stuff. Was hoping to switch to softer front springs, but I don't think I have the ones I wanted to use anymore.
Reply
0
0


