When you click on links to various merchants on this site and make a purchase, this can result in this site earning a commission. Affiliate programs and affiliations include, but are not limited to, the eBay Partner Network.
Good to hear.
I mainly decided off exterior dimensions, delta P, and HP rating on the Setrab site. I had a few options in 1-series or 6-series. Setrab Engine Oil Coolers | susa
1 Series seemed to package better in the NA headlight area and have about half the pressure drop for similar HP rated cores. The port location for the orientation I was looking at for the Series 1 seemed like a bonus benefit and should equate to shorter lines meaning even less pressure drop.
Looks like I'll have a 9-series 10 row for sale in the near future.
My harbor freight vice has been having problems with holding in the griping plates to the jaw on the vice and I didn't really want to deal with fixing this piece of junk. Last weekend, one side finally gave up and I could no longer secure the jaw plate, but I worked through it. That piece would fall to the ground every time I loosened the jaw so I decided I wanted a new one.
Bought a Yost rotating combination vise. Might cause me to build a work bench and get rid of the hand me down craftsman bench and have a more stable work bench that better fits my space.
After I bought the vise, I was thinking about bending the ducting for the oil cooler and eventually the radiator. Ended up pulling the trigger on a brake I had in my amazon list for $130.
Then I got to thinking about how bad my cuts were with hand sheers on longer pieces and I am horrible with the cutoff wheel. Starting googling and found one of these nibblers that use a drill and are pretty cheap at $35 so I'll give it a try.
Was on the fence on coroplast vs aluminum for ducting material but now I'm definitely going aluminum now.
I also liked having the Indy 500 on while in the shop last weekend so bought a cheap TV wall mount to get the extra TV off the bench. Already have an old Fire Stick that works well enough with my YouTubeTV subscription and other apps.
I've been starting to think about the plans for my workshop building that I'm hoping to have completed by end of 2021. Currently thinking a 24' x 28' 2-car garage with a 2 post lift. Should give me a place space to work, along with storage for a future out of season car protected from hail, and space to work on the race car. Still working exact location and might spill into an outdoor patio/BBQ setup with a shade structure of some sort. I've got close to an acre of property in a neighborhood where probably half of the properties have a secondary workshop or RV storage so I should fit in.
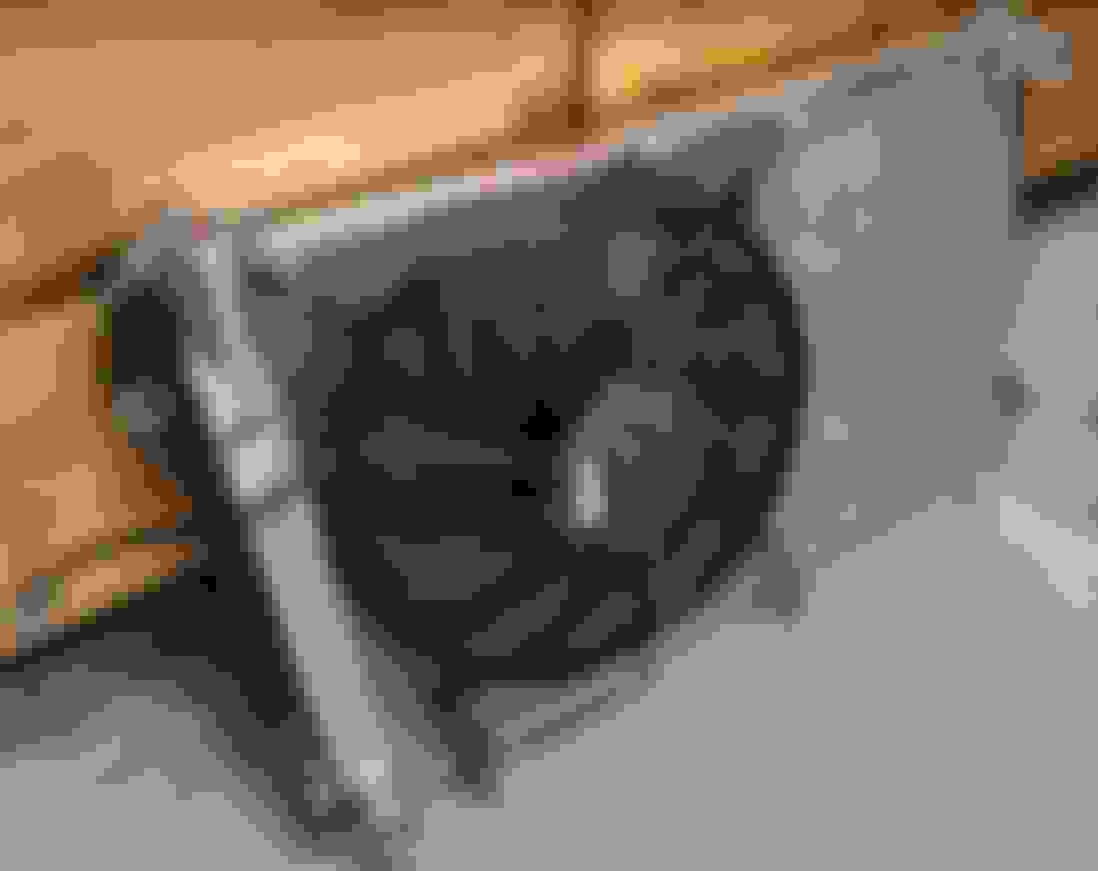
reworked the oil cooler mounting this weekend. It's not perfect but it should work pretty good for me. tried to make the radiator not too difficult to remove and have decent air ducting where I can still remove the bumper without a lot of extra work. It's not air tight should be functional. I think I'm going to swap out one of the 90 degree oil line fittings when I redo the oil lines for a straight to improve the routing.
reworked the oil cooler mounting this weekend. It's not perfect but it should work pretty good for me. tried to make the radiator not too difficult to remove and have decent air ducting where I can still remove the bumper without a lot of extra work. It's not air tight should be functional. I think I'm going to swap out one of the 90 degree oil line fittings when I redo the oil lines for a straight to improve the routing.
I wish my oil cooler was shaped like that. It would have make my mounting so much easier.
I wish my oil cooler was shaped like that. It would have make my mounting so much easier.
It's just money. Readily available Setrab series 1.
I took a lot of inspiration from your pictures in the oil cooler tech thread so thank you for posting those.
It's just money. Readily available Setrab series 1.
I took a lot of inspiration from your pictures in the oil cooler tech thread so thank you for posting those.
My likely version 2.0 will use that cooler. I was just trying to reuse what I already had and improve its efficiency.
Been a while since I updated. I've been busy with family stuff and changing jobs but I've had some time before starting my new job to knock a lot off my to do list. I'm getting pretty close to the first engine start and learning quite a bit about megasquirt settings as I go.
Finished the oil cooler setup and remade the oil lines for the new location. New lines are less than half the length of the 1st iteration which can only help.
Did a bunch of little things like filling the trans and diff, installing the rest of the exhaust, new eccentric bolts, routing wires from the new wideband sensor up to the gauge/controller, and clutch hydraulic refresh. Cleaned up the old rotors and reinstalled the brakes to use for now since I won't be driving till the spring.
I had to do a little bit of troubleshooting to calibrate the stock fuel level sensor feeding into my ECUMaster PMU-16. I thought I was going to be able to use a built in pulldown resistor but I misinterpreted a setting so I had to add one in the harness and start over. Overall pretty easy and now it's sent over CAN to the AIM dash where it is translated from litters to gallons and displayed. Pressurized the fuel system for the first time and sorted a pinched o-ring on injector 2 that caused a big leak along with wrong pinout on the flex fuel sensor. I was happy all the new lines and fittings didn't leak and the fuel pressure sensor seems to be working correctly. I set to the regulator to 50 psi for no good reason other than it is a nice even number and I should have plenty of overhead with DW 450 injectors.
The ECUMaster Battery isolator also had some kind of defective part and was recalled and replace by them. Didn't get a whole lot of details but the replacement was sent quickly can't tell a difference from my perspective.
I worked my way through all the critical sensors and configurations in the MS3Pro EVO and did some rapid googling to figure out my best guess at some of the settings. Used the 99 miata PNP base map to compare my tune and try to catch any critical mistakes but I mostly ignored idle settings and looked at general trends in the fuel and ignition maps. I'm just trying to get it started and idling conservatively before heading to the tuner.
With injectors and coils disconnected I started to test the cam and crank sensors and could get the crank signal to show up on the composite log. I checked everything I could think of in the settings and harness but couldn't figure it out. I had just added the FM 36-2 trigger wheel since I previously had a 12+1 for my AEM EMS4 so I changed that back and also swapped in my spare crank sensor. Ran new wires outside the harness direct to MS3/power with a new deutsch connector and still was hitting a wall. Cam sensor was working so I swapped the CMP+ and CKP+ pins to make sure there wasn't a problem on the MS3 and I was able to see a signal on the crank input which meant it had to be the crank sensor as the problem. I mounted my spare cam sensor on a real quick bracket to read the crank and now I have sync. I'm guessing the OEM sensor needs a pull up resistor on the signal but I'm just going to get the DIYAutotune threaded body crank sensor which has all the documentation needed and be done with it. I thought I was stuck on this one and sent out a few panic posts in a few Miata or Megasquirt groups on facebook but I feel so relieved to figure this one out.
After I get the parts needed to have a permanent fix for the crank sensor, I think I can cross my fingers and try to actually start the engine. I still need to run through all the data channels running to the AIM dash and verify the formatting on both sides of CAN but that will be easier when I have a lot less non-zero data values.
I decided to throw a 2.49k ohm resistor between 12V and signal of the NB crank sensor and what do you know, I get a nice signal in the composite logger and a quick sync.
This is what throwing a resistor in looks like:
Received some Diode Dynamics 310 lumen LED tail light bulbs today and swapped these mini Hubble telescopes in.
Instant brake pedal switch illumination and definitely brighter. Old bulbs were drawing 3.93 Amps which is expected with 2x 27 W bulbs, but also a 14 amp inrush. LED bulbs hit a 0.65 amp draw and stay there.
The more I dig into the ECUMaster PMU-16, the more I like it.
After specifically looking for the current draw difference on the LEDs, I figured I'd document everything else and see how it compared to my plan. This is with all the power systems activated except coils and injectors and the engine not running. I'll check again at idle and again while out on track once I get there.
I wasn't too far off in my estimates. The one that surprised me was the starter. I thought the starter signal would be pretty small but it actually tripped my 15 amp limit the first couple of times I tried it. I only have a 20 awg wire which is a little smaller than I'd like for 11 amp continuous load, especially with cold morning e85 starts.
PMU-16 is handling my fan control. I added a Spal 12" Curved Blade Puller Fan behind a new SuperMiata Crossflow radiator. The PMU-16 has a convenient built in hysteresis function I used for the temperature on and off points. CLT comes in via CAN form the MS3 so I'll get that data whenever the MS3 is powered up. I also have an or statement and logic to use keyboard button to turn on the fan that doesn't require the MS3.
Fan control in MS3 has a throttle position fan shutoff feature I tried replicating a little bit with logic and I actually think I like the PMU option better. TPS is fed in via CAN so I'll turn the fan on if TPS is under 40% for 10 seconds and satisfying the temperature hysteresis statement. Should stop the fan from kicking in during braking while out on track.
I'll most likely tweak the temperature and throttle settings a little bit once I get the car running.
I decided to throw a 2.49k ohm resistor between 12V and signal of the NB crank sensor and what do you know, I get a nice signal in the composite logger and a quick sync.
This is what throwing a resistor in looks like:
I presume you'll add serious strain relief on that connector and harness. That resistor is the pivot point for any movement in the harness at that sensor.
I presume you'll add serious strain relief on that connector and harness. That resistor is the pivot point for any movement in the harness at that sensor.
Definitely. This was a proof of concept level hack to see if the resistor solved my problem. Waiting for 3 pin DTM connector to arrive to make the final version which will be fully heat shrunk(shrinked?) and supported.
I got everything sorted on the trigger side just in time for a snow storm to come through. Now it's a little chilly in the garage to work on the car and I'm afraid to add water due to winter. I think I'm going full anti-freeze until spring so I can keep working and not worry. This weekend is looking good to try a first start up.
Since I didn't physically work on my car, I decided to draw out the harness. I used LucidChart and it was pretty easy to figure out. Tried to draw it mostly to scale by starting with a car outline with a real measurements, but the components aren't exactly in the right places. I think the architecture is captured which is really what this is meant to do. Even made individual layers for the car outline, components, power, signals, ground, and CAN so I can trace signals a little easier. Hard to see any detail in the screenshot but every single wire in the harness is accounted for and the correct color.
Did you get around to first startup? I'm about to undertake rewiring one of my cars and curious on how your setup is working for you. I'll be updating my ms2pnp with a ms3pro and I have been trying to decide on which pmu/pmd to use and been leaning towards the ecumaster's unit like your setup.
Did you get around to first startup? I'm about to undertake rewiring one of my cars and curious on how your setup is working for you. I'll be updating my ms2pnp with a ms3pro and I have been trying to decide on which pmu/pmd to use and been leaning towards the ecumaster's unit like your setup.
I got the engine to sputter a little bit but I think the fueling settings are too far off in startup/idle/fuel map. I copied in a bunch of settings from various base maps and cranking feels close but I can't keep it running after that. It got cold in the garage, I lost some motivation, and I started devoting all my warmer weather hours to cycling. I need to get back out there and start chipping away at some of the tasks. I'd like to do a shakedown before the first NASA Rocky Mountain race in April.
I really like the ECUMaster PMU-16, but I haven't worked with any others. I feel like I've gone the simple route in terms of setup but I'll dive into the advanced logic if I see an opportunity once I start using the car. The AIM PDM looks pretty nice too and make one less device to setup and troubleshoot with the dash, logger, and power distribution in one unit. After setting up the AIM MXL2 and ECUMaster PMU, I do find it easier to setup non-standard interfaces in ECUMaster software as long as you know how to find the documentation in ECUMaster. AIM is great to quickly get up and running with standard devices but expanding off the standard items isn't as user friendly.
For starting fuel, start with what you're sure is far too little. Make sure its not soaked in fuel before tuning. Shut off injectors and crank for a while. Pull plugs if you think you have drowned it (kill ignition).
Once you have in cranking cleanly just add cold enrichment until it catches. Once you have it starting reliably, get it tuned so it'll idle cleanly. Once warm, tune hot cranking fuel by turning cold enrichment to zero past about 160�. Then tweak cranking fuel until it fires reliably hot. Then go back over a few mornings to tweak cold enrichment.
It's possible to get it to start cold by having cold enrichment and basic cranking adjusted kinda opposite of what they should be. You'll know that's the case when it won't hot start. E85 needs lots of fuel when cold, enrichment slope is steeper than gas.
Thanks for the response, The AIM one is on my radar but I already have a AEM dash, however I am more familiar with AIM's data analyzer since I had been running a aim solo lap timer in the past so i may consider switching back. Also thank you for posting your power draw chart, helps with planning out my harness.
It's been a while since I updated and I basically haven't touched my car in all of 2021. My uninsulated garage was not enticing except for a few months of the year and I was spending all the nice weather time out riding my bike. Now I'm making plans for 2022.
Went full nuclear option on the garage situation. Building a 24'x24' workshop in my backyard. 12' ceilings for a 2 post lift, fully insulated, heated/cooled, 220V circuits. Permit should be available this week and construction finished before Christmas, hopefully.
I have also realized I'm in no man's land in terms of car class. ST5 is non-existent in Rocky Mountain region so I was planning to shift my build to ST6. There's maybe 6 or 7 regular racers in ST6 on the results but just found out almost all are in a regional class called Front4, which as you can guess, isn't for Miatas. Changing to ST6 simplifies a few things on aero and power shouldn't be an issue. I think I'll finish the build in ST6 and then reevaluate my next move. I was super close to getting the engine running and then it's mostly small things and setup. Out here, SM, GTS, and Front4 are popular along with 86 Cup (running in TT5). SM doesn't do it for me but an 86 could be a lot of fun...


 0
0