
How to Turbocharge your NA for 2k, build with TONNES of pics and info.


I thought that them having Skylines and sr20 Silvia's overthere would make for a cheaper trubo aftermarket.
Reply
 0
0

0

I see where Dan's coming from. I can appreciate him showing people how to make a reasonable setup that is affordable.
Only beef I really have with you Dan is your dramatic statements. I think you are a skilled mechanic. You just come off overly arrogant.
interested enough to swing back by for final product. with pictures of course. w/ upside down dyno.
Only beef I really have with you Dan is your dramatic statements. I think you are a skilled mechanic. You just come off overly arrogant.
interested enough to swing back by for final product. with pictures of course. w/ upside down dyno.
Reply
0
0


Thread Starter
Elite Member
Joined: Apr 2010
Posts: 2,826
Total Cats: 66
From: Newcastle, Australia
Let me put this into perspective for everyone.
The 22" magnaflow everyone runs is over 400 dollars here.
Cleaning for a set of 4 used injectors is over 100. Ms PNP costs 1000 landed.
I could post some of the repkies in australia but basically half a dozen people had already called bullshit on the price being possible first page.
My wording isnt dramatic over here and the thread is a direct cut and paste.
Im still waiting to recover post number 3 then i can put half a dozen more up with it.
EDIT:
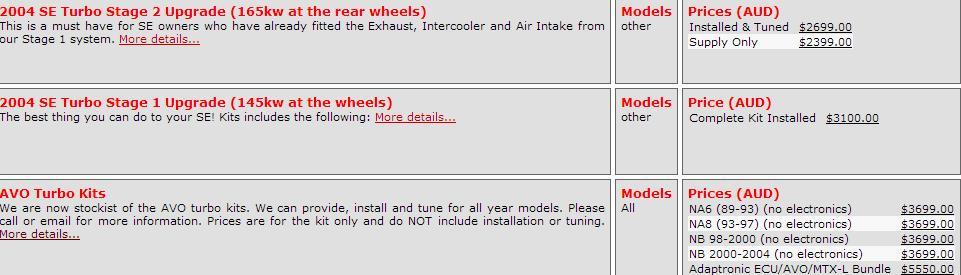
Here is an example from one of Australias leading mx5 specialists websites, showing current turbo kit prices.
The 22" magnaflow everyone runs is over 400 dollars here.
Cleaning for a set of 4 used injectors is over 100. Ms PNP costs 1000 landed.
I could post some of the repkies in australia but basically half a dozen people had already called bullshit on the price being possible first page.
My wording isnt dramatic over here and the thread is a direct cut and paste.
Im still waiting to recover post number 3 then i can put half a dozen more up with it.
EDIT:
Here is an example from one of Australias leading mx5 specialists websites, showing current turbo kit prices.
Last edited by nitrodann; Jul 23, 2013 at 09:05 PM.
Reply
0
0

Senior Member
Joined: May 2011
Posts: 1,112
Total Cats: 35
From: Pennsylvania
Let me put this into perspective for everyone.
The 22" magnaflow everyone runs is over 400 dollars here.
Cleaning for a set of 4 used injectors is over 100. Ms PNP costs 1000 landed.
I could post some of the repkies in australia but basically half a dozen people had already called bullshit on the price being possible first page.
My wording isnt dramatic over here and the thread is a direct cut and paste.
Im still waiting to recover post number 3 then i can put half a dozen more up with it.
double win...
Reply
0
0
so the bullshit is all relative.
Hell I turboed my car for $1200 initially...
Reply
0
0


Thread Starter
Elite Member
Joined: Apr 2010
Posts: 2,826
Total Cats: 66
From: Newcastle, Australia
Here is the steampipe being used for this basic log manifold.

Pull some steampipe up to the press, or alternatively use a hammer on a vice. We are going to crush the entries flatter to match the manifold ports.
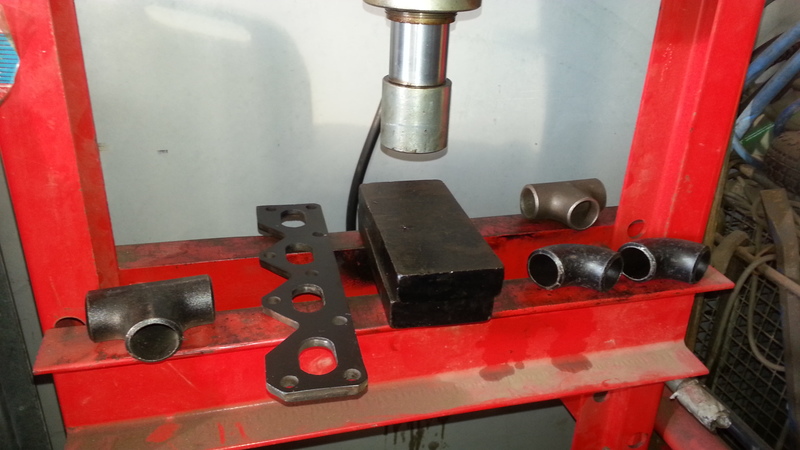
This is how its held in the vice.
Now the steampipe matches the ports in the flange and head.
Dann
Pull some steampipe up to the press, or alternatively use a hammer on a vice. We are going to crush the entries flatter to match the manifold ports.
This is how its held in the vice.
Now the steampipe matches the ports in the flange and head.
Dann
Reply
1
1
Thread Starter
Elite Member
Joined: Apr 2010
Posts: 2,826
Total Cats: 66
From: Newcastle, Australia
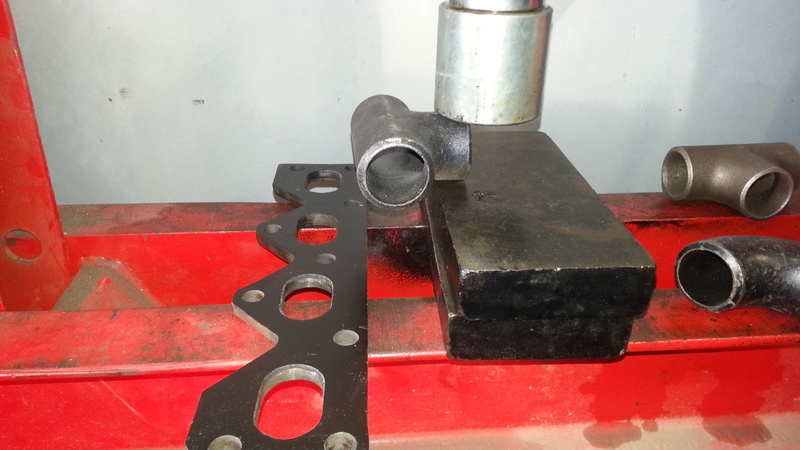
Ok, so next we need to cut and clean the steampipe, it needs to be be cut down in horizontal length to that in total the bend-T-T-bend combination fits the port holes.
I used the grinder you can see in the photos to cut and a wire brush to clean them.
Small gap for weld penetration.
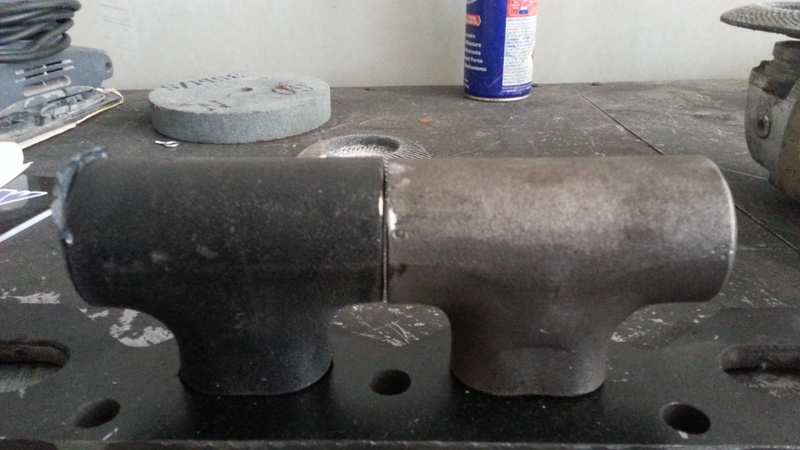
Now they fit the ports.
Cleaned with wire brush so they weld nicely.

Dann
I used the grinder you can see in the photos to cut and a wire brush to clean them.
Small gap for weld penetration.
Now they fit the ports.
Cleaned with wire brush so they weld nicely.
Dann
Reply
1
1
Thread Starter
Elite Member
Joined: Apr 2010
Posts: 2,826
Total Cats: 66
From: Newcastle, Australia
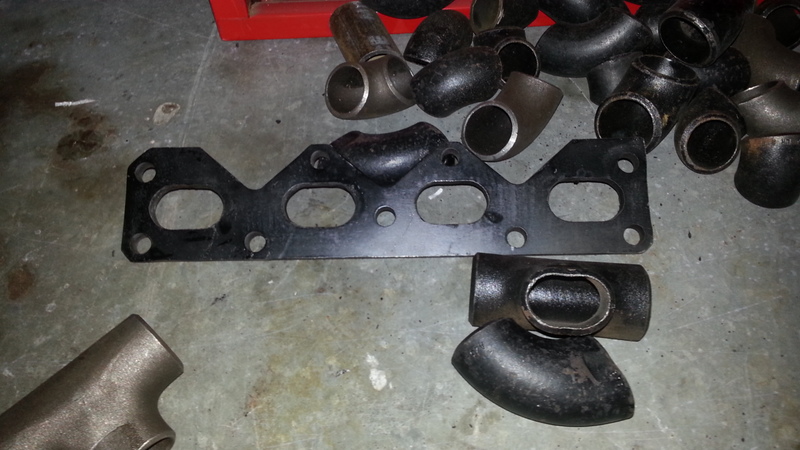
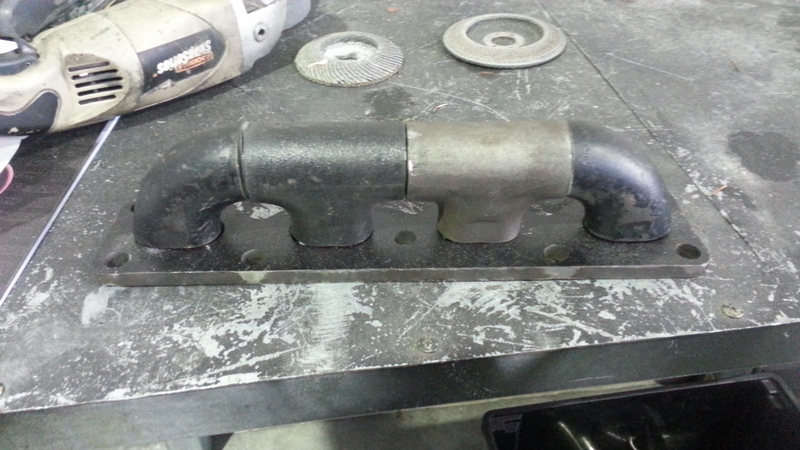
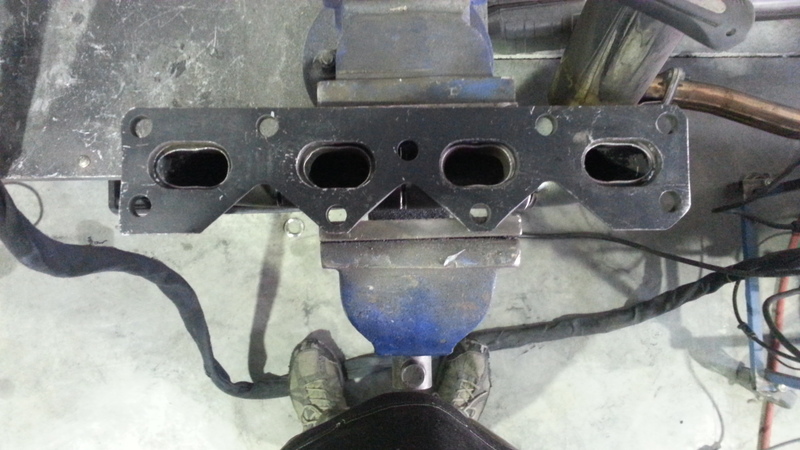
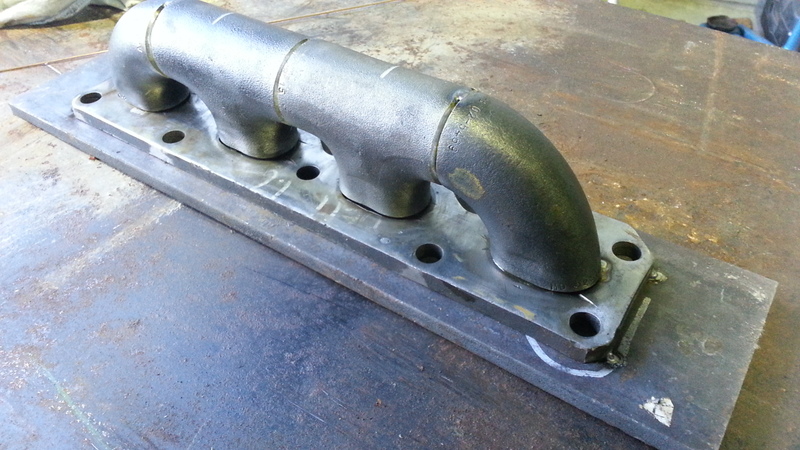
Next we line them up and tack them together on top.
Flip it, lay the flange over and see if the ports line up, in this case I tapped the far left one with a hammer a little inwards and up.
Tack the bottom.
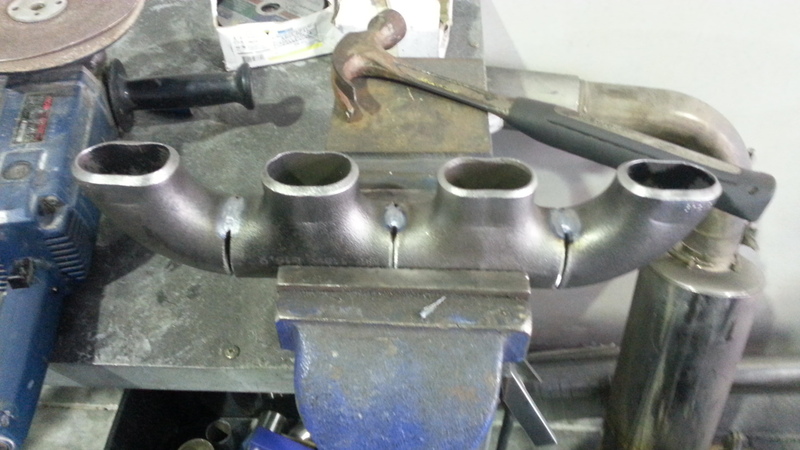
Clean the flange on the wled side and tack it on.
Double check th eports line up nicely, remember this will be hand ported later.
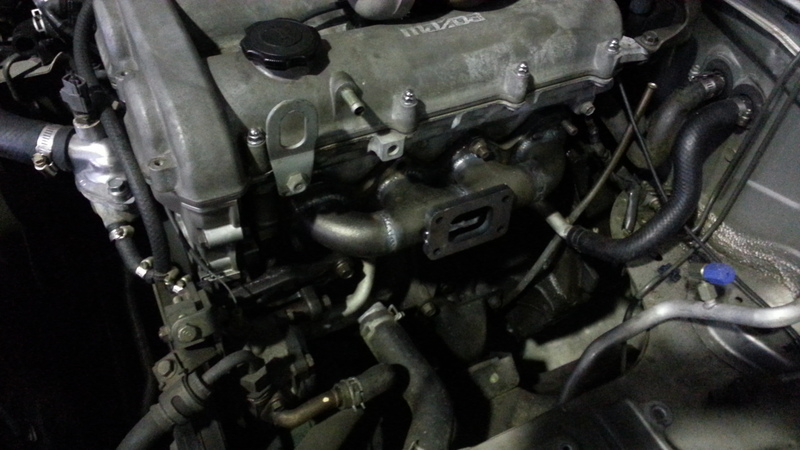
Check it on the car, awesome, heaps of space to work with.
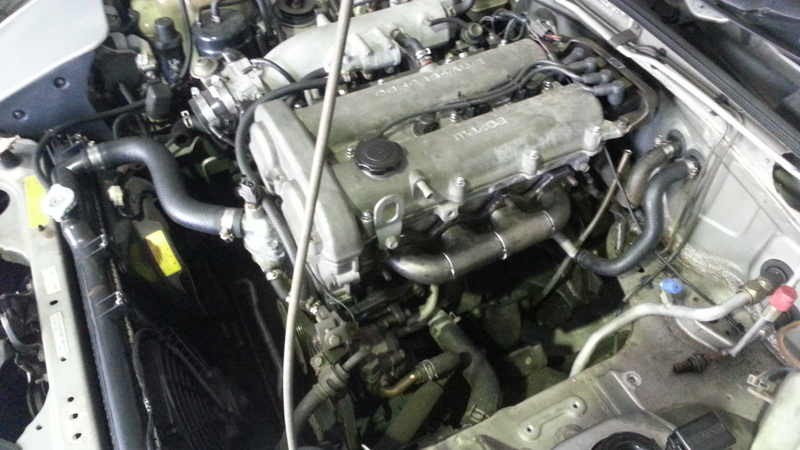
Keep in mind future turbo upgrade size, and choose a location for the turbo, in this case Im going with side mount as discussed with the owner, it keeps it easy to work on, can be covered with a heatshield, and allows a lot of room for a T28 later.

Dont just consider these questions regarding the current turbo, but for other bolt on upgrades, in this case the T25 and t28 were considered.
Dann
Flip it, lay the flange over and see if the ports line up, in this case I tapped the far left one with a hammer a little inwards and up.
Tack the bottom.
Clean the flange on the wled side and tack it on.
Double check th eports line up nicely, remember this will be hand ported later.
Check it on the car, awesome, heaps of space to work with.
Keep in mind future turbo upgrade size, and choose a location for the turbo, in this case Im going with side mount as discussed with the owner, it keeps it easy to work on, can be covered with a heatshield, and allows a lot of room for a T28 later.
Dont just consider these questions regarding the current turbo, but for other bolt on upgrades, in this case the T25 and t28 were considered.
Dann
Reply
1
1
Thread Starter
Elite Member
Joined: Apr 2010
Posts: 2,826
Total Cats: 66
From: Newcastle, Australia
Clean your material where the welds will go with a solvent.
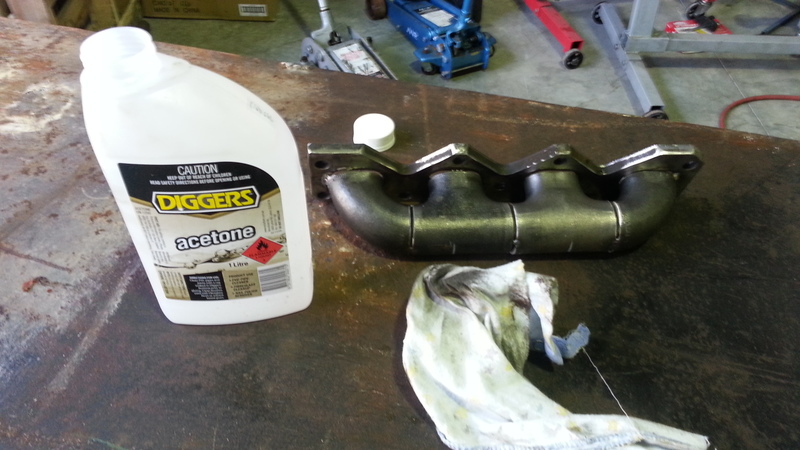
Tack the flange to something solid or bolt it down or clamp it to a bench etc to stop it warping during welding.
Lay some beads.
Dann
Tack the flange to something solid or bolt it down or clamp it to a bench etc to stop it warping during welding.
Lay some beads.
Dann
Reply
1
1
Thread Starter
Elite Member
Joined: Apr 2010
Posts: 2,826
Total Cats: 66
From: Newcastle, Australia
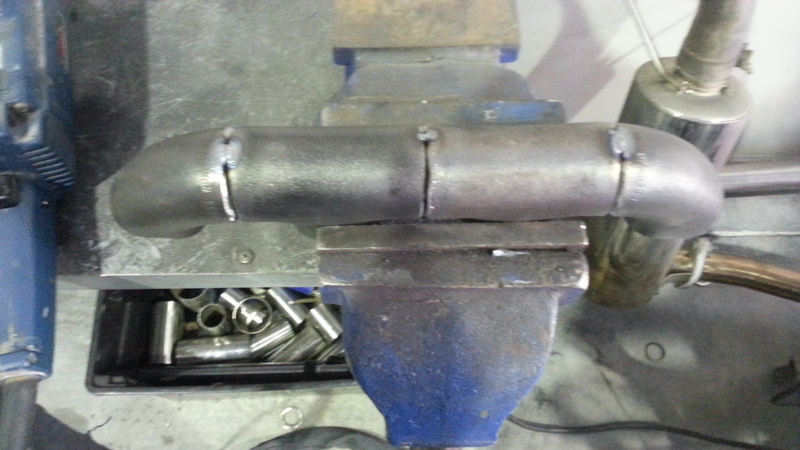
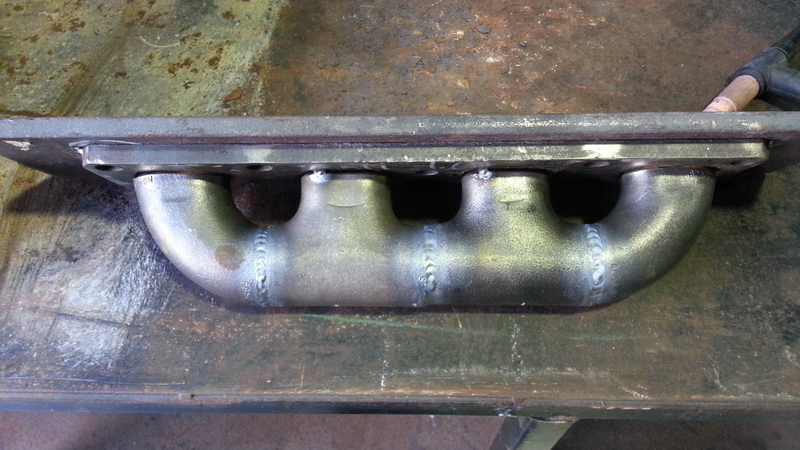
Weld..
Weld some more.
Take off your shirt and get a welding suntan (NB: Joke..)
Now let it cool down at its own pace to prevent warping the flange, this may take 1, 2 or even 3 beers.

Dann
Weld some more.
Take off your shirt and get a welding suntan (NB: Joke..)
Now let it cool down at its own pace to prevent warping the flange, this may take 1, 2 or even 3 beers.
Dann
Reply
0
0
Thread Starter
Elite Member
Joined: Apr 2010
Posts: 2,826
Total Cats: 66
From: Newcastle, Australia
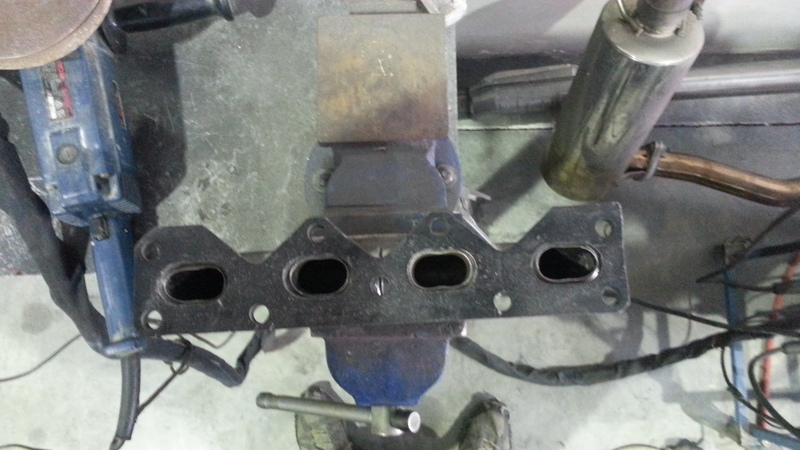
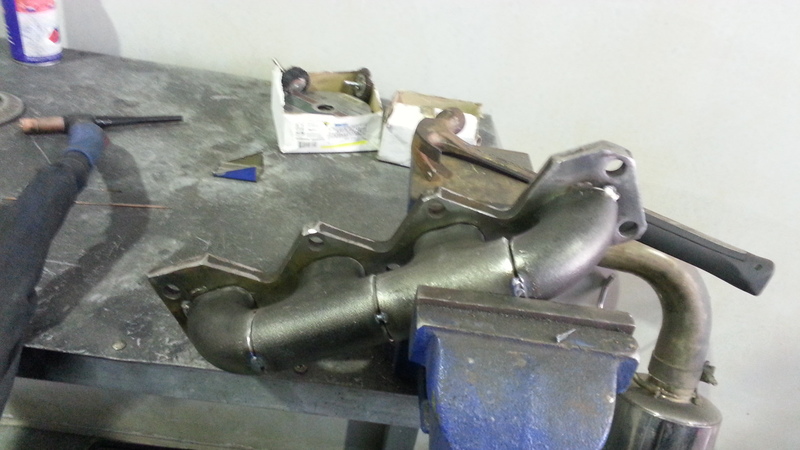
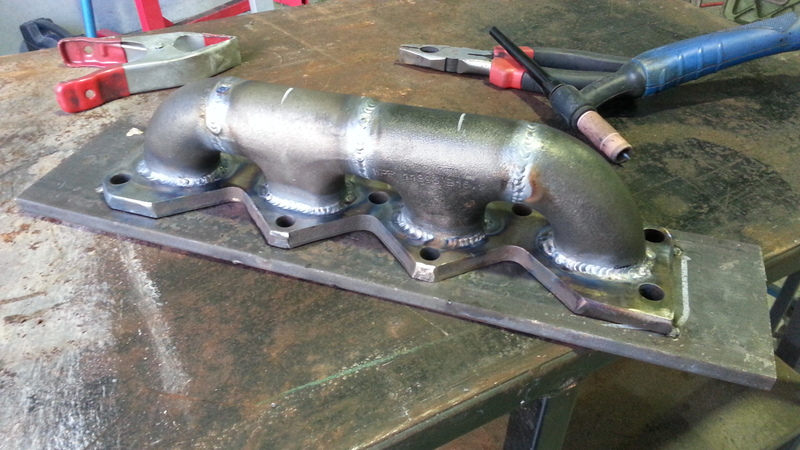
Ok so next step is cut out a section of log with a grinder for the flange.
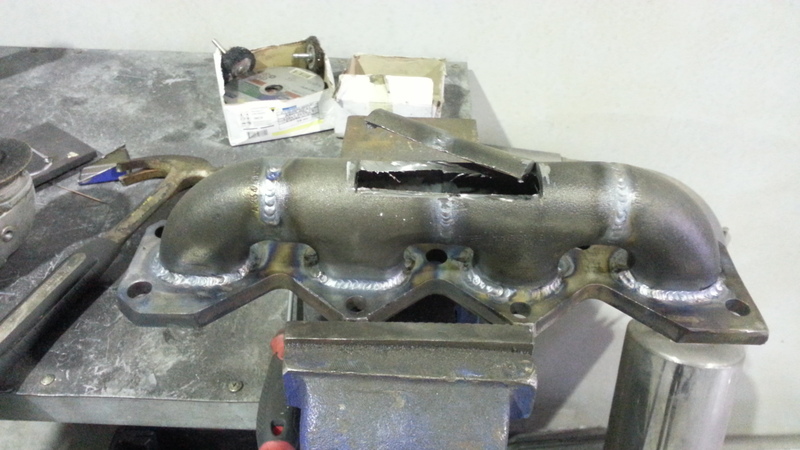
Doble check it sits right with the turbo flange tacked on.
Do some more welds, sorry for blurriness.
Test fit, this is make or break, if it doesnt look tough enough now its too late :P

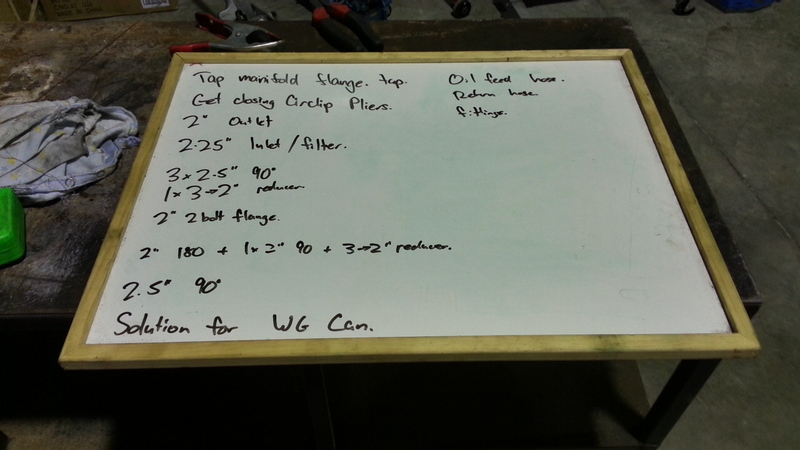
Grab your whiteboard and brainstorm what else needs to be done, and what you need to have on hand for the next steps.
Go back and have another look
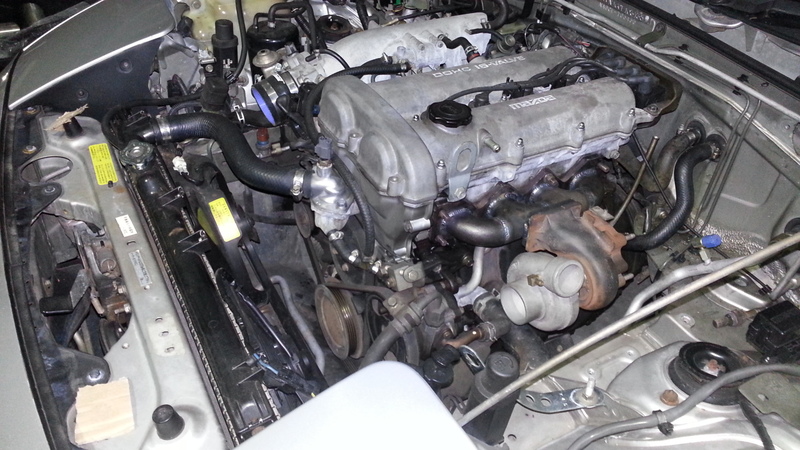
So at this point I can start the intercooler piping, or in this case, the crossover pipe. I want to clock the turbo, which means rotate the front and rear housing to get the oil drain facing down and get the turbo intercooler outlet where I want it. So for now I will start on the downpipe and start the intercooler piping from the throttle body and leave the last bit for when the turbo is clocked correctly into place.
Dann
Doble check it sits right with the turbo flange tacked on.
Do some more welds, sorry for blurriness.
Test fit, this is make or break, if it doesnt look tough enough now its too late :P
Grab your whiteboard and brainstorm what else needs to be done, and what you need to have on hand for the next steps.
Go back and have another look
So at this point I can start the intercooler piping, or in this case, the crossover pipe. I want to clock the turbo, which means rotate the front and rear housing to get the oil drain facing down and get the turbo intercooler outlet where I want it. So for now I will start on the downpipe and start the intercooler piping from the throttle body and leave the last bit for when the turbo is clocked correctly into place.
Dann
Reply
1
1
Thread Starter
Elite Member
Joined: Apr 2010
Posts: 2,826
Total Cats: 66
From: Newcastle, Australia
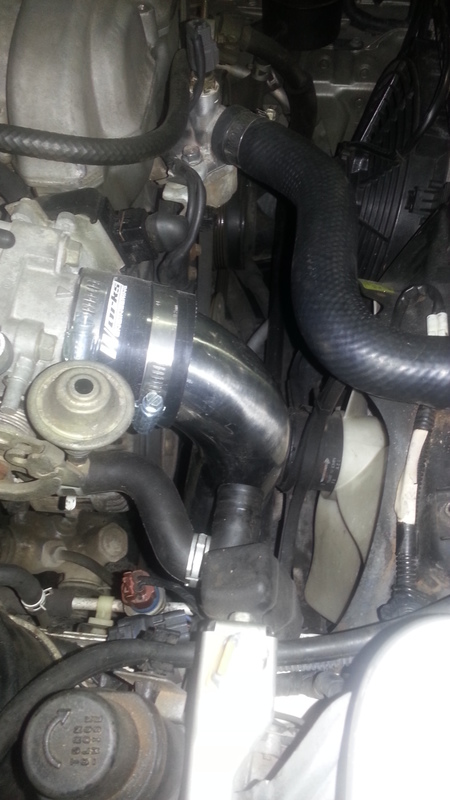
So starting at the throttle body, Im going to have the traditional 2.5" vertical straight down pipe, Ill then go down to 2" and across the bay, this way if an intercooler is added later, this piece of the puzzle has already been made and ready, complete with BOV fitting (although blocked) and ICV fitting.
A BOV can be fitted at any time in about 10 minutes and it saves remaking the this section. This costs the same in material as doing it the easy way, but builds an upgrade path into this side of the system.
Dann
A BOV can be fitted at any time in about 10 minutes and it saves remaking the this section. This costs the same in material as doing it the easy way, but builds an upgrade path into this side of the system.
Dann
Reply
0
0
Thread Starter
Elite Member
Joined: Apr 2010
Posts: 2,826
Total Cats: 66
From: Newcastle, Australia
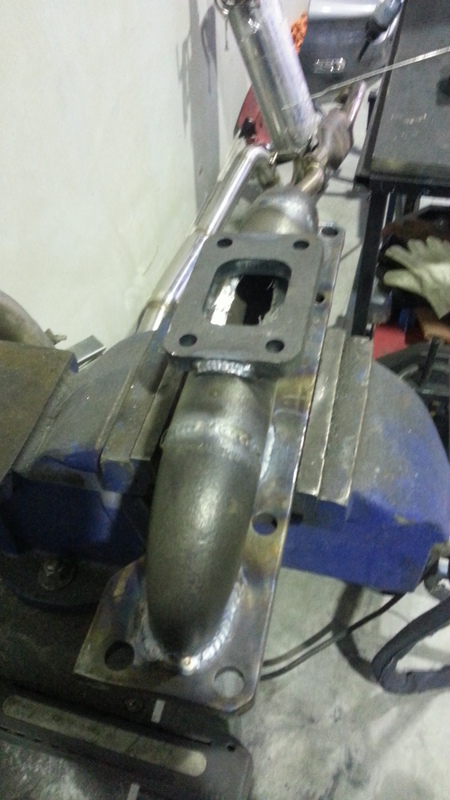
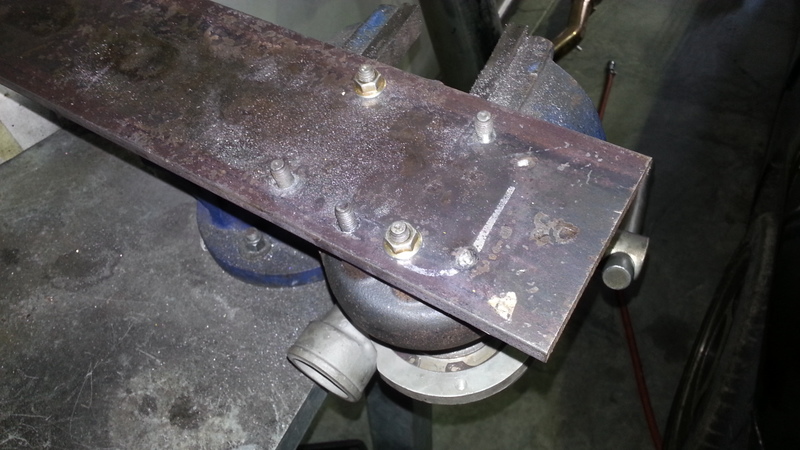
Clocking the turbo to get a nice piping path is next.
Take your circlip pliers and remove this circlip on the front housing, T25/28 have 6 bolts instead of the circlip.
It may be rusted on quite hard so you might need a bit of wd40 overnight to get it free.
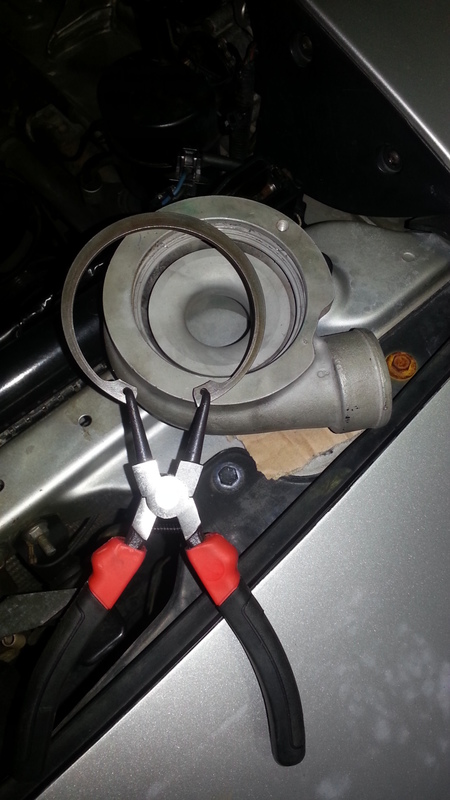
This is the turbo with the front housing removed.
This pic illustrates the variety of mounting option you have, the outlet can spin all the way around.
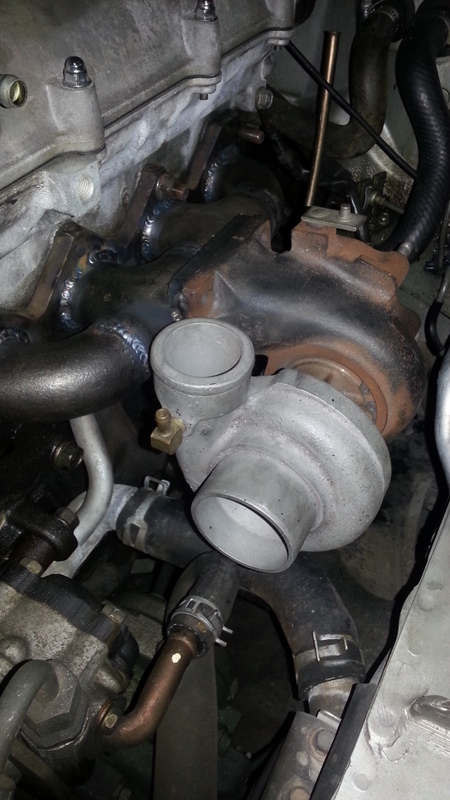
Dann
Take your circlip pliers and remove this circlip on the front housing, T25/28 have 6 bolts instead of the circlip.
It may be rusted on quite hard so you might need a bit of wd40 overnight to get it free.
This is the turbo with the front housing removed.
This pic illustrates the variety of mounting option you have, the outlet can spin all the way around.
Dann
Reply
1
1
Thread Starter
Elite Member
Joined: Apr 2010
Posts: 2,826
Total Cats: 66
From: Newcastle, Australia
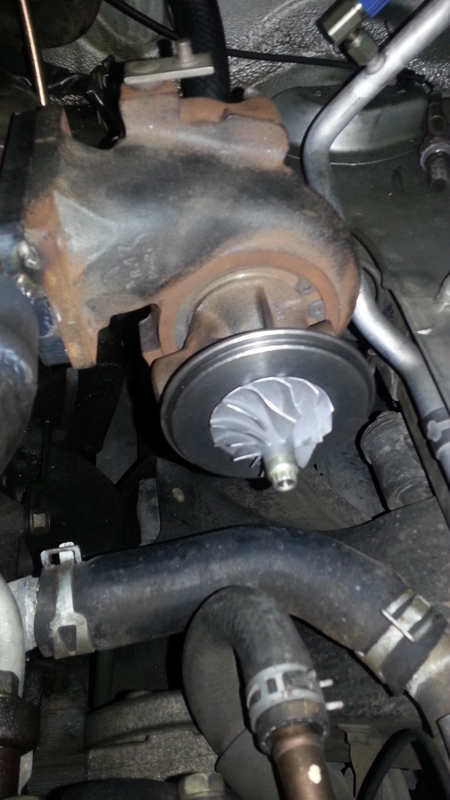
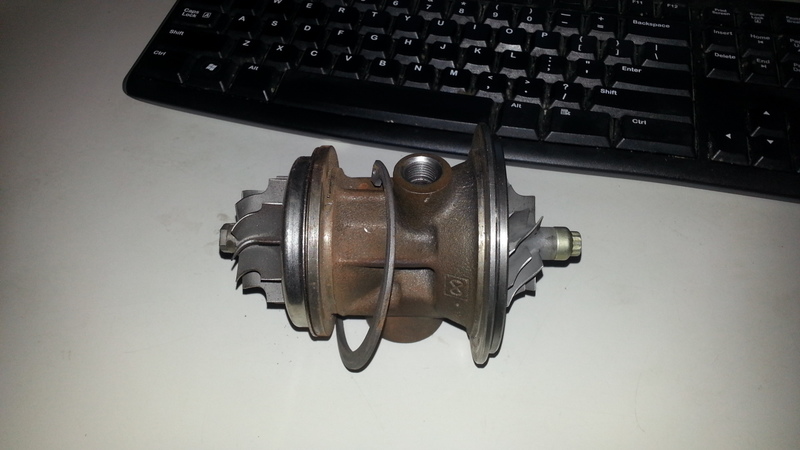
And with the rear circlip removed we can remove the Centre Housing Rotating Assembly (CHRA).
Now the centre housing can be reinstalled with the oil feed on top and the drain facing down as pictured.
Dann
Now the centre housing can be reinstalled with the oil feed on top and the drain facing down as pictured.
Dann
Reply
0
0
Thread Starter
Elite Member
Joined: Apr 2010
Posts: 2,826
Total Cats: 66
From: Newcastle, Australia
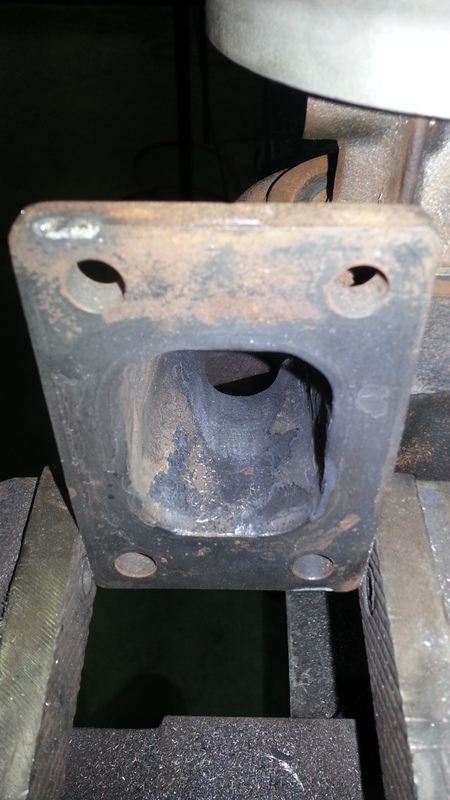
So the downpipe flange isnt QUITE what the flange for a T25/28 is, so Im going to make one.
Mount in vice.
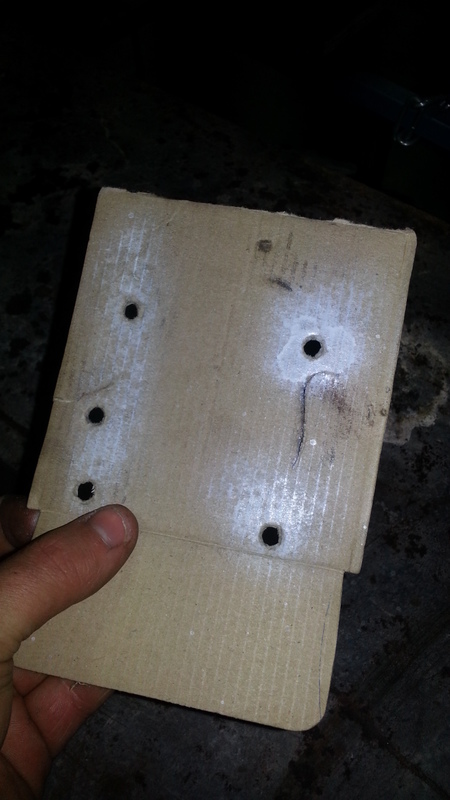
Cardboard and a hammer, gently tap on the studs to cut through.
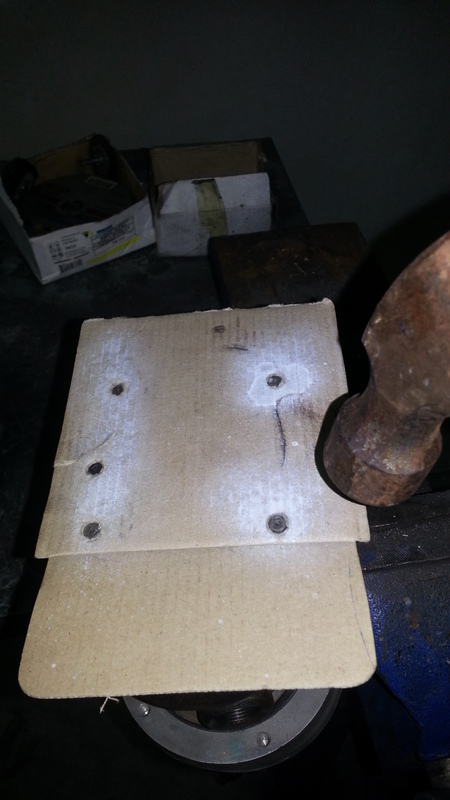
Stud pattern.
Transfer through to your steel plate with spray paint.
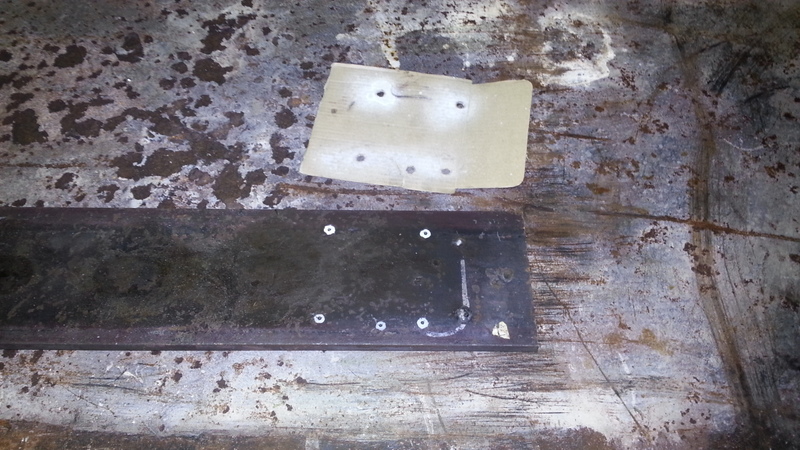
Dann
Mount in vice.
Cardboard and a hammer, gently tap on the studs to cut through.
Stud pattern.
Transfer through to your steel plate with spray paint.
Dann
Reply
1
1
Thread Starter
Elite Member
Joined: Apr 2010
Posts: 2,826
Total Cats: 66
From: Newcastle, Australia
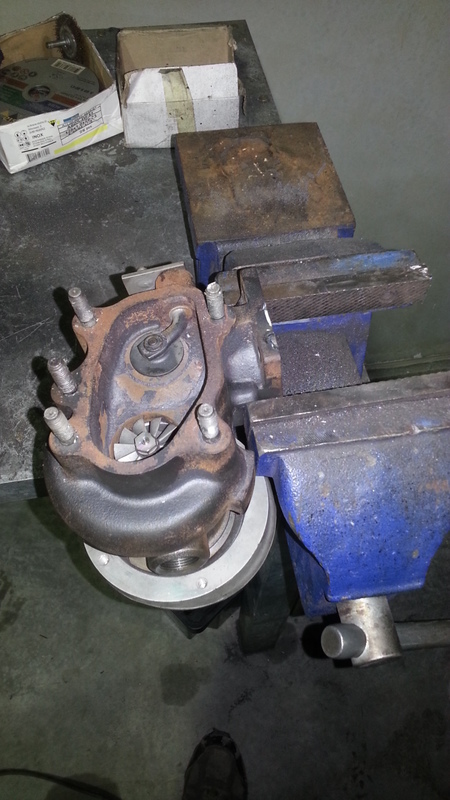
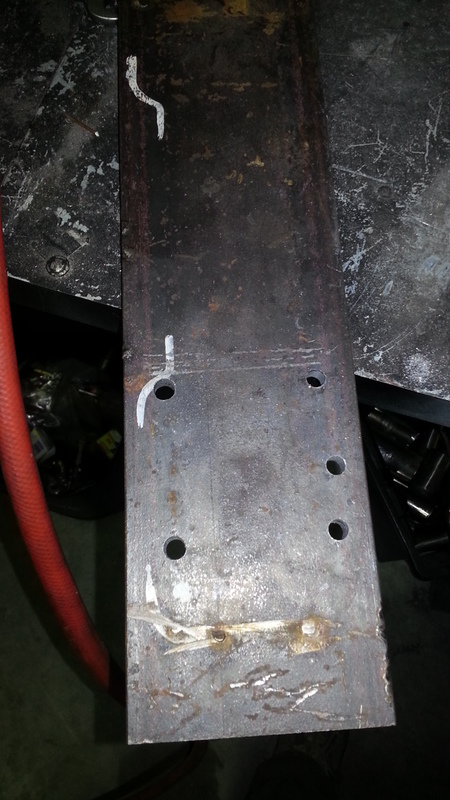
Not much done today, Drilled the earlier marked holes.
About half an hour with a round file to get the holes spot on and nicely fitting.
This is the exhaust side of the turbo, shown open is the wastegate port, the flapper door is the wastegate flapper and opens to allow exhaust gases to bypass the exhaust wheel shown at the bottom, with less gases the wheels spin less and the turbo produces less boost, this is how boost control works with an internal wastegate like this.
I ported the opening a little larger, being careful to leave at least 1mm sealing surface (ie the hole is 2mm smaller than the flapper is.)
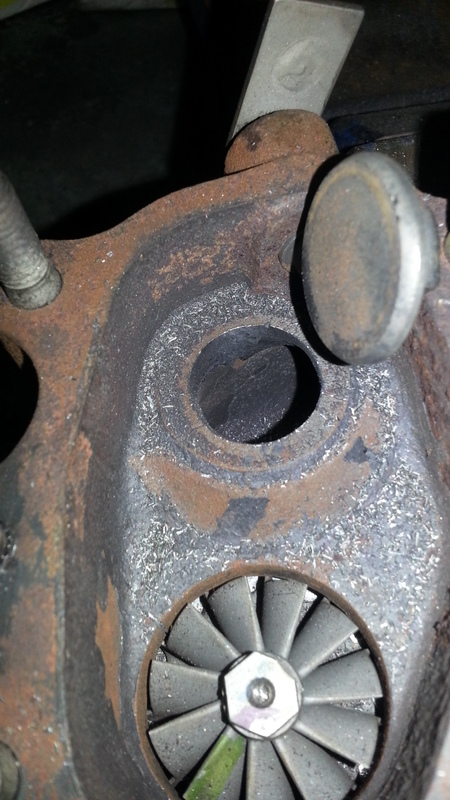
On the inside I ported the entry to the wastegate hole.
So next we will mark the shape of the flange and the cut it out.
The reason Ive ported this wastegate is because the turbo is quite small, even for a 1.6L, the wastegate might have trouble flowing enough gas to bypass the turbine wheel enough for good boost control and as a result boost may rise with rpm as the wastegate has a harder and harder time bypassing gas for boost control.
This is just a bit of extra just in case kind of work.
Dann
About half an hour with a round file to get the holes spot on and nicely fitting.
This is the exhaust side of the turbo, shown open is the wastegate port, the flapper door is the wastegate flapper and opens to allow exhaust gases to bypass the exhaust wheel shown at the bottom, with less gases the wheels spin less and the turbo produces less boost, this is how boost control works with an internal wastegate like this.
I ported the opening a little larger, being careful to leave at least 1mm sealing surface (ie the hole is 2mm smaller than the flapper is.)
On the inside I ported the entry to the wastegate hole.
So next we will mark the shape of the flange and the cut it out.
The reason Ive ported this wastegate is because the turbo is quite small, even for a 1.6L, the wastegate might have trouble flowing enough gas to bypass the turbine wheel enough for good boost control and as a result boost may rise with rpm as the wastegate has a harder and harder time bypassing gas for boost control.
This is just a bit of extra just in case kind of work.
Dann
Reply
1
1


