
MS3 or MSPNP Pro


Thread Starter
Junior Member
iTrader: (2)
Joined: Dec 2014
Posts: 307
Total Cats: 23
From: Salinas, CA
I recently acquired a 2001 vvt longblock. I currently have a 1.6 in my 1990 NA. I am running a MSPNP Gen 2 and I know that I won't be able to control vvt with it unless I get the vvt controller. If I were to put the 2001 engine into my 90 NA. Would the MS3 be plug and play if I were to get one made from Reverant or Braineack? Would the MSPNP Pro be easier? How much of the MSPNP pro is really PNP? I'm assuming everything besides the vvt stuff? What I really want is to be able to controll vvt and use the 2001 coils, BUT keep my 1.6 wiring on the car side.
Thanks
David
Thanks
David
Reply
 0
0

0


/thread
I have an MS3x built by Brain. It's in a 92. I have VVT. 2001 Coils you'd have to wire into your NA harness anyway. Ditch the CAS, split the wiring to utilize the NB2 cam and crank sensors. Easy peasy (after lots of hand holding).
Reply
0
0
Thread Starter
Junior Member
iTrader: (2)
Joined: Dec 2014
Posts: 307
Total Cats: 23
From: Salinas, CA
 One more question. Do you have to use a boomslang type adapter to connect to the Braineack built ECUs or just plug your NA harness straight to it?
Reply
0
0
Brain does a great job setting it up. You just unplug stock ecu, plug in new ecu with a vacuum line.
You will run one wire out to the VVT solenoid, and also out to the knock sensor should you elect to run one (and you should). This is handled by an auxiliary harness/plug which will be provided with the unit.
Why not just get VVTuner and use your MS2?
http://www.diyautotune.com/catalog/vvtuner-c-80.html
Just transfer the relevant coolant temp sensor, and simply splice the wires into the IACV and TPS of your existing setup. You can still use your CAS setup and just run it on the exhaust cam. Just keep the hole plugged up on the VVT valve cover for the stock NB cam sensor.
Reply
0
0
Thread Starter
Junior Member
iTrader: (2)
Joined: Dec 2014
Posts: 307
Total Cats: 23
From: Salinas, CA
Brain does a great job setting it up. You just unplug stock ecu, plug in new ecu with a vacuum line.
You will run one wire out to the VVT solenoid, and also out to the knock sensor should you elect to run one (and you should). This is handled by an auxiliary harness/plug which will be provided with the unit.
Why not just get VVTuner and use your MS2?
VVTuner Megasquirt Kits / Assembled Engine Management Systems, Wideband o2 Sensor Systems and tuning products - DIYAutoTune.com
Just transfer the relevant coolant temp sensor, and simply splice the wires into the IACV and TPS of your existing setup. You can still use your CAS setup and just run it on the exhaust cam. Just keep the hole plugged up on the VVT valve cover for the stock NB cam sensor.
Reply
0
0
You can do that anyway, you just split the 4 CAS wires, bus power and ground to each sensor, and run the two signal wires to the corresponding sensor. Make sure you select 99-00 under spark mode in your ignition options. Look below for wire info for NA6
Wiring is the same as BP4W, that was just my old motor.
If anyone that follows this thread is knowledgable with wiring between miata's, can you please check out this thread:
https://www.miataturbo.net/engine-pe...5/#post1117257
I'm hoping to have this all markered before I try to swap this weekend.
I need to ensure that they are connected correctly.
____________________________________
For the Crank/Cam signal
Stock 1.6L CAS:
black w/ light green stripe = Ground
white w/ red stripe = +12V
white = crank signal
yellow w/ blue stripe = cam signal
on the BP4W Crank Sensor:
White w/red stripe = +12v
Black w/blue stripe = ground
Grey w/ Red = Crank signal
on BP4W Cam Sensor:
White w/red stripe = +12v
Black w/blue stripe = ground
Grey w/ Blue = Cam signal
essentially, I can split the power and ground from the stock CAS and wire it into the respective white/red and black wires on the BP4W sensors, then just hook up
[NA6:white to BP4W:grey/red] and
[NA6: yellow/blue to BP4W: grey/blue]
____________________________________
For IACV
just connect the wires as polarity doesn't matter?
source: http://forum.miata.net/vb/newreply.p...eply&p=5233397
____________________________________
TPS
NA6 Red = 5v reference
NA6 light green/white = TPS signal
NA6 black/green = Ground
BP4W Light Grn/Red = 5v reference
BP4W Green/Black = TPS signal
BP4W Black/Red = Ground
source: https://www.miataturbo.net/megasquir...-93-car-36271/
____________________________________
Reply
0
0
I would highly suggest getting a MS3 over the vvttuner. The other updated features above what your ms2 has are worth it. You should be able to sell the ms2 to help offset the cost.
Reply
0
0
If cost is not prohibitive, I'd advise this as well. But you can still get away with ms2 if that's what you're comfy with. I made back enough off of my mspnp1 to justify Brains miracle box. Setup and tuning on ms3 is a bit daunting for me though. Still trying to learn/understand/not blow up the second motor.
Reply
0
0
Thread Starter
Junior Member
iTrader: (2)
Joined: Dec 2014
Posts: 307
Total Cats: 23
From: Salinas, CA
Thanks, appreciate all the input. This MSPNP2 is fairly new, bought from 949Racing less than a year ago. I learned what I know so far by messing with this on my N/A 1.6 Miata. Hopefully an MS3 is not that much different. I would probably just keep this MS and have two of them in case I build a second NA.
Reply
0
0

VVT swap megathread
MSLabs MS3 Basic Plug-and-Play
If you can put your pants on without assistance, you can do the swap with the two links above
MSLabs MS3 Basic Plug-and-Play
If you can put your pants on without assistance, you can do the swap with the two links above
Reply
0
0
Thread Starter
Junior Member
iTrader: (2)
Joined: Dec 2014
Posts: 307
Total Cats: 23
From: Salinas, CA
VVT swap megathread
MSLabs MS3 Basic Plug-and-Play
If you can put your pants on without assistance, you can do the swap with the two links above
MSLabs MS3 Basic Plug-and-Play
If you can put your pants on without assistance, you can do the swap with the two links above
Reply
0
0

I recently acquired a 2001 vvt longblock. I currently have a 1.6 in my 1990 NA. I am running a MSPNP Gen 2 and I know that I won't be able to control vvt with it unless I get the vvt controller. If I were to put the 2001 engine into my 90 NA. Would the MS3 be plug and play if I were to get one made from Reverant or Braineack? Would the MSPNP Pro be easier? How much of the MSPNP pro is really PNP? I'm assuming everything besides the vvt stuff? What I really want is to be able to controll vvt and use the 2001 coils, BUT keep my 1.6 wiring on the car side.
Thanks
David
Thanks
David
FYI, Kevin's CSP prepped 90 with VVT swap, the test mule for this ECU (we practice what we preach):
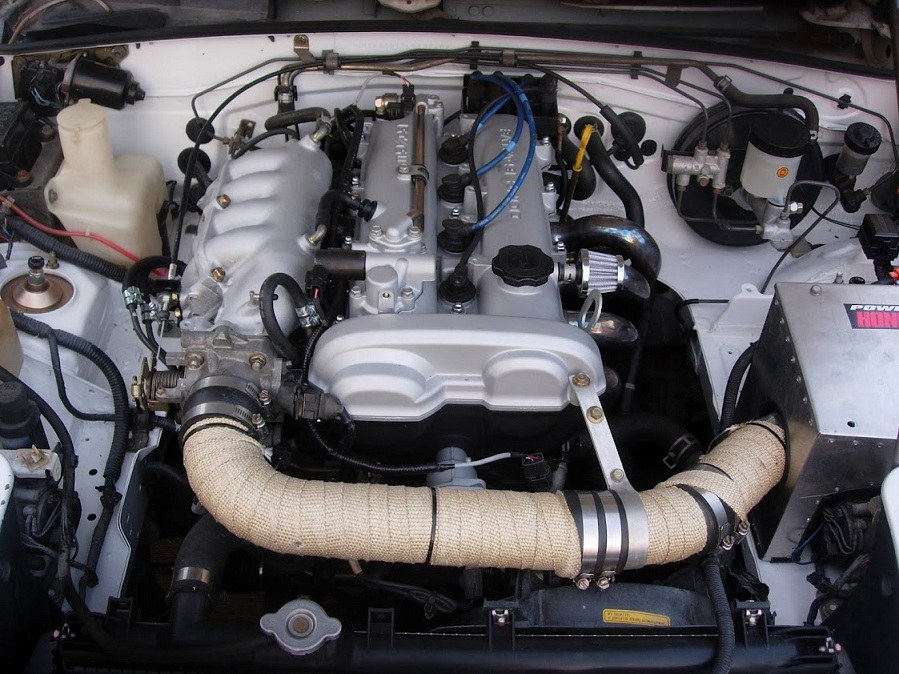
And you can see documentation here that shows how the extra connectors are pinned for the VVT engine's extra I/O needs. Scroll to the bottom:
MegaSquirtPNP by DIYAutoTune.com

Reply
0
0
Thread Starter
Junior Member
iTrader: (2)
Joined: Dec 2014
Posts: 307
Total Cats: 23
From: Salinas, CA
The MSPNP Pro is extremely PNP, even with the VVT swap. In fact, Kevin and I designed the ECU specifically with VVT swap in mind. It can retain the complete 1.6 wiring harness if desired, and the new cam sensor, crank sensor, and OCV solenoid wire to a spare connector on the ECU. It can also run the NB alternator as desired (which is my preference, but some people keep the 1.6 accessories).
FYI, Kevin's CSP prepped 90 with VVT swap, the test mule for this ECU (we practice what we preach):
And you can see documentation here that shows how the extra connectors are pinned for the VVT engine's extra I/O needs. Scroll to the bottom:
MegaSquirtPNP by DIYAutoTune.com
FYI, Kevin's CSP prepped 90 with VVT swap, the test mule for this ECU (we practice what we preach):
And you can see documentation here that shows how the extra connectors are pinned for the VVT engine's extra I/O needs. Scroll to the bottom:
MegaSquirtPNP by DIYAutoTune.com
Reply
0
0
I just got a hold a MSPNP Pro from a member on this forum. I was looking at the optional connector pinouts from the link you provided and noticed that I did not receive the 12 pin connector, I only got the rear option connector and connector number#3. I assume that this connector normally comes included when new?
Last edited by shuiend; Nov 5, 2015 at 02:03 PM.
Reply
0
0
Thread Starter
Junior Member
iTrader: (2)
Joined: Dec 2014
Posts: 307
Total Cats: 23
From: Salinas, CA
shoot an email to support@diyautotune.com and you will probably get a faster response about this.
Reply
0
0
Reply
0
0


