

Oil cooler tech


Junior Member
Joined: Feb 2012
Posts: 60
Total Cats: 21
From: near Ottawa Ontario Canada
Accessories - Adapters, Fitting & Hose
Try Jegs, Summit, etc.
Reply
 0
0

0


Joined: Apr 2014
Posts: 18,643
Total Cats: 1,870
From: Beaverton, USA
Had @hi_im_sean throw this together for me.
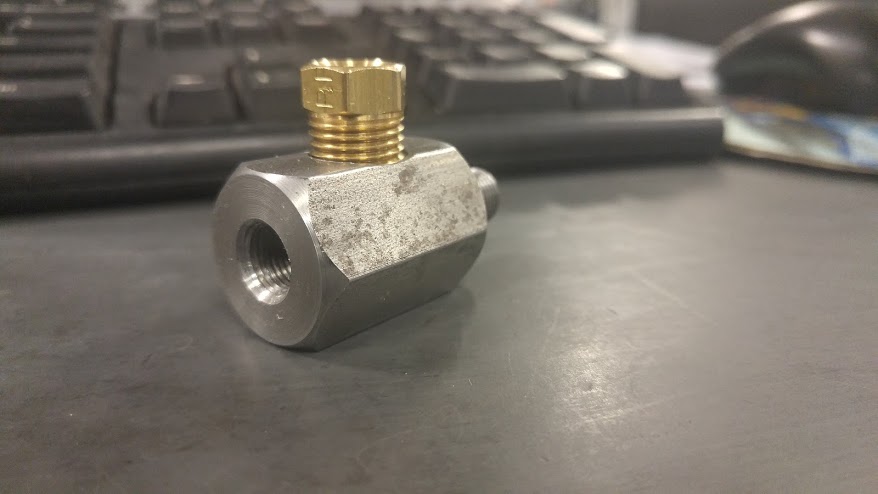
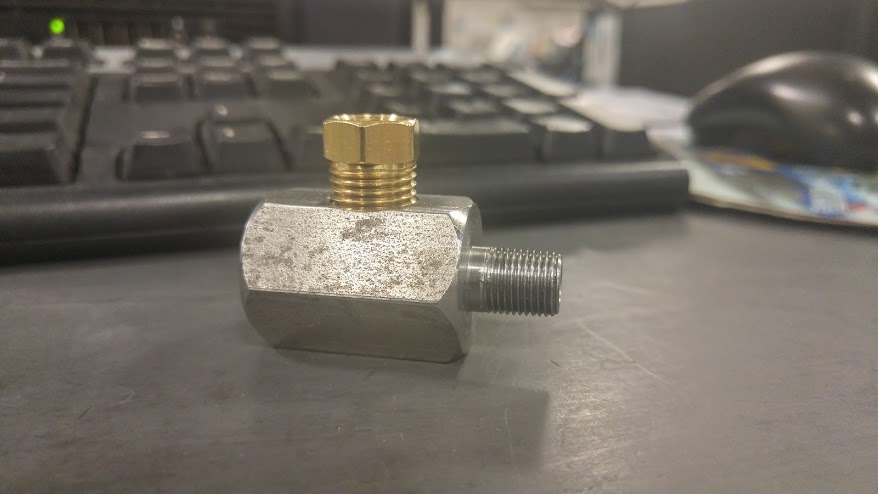
Similar to TSE adapter, but the top has a 1/4 npt fitting, with a 1/4-1/8npt adapter. The male is BSPT, and the female on the end is BSPT for the stock pressure sender.
There is a 1/8npt on the other side for oil feed.
Hopefully @Savington gets my message in time to cancel my adapter order.
Similar to TSE adapter, but the top has a 1/4 npt fitting, with a 1/4-1/8npt adapter. The male is BSPT, and the female on the end is BSPT for the stock pressure sender.
There is a 1/8npt on the other side for oil feed.
Hopefully @Savington gets my message in time to cancel my adapter order.
Reply
0
0


Setrab 25 row oil cooler on ebay for $85. It looks to be a different version than most of the miata "kits" with built in AN fittings. I'm giving it a shot. Can't beat the price.
http://www.ebay.com/itm/927AN10-SETR...5Wl~f8&vxp=mtr
I added another item and stacked it with this $20 off $100 ebay coupon.
http://www.ebay.com/itm/927AN10-SETR...5Wl~f8&vxp=mtr
I added another item and stacked it with this $20 off $100 ebay coupon.
Reply
1
1
Joined: Apr 2014
Posts: 18,643
Total Cats: 1,870
From: Beaverton, USA
Setrab 25 row oil cooler on ebay for $85. It looks to be a different version with built in AN fittings. I'm giving it a shot. Can't beat the price.
927AN10 Setrab Oil Cooler 50 927 4062 M 25 Row 8" High 14" Wide 2" Thick | eBay
I added another item and stacked it with this $20 off $100 ebay coupon.
927AN10 Setrab Oil Cooler 50 927 4062 M 25 Row 8" High 14" Wide 2" Thick | eBay
I added another item and stacked it with this $20 off $100 ebay coupon.
It's significantly longer than the usual 25 row.
It's huge.
Reply
0
0

Other than blocking more of the radiator and weight, is there any disadvantage to having a monster oil cooler?
Reply
0
0
Reply
0
0

I run a 25row w/ the standard MOCAL adapter thermostat mounted just like Aidan here and it takes a little while for oil to heat up on warmish days (60*+). You may have to block part of the cooler on cold days, I know I do (I also have a 55mm Mishi rad) but I've been driving in 40-50* days. Just do what I do: Duct tape over a cardboard sheet so it doesn't get soggy, leave a long flap to grab for a handle to extract it and leave it in the trunk on warm days.
Reply
0
0
Joined: Sep 2012
Posts: 4,560
Total Cats: 1,143
From: your mom's house phoenix, AZ
Aidan's diaper changer here,
They are AN10, but male, instead of the usual female ports.
https://www.miataturbo.net/build-thr...0/#post1312453
They are AN10, but male, instead of the usual female ports.
https://www.miataturbo.net/build-thr...0/#post1312453
Reply
1
1
Aidan's diaper changer here,
They are AN10, but male, instead of the usual female ports.
https://www.miataturbo.net/build-thr...0/#post1312453
They are AN10, but male, instead of the usual female ports.
https://www.miataturbo.net/build-thr...0/#post1312453
Reply
0
0

Junior Member
Joined: May 2011
Posts: 257
Total Cats: 13
From: Signal Hill, CA
Reply
0
0

I recently finished installing my oil cooler kit from Trackspeed (19 row) and I thought I would share.
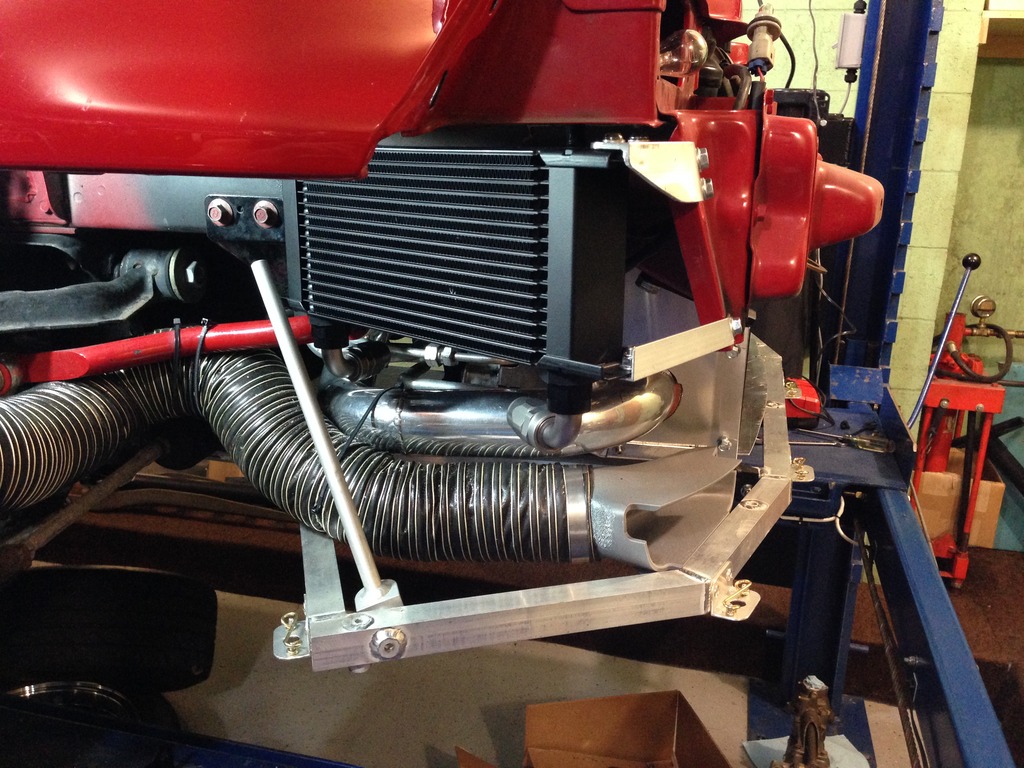
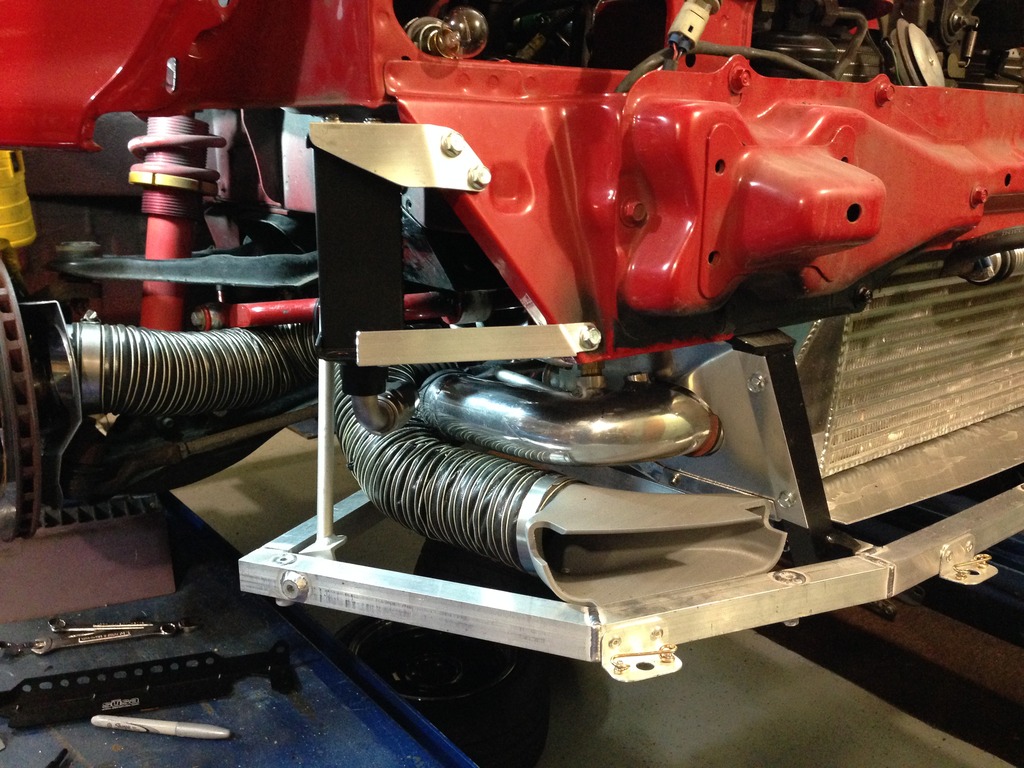
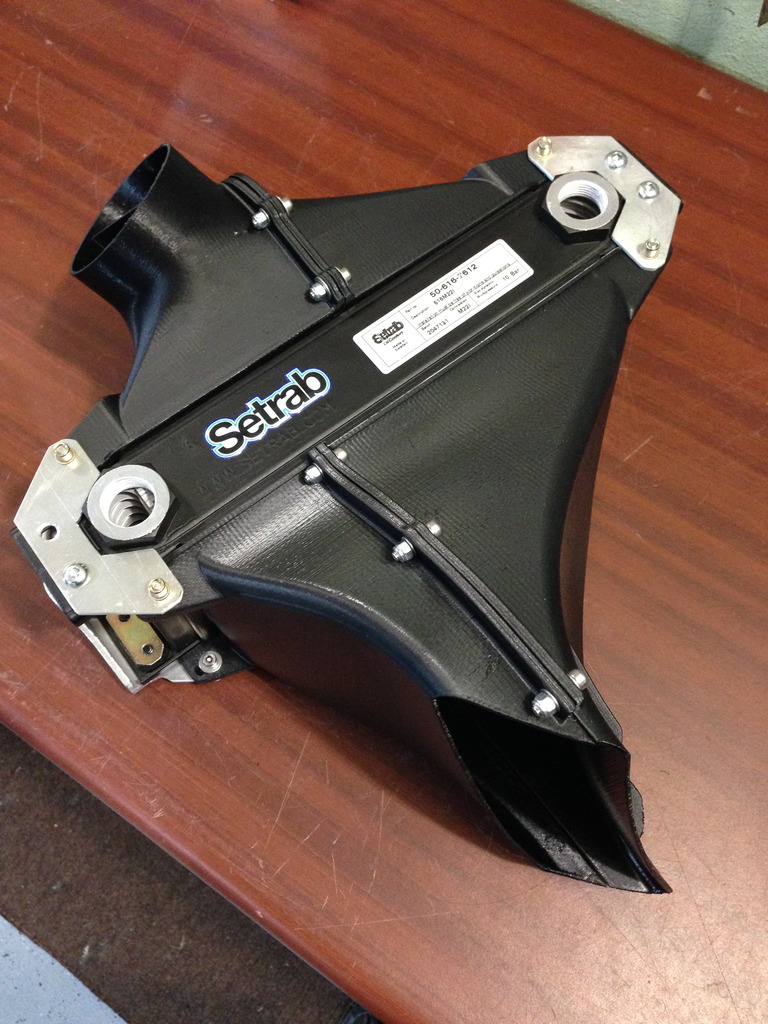
First off, I have an intercooler and A/C already in front of my Koyo 38mm rad. They are fairly well ducted but i was already seeing water temps creeping upward throughout each 20 minute track session without ever leveling off, so i didn't think stacking the oil cooler with the other heat exchangers was a good idea. I decided to put it as high as possible in the front right corner of the car.
Being that the wheel well is a high pressure area with rocks and debris flying around constantly, I decided that ducting the exit air out the front bumper just in front of the wheel would be�better. In other words I stole the idea from Ryan Passey.
I started out by fabricating the mounting brackets and adding rivet nuts to the chassis to bolt it in. Part of the bracketry was for attaching the duct work.

First I attempted to fabricate the ducting from aluminum. I had a feeling I was using too thin of a gauge and it would be hard to weld. I was right - I just don't have the chops to weld .035" alum, so I gave up on welding and took a more "fun" approach


Being that I have a home made 3-D printer in my kitchen, it was the natural choice for plan B. I started out by transferring the measurements off the aluminum prototype into a SolidWorks model. I had to print both the inlet side and the outlet side in two halves, since my build platform is only 8x8x11. It took a few iterations and a couple failed prints but I finally got some decent parts! They are printed from ABS so hopefully it will be able to take the temperature. We will see what happens at the next track day.
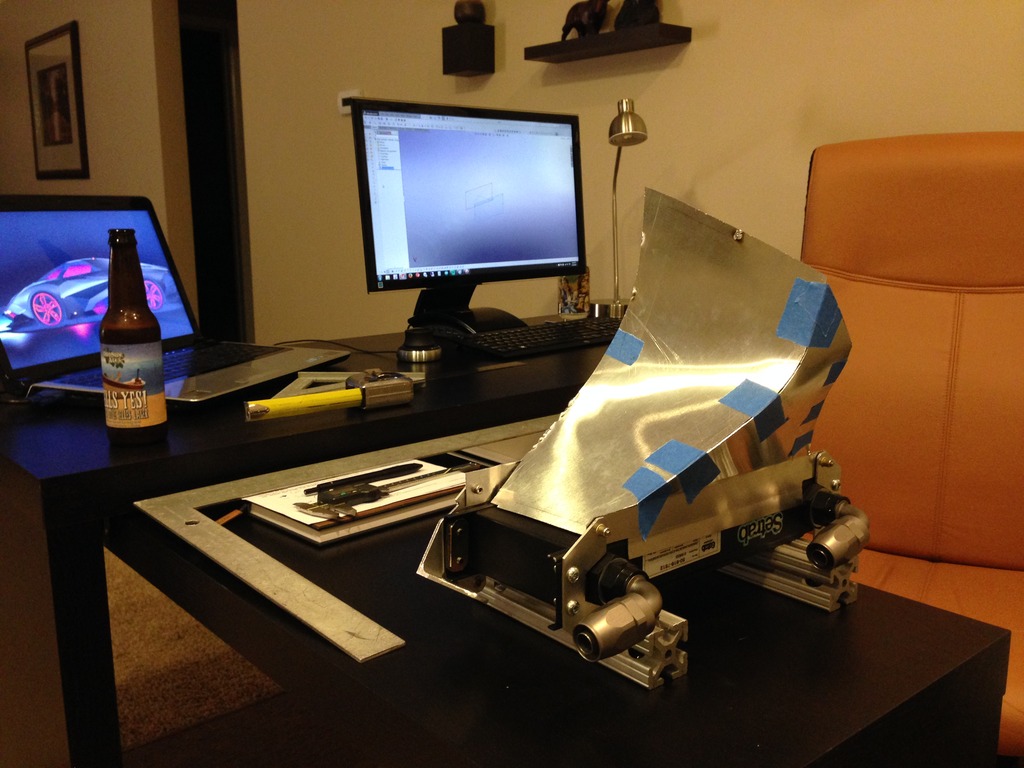


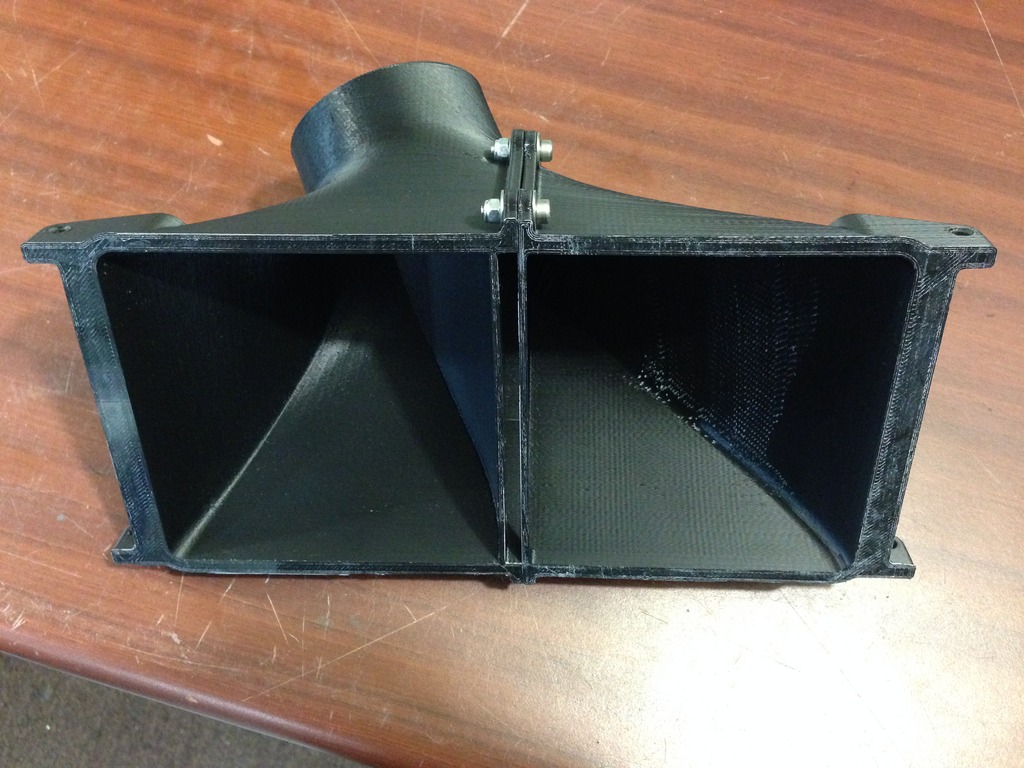


The inlet starts out as a 3" aluminum tube that I mounted to the frame. I cut a hole in the bumper and poked it out. The printed inlet duct is connected to the aluminum tube via a short piece of brake duct hose, which keeps some flexibility in the system in case the front gets bumped (the printed parts really aren't that strong).


First off, I have an intercooler and A/C already in front of my Koyo 38mm rad. They are fairly well ducted but i was already seeing water temps creeping upward throughout each 20 minute track session without ever leveling off, so i didn't think stacking the oil cooler with the other heat exchangers was a good idea. I decided to put it as high as possible in the front right corner of the car.
Being that the wheel well is a high pressure area with rocks and debris flying around constantly, I decided that ducting the exit air out the front bumper just in front of the wheel would be�better. In other words I stole the idea from Ryan Passey.
I started out by fabricating the mounting brackets and adding rivet nuts to the chassis to bolt it in. Part of the bracketry was for attaching the duct work.
First I attempted to fabricate the ducting from aluminum. I had a feeling I was using too thin of a gauge and it would be hard to weld. I was right - I just don't have the chops to weld .035" alum, so I gave up on welding and took a more "fun" approach
Being that I have a home made 3-D printer in my kitchen, it was the natural choice for plan B. I started out by transferring the measurements off the aluminum prototype into a SolidWorks model. I had to print both the inlet side and the outlet side in two halves, since my build platform is only 8x8x11. It took a few iterations and a couple failed prints but I finally got some decent parts! They are printed from ABS so hopefully it will be able to take the temperature. We will see what happens at the next track day.
The inlet starts out as a 3" aluminum tube that I mounted to the frame. I cut a hole in the bumper and poked it out. The printed inlet duct is connected to the aluminum tube via a short piece of brake duct hose, which keeps some flexibility in the system in case the front gets bumped (the printed parts really aren't that strong).
boop
Reply
0
0


I will pay in US currency. But, definitely would pay for a product. If composite or something a bit stronger, I wouldn't mind shelling out some dough as it's nicely put together and a good solution especially if I'm keeping A/C and don't want to stack so many heat exchangers in a row. I know a one off would be rather pricey, I don't know if there's enough volume for a vendor to make a single run batch. I'd pay mid triple digits since I don't have the facility to print/manufacture these myself. But this is flexible depending on the end product if someone is willing to take this on. Though I just realized this is for a 19row Setrab cooler while I have a 25row
I'm curious if a wider collector/scoop/velocity stack could be used up front instead of a pipe.
I'm curious if a wider collector/scoop/velocity stack could be used up front instead of a pipe.
Last edited by psyber_0ptix; Jun 7, 2016 at 12:49 PM.
Reply
0
0
I would love one for my 25 row, does that leave room for a second fan? I had my needle start to climb the other day on asphalt on a 90* sunny day. Pulled over and grounded out the fan in the diagnostic box to cool it down, pretty sure moving the cooler from the A/C fan spot to there and adding back that second fan would fix this.
how many people would we need for there to be interest in making this a reality?
Reply
0
0

Being that I have a home made 3-D printer in my kitchen, it was the natural choice for plan B. I started out by transferring the measurements off the aluminum prototype into a SolidWorks model. I had to print both the inlet side and the outlet side in two halves, since my build platform is only 8x8x11. It took a few iterations and a couple failed prints but I finally got some decent parts! They are printed from ABS so hopefully it will be able to take the temperature. We will see what happens at the next track day.
http://www.nrri.umn.edu/NLTC/ABS07.pdf
https://en.wikipedia.org/wiki/Glass_transition
http://www.stratasys.com/materials/fdm/pc
If you have good airflow and an insulated / gasketed gap you can probably get away with ABS. PC or PC/ABS mix will raise the temp as you can gain ~50C or ~20C respectively on the glass transition temperature.
Reply
0
0


