
Blaen's because 350hp build

Thread Starter
Elite Member
iTrader: (6)
Joined: Sep 2010
Posts: 3,611
Total Cats: 25
From: Seattle, WA
I received an item in the mail today that necessitated this post. Voila, enjoy BEGi's modern art!
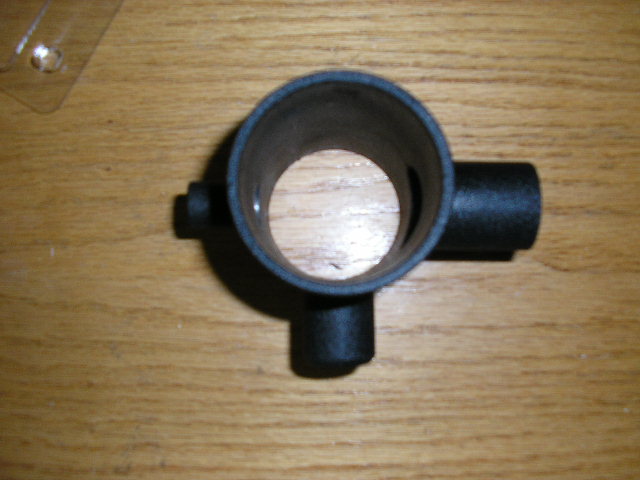
Well, it's not modern art - it's something I have plans up my sleeve for! We'll see how well it works out!
Anyways, I do believe it's time that I finally posted a build thread. As a disclaimer, I'm not running anything fancy (yet), mainly learning the ropes.
I am in the middle of moving to an intercooler-based setup as opposed to my current setup, and since I'm currently stuck untill Monday, it was a good time to start a build thread.
Currently:
Brainy-rebuilt MS2 and various GM sensors
Tokico Illumina's w/Swift Shocks
T25G Turbo@8psi
Coolant Reroute (Budget $25 reroute too, total cost yo! I removed the heater part of it recently though, working on a better way.)
RX7 550cc injectors
ARTech SS line kit (Yes, one line is rubber.)
Custom downpipe that required me to cut apart the shelf right behind the downpipe and re-weld it to a more appropriate spot.
BEGi ceramic-coated cast manifold
Brembo BBKs
Robbins top
F1 10lb flywheel + stage 3 clutch kit (Ew)
Soon:
COPs (LS2 perhaps, but I'd like COPs for wiring and TSE's kit makes me )
)
Intercooler (Waiting on the piping to show up in the mail)
ARTech SS line - replacing the last rubber line for a warranty replacement
MS3/MS3X and custom-built harness
Bodywork and paint
ACT clutch to replace the F1 stage 3 crap.
Enjoy, I brace for the incoming MT.net mockery.
Well, it's not modern art - it's something I have plans up my sleeve for! We'll see how well it works out!
Anyways, I do believe it's time that I finally posted a build thread. As a disclaimer, I'm not running anything fancy (yet), mainly learning the ropes.
I am in the middle of moving to an intercooler-based setup as opposed to my current setup, and since I'm currently stuck untill Monday, it was a good time to start a build thread.
Currently:
Brainy-rebuilt MS2 and various GM sensors
Tokico Illumina's w/Swift Shocks
T25G Turbo@8psi
Coolant Reroute (Budget $25 reroute too, total cost yo! I removed the heater part of it recently though, working on a better way.)
RX7 550cc injectors
ARTech SS line kit (Yes, one line is rubber.)
Custom downpipe that required me to cut apart the shelf right behind the downpipe and re-weld it to a more appropriate spot.
BEGi ceramic-coated cast manifold
Brembo BBKs
Robbins top
F1 10lb flywheel + stage 3 clutch kit (Ew)
Soon:
COPs (LS2 perhaps, but I'd like COPs for wiring and TSE's kit makes me
)Intercooler (Waiting on the piping to show up in the mail)
ARTech SS line - replacing the last rubber line for a warranty replacement
MS3/MS3X and custom-built harness
Bodywork and paint
ACT clutch to replace the F1 stage 3 crap.
Enjoy, I brace for the incoming MT.net mockery.
Last edited by blaen99; Jan 14, 2012 at 10:07 PM.
Reply
 0
0

0


Thread Starter
Elite Member
iTrader: (6)
Joined: Sep 2010
Posts: 3,611
Total Cats: 25
From: Seattle, WA
From a PM earlier today, I present...Blaen's ghetto reroute
I'll see about pictures later.
Here's what I did for my reroute
Stock 1.6 neck (No, seriously. It's identical to the KIA neck, minus a sensor hole tapped.)
Front thermo housing (Optional) or blockoff plate (optional) or BEGi 1.6 blockoff plate (If no MS)
GM Water Hose
90 degree 3/8NPT
3/8NPT to 1/8NPT fitting
Heater hose, possibly additional NPT fittings
Retap front housing to 3/8NPT (Just run a tap down it real fast, 3/8BSP is 1 thread per inch larger than 3/8NPT)
Put your 3/8NPT 90 in front housing's sensor hole.
Put 3/8 to 1/8 NPT fitting in previous 90
Use a bit of thread sealant, put the sensor in the now 90'd hole. (BSP fits fine in NPT if it's male, but not if it's female.)
Test fit now-90ed front housing. It should fit fine with some clearance for the rear firewall. NOTE: The rear sensor placement is critical. You may have to replace several times, or even potentially do slight grinding on the sensor tap to get it all aligned.
This is the only hard part of the thing. Once you get the rear sensor-to-front-housing fixed, the rest is cake.
If you have a MS, you can put the rear housing on the front, then route the front to the heater via heater hose and retain the nipples for coolant underneath.
Also, if you have a MS, you can just block off the front at the thermostat still retaining nipples for coolant underneath, and then route from the cursed water plug, a...3/8NPT to 5/8NPT adapter w/nipples (I'm not sure, you'll have to recheck - I just welded pipes together rather than using NPT fittings), and to the heater.
If you are relying on the stock ECU, you -have- to get a BEGi block off plate, use the sensor in front, and route from the cursed waterplug as above.
YMMV, the BEGi looks awfully clean, although option 2 and 3 are basically identical to the BEGi and as a bonus get rid of the cursed water seal headache forever. I've tried all 3 of the above, you don't need the BEGi front blockoff plate if you have a MS. You can make the MS run your fans fine.
Reply
0
0

Thread Starter
Elite Member
iTrader: (6)
Joined: Sep 2010
Posts: 3,611
Total Cats: 25
From: Seattle, WA
Ah, sorry. I saw the pipe, it immediately reminded me of some modern "art" exhibits I've seen, and I decided "Hey, perfect excuse for a build thread."
I have experience with a (very) cheap pump that is rated for use appropriate to WI. The black pipe ties into a sensor and some other crap to go with it to test it and see if it works out in actual use.
It may suck, and burn terribly. We'll see - if I can throw on WI for sub-$100, I'm all for throwing in WI. If I can't, it's not worth it.
BTW what is the WI rig
It may suck, and burn terribly. We'll see - if I can throw on WI for sub-$100, I'm all for throwing in WI. If I can't, it's not worth it.
Reply
0
0

Thread Starter
Elite Member
iTrader: (6)
Joined: Sep 2010
Posts: 3,611
Total Cats: 25
From: Seattle, WA
So, a bit of the history behind the car.
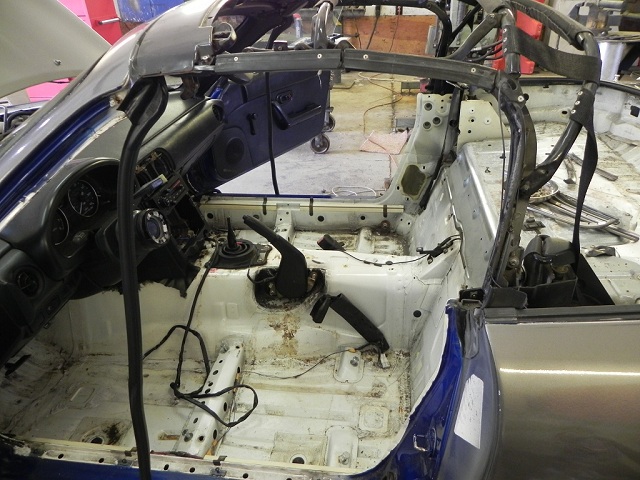
This is when I was just starting to pull it apart. (Why, yes, it's had at least 3 colors. I'm seriously considering repainting it white at this point.) Everything, including carpet, is gone.
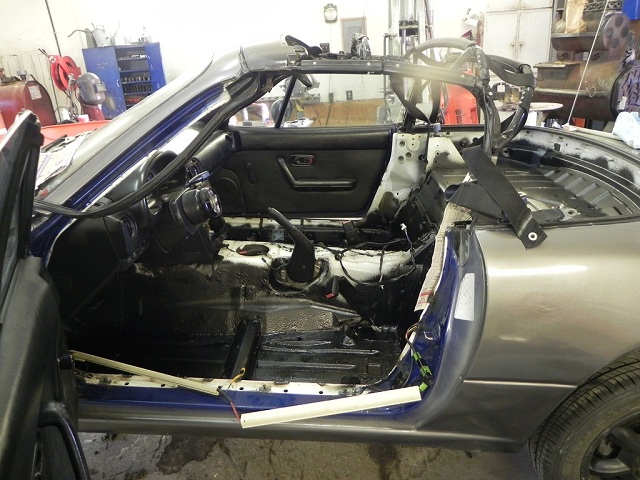
This is in the middle of the first application of sound dampening paint, first round of stitch welding (MIG), and putting on a new top.
The second round of sound dampening.
The third round of sound dampening - this is the test fitting and preparing to apply the ever-great Reflectix.
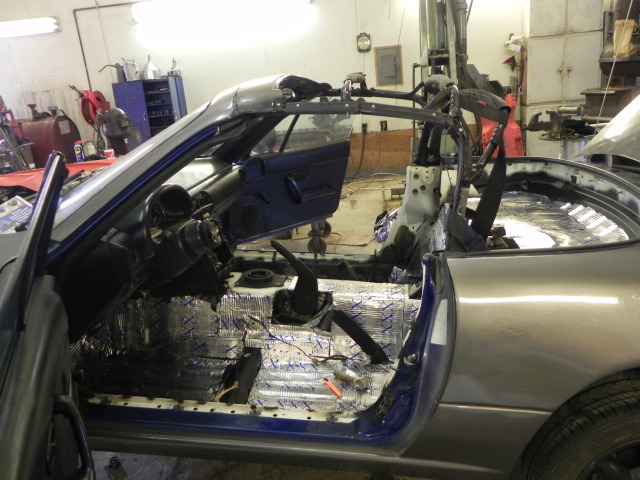
Hey, all the sound dampening finished! Yes, three layers for those who have been keeping track - I'll be going back in to move it up to 4 layers this spring.

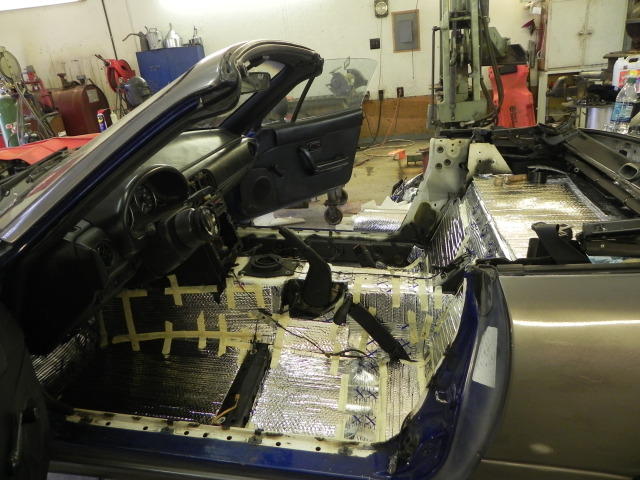
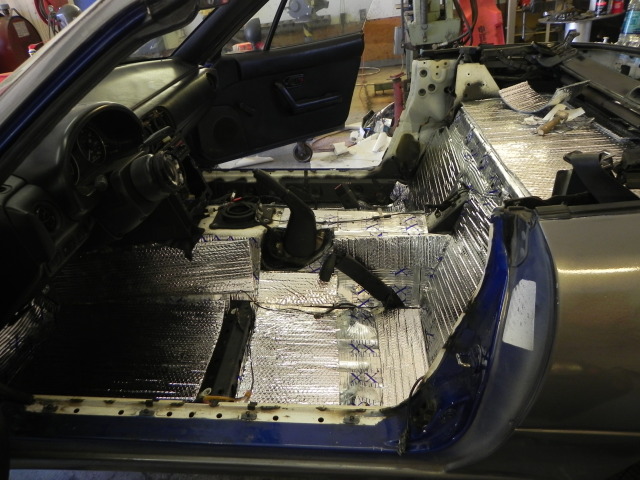
Here is the finished interior!
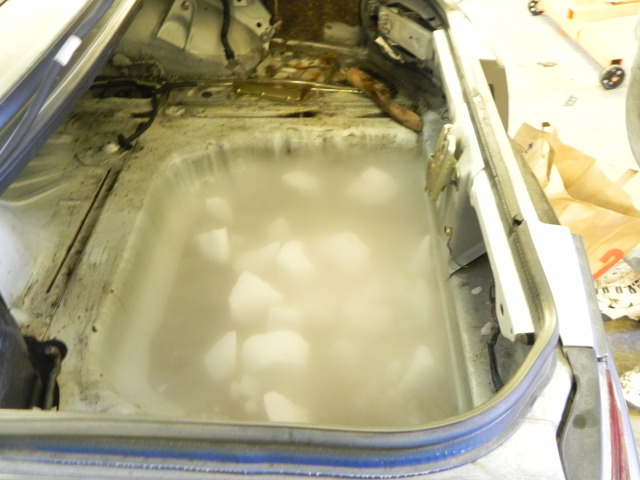
Time to dry-ice the mothertrucking trunk!

This is the final stages of dry icing the tar out of the trunk, in preparation for yet-more sound dampening material.

This is the first layer of sound dampening paint applied in the trunk.
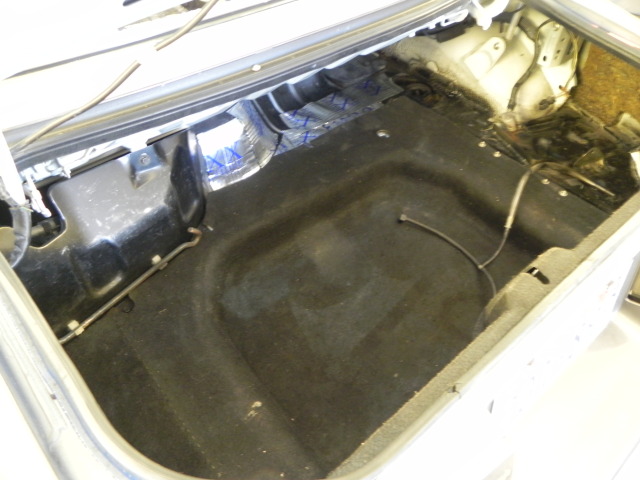
This is the finished trunk.
Minus the worn stock carpet, I'm actually extremely happy with how it turned out. I'll be going back in to add in another layer of sound dampening material (Weight increase is negligible - probably ~25lbs in all for a dramatic decrease in sound) this spring, with (hopefully) Goodwin Racing's premium plush carpet set.
This is when I was just starting to pull it apart. (Why, yes, it's had at least 3 colors. I'm seriously considering repainting it white at this point.) Everything, including carpet, is gone.
This is in the middle of the first application of sound dampening paint, first round of stitch welding (MIG), and putting on a new top.
The second round of sound dampening.
The third round of sound dampening - this is the test fitting and preparing to apply the ever-great Reflectix.
Hey, all the sound dampening finished! Yes, three layers for those who have been keeping track - I'll be going back in to move it up to 4 layers this spring.
Here is the finished interior!
Time to dry-ice the mothertrucking trunk!
This is the final stages of dry icing the tar out of the trunk, in preparation for yet-more sound dampening material.
This is the first layer of sound dampening paint applied in the trunk.
This is the finished trunk.
Minus the worn stock carpet, I'm actually extremely happy with how it turned out. I'll be going back in to add in another layer of sound dampening material (Weight increase is negligible - probably ~25lbs in all for a dramatic decrease in sound) this spring, with (hopefully) Goodwin Racing's premium plush carpet set.
Last edited by blaen99; Jan 20, 2012 at 03:35 PM.
Reply
0
0

Nice, I've been thinking about this for a while. Nothing inside the doors or the trunk tunnels? What "sound dampening paint" is that, and how many square feet of what mat did you use? Yes, Reflectix is awesome stuff. You will have to let us know how you like it when its done!
Reply
0
0
Thread Starter
Elite Member
iTrader: (6)
Joined: Sep 2010
Posts: 3,611
Total Cats: 25
From: Seattle, WA
What "sound dampening paint" is that,
and how many square feet of what mat did you use?
Yes, Reflectix is awesome stuff. You will have to let us know how you like it when its done!
I'm currently on a crusade to eliminate all rattles/unnecessary noise from the Miata that I can.
Last edited by blaen99; Jan 20, 2012 at 05:07 PM.
Reply
1
1
Thread Starter
Elite Member
iTrader: (6)
Joined: Sep 2010
Posts: 3,611
Total Cats: 25
From: Seattle, WA
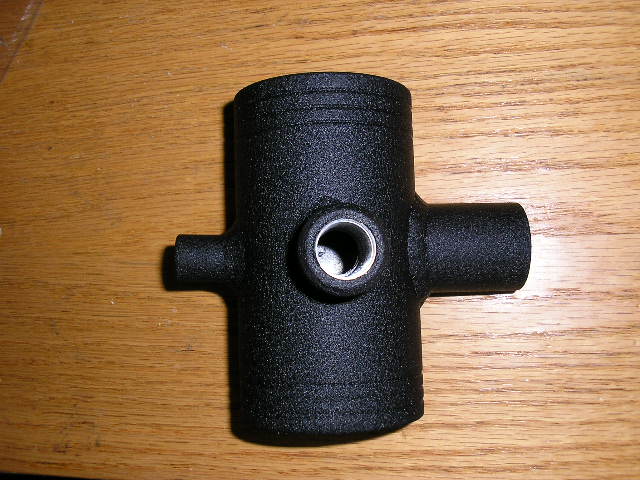
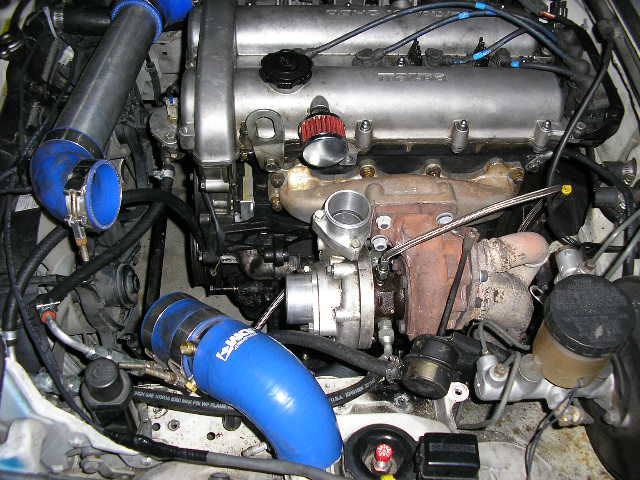
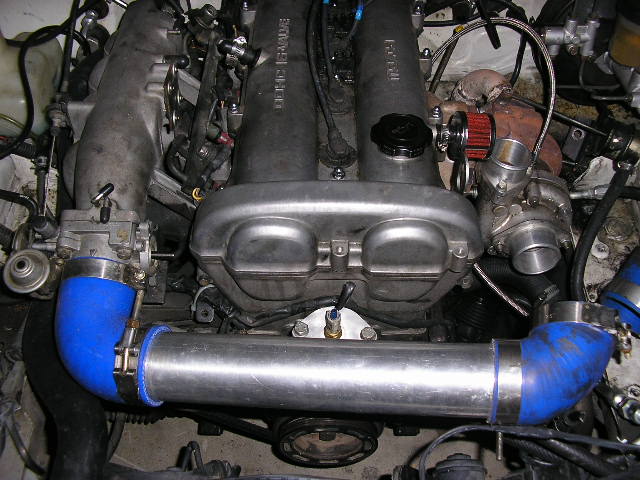
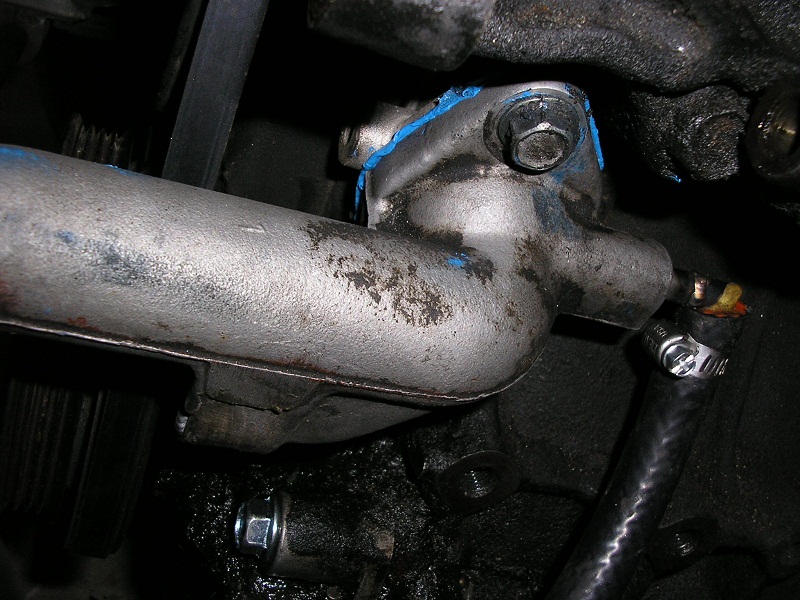
Latest additions, courtesy of Artech. Flipped the mixing manifold around and blocked off the heater return for much easier turbo routing and generally easier life.

P.S. Abe rocks. Buy his stuff.
P.S. Abe rocks. Buy his stuff.
Reply
0
0
Thread Starter
Elite Member
iTrader: (6)
Joined: Sep 2010
Posts: 3,611
Total Cats: 25
From: Seattle, WA
http://www.thefreedictionary.com/dampening
The dictionary disagrees with you, as does in fact the English language itself.
The dictionary disagrees with you, as does in fact the English language itself.
Reply
0
0
Where is the Artech stuff in the pictures? All I see is the flipped manifold. Is there a picture missing?
Reply
0
0


