

Post your DIY aero pics


Newb
Joined: Feb 2009
Posts: 12
Total Cats: 3
From: Seattle, Wa.
It's mounted at the rear where the stock under-tray bolts go in. You can barely make out the holes outboard of the cut-outs at the rear which are to clear the plastic scoops. The front is supported by 2 drop rods, passed thru the frame rails on either side of the radiator, that go into the t-nuts just outboard of the Tig-welded "X". The brace needs to be redone as it is nowehere near as stiff as I had planned. Gotta road test it first though...
Reply
 0
0

0

Looks good. I've been tossing around an idea like this as well to work with my RB front bumper because my car sees more time on the street than the track. Thanks for the information.
Reply
0
0

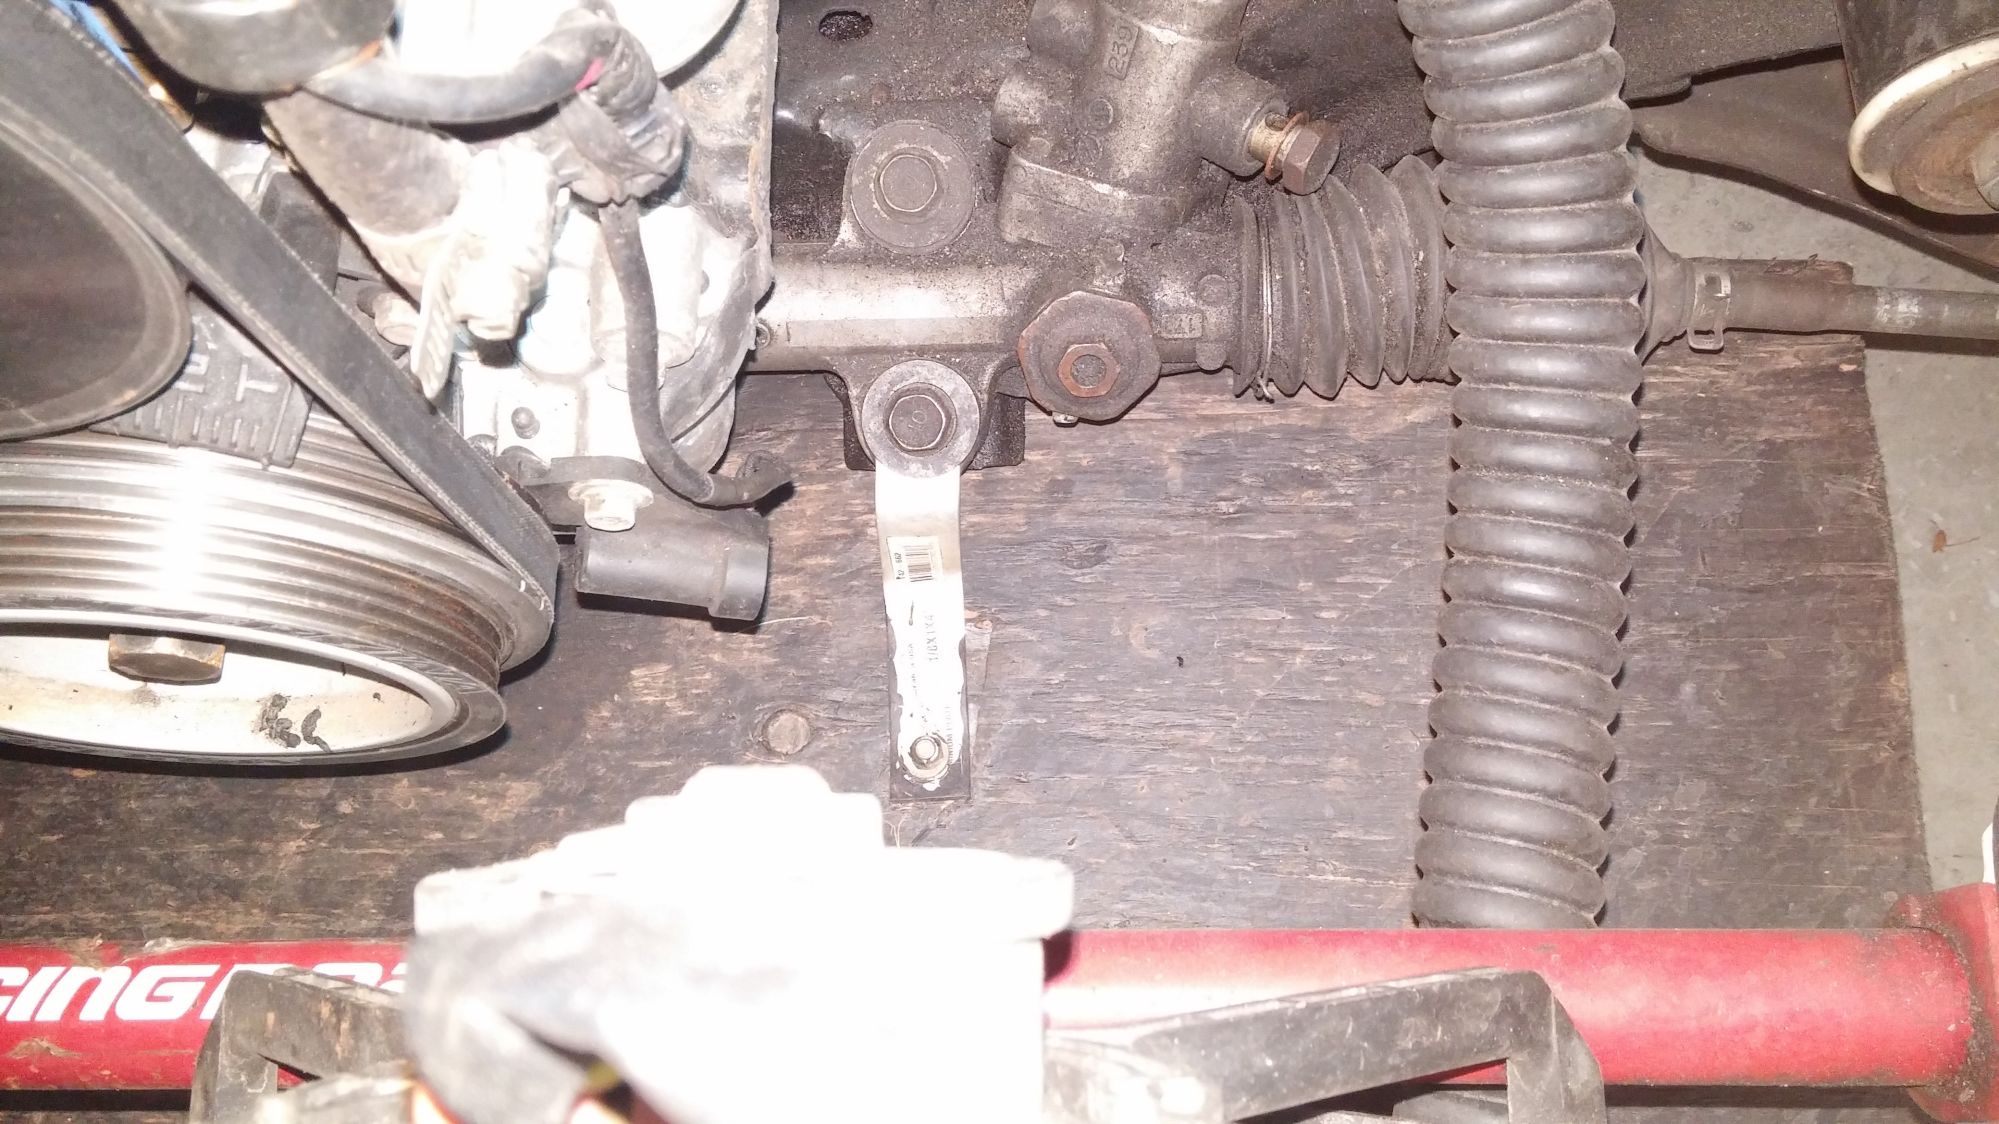
Mine is rigid on the back and using 4 carabiners and steel cable (66# rating) i front, it saves it twice actually! Little aluminum bracket mounts to the steering rack bolts, bends and shear off easily with contact...
Emilio knows his stuff... As a bonus, I can remove it quickly and adjust it in few seconds with the turnbuckles. Will post pics this week...
Emilio knows his stuff... As a bonus, I can remove it quickly and adjust it in few seconds with the turnbuckles. Will post pics this week...
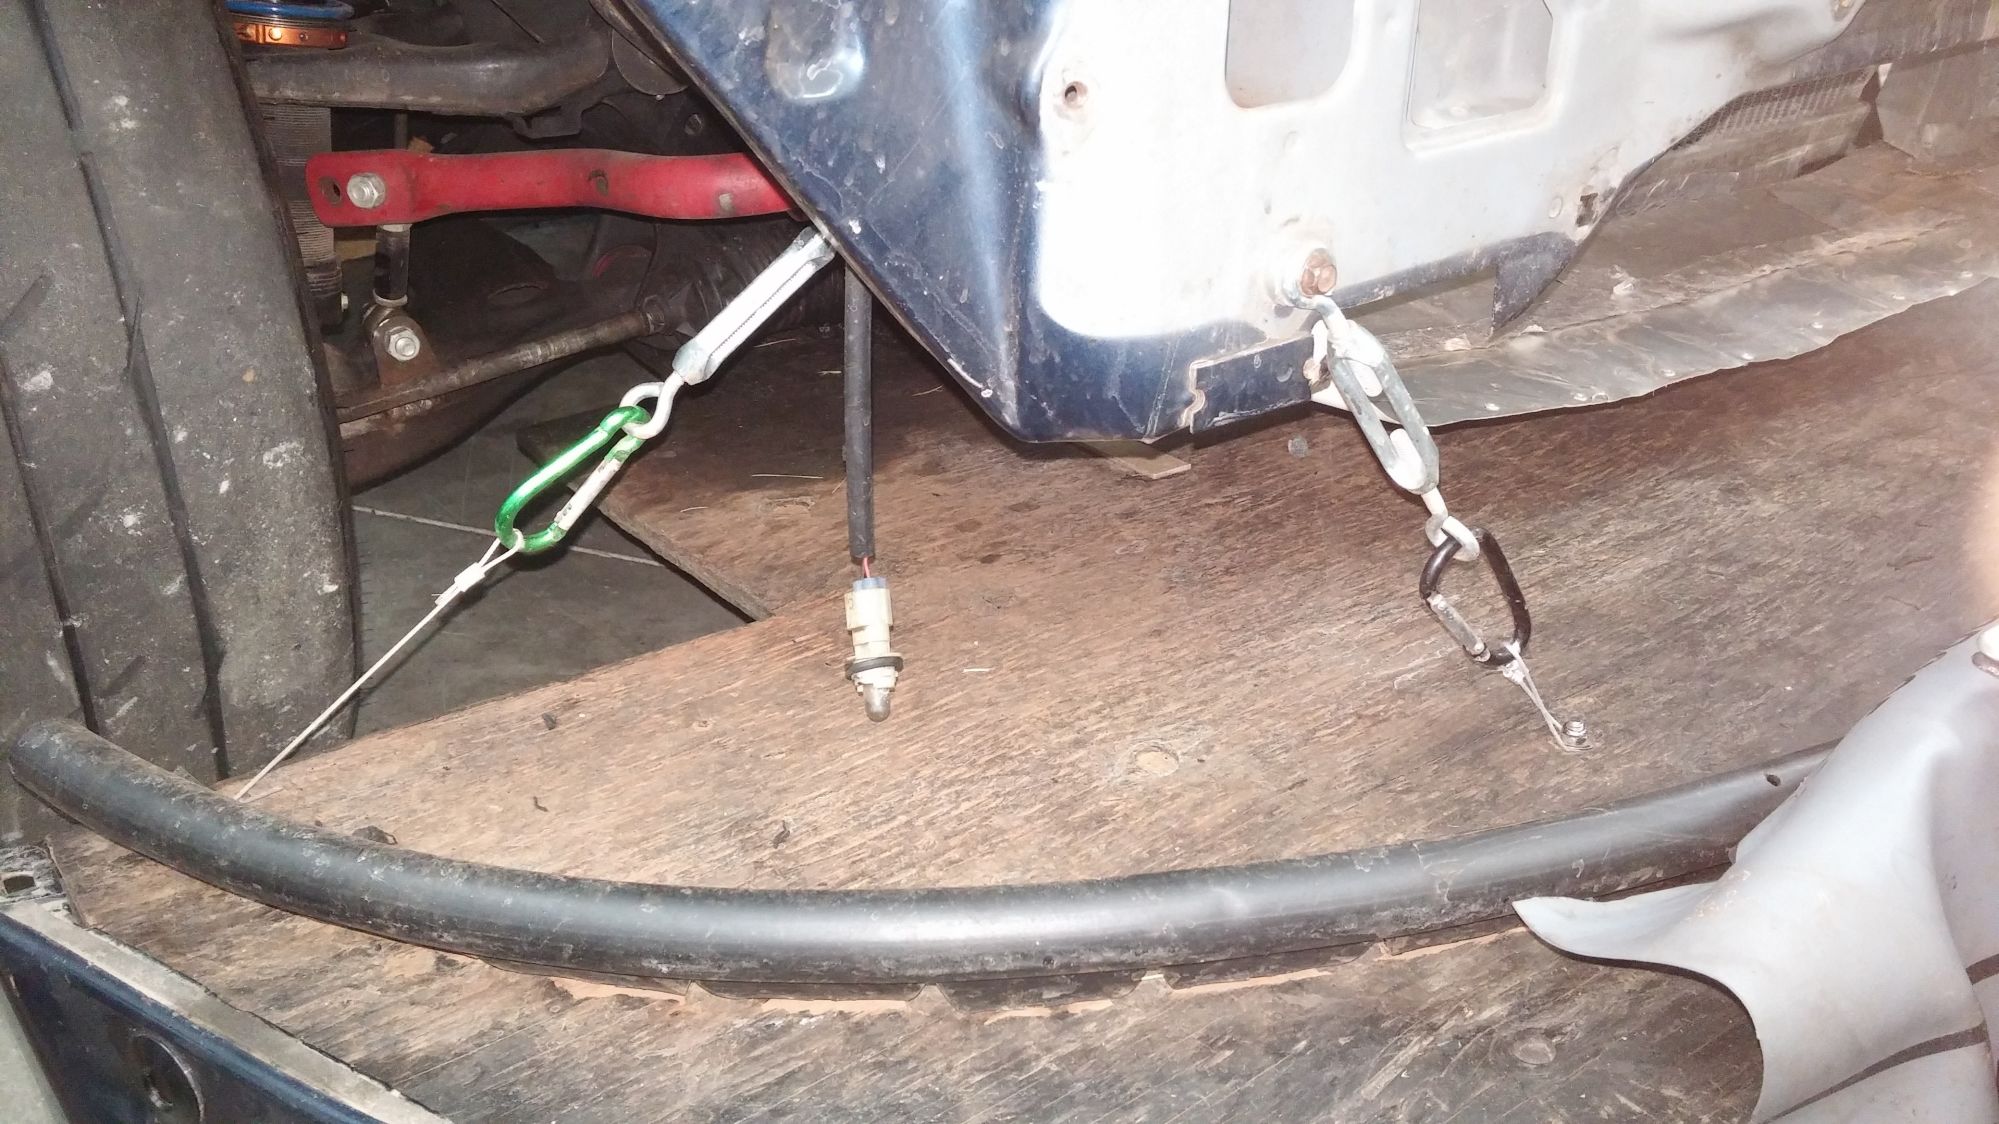

And I use the same support as most of you in the back.
Works really good, balance with GTC-200 and Singular plates is near perfect. It does hit the ground sometimes and I know what you guys did + I can raise it a bit if I need to. Need to do my homework on ducting better now...
Reply
0
0


Joined: Apr 2014
Posts: 18,643
Total Cats: 1,870
From: Beaverton, USA
Total fiberglass newb here. When people are fiberglassing the top of the splitter are you laying down the strips and whatnot, or just a layer of resin?
Picked up some birch the other day and need to figure out the best way to protect it. (my junk leaks a lot )
)
Picked up some birch the other day and need to figure out the best way to protect it. (my junk leaks a lot
)
Reply
0
0

You have to use some cloth, one or two layers at least. You can find big sheets, and trim to your liking. Strips will get messy and ugly, fast .Resin alone, does not offer any measurable strength. IMO.
Reply
0
0
 off to youtube to learn myself some fiberglassing

When I used to make longboards, I would lay a strip of glass in the resin mixed up in a paint roller tray. Pick it up and lay it down direct on the ply.
It beat dabbing the resin on and messing the glass up, and I got sooo many less bubbles and wasted resin from not working fast enough. Use a little foam roller to press it out and make it even.
I did some pretty long strips, too. Longboard length, at least.
It beat dabbing the resin on and messing the glass up, and I got sooo many less bubbles and wasted resin from not working fast enough. Use a little foam roller to press it out and make it even.
I did some pretty long strips, too. Longboard length, at least.
Reply
0
0


Big sheets are available by the yard if you can find a local composites supplier. Down here there's a place I go that has everything in 60" wide by the yard; all the different CF weaves, glass types, etc. You just want one layer of simple and lightweight standard glass.
Wet the top of the birch with resin first or you'll spend forever trying to saturate the wood below the glass fully. Use one sheet of glass large enough to cover the whole thing - any folds or overlaps of multiple pieces just looks like crap. Then brush on the resin. This is a "wet layup" and if you stop here it will have at least a couple extra pounds of excess resin on it, and the surface will dry with lots of irregularities from the brush (unless you're using fancy self-leveling resin).
Last step is to take a simple plastic squeegee blade - like the Bondo brand ones they sell everywhere - and squeegee all the excess resin off and wipe that off into a throw-away bucket. You're left with a very evenly saturated layer of glass with a very uniform finish to lay paint on once it dries, and it's as light as it can get without vacuum bagging it.

Reply
0
0
Before laying it on, you just cut the piece down to slightly larger than the splitter dimensions. All the trimming is done after it's hardened. A small dremel does a good job of trimming it to close to the splitter then clean it up with a sander.
Reply
0
0

Fiberglass supply exists down in the northwest warehouse district on the western shore of the river.
They also have a decent (but marked up) selection of resins.
Crosscut hardwoods is on the way and has all the baltic birch ply you can afford
If you're using light woven cloth you can wrap edges without wrinkles. It might be hard to get it to stick as you envision it without a press.
It will wet out pretty translucent so there's a good chance you wouldn't see anything glass related in the end product.
1. cut a piece larger than your splitter (3ish inches overlap)
2. mix your batch (not too much, it'll catch fire, read instructions)
3. wet out the board (plywood/etc)
4. put the glass on your board
5. pour batch of epoxy on a section, work it into the glass with your fingers (my preferred method, rollers/etc make it hard to determine glass to resin ratio)
6. use your hand to squeegee excess
7. level the thing out and let the resin smooth over.
Wear gloves and fight the temptation to touch your face. I always wear safety glasses as well.
(Experience from my other ski building hobby )
)
If you want to get serious, build a vacuum table and start pressing...
If you want to get srsly srs build an autoclave
They also have a decent (but marked up) selection of resins.
Crosscut hardwoods is on the way and has all the baltic birch ply you can afford
If you're using light woven cloth you can wrap edges without wrinkles. It might be hard to get it to stick as you envision it without a press.
It will wet out pretty translucent so there's a good chance you wouldn't see anything glass related in the end product.
1. cut a piece larger than your splitter (3ish inches overlap)
2. mix your batch (not too much, it'll catch fire, read instructions)
3. wet out the board (plywood/etc)
4. put the glass on your board
5. pour batch of epoxy on a section, work it into the glass with your fingers (my preferred method, rollers/etc make it hard to determine glass to resin ratio)
6. use your hand to squeegee excess
7. level the thing out and let the resin smooth over.
Wear gloves and fight the temptation to touch your face. I always wear safety glasses as well.
(Experience from my other ski building hobby
)If you want to get serious, build a vacuum table and start pressing...
If you want to get srsly srs build an autoclave
Reply
0
0

Junior Member
Joined: May 2008
Posts: 488
Total Cats: 17
From: Grants Pass, OR.
Mine has been on for 3 yrs now with nothing but a primer coat of krylon and a couple coats of semi gloss black. Mine has had oil and water [running in the rain] and have had no issues. Oil based enamel sinks in and protects very good and dripping oil won't do anything but help preserve it. If you must glass it use what they call finish cloth and do as Ryan suggested. Save your money for other needs.
Last edited by jmann; Jan 28, 2016 at 07:57 PM.
Reply
0
0
Well that's the expensive and time consuming aproach, just to make it waterproof.
It's usually tough to mix epoxy more than 8 ounces at a time, without starting a fire. Poly fiberglass resin however, can be mixed by the gallon.
It's usually tough to mix epoxy more than 8 ounces at a time, without starting a fire. Poly fiberglass resin however, can be mixed by the gallon.
Last edited by ryansmoneypit; Jan 28, 2016 at 08:29 PM.
Reply
0
0

I just sprayed mine with polyester based gelcoat in the $14 HF gun and threw it away.
Reply
0
0


