$2018 GRM challenge turbo miata build. with added insanity.
 06-09-2019, 06:23 PM
#81
Junior Member
Thread Starter

Join Date: Nov 2017
Posts: 112
Total Cats: 7
Old money: 1945.53
new money:
none of this counts in the budget, thank god, but it counts in my wallet....
buffer and pad, harbor freight: 45
cutting compound, scratch and swirl remover, and machine glaze: 65
pads and sandpaper for DA 44
sandpaper and block for hand sanding: 26
Recoup: 820
new total: 1945.53
so, this week ive learned some new skills, and a new thing about car people.
First thing is about the people: the guys that buy really high dollar materials, and lay down paint that looks great out of the gun have large *****. I mean HUGE *****. It was pucker inducing taking sandpaper to a $4.50 quart of valspar. I cant imagine a $450 materials job. My job was garbage, and I was still scared of screwing it up.
That being said, it was bad enough (though all one color, which was the primary purpose!) that something needed to be done.
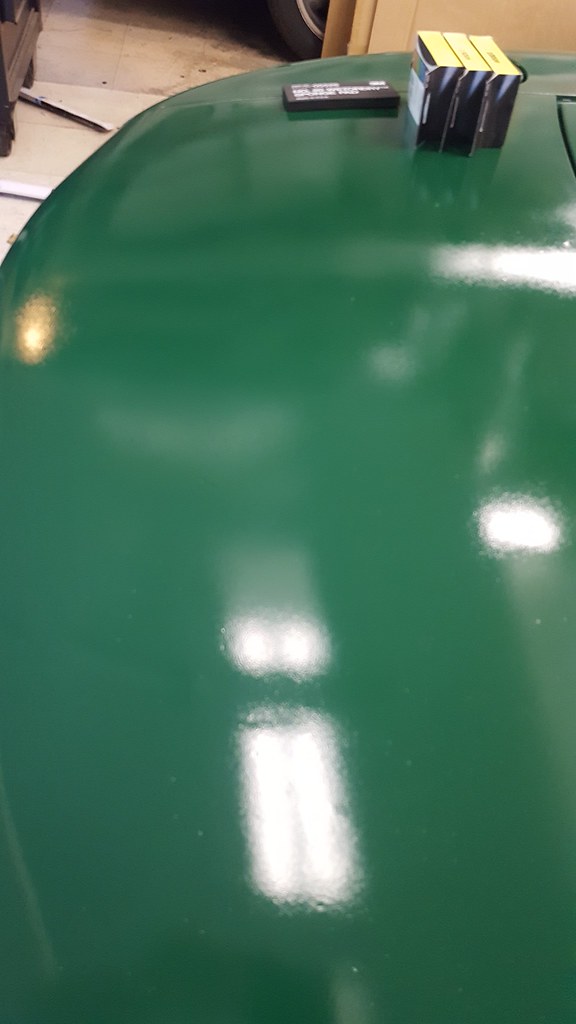
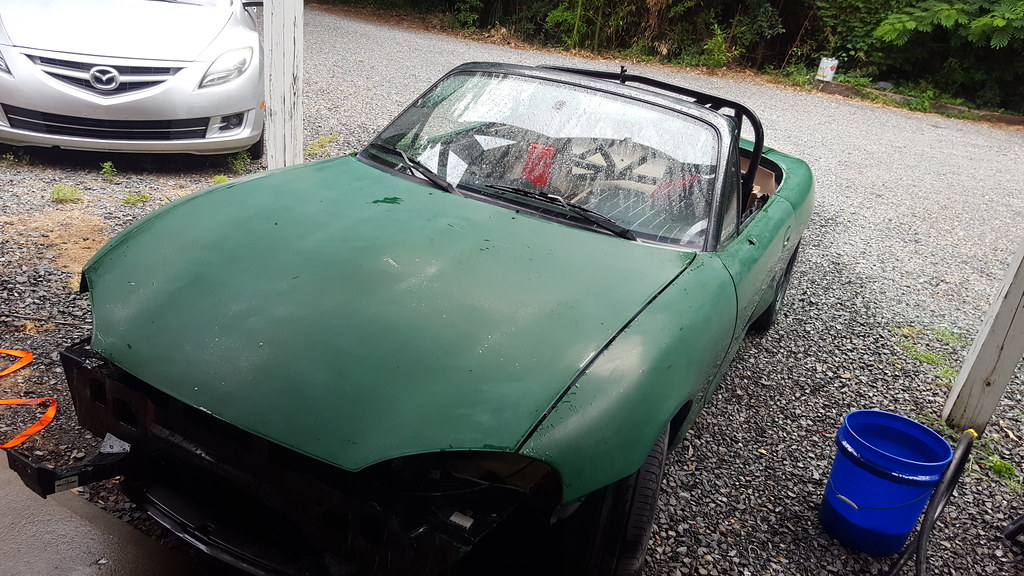
This is what I was starting with. Random pictures of the as sprayed surface. It was BAD. I did try to take similar pictures for before an after effect, but im not all that good with a camera, so make sure to squint. Or drink. Heavily. Much like last call, this car will keep looking better!
Overall long view
20190602_103336 by Michael Crawford, on Flickr
decklid, with a picture of my beginners wet-sanding kit.
20190603_073709 by Michael Crawford, on Flickr
super closeup of the surface on the best panel on the car

20190603_073726 by Michael Crawford, on Flickr
good overall of texture, along with my complete beginners kit of materials. (note, I wound up with a hell of a lot of different supplies by the end.)

20190603_073742 by Michael Crawford, on Flickr
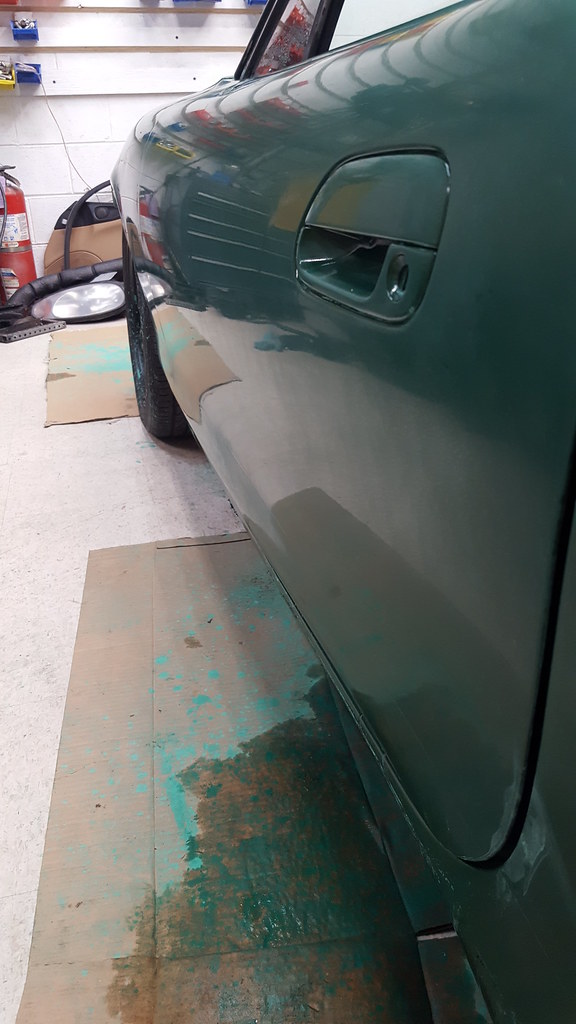
started with the foam block and 800 grit. Wet the paper in a 5 gallon bucket of soapy water, and used a spray bottle of soapy water on the surface. I watched youtube videos and internet posts made it look like a few seconds of sanding would produce a nice flat surface. This was after 10 minutes of sanding, and it definitely AINT a flat surface yet.

20190603_082603 by Michael Crawford, on Flickr
so after enough wet-sanding with 800 grit to make my arm fall off (it got better!) the surface of the decklid, quarter, and door were flat. Except for the fisheyes. Those were DEEP, so I left them. Figured they wouldnt be noticeable.

20190603_170045 by Michael Crawford, on Flickr
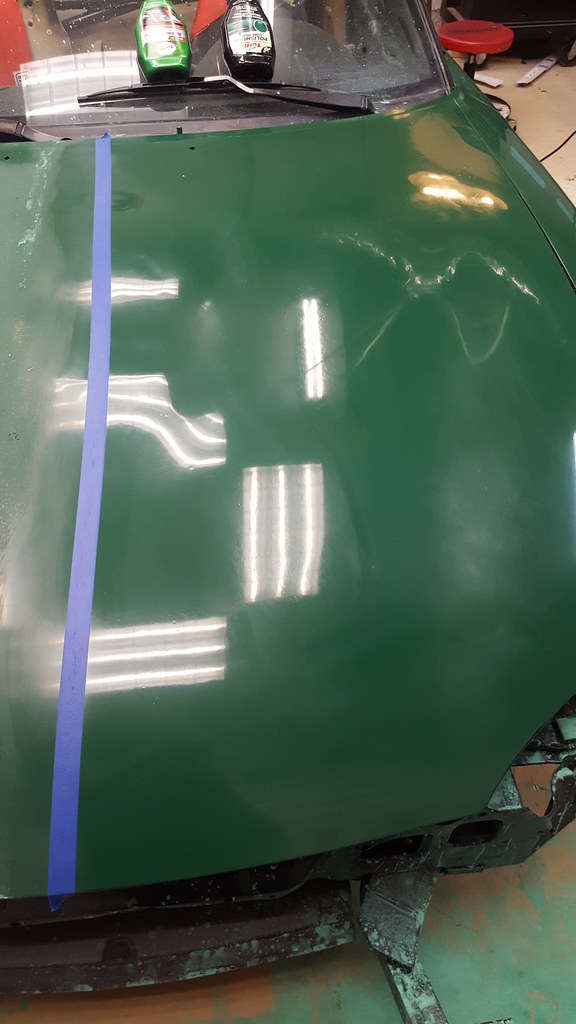
one of the tips I learned was to use blue tape to outline areas of the panel that needed more work. Trhis also worked to help flatten the runs without going too deep on the surrounding area. Also taped the edges of the panels, though this proved to be wasted effort. Supposedly it would prevent burn through, but it didnt. Aparently 800 grit will work through tape.

20190604_080329 by Michael Crawford, on Flickr

20190605_081857 by Michael Crawford, on Flickr
at some point, my bum shoulder and wetsanding conspired to make me hate life. Thats when I struck on an idea.

20190605_125047 by Michael Crawford, on Flickr
I went to the local autobody supply house and obtained a box of 800 grit wet hook and loop sandpaper discs. As well as a couple of buffing pads, and a backer pad for the paper. This made quick work of the rest of the surface. And the edges. And my wallet. But, my shoulder was a whole lot better, and the process sped up immeasurably!
We got the whole car down to 800 grit. I was pretty happy, but definitely concerned that I just ruined the paint. But, im a redneck with a rabbits foot and no fear of failure!
Rolled it outside, and washed the slurry off with dawn and a rag.
20190605_180533 by Michael Crawford, on Flickr
20190605_180951 by Michael Crawford, on Flickr
next was 1000 grit

20190606_080451 by Michael Crawford, on Flickr
then 1500
20190606_084847 by Michael Crawford, on Flickr
then 2000, but it didn't really look any different. And my shoulder was back to hurting. (unfortunately, that's a lingering aftereffect to eating a honda in the drivers door of a 1964 el camino at 50mph. Look back in the thread, there's a picture)

20190607_081933 by Michael Crawford, on Flickr
anyway, we then started on buffing. I originally started with the porter cable DA and turntle wax rubbing compound.
20190607_165024 by Michael Crawford, on Flickr
garbage. Ruined paint that actually looked worse than before I started. So, did some digging, and was told to use a firm foam pad on a rotary buffer with 3m compound. So, a trip to harbor freight and oriellys, and a bunch of money later, we were making progress!

20190607_165029 by Michael Crawford, on Flickr
but I still wasn't happy with the results. I called Art over to give me pointers on what I was doing wrong. 30 seconds of watching him showed I was moving too fast, at too low a speed, with too much compound, and too much angle. I took back over, and came up with satisfactory results!
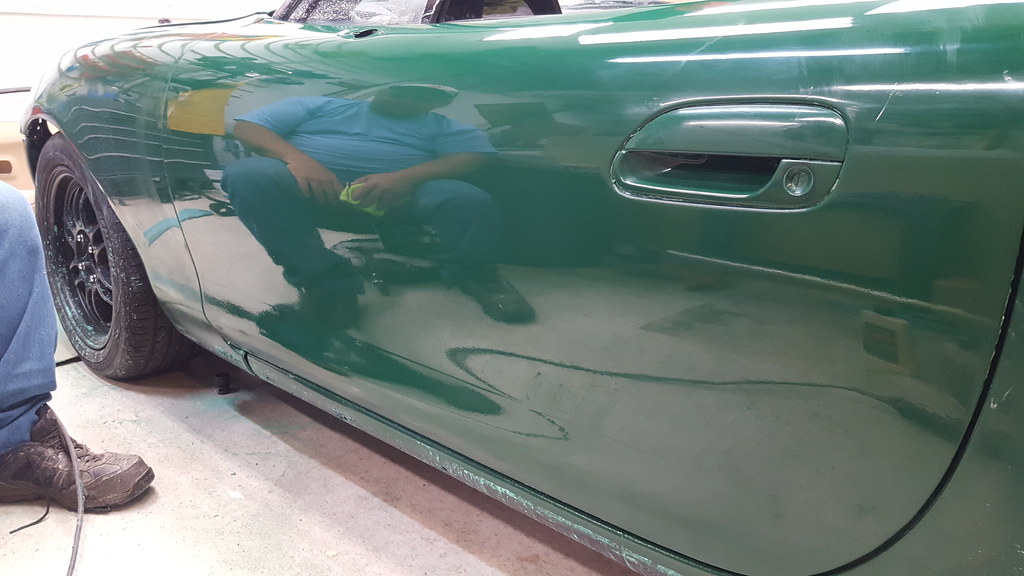
20190608_180227 by Michael Crawford, on Flickr
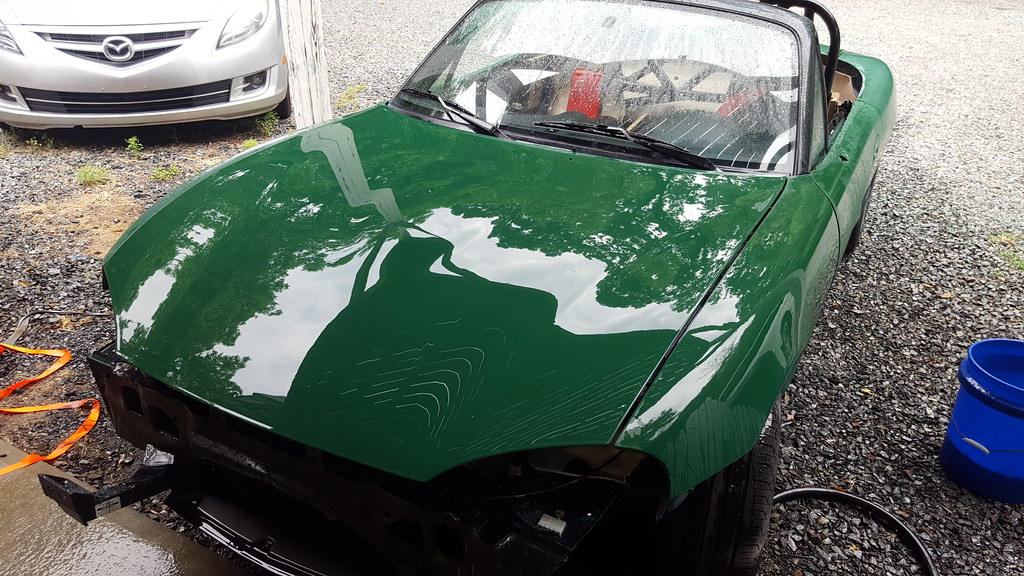
so, last night and today I worked through the 3m, meguires scratch and swirl remover, meguires machine glaze, and tr3 resin glaze. My shoulder and back are killing me, but im pretty happy with the results!

20190609_160837 by Michael Crawford, on Flickr

20190609_160843 by Michael Crawford, on Flickr
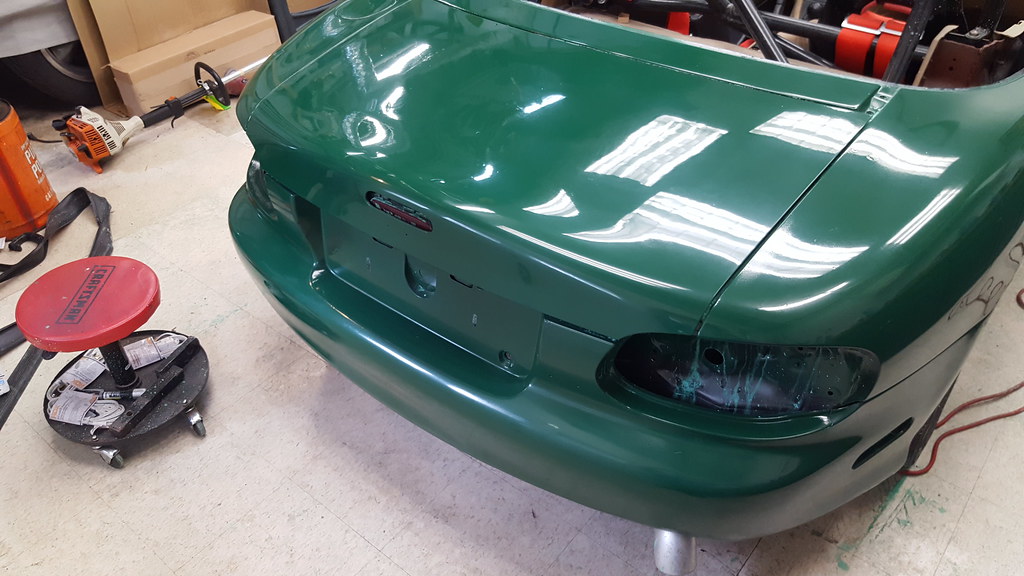
20190609_160927 by Michael Crawford, on Flickr
20190609_160857 by Michael Crawford, on Flickr
and a super close up of the same horrible surface of the decklid as in the first pictures

20190609_160953 by Michael Crawford, on Flickr
lots of work. Lots and lots of work. But, I have a target. See, in every competition ive ever been in, ive been told to pick your targets. Wether that was football, autocross, or boy scouts, ive always had to have something i was aiming for. In this years upcoming challenge, I have two targets. First is top 10 overall. Second is beating angrycorvair in his mid engine v8 corvair. That may or may not actually get finished. But my major one, and the most euqal challenge target I can think of to my build, is machinenbau in datsanity. Its an incredible build, that outclasses mine in every measurable way. And has already competed at the challenge and placed well before the mammoth paint and body and sorting campaign hes been on all year. But v6 swapped, street legal, rwd Japanese car. Who's build thread rivals mine in length and scope. Its incredible I hope to match him, and hopefully squeak by him in the rankings. But it will be close! And FUN!!!!!
heres his build thread: https://grassrootsmotorsports.com/fo.../138776/page1/
as soon as the resin glaze cures (24 hours) ill take my car outside to was every surface. Twice. Then, reassembly! And engine bat detailing. And figuring out the livery. And nitrous install. And.....
Octobers coming quick.
new money:
none of this counts in the budget, thank god, but it counts in my wallet....
buffer and pad, harbor freight: 45
cutting compound, scratch and swirl remover, and machine glaze: 65
pads and sandpaper for DA 44
sandpaper and block for hand sanding: 26
Recoup: 820
new total: 1945.53
so, this week ive learned some new skills, and a new thing about car people.
First thing is about the people: the guys that buy really high dollar materials, and lay down paint that looks great out of the gun have large *****. I mean HUGE *****. It was pucker inducing taking sandpaper to a $4.50 quart of valspar. I cant imagine a $450 materials job. My job was garbage, and I was still scared of screwing it up.
That being said, it was bad enough (though all one color, which was the primary purpose!) that something needed to be done.
This is what I was starting with. Random pictures of the as sprayed surface. It was BAD. I did try to take similar pictures for before an after effect, but im not all that good with a camera, so make sure to squint. Or drink. Heavily. Much like last call, this car will keep looking better!
Overall long view
20190602_103336 by Michael Crawford, on Flickr
decklid, with a picture of my beginners wet-sanding kit.
20190603_073709 by Michael Crawford, on Flickr
super closeup of the surface on the best panel on the car
20190603_073726 by Michael Crawford, on Flickr
good overall of texture, along with my complete beginners kit of materials. (note, I wound up with a hell of a lot of different supplies by the end.)
20190603_073742 by Michael Crawford, on Flickr
started with the foam block and 800 grit. Wet the paper in a 5 gallon bucket of soapy water, and used a spray bottle of soapy water on the surface. I watched youtube videos and internet posts made it look like a few seconds of sanding would produce a nice flat surface. This was after 10 minutes of sanding, and it definitely AINT a flat surface yet.
20190603_082603 by Michael Crawford, on Flickr
so after enough wet-sanding with 800 grit to make my arm fall off (it got better!) the surface of the decklid, quarter, and door were flat. Except for the fisheyes. Those were DEEP, so I left them. Figured they wouldnt be noticeable.
20190603_170045 by Michael Crawford, on Flickr
one of the tips I learned was to use blue tape to outline areas of the panel that needed more work. Trhis also worked to help flatten the runs without going too deep on the surrounding area. Also taped the edges of the panels, though this proved to be wasted effort. Supposedly it would prevent burn through, but it didnt. Aparently 800 grit will work through tape.
20190604_080329 by Michael Crawford, on Flickr
20190605_081857 by Michael Crawford, on Flickr
at some point, my bum shoulder and wetsanding conspired to make me hate life. Thats when I struck on an idea.
20190605_125047 by Michael Crawford, on Flickr
I went to the local autobody supply house and obtained a box of 800 grit wet hook and loop sandpaper discs. As well as a couple of buffing pads, and a backer pad for the paper. This made quick work of the rest of the surface. And the edges. And my wallet. But, my shoulder was a whole lot better, and the process sped up immeasurably!
We got the whole car down to 800 grit. I was pretty happy, but definitely concerned that I just ruined the paint. But, im a redneck with a rabbits foot and no fear of failure!
Rolled it outside, and washed the slurry off with dawn and a rag.
20190605_180533 by Michael Crawford, on Flickr
20190605_180951 by Michael Crawford, on Flickr
next was 1000 grit
20190606_080451 by Michael Crawford, on Flickr
then 1500
20190606_084847 by Michael Crawford, on Flickr
then 2000, but it didn't really look any different. And my shoulder was back to hurting. (unfortunately, that's a lingering aftereffect to eating a honda in the drivers door of a 1964 el camino at 50mph. Look back in the thread, there's a picture)
20190607_081933 by Michael Crawford, on Flickr
anyway, we then started on buffing. I originally started with the porter cable DA and turntle wax rubbing compound.
20190607_165024 by Michael Crawford, on Flickr
garbage. Ruined paint that actually looked worse than before I started. So, did some digging, and was told to use a firm foam pad on a rotary buffer with 3m compound. So, a trip to harbor freight and oriellys, and a bunch of money later, we were making progress!
20190607_165029 by Michael Crawford, on Flickr
but I still wasn't happy with the results. I called Art over to give me pointers on what I was doing wrong. 30 seconds of watching him showed I was moving too fast, at too low a speed, with too much compound, and too much angle. I took back over, and came up with satisfactory results!
20190608_180227 by Michael Crawford, on Flickr
so, last night and today I worked through the 3m, meguires scratch and swirl remover, meguires machine glaze, and tr3 resin glaze. My shoulder and back are killing me, but im pretty happy with the results!
20190609_160837 by Michael Crawford, on Flickr
20190609_160843 by Michael Crawford, on Flickr
20190609_160927 by Michael Crawford, on Flickr
20190609_160857 by Michael Crawford, on Flickr
and a super close up of the same horrible surface of the decklid as in the first pictures
20190609_160953 by Michael Crawford, on Flickr
lots of work. Lots and lots of work. But, I have a target. See, in every competition ive ever been in, ive been told to pick your targets. Wether that was football, autocross, or boy scouts, ive always had to have something i was aiming for. In this years upcoming challenge, I have two targets. First is top 10 overall. Second is beating angrycorvair in his mid engine v8 corvair. That may or may not actually get finished. But my major one, and the most euqal challenge target I can think of to my build, is machinenbau in datsanity. Its an incredible build, that outclasses mine in every measurable way. And has already competed at the challenge and placed well before the mammoth paint and body and sorting campaign hes been on all year. But v6 swapped, street legal, rwd Japanese car. Who's build thread rivals mine in length and scope. Its incredible I hope to match him, and hopefully squeak by him in the rankings. But it will be close! And FUN!!!!!
heres his build thread: https://grassrootsmotorsports.com/fo.../138776/page1/
as soon as the resin glaze cures (24 hours) ill take my car outside to was every surface. Twice. Then, reassembly! And engine bat detailing. And figuring out the livery. And nitrous install. And.....
Octobers coming quick.

Reply
 0
0

0
06-23-2019, 05:06 PM
#82
Junior Member
Thread Starter
Join Date: Nov 2017
Posts: 112
Total Cats: 7
Old money: 1945.53
new money:
sold the Holley fuel pressure regulator and one wire alternator I never used for 50, but can only count 26.87
used a free demayo law office water bottle, and a .61 holly fitting for new overflow bottle
bought a can of forest green rustoleum from lowes 4.38
Recoup: 846.87
new total: 1923.65
this will be my last major update before the challenge. There's further development and tweaks to the car before the big show, bit ive decided to keep them under wraps until we load up for the event. Part of the strategy of doing well is shock and awe, as well as leaving some exclusive content for the magazine. In addition, there's still enough time before the challenge for others to build a better mousetrap. So the final form of the car will have to be a surprise in October.
Regardless, here we go!
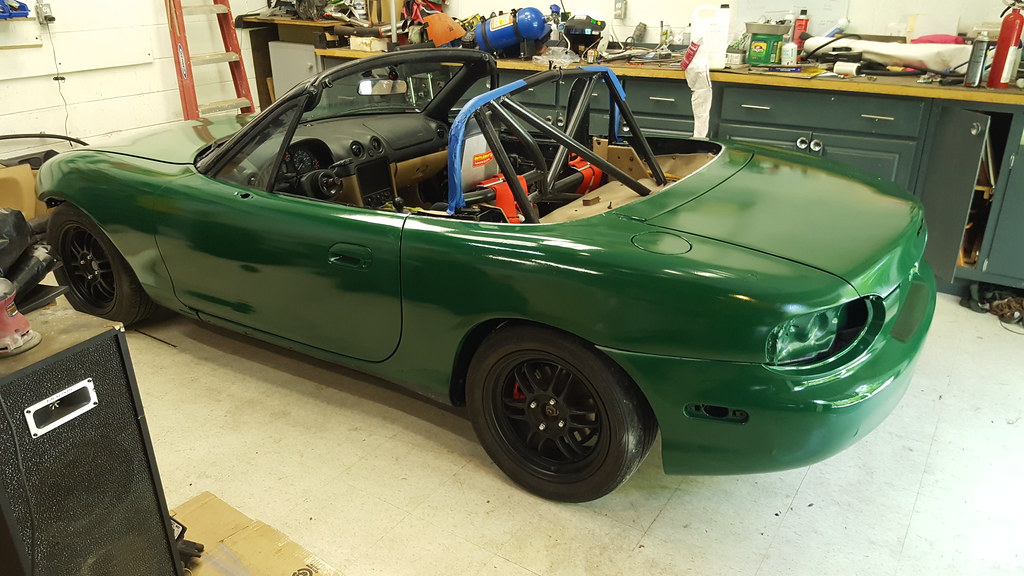
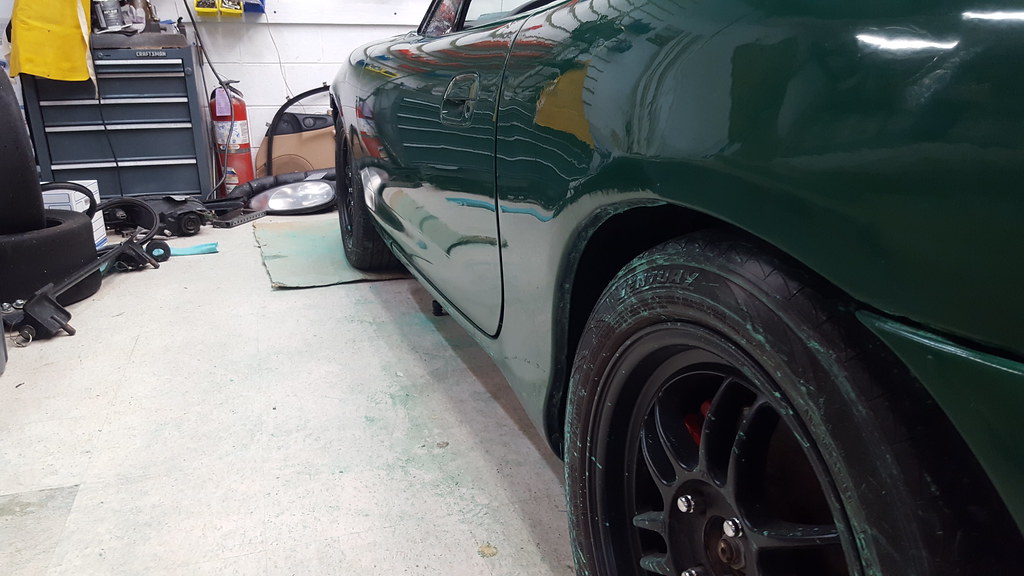
When we left off, I had finished wetsanding and buffing, but the car looked like chrome plated butt crack. That swarf gets EVERYWHERE.
So my daughter and I took it outside and scrubbed it. Inside, outside, topside, and bottom. I really liked what I was seeing, but it made my life harder, as now I had to bring the rest of the project up to the standards set by paint and body.

20190611_181604 by Michael Crawford, on Flickr
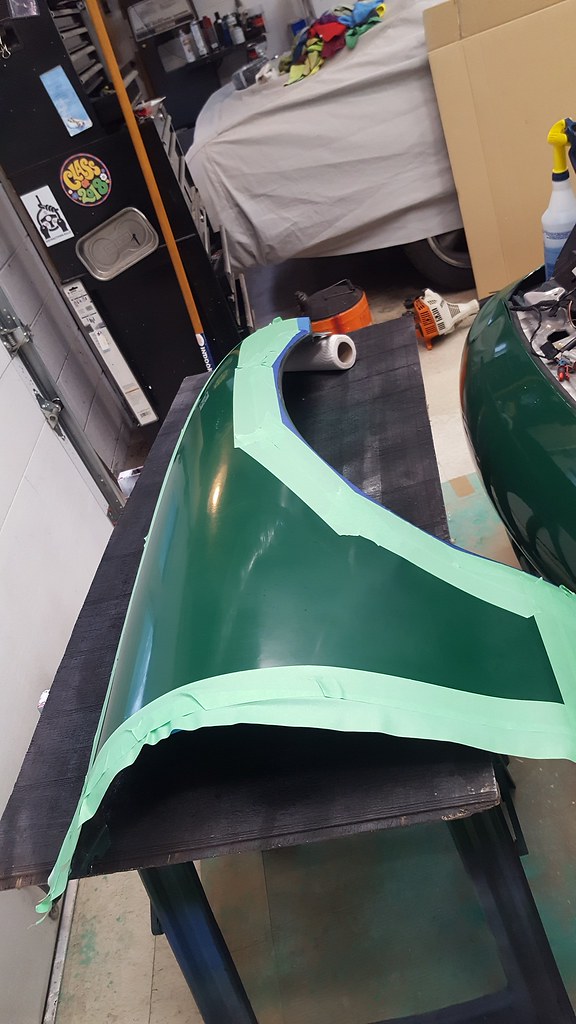
I figured id start with the underside of the hood and the front fender jambs. I used a can of hunter green rustoleum, as its incredibly close to the valspar color, and what was left a can of white spray paint. And a LOT of painters tape. And used plastic tablecloths from the trash barrel at work. And....
anyway, I pulled the front clip off entirely, and got my tape and paint on!
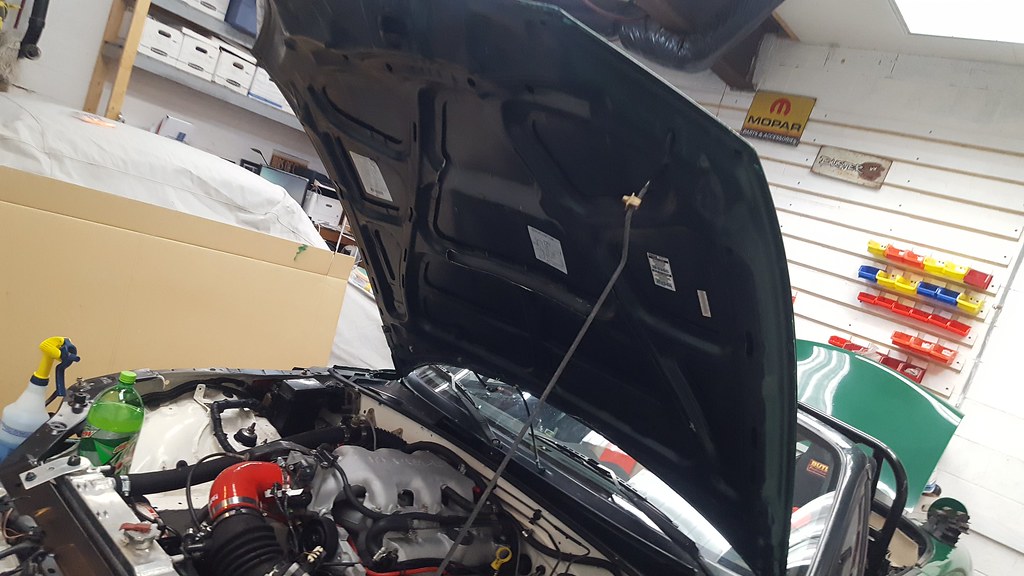
20190613_081017 by Michael Crawford, on Flickr

20190614_124030 by Michael Crawford, on Flickr

20190615_175225 by Michael Crawford, on Flickr

20190615_182517 by Michael Crawford, on Flickr
20190613_081015 by Michael Crawford, on Flickr

20190613_081129 by Michael Crawford, on Flickr
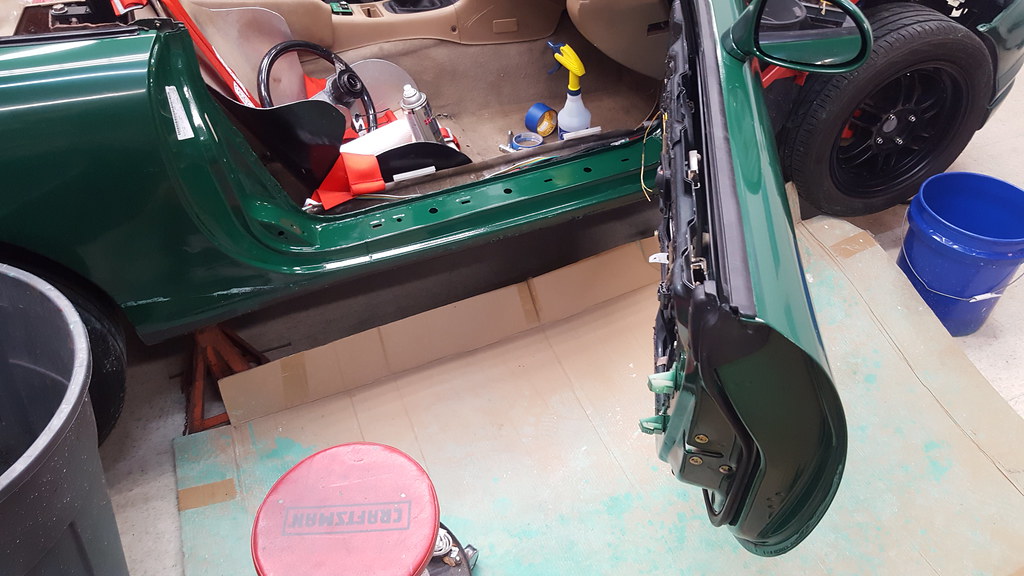
while I was at it, I did the door jambs. THAT was not easy.

20190613_080959 by Michael Crawford, on Flickr

20190612_185542 by Michael Crawford, on Flickr
20190613_075227 by Michael Crawford, on Flickr
I also painted the windshield surround that I had forgotten about entirely. As well as cleaned up the cowl plastics, etc. just general tidiness and cleaning.

20190616_104043 by Michael Crawford, on Flickr
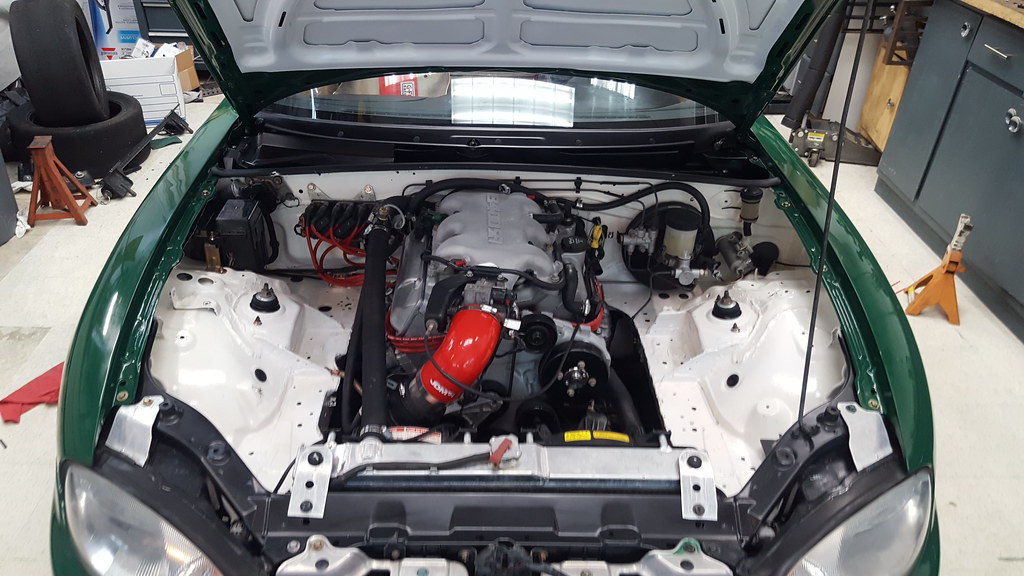
I then looked at the engine bay. And decided that it looked like a hack job swap that belonged in a trailer park in Kentucky, not my shop. Not my best work, and I didn't like it.
Before, as clean and tidy as it ever was

20190519_102309 by Michael Crawford, on Flickr

20190519_102314 by Michael Crawford, on Flickr

20190519_102318 by Michael Crawford, on Flickr
the solution was multifaceted.
Step one was to relocate the yellowed, ugly, bulky washer bottle. So I used an aluminum water bottle that was given to me by demayo law offices when they were trying to get my business, and a Holley clearance page NPT hose barb fitting.

20190618_121053 by Michael Crawford, on Flickr
cut the top loop off the cap, a little drilling, and bobs your uncle!

20190618_121840 by Michael Crawford, on Flickr
and ziptied into place
20190618_171114 by Michael Crawford, on Flickr
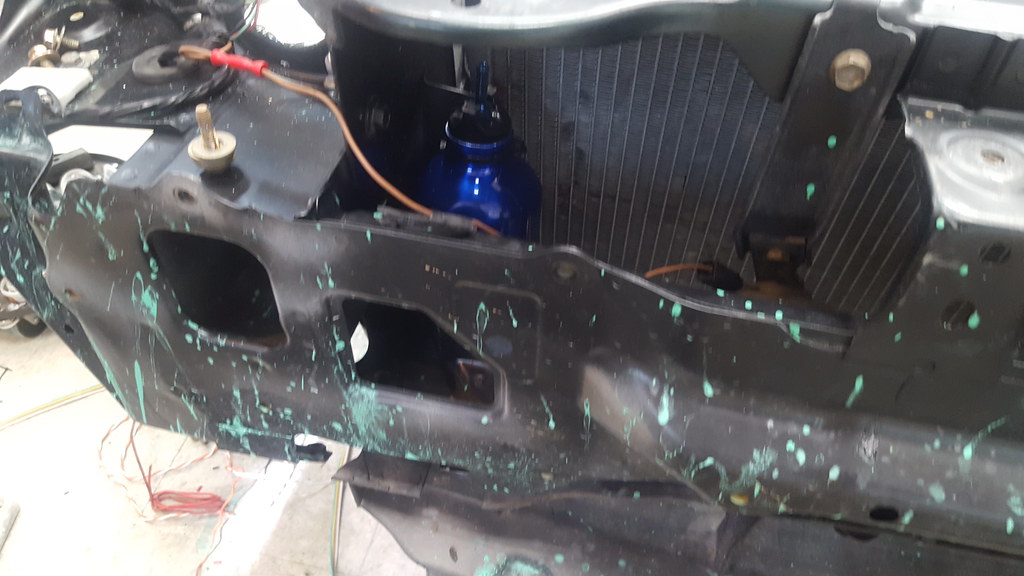
step two was nuclear. I decided to do a wire tuck. After the washer bottle was out of the way, the wiring was the next really ugly spot. Not the engine harness I did, but the mazda harness and the wiring where the two met in the engine bay. Not my best work, and mazda didn't make the harness for looks, but for their design parameters.
So first, I cut off all the extra plugs that weren't being used anymore, stripped the factory wrapping, and started plucking the leftover wires out of the bundles. Then, since I like simple solutions, I drilled some holes in the backside of the wheel tubs in front of where the bundles come through the firewall. Makes it a straight shot to the wheelwell for wiring. Extended what needed extended, re-wrapped, fastened into place, etc. in the process, I changed the starter cable and alternator wiring routing, deleted extra brackets, cleaned up the under dash wiring, etc. quite a lot of work to make it look like I did LESS than the first time!

20190616_122519 by Michael Crawford, on Flickr

20190618_081015 by Michael Crawford, on Flickr

20190618_122247 by Michael Crawford, on Flickr

20190619_091020 by Michael Crawford, on Flickr
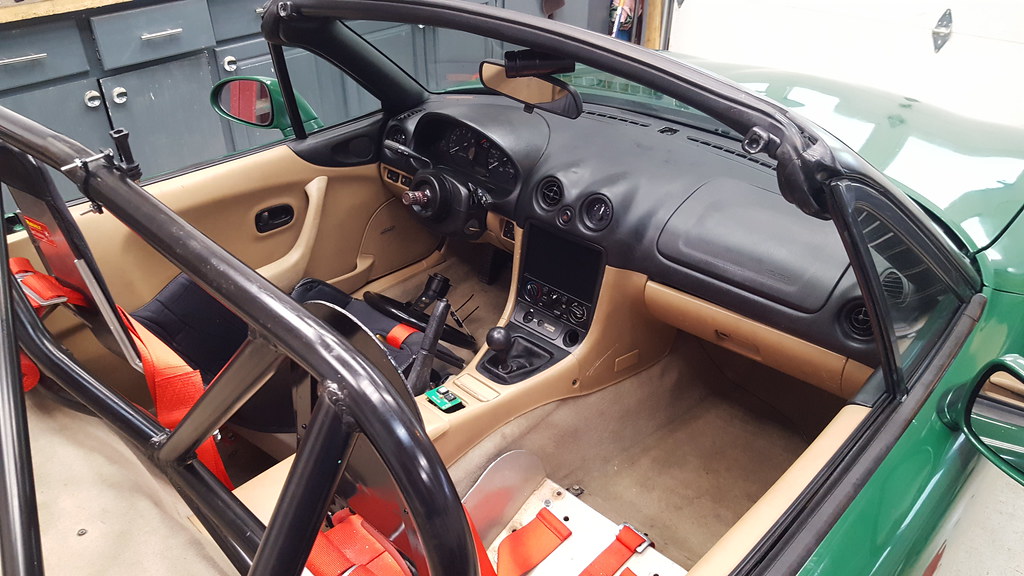
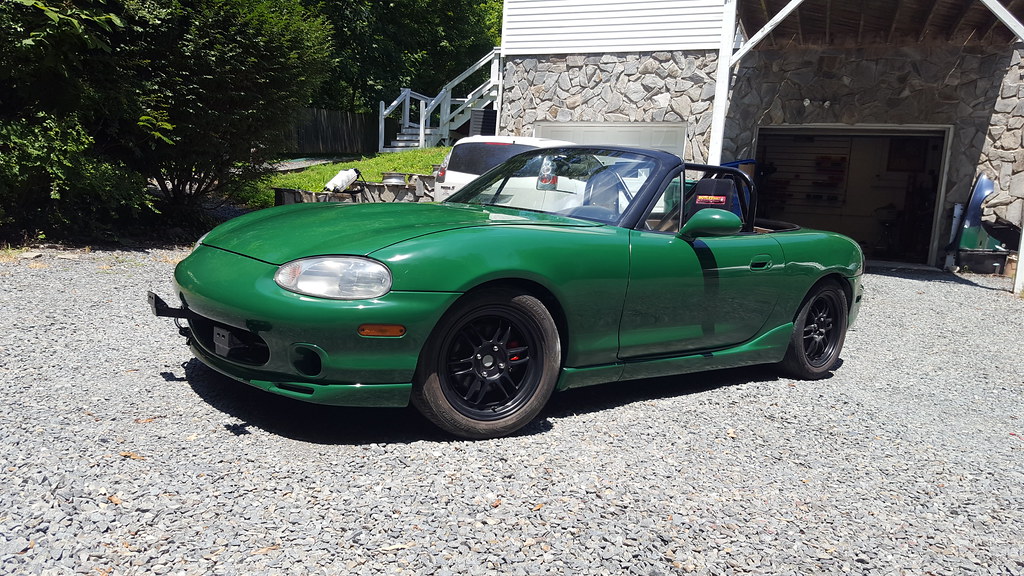
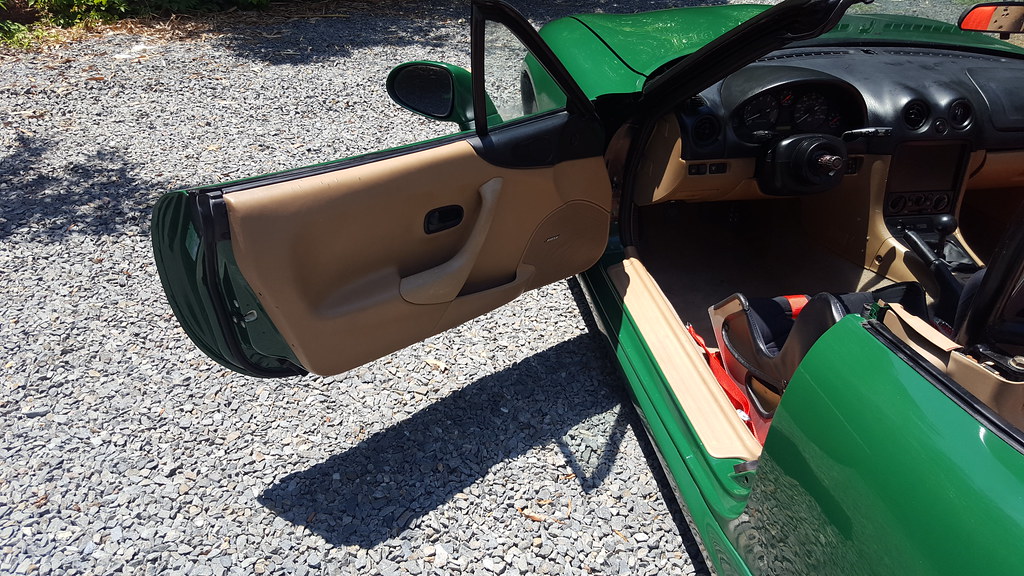
then I changed the routing of my air intake tube, and put it all back together. In the process, I cleaned all the interior plastics, installed the body kit, cleaned all the undercarriage and wheels, cleaned the windshield properly (razor blade, lacquer thinner, steel wool, windex) for the first time since I bought the car, etc. essentially “finished” the car. From here, the thread goes dark, and when next a big update is done, it wont be such a sleeper anymore. Will hopefully look a lot more interesting than the stock appearing miata it is now.
Im super stocked with it, hence the HUGE photo dump im subjecting you all to.
20190623_143209 by Michael Crawford, on Flickr

20190623_143225 by Michael Crawford, on Flickr
20190623_143319 by Michael Crawford, on Flickr

20190623_143325 by Michael Crawford, on Flickr

20190623_143337 by Michael Crawford, on Flickr

20190623_143353 by Michael Crawford, on Flickr

20190623_143611 by Michael Crawford, on Flickr
20190623_143619 by Michael Crawford, on Flickr

20190623_143632 by Michael Crawford, on Flickr

20190623_143643 by Michael Crawford, on Flickr
20190623_143741 by Michael Crawford, on Flickr

20190623_143745 by Michael Crawford, on Flickr

20190623_143940 by Michael Crawford, on Flickr
20190623_143940 by Michael Crawford, on Flickr
now that youve seen this, I WANT you to be SUPER CRITICAL of everything in the pictures. Something that could look better, be done better, sticks out as ugly or unfinished, etc. nitpick it to death like its a political post on facebook. Be brutal and harsh. I want all the feedback, positive and negative, that I can get. Im going after the top 10, and need to bring the best car I can. I know what my eyes see, but I want to know what every other set of eyes that falls on this mongrel see. Preferably the negative. But I wont be pissed at positive mixed in!
new money:
sold the Holley fuel pressure regulator and one wire alternator I never used for 50, but can only count 26.87
used a free demayo law office water bottle, and a .61 holly fitting for new overflow bottle
bought a can of forest green rustoleum from lowes 4.38
Recoup: 846.87
new total: 1923.65
this will be my last major update before the challenge. There's further development and tweaks to the car before the big show, bit ive decided to keep them under wraps until we load up for the event. Part of the strategy of doing well is shock and awe, as well as leaving some exclusive content for the magazine. In addition, there's still enough time before the challenge for others to build a better mousetrap. So the final form of the car will have to be a surprise in October.
Regardless, here we go!
When we left off, I had finished wetsanding and buffing, but the car looked like chrome plated butt crack. That swarf gets EVERYWHERE.
So my daughter and I took it outside and scrubbed it. Inside, outside, topside, and bottom. I really liked what I was seeing, but it made my life harder, as now I had to bring the rest of the project up to the standards set by paint and body.
20190611_181604 by Michael Crawford, on Flickr
I figured id start with the underside of the hood and the front fender jambs. I used a can of hunter green rustoleum, as its incredibly close to the valspar color, and what was left a can of white spray paint. And a LOT of painters tape. And used plastic tablecloths from the trash barrel at work. And....
anyway, I pulled the front clip off entirely, and got my tape and paint on!
20190613_081017 by Michael Crawford, on Flickr
20190614_124030 by Michael Crawford, on Flickr
20190615_175225 by Michael Crawford, on Flickr
20190615_182517 by Michael Crawford, on Flickr
20190613_081015 by Michael Crawford, on Flickr
20190613_081129 by Michael Crawford, on Flickr
while I was at it, I did the door jambs. THAT was not easy.
20190613_080959 by Michael Crawford, on Flickr
20190612_185542 by Michael Crawford, on Flickr
20190613_075227 by Michael Crawford, on Flickr
I also painted the windshield surround that I had forgotten about entirely. As well as cleaned up the cowl plastics, etc. just general tidiness and cleaning.
20190616_104043 by Michael Crawford, on Flickr
I then looked at the engine bay. And decided that it looked like a hack job swap that belonged in a trailer park in Kentucky, not my shop. Not my best work, and I didn't like it.
Before, as clean and tidy as it ever was
20190519_102309 by Michael Crawford, on Flickr
20190519_102314 by Michael Crawford, on Flickr
20190519_102318 by Michael Crawford, on Flickr
the solution was multifaceted.
Step one was to relocate the yellowed, ugly, bulky washer bottle. So I used an aluminum water bottle that was given to me by demayo law offices when they were trying to get my business, and a Holley clearance page NPT hose barb fitting.
20190618_121053 by Michael Crawford, on Flickr
cut the top loop off the cap, a little drilling, and bobs your uncle!
20190618_121840 by Michael Crawford, on Flickr
and ziptied into place
20190618_171114 by Michael Crawford, on Flickr
step two was nuclear. I decided to do a wire tuck. After the washer bottle was out of the way, the wiring was the next really ugly spot. Not the engine harness I did, but the mazda harness and the wiring where the two met in the engine bay. Not my best work, and mazda didn't make the harness for looks, but for their design parameters.
So first, I cut off all the extra plugs that weren't being used anymore, stripped the factory wrapping, and started plucking the leftover wires out of the bundles. Then, since I like simple solutions, I drilled some holes in the backside of the wheel tubs in front of where the bundles come through the firewall. Makes it a straight shot to the wheelwell for wiring. Extended what needed extended, re-wrapped, fastened into place, etc. in the process, I changed the starter cable and alternator wiring routing, deleted extra brackets, cleaned up the under dash wiring, etc. quite a lot of work to make it look like I did LESS than the first time!
20190616_122519 by Michael Crawford, on Flickr
20190618_081015 by Michael Crawford, on Flickr
20190618_122247 by Michael Crawford, on Flickr
20190619_091020 by Michael Crawford, on Flickr
then I changed the routing of my air intake tube, and put it all back together. In the process, I cleaned all the interior plastics, installed the body kit, cleaned all the undercarriage and wheels, cleaned the windshield properly (razor blade, lacquer thinner, steel wool, windex) for the first time since I bought the car, etc. essentially “finished” the car. From here, the thread goes dark, and when next a big update is done, it wont be such a sleeper anymore. Will hopefully look a lot more interesting than the stock appearing miata it is now.
Im super stocked with it, hence the HUGE photo dump im subjecting you all to.
20190623_143209 by Michael Crawford, on Flickr
20190623_143225 by Michael Crawford, on Flickr
20190623_143319 by Michael Crawford, on Flickr
20190623_143325 by Michael Crawford, on Flickr
20190623_143337 by Michael Crawford, on Flickr
20190623_143353 by Michael Crawford, on Flickr
20190623_143611 by Michael Crawford, on Flickr
20190623_143619 by Michael Crawford, on Flickr
20190623_143632 by Michael Crawford, on Flickr
20190623_143643 by Michael Crawford, on Flickr
20190623_143741 by Michael Crawford, on Flickr
20190623_143745 by Michael Crawford, on Flickr
20190623_143940 by Michael Crawford, on Flickr
20190623_143940 by Michael Crawford, on Flickr
now that youve seen this, I WANT you to be SUPER CRITICAL of everything in the pictures. Something that could look better, be done better, sticks out as ugly or unfinished, etc. nitpick it to death like its a political post on facebook. Be brutal and harsh. I want all the feedback, positive and negative, that I can get. Im going after the top 10, and need to bring the best car I can. I know what my eyes see, but I want to know what every other set of eyes that falls on this mongrel see. Preferably the negative. But I wont be pissed at positive mixed in!
Reply
1
1
07-24-2019, 07:14 PM
#83
Junior Member
Thread Starter
Join Date: Nov 2017
Posts: 112
Total Cats: 7
Old money: 1923.65
new money:
plastic hole plugs from widgetco 18.20
nitrous line: traded scrap wheelie bars to patrick: .50
added monster tach: $6
spring rubbers 11.98
replacement seats and one 5 point harness: $75
sold 5 point harness: -35
Recoup: 881.87
new total: 1993.83
so, youll notice the budget is almost over the amount. At the moment, it has 4 seats, and some extra stuff in it. Im narrowing down options via testing. Dont want to pull the extras out until I know.
Anyway, in my last update, I said the thread would go dark.
I apparently lied.
At the time I wrote the last update, I was getting very serious about going for the overall at the challenge. The winning spot, and the welder.
It sucked the joy out of the build for me. I stopped having fun. I stopped working towards the car I want to OWN. It began to dominate my thinking. This aint what this is supposed to be about. At all. This is supposed to be a fun build with my dad, a challenge car that winds up where it may, and one that has a life afterwards. It was not intended from the start to be an overall car, and to make it sich would require such efforts as to ruin it for what I want after the challenge. And I dont need the stress right now, or ever, of being that competitive again. It danm near killed my marriage once. Never again.
I need to thank Patrick, and more importantly MY WIFE for pointing it out to me. I had honestly slipped back into those old habits and ways of thinking without even noticing. Im blessed to have them as friends.
Anyway, this is about a car build. Even though its been a little bit like zen and the art of motorcycle maintenance at times. Read the thread from the beginning, and youll see what I mean....
so, I started getting ready to try drag passes. Used about .10 worth of satin black spray paint on those horrendous honda wheels, and got the honda sized slicks mounted up.

20190703_181651 by Michael Crawford, on Flickr
I also started practicing powershifting the car through 3rd gear on the street. It quickly became apparent that the clutch was slipping. Luckily this was due to misadjusted linkage at the clutch master and didnt require pulling the drivetrain. After it wasnt slipping anymore, I realized that the shift light wasnt accurate at all. It would sometimes light at the rev limiter, sometimes at the proper point, sometimes not at all.
I had picked up a broken autometer phantom shift light tach at a swap meet a while back for 6 bucks. It required reattaching the calibration loops, reattaching the bezel, redoing the ground wire, and then it worked. So I mounted it where the shift light had been, full on ricer style. Had to remove the rearview mirror to make it fit....

20190713_113739 by Michael Crawford, on Flickr
with those in place, I planned my first test and tune night. Which got rained out.
So, I went to prep for the upcoming autocross instead. This involved a comprehgensive nut and bolt check, as well as adding some spring rubbers. See, nascar uses rubbers to make incremental changes in spring rate quickly and cheaply. I felt at the last autocross that the car was undersprung. So, I went to oriellys and got a pair of 5.99 coil spring boosters.

20190714_073235 by Michael Crawford, on Flickr
these are the universal/intended for 5 inch diameter truck springs boosters. I cut them in half to make 4 sections that should do a full coil of wrap on my 2.5 coilover springs. Then, with a bit of trimming with a razor blade, some molding with a propane torch, and squeezing in place with giant channel locks, I took one full coil out of each spring. Which, by napkin calculation, is about a 30% increase in spring rate. Still have no idea what the rates actually are, but its stiffer! I also dialed in all the negative camber I could get, and zero toe. I am definitely camber limited here. By a significant amount. Somethings bent somewhere, probably the warped crossmember. But it is what it is at this point.

20190714_125242 by Michael Crawford, on Flickr
the next weekend, I had an autocross at zmax saturday morning. However, the had a test and tune friday night, and I got out of work early, and the truck was already loaded except for drag slicks, and....

20190719_165006 by Michael Crawford, on Flickr

20190719_180423 by Michael Crawford, on Flickr

20190719_194848 by Michael Crawford, on Flickr
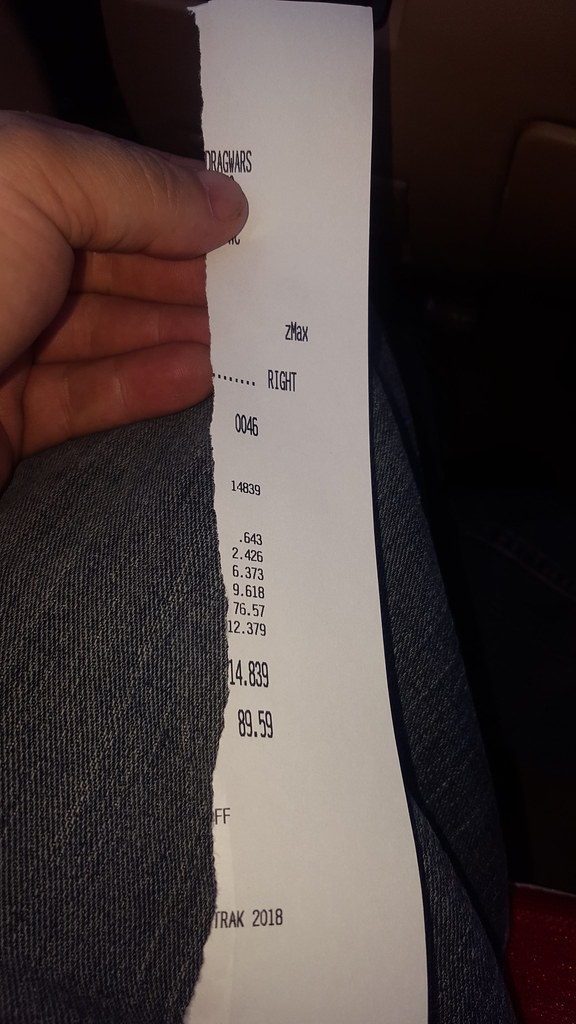
20190719_202223 by Michael Crawford, on Flickr
I was disappointed to say the least. Really a kick in the emotional nuts. Spent a lot of time thinking, and wrote the following the next afternoon.
I think I introduced too many variables, both mechanically and psychologically. Trying to re-learn drag racing, while relearning how to drive slicks on a car that is completely unknown on a drag strip. It felt squirrelly on the big end, squishy all around, etc. Nothing felt right, which caused fear. Dear amplified the nervousness and perception of the cars oddities. Which increased fear. Etc.
My plan is to rrtest. On street tires. And focus on shifting and driving the car straight. Once im comfortable with that, THEN introduce the variable of slicks. Relearn a car with a single new change.
I wasn't launching properly with the rolling and overthinking slicks. I was lifting when it got squirrelly. I wasn't shifting well, or using 4th properly. There's a LOT of wrong with last night. But a lot of right. It drives straight, stops straight, passes tech, and the clutch doesn't slip powershifting.
Im pretty sure there's a low 14 off the bottle in the car. But not a glory run that will get me the overall.
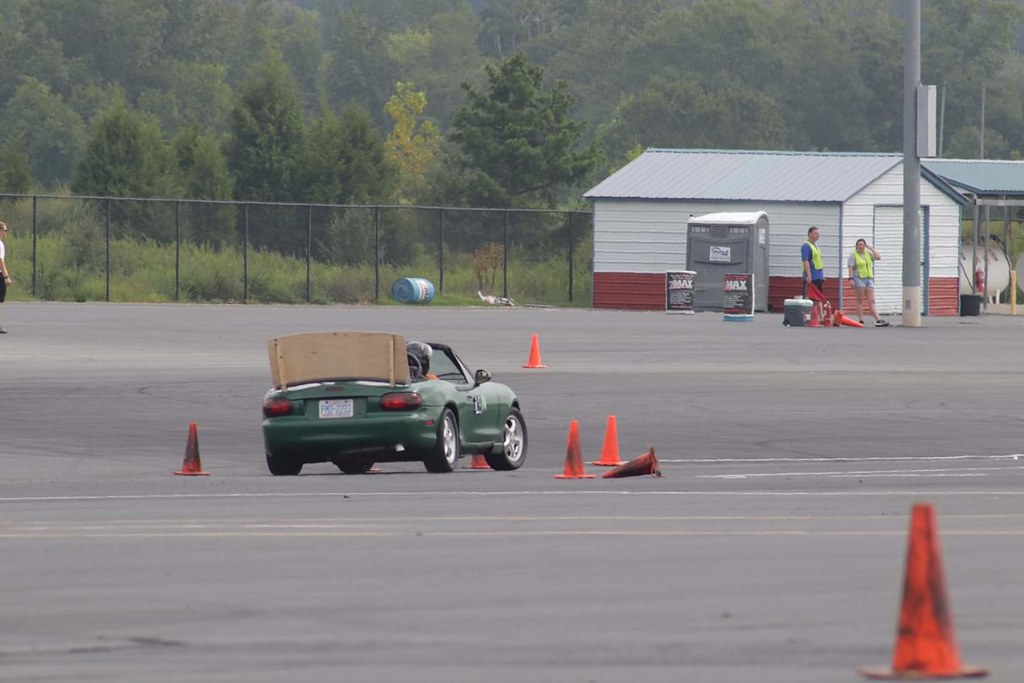
Regardless, I left the car parked in the zmax lot overnight, and came back the next morning to autocross. Got there at 6am, as I volunteered to help setup due to some medication side effects with prolonged sun exposure. Means I could leave early after my runs. It was a BIG course. I actually hit the rev limiter in 3rd a few times. I also kept getting significantly quicker every run, and the spec miata slicks just flat WORK. Im sure a set of sticker A7s would be even better, but im not going to spend sticker A7 money. After the challenge, ill spend re71r money. Maybe. Just so I can drive it to and from events and not have to swap tires.

20190720_081959 by Michael Crawford, on Flickr
john (untouchabl that I bought the car and seat from) and his buddy came out saturday. He got some video (whereas I forgot to charge my camera, or even take a picture of it) and john took it for a run up the street afterwards. It got his seal of approval. Im happy there!
over my 5 runs, I got down to a 78.xxx the fast guys were all in the mid to high 60s. However, this is my second event in this car. And second event in two years. And first on warmed up slicks with a properly running car. And various other excuses. Im not fast. Im not a rock star driver. But, im getting better, and learning the car and how to drive at an autocross. Hopefully ill feel confident in October of being able to get everything out of the car I can. I plan to run all ME, and skip the pro driver at this point. That is subject to change, however.
so that brings us up to today, more or less. I was screwing around at a training on the various sale apps I have loaded into my phone, and came across an add on offerup for a set of tuner fx seats and 5 point harnesses for 150. I plan to street drive the car after the challenge, and wanted more comfortable seats. In addition, the mismatched aluminum seats really don't look all that great in the car. So these seemed like a good idea if I fit in them well. I happened to be going nearby the seller around lunch today, so I stopped to take a look at them, and more importantly a sit. They fit my hips well, were very faded, the foam is somewhat hard, and the ribcage is a little loose. Only one complete, outdated harness, and functional sliders. I had decided to pass on them when the guy said to make an offer. I told him that theyd really only be worth $75 to me, and got in my car and started pulling out. He came to the car and said he changed his mind and would take my offer. So I loaded them up in the mazda.

20190724_121441_001 by Michael Crawford, on Flickr

20190724_151923 by Michael Crawford, on Flickr
brought them home, and promptly sold the harness to brother dustin for 35 bucks. Making the pair of seats the same price as the one aluminum seat currently in the budget. Still don't know if they fit in the car yet though, but I fired up the superclean, scrub brush, and garden hose to clean the mud, dust, dirt, and nicotine off of them. Re-dye will happen with RIT and a spray bottle after another couple of rounds of scrubbing and then making sure they fit the car. Im sure there's a way to tighten the ribcage fit on the drivers side, and these will hopefully be more comfortable and better fitting, as well as easier ingress/egress than the aluminum seats, even if they are significantly heavier.

20190724_172841 by Michael Crawford, on Flickr
new money:
plastic hole plugs from widgetco 18.20
nitrous line: traded scrap wheelie bars to patrick: .50
added monster tach: $6
spring rubbers 11.98
replacement seats and one 5 point harness: $75
sold 5 point harness: -35
Recoup: 881.87
new total: 1993.83
so, youll notice the budget is almost over the amount. At the moment, it has 4 seats, and some extra stuff in it. Im narrowing down options via testing. Dont want to pull the extras out until I know.
Anyway, in my last update, I said the thread would go dark.
I apparently lied.
At the time I wrote the last update, I was getting very serious about going for the overall at the challenge. The winning spot, and the welder.
It sucked the joy out of the build for me. I stopped having fun. I stopped working towards the car I want to OWN. It began to dominate my thinking. This aint what this is supposed to be about. At all. This is supposed to be a fun build with my dad, a challenge car that winds up where it may, and one that has a life afterwards. It was not intended from the start to be an overall car, and to make it sich would require such efforts as to ruin it for what I want after the challenge. And I dont need the stress right now, or ever, of being that competitive again. It danm near killed my marriage once. Never again.
I need to thank Patrick, and more importantly MY WIFE for pointing it out to me. I had honestly slipped back into those old habits and ways of thinking without even noticing. Im blessed to have them as friends.
Anyway, this is about a car build. Even though its been a little bit like zen and the art of motorcycle maintenance at times. Read the thread from the beginning, and youll see what I mean....
so, I started getting ready to try drag passes. Used about .10 worth of satin black spray paint on those horrendous honda wheels, and got the honda sized slicks mounted up.
20190703_181651 by Michael Crawford, on Flickr
I also started practicing powershifting the car through 3rd gear on the street. It quickly became apparent that the clutch was slipping. Luckily this was due to misadjusted linkage at the clutch master and didnt require pulling the drivetrain. After it wasnt slipping anymore, I realized that the shift light wasnt accurate at all. It would sometimes light at the rev limiter, sometimes at the proper point, sometimes not at all.
I had picked up a broken autometer phantom shift light tach at a swap meet a while back for 6 bucks. It required reattaching the calibration loops, reattaching the bezel, redoing the ground wire, and then it worked. So I mounted it where the shift light had been, full on ricer style. Had to remove the rearview mirror to make it fit....
20190713_113739 by Michael Crawford, on Flickr
with those in place, I planned my first test and tune night. Which got rained out.
So, I went to prep for the upcoming autocross instead. This involved a comprehgensive nut and bolt check, as well as adding some spring rubbers. See, nascar uses rubbers to make incremental changes in spring rate quickly and cheaply. I felt at the last autocross that the car was undersprung. So, I went to oriellys and got a pair of 5.99 coil spring boosters.
20190714_073235 by Michael Crawford, on Flickr
these are the universal/intended for 5 inch diameter truck springs boosters. I cut them in half to make 4 sections that should do a full coil of wrap on my 2.5 coilover springs. Then, with a bit of trimming with a razor blade, some molding with a propane torch, and squeezing in place with giant channel locks, I took one full coil out of each spring. Which, by napkin calculation, is about a 30% increase in spring rate. Still have no idea what the rates actually are, but its stiffer! I also dialed in all the negative camber I could get, and zero toe. I am definitely camber limited here. By a significant amount. Somethings bent somewhere, probably the warped crossmember. But it is what it is at this point.
20190714_125242 by Michael Crawford, on Flickr
the next weekend, I had an autocross at zmax saturday morning. However, the had a test and tune friday night, and I got out of work early, and the truck was already loaded except for drag slicks, and....
20190719_165006 by Michael Crawford, on Flickr
20190719_180423 by Michael Crawford, on Flickr
20190719_194848 by Michael Crawford, on Flickr
20190719_202223 by Michael Crawford, on Flickr
I was disappointed to say the least. Really a kick in the emotional nuts. Spent a lot of time thinking, and wrote the following the next afternoon.
I think I introduced too many variables, both mechanically and psychologically. Trying to re-learn drag racing, while relearning how to drive slicks on a car that is completely unknown on a drag strip. It felt squirrelly on the big end, squishy all around, etc. Nothing felt right, which caused fear. Dear amplified the nervousness and perception of the cars oddities. Which increased fear. Etc.
My plan is to rrtest. On street tires. And focus on shifting and driving the car straight. Once im comfortable with that, THEN introduce the variable of slicks. Relearn a car with a single new change.
I wasn't launching properly with the rolling and overthinking slicks. I was lifting when it got squirrelly. I wasn't shifting well, or using 4th properly. There's a LOT of wrong with last night. But a lot of right. It drives straight, stops straight, passes tech, and the clutch doesn't slip powershifting.
Im pretty sure there's a low 14 off the bottle in the car. But not a glory run that will get me the overall.
Regardless, I left the car parked in the zmax lot overnight, and came back the next morning to autocross. Got there at 6am, as I volunteered to help setup due to some medication side effects with prolonged sun exposure. Means I could leave early after my runs. It was a BIG course. I actually hit the rev limiter in 3rd a few times. I also kept getting significantly quicker every run, and the spec miata slicks just flat WORK. Im sure a set of sticker A7s would be even better, but im not going to spend sticker A7 money. After the challenge, ill spend re71r money. Maybe. Just so I can drive it to and from events and not have to swap tires.
20190720_081959 by Michael Crawford, on Flickr
john (untouchabl that I bought the car and seat from) and his buddy came out saturday. He got some video (whereas I forgot to charge my camera, or even take a picture of it) and john took it for a run up the street afterwards. It got his seal of approval. Im happy there!
over my 5 runs, I got down to a 78.xxx the fast guys were all in the mid to high 60s. However, this is my second event in this car. And second event in two years. And first on warmed up slicks with a properly running car. And various other excuses. Im not fast. Im not a rock star driver. But, im getting better, and learning the car and how to drive at an autocross. Hopefully ill feel confident in October of being able to get everything out of the car I can. I plan to run all ME, and skip the pro driver at this point. That is subject to change, however.
so that brings us up to today, more or less. I was screwing around at a training on the various sale apps I have loaded into my phone, and came across an add on offerup for a set of tuner fx seats and 5 point harnesses for 150. I plan to street drive the car after the challenge, and wanted more comfortable seats. In addition, the mismatched aluminum seats really don't look all that great in the car. So these seemed like a good idea if I fit in them well. I happened to be going nearby the seller around lunch today, so I stopped to take a look at them, and more importantly a sit. They fit my hips well, were very faded, the foam is somewhat hard, and the ribcage is a little loose. Only one complete, outdated harness, and functional sliders. I had decided to pass on them when the guy said to make an offer. I told him that theyd really only be worth $75 to me, and got in my car and started pulling out. He came to the car and said he changed his mind and would take my offer. So I loaded them up in the mazda.
20190724_121441_001 by Michael Crawford, on Flickr
20190724_151923 by Michael Crawford, on Flickr
brought them home, and promptly sold the harness to brother dustin for 35 bucks. Making the pair of seats the same price as the one aluminum seat currently in the budget. Still don't know if they fit in the car yet though, but I fired up the superclean, scrub brush, and garden hose to clean the mud, dust, dirt, and nicotine off of them. Re-dye will happen with RIT and a spray bottle after another couple of rounds of scrubbing and then making sure they fit the car. Im sure there's a way to tighten the ribcage fit on the drivers side, and these will hopefully be more comfortable and better fitting, as well as easier ingress/egress than the aluminum seats, even if they are significantly heavier.
20190724_172841 by Michael Crawford, on Flickr
Reply
0
0
08-23-2019, 07:24 PM
#84
Junior Member
Thread Starter
Join Date: Nov 2017
Posts: 112
Total Cats: 7
so, you'll notice the budget is missing. I've finalized it, but want to play some of my work close to the vest before the challenge, and it would give it away.
Anyway, in the last full update I had sucked at drag racing, sucked at autocrossing, and bought seats that ultimately didn't fit.
I've made a few small changes since then.....
step one was cleaning up the property some. I loaded ALL my extra miata crap in the back of the truck, and headed down to h&s miata parts (kannapolis NC 704-724-8010). Goal was to see if any of it was useful to him before I dropped it off at the scrap metal yard, and buy a side marker lens for the back bumper to fill the hole from where one was missing. Wound up unloading my truck there, and pulling black carpets and scruffy NA seats from a couple of cars headed to the crusher. He was happy to get parts that are in demand, I was happy to get stuff I wanted for life after the challenge.
 20190731_143829 by Michael Crawford, on Flickr
I also went ahead and used the hole plugs I bought from the internet for cleaning up the engine bay some more. Used the proper sized plug, driven into place with a mallet and chunk of oak dowel. Then a fresh coat of brush paint. Looks much better now.
 20190730_095204 by Michael Crawford, on Flickr
my previous roll bar did not clear a soft top. At all. No matter what. So I put it up for sale or trade in a few places. I was contacted from facebook marketplace by a nice young guy from greenville SC. He offered me a hard dog deuce, a soft top on a frame for a straight trade. I agreed.
 Screenshot_20190805-192938 by Michael Crawford, on Flickr
by the time I left his house, I had a canvas top on an NB frame, stock NB seatbelts, the roll bar, a good used rain rail, and the rear interior plastics and body metal parts for the top.
 20190806_080109 by Michael Crawford, on Flickr
 20190806_080654 by Michael Crawford, on Flickr
I wasted no time in the next steps. Used some of the can of white brush paint, dregs from a rattle can, and got busy.
 20190804_110325 by Michael Crawford, on Flickr
 20190806_182742 by Michael Crawford, on Flickr
 20190807_172654 by Michael Crawford, on Flickr
I called my better half to help trim the black package tray carpet for roll bar clearance. My last attempts left MUCH to be desired. Shes awesome.
 20190808_124626 by Michael Crawford, on Flickr
tossed the NA seats in, and called it good enough. I really like the contrast between the black carpets and tan interior. I will need to find GOOD seat covers for the NA seats after the challenge in tan. Preferably cloth. I like cloth. But the seats are comfortable, and more importantly, kid friendly! I took the car right after this picture for a road test. By road test, I mean I picked the kiddo up from YMCA camp and proceeded to pound 40 some odd miles on the car going up to the top of morrow mountain and back.
 20190808_130946 by Michael Crawford, on Flickr
 20190808_131122 by Michael Crawford, on Flickr
 20190808_173855 by Michael Crawford, on Flickr
 20190808_173901 by Michael Crawford, on Flickr
calling that a MAJOR win. This is what I want to own, more or less. A torquey, good handling, neat looking drop top. This one is coming close to how I imagined the perfect miata.
Anyway, hot on the heels of this success, dad and I loaded up and went drag racing again. This time, I left the street tires on. Focused only on using all the track, shifting properly, and launching. Essentially the muscle memory of drag racing, with very limited variables. We only got three runs in. also, I had readjusted the shift light and tach to be visible, and they made me run with the top and windows up. My window switch died that night.
 20190809_203731 by Michael Crawford, on Flickr
last run, it got hot enough to puke, and I lost steering. I honestly think part of the problem with the slicks that night was the quick release wheel coupler starting to loosen up. It came completely undone this time.
 20190810_103013 by Michael Crawford, on Flickr
dad and I counter drilled the set screw locations, so the set screws now thread into the steering shaft itself, cleaned everything, and broke out the good locktite. Dad then spent a few night putting a wrench on every single bolt in the entire car except bellhousing and flywheel, due to them not being accessible. He was able to get � turn out of some, none out of others, and generally checked all our work with a fresh set of eyes and a magnifying glass. Im grateful he did.
I went ahead and flushed the cooling system, getting all sorts of nasty crap out of it. Probably will need to be done again. I blame dexcool being the factory antifreeze in the rondevous the engine came out of.
Dad took my cardboard, duct tape, and sharpie spoiler setup, some scraps from a construction site down the road, and made the ginormous spoiler. Its actually a really well engineered piece, and only two holes were drilled in the car for nutserts in the rain gutter channel in the trunk. Whole goal was easy to mount at the autocross, easy to remove to drive home. We hit it. The aluminum tube was curved and found in the front yard of one of dustins neighbors, the wires and eyebolts were bought at ace hardware. The wires run through a couple small pieces of angle iron held down where the Frankenstein bolts would go.
 20190815_190908 by Michael Crawford, on Flickr
 20190816_165544 by Michael Crawford, on Flickr
I also got a 3 position toggle to replace the dead window switch. Because challenge budget, both windows now operate with one switch. So, up, down, or unequally in between are now the options. No picture, because it looked really hack, but needed done due to....
 Screenshot_20190814-095914 by Michael Crawford, on Flickr
going autocrossing!!!!!
had a two day event at zmax this past weekend. Ran in novice A, and sucked. But got faster with almost every run!
So, saturday morning, got through tech, pumped the spec miata slicks to 40psi, mounted the spoiler, and went to run.
 20190817_084605 by Michael Crawford, on Flickr
First three runs were rough. But the car felt more planted under throttle, and was definitely able to lay down the power in the long sweepers. Keeping a higher base fuel level made the hesitation/flat spot issues id had previously go away. I set the alignment to all the negative camber (2.5 degrees) front, 1/8 toe in, 1 degree negative with zero toe rear. Car was stiff with the spring rubbers, but not bouncy like we had feared. It honestly felt like I had no grip at all, but then I would overdrive and understeer. Left foot braking was much more predictable. Let an instructor take the car for a run with me riding along, and he beat me by 5 seconds. First time he ever sat in the car. So, I know the car has a lot more in it than I have as a driver. We later dropped tire pressure, and it made a difference in ultimate grip and balance. I did rip the passengers side side skirt off in the first run, so you'll see that in the videos. Videos, by the way, are courtesy of a father and his kids. Dads name was david howell. Nice family! On track pictures courtesy of luke woessner.
 FB_IMG_1566137715251 by Michael Crawford, on Flickr
 FB_IMG_1566137768594 by Michael Crawford, on Flickr
Sunday, we tried removing the spoiler and playing with tire pressures. I also had another instructor run, with the top CSP miata driver that was there. He was insanely fast, and I almost hurled. Very rarely do I get motion sickness, but I did that time! Forget the guys name that did that run, but he gave me good feedback. The results of Sunday were that we know the spoiler is helping, however, its unbalancing the car. So we will cut it down to legal limit of 10 inches for XP (currently 19 inches tall). Toe out will be a big help in autocross, he recommended 1/8. he also mentioned that the slicks never really bit like they should. When he got out, he checked temps, which he said were fine, but the tires are rock hard. He recommended doping them for the challenge, and scrapping them form cheap r-comps afterwards. I need to learn about tire sauce. After the two days, I was incredibly sore on monday. In talking with dad, an old road racer, he said it was from trying to hold myself in on the stock seats. So we need to build a harness bar and put the butlerbuilt back in for autocross work.
Anyway, here are the autocross videos! Car is currently torn back apart for the last thrash before the challenge, where I hope to pull top 10 overall, and maybe win concourse. Maybe. Its kind of a pile. But dammit, its MY pile!
yall have a god weekend, and love your family.
Also, feedback is ALWAYS welcome. Especially if its on any of the lingering questions/suggestions/ideas/etc. I love community interaction with this stuff.
Anyway, in the last full update I had sucked at drag racing, sucked at autocrossing, and bought seats that ultimately didn't fit.
I've made a few small changes since then.....
step one was cleaning up the property some. I loaded ALL my extra miata crap in the back of the truck, and headed down to h&s miata parts (kannapolis NC 704-724-8010). Goal was to see if any of it was useful to him before I dropped it off at the scrap metal yard, and buy a side marker lens for the back bumper to fill the hole from where one was missing. Wound up unloading my truck there, and pulling black carpets and scruffy NA seats from a couple of cars headed to the crusher. He was happy to get parts that are in demand, I was happy to get stuff I wanted for life after the challenge.
20190731_143829 by Michael Crawford, on FlickrI also went ahead and used the hole plugs I bought from the internet for cleaning up the engine bay some more. Used the proper sized plug, driven into place with a mallet and chunk of oak dowel. Then a fresh coat of brush paint. Looks much better now.
20190730_095204 by Michael Crawford, on Flickrmy previous roll bar did not clear a soft top. At all. No matter what. So I put it up for sale or trade in a few places. I was contacted from facebook marketplace by a nice young guy from greenville SC. He offered me a hard dog deuce, a soft top on a frame for a straight trade. I agreed.
Screenshot_20190805-192938 by Michael Crawford, on Flickrby the time I left his house, I had a canvas top on an NB frame, stock NB seatbelts, the roll bar, a good used rain rail, and the rear interior plastics and body metal parts for the top.
20190806_080109 by Michael Crawford, on Flickr20190806_080654 by Michael Crawford, on FlickrI wasted no time in the next steps. Used some of the can of white brush paint, dregs from a rattle can, and got busy.
20190804_110325 by Michael Crawford, on Flickr20190806_182742 by Michael Crawford, on Flickr20190807_172654 by Michael Crawford, on FlickrI called my better half to help trim the black package tray carpet for roll bar clearance. My last attempts left MUCH to be desired. Shes awesome.
20190808_124626 by Michael Crawford, on Flickrtossed the NA seats in, and called it good enough. I really like the contrast between the black carpets and tan interior. I will need to find GOOD seat covers for the NA seats after the challenge in tan. Preferably cloth. I like cloth. But the seats are comfortable, and more importantly, kid friendly! I took the car right after this picture for a road test. By road test, I mean I picked the kiddo up from YMCA camp and proceeded to pound 40 some odd miles on the car going up to the top of morrow mountain and back.
20190808_130946 by Michael Crawford, on Flickr20190808_131122 by Michael Crawford, on Flickr20190808_173855 by Michael Crawford, on Flickr20190808_173901 by Michael Crawford, on Flickrcalling that a MAJOR win. This is what I want to own, more or less. A torquey, good handling, neat looking drop top. This one is coming close to how I imagined the perfect miata.
Anyway, hot on the heels of this success, dad and I loaded up and went drag racing again. This time, I left the street tires on. Focused only on using all the track, shifting properly, and launching. Essentially the muscle memory of drag racing, with very limited variables. We only got three runs in. also, I had readjusted the shift light and tach to be visible, and they made me run with the top and windows up. My window switch died that night.
20190809_203731 by Michael Crawford, on Flickrlast run, it got hot enough to puke, and I lost steering. I honestly think part of the problem with the slicks that night was the quick release wheel coupler starting to loosen up. It came completely undone this time.
20190810_103013 by Michael Crawford, on Flickrdad and I counter drilled the set screw locations, so the set screws now thread into the steering shaft itself, cleaned everything, and broke out the good locktite. Dad then spent a few night putting a wrench on every single bolt in the entire car except bellhousing and flywheel, due to them not being accessible. He was able to get � turn out of some, none out of others, and generally checked all our work with a fresh set of eyes and a magnifying glass. Im grateful he did.
I went ahead and flushed the cooling system, getting all sorts of nasty crap out of it. Probably will need to be done again. I blame dexcool being the factory antifreeze in the rondevous the engine came out of.
Dad took my cardboard, duct tape, and sharpie spoiler setup, some scraps from a construction site down the road, and made the ginormous spoiler. Its actually a really well engineered piece, and only two holes were drilled in the car for nutserts in the rain gutter channel in the trunk. Whole goal was easy to mount at the autocross, easy to remove to drive home. We hit it. The aluminum tube was curved and found in the front yard of one of dustins neighbors, the wires and eyebolts were bought at ace hardware. The wires run through a couple small pieces of angle iron held down where the Frankenstein bolts would go.
20190815_190908 by Michael Crawford, on Flickr20190816_165544 by Michael Crawford, on FlickrI also got a 3 position toggle to replace the dead window switch. Because challenge budget, both windows now operate with one switch. So, up, down, or unequally in between are now the options. No picture, because it looked really hack, but needed done due to....
Screenshot_20190814-095914 by Michael Crawford, on Flickrgoing autocrossing!!!!!
had a two day event at zmax this past weekend. Ran in novice A, and sucked. But got faster with almost every run!
So, saturday morning, got through tech, pumped the spec miata slicks to 40psi, mounted the spoiler, and went to run.
20190817_084605 by Michael Crawford, on FlickrFirst three runs were rough. But the car felt more planted under throttle, and was definitely able to lay down the power in the long sweepers. Keeping a higher base fuel level made the hesitation/flat spot issues id had previously go away. I set the alignment to all the negative camber (2.5 degrees) front, 1/8 toe in, 1 degree negative with zero toe rear. Car was stiff with the spring rubbers, but not bouncy like we had feared. It honestly felt like I had no grip at all, but then I would overdrive and understeer. Left foot braking was much more predictable. Let an instructor take the car for a run with me riding along, and he beat me by 5 seconds. First time he ever sat in the car. So, I know the car has a lot more in it than I have as a driver. We later dropped tire pressure, and it made a difference in ultimate grip and balance. I did rip the passengers side side skirt off in the first run, so you'll see that in the videos. Videos, by the way, are courtesy of a father and his kids. Dads name was david howell. Nice family! On track pictures courtesy of luke woessner.
FB_IMG_1566137715251 by Michael Crawford, on FlickrFB_IMG_1566137768594 by Michael Crawford, on FlickrSunday, we tried removing the spoiler and playing with tire pressures. I also had another instructor run, with the top CSP miata driver that was there. He was insanely fast, and I almost hurled. Very rarely do I get motion sickness, but I did that time! Forget the guys name that did that run, but he gave me good feedback. The results of Sunday were that we know the spoiler is helping, however, its unbalancing the car. So we will cut it down to legal limit of 10 inches for XP (currently 19 inches tall). Toe out will be a big help in autocross, he recommended 1/8. he also mentioned that the slicks never really bit like they should. When he got out, he checked temps, which he said were fine, but the tires are rock hard. He recommended doping them for the challenge, and scrapping them form cheap r-comps afterwards. I need to learn about tire sauce. After the two days, I was incredibly sore on monday. In talking with dad, an old road racer, he said it was from trying to hold myself in on the stock seats. So we need to build a harness bar and put the butlerbuilt back in for autocross work.
Anyway, here are the autocross videos! Car is currently torn back apart for the last thrash before the challenge, where I hope to pull top 10 overall, and maybe win concourse. Maybe. Its kind of a pile. But dammit, its MY pile!
yall have a god weekend, and love your family.
Also, feedback is ALWAYS welcome. Especially if its on any of the lingering questions/suggestions/ideas/etc. I love community interaction with this stuff.
Reply
0
0
10-21-2019, 04:46 PM
#85
Junior Member
Thread Starter
Join Date: Nov 2017
Posts: 112
Total Cats: 7
so, its close enough to the challenge to let you all in on the last of it. The car is done and on the trailer, and has been done for a couple of weeks.
So, since the last update, we did a bunch.
First, I pulled the stock seats back out, then ripped out the entire interior and roll bar. Again.
For the roll bar, I welded a tube from side to side for shoulder strap harness bar. The tube was leftover from the stick that came with the spec miata roll bar stuff that I traded for the top and deuce. So budget free! Sprayed it in some leftover satin black paint, and put it in along with my butlerbuilt seat and 5 points. While I was at it, I re-dyed every single piece of the interior with duplicolor medium beige. Really turned out nice! I also painted the radio and shifter surrounds in gloss black for a higher class look.

20190831_204452 by Michael Crawford, on Flickr

20190919_121211 by Michael Crawford, on Flickr

20190919_121252 by Michael Crawford, on Flickr

20190822_172146 by Michael Crawford, on Flickr
while were talking mechanical, I took the spring rubbers out, and re-aligned it. Not really picture worthy. I also installed the nitrous, in the process repainting and re-looming the trunk. I integrated the wide open throttle switch in the linkage on the accelerator pedal that was used for cruise control. It bottoms out on a bolt on the firewall. Easy. I put the arming switch where the key for the airbag shutoff would go, with a warning light integrated there as well. The bottle heater is operated by the switch where the cigarette lighter should be. Solenoids were bolted to the passengers side head, and the nozzle in the exhaust tube splice. I went ahead and changed the red intake elbow for black while I was in there.

20190902_153544 by Michael Crawford, on Flickr

20190902_153732 by Michael Crawford, on Flickr

20190921_120941 by Michael Crawford, on Flickr
I took the car to my vinyl guy. We tried a bunch of different things out, and what we ultimately decided on was a few things, that all work together. Most obvious is the 20 inch diameter white door gumballs. They are sized such that the challenge number plate will fit entirely within the circle. We had the vinyl to do another gumball and a side stripe on the hood, but decided it was visually too much. We did use some scrap gray vinyl to wrap the way too shiny and sharp steering wheel. Solved the issues there. I traded a pair of BMW battery cables for the materials. Rear mounted battery in his truck, stickers on my car. Win win!
We then added some specific family decals. The front fenders are the insignia from grandfather crawfords 305th bomber group in WW2. On the back bumper is the insignia from grandfather tarasis 34th infantry division. If it weren't for these two men, and the lives they forged in ww2 and the years afterwards, I would not have the parents, and therefore life, that I have today. I'm proud of my heritage.
We rounded out the package with a flyin miata on the roll bar, bilstein/american powertrain on the air dam, and a hellbilly hotrods sticker. In addition, I cut down the mazda emblems and painted them black.

20190919_113614 by Michael Crawford, on Flickr

Screenshot_20190830-172501 by Michael Crawford, on Flickr

20190920_081833 by Michael Crawford, on Flickr

20190920_081855 by Michael Crawford, on Flickr
stuff that was done, but not photographed: radiator and fans sealed up better. All hardware underhood with matching levels of gold zinc. Overspray cleaned from everything. Tailpipe turned black. Scrubbing, polishing, etc. tons and tons of detail work that isn't in and of itself photographic, but makes a qualitative difference overall.
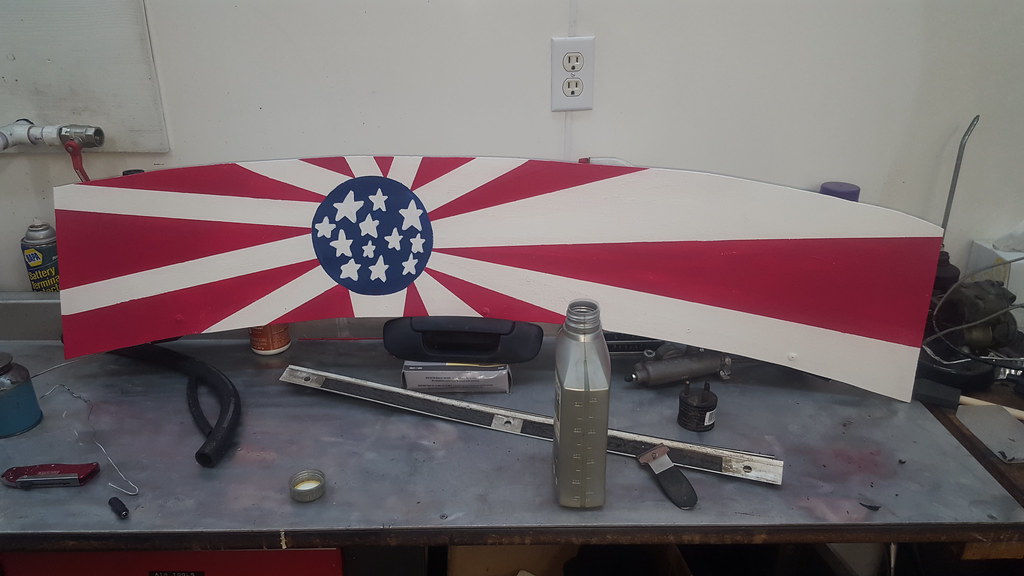
Anyway, the final details were aero. I built a splitter out of the cheapest � plywood I could find, and cut the barn door sized spoiler down to XP limits. In addition, I had brother dustins wife get artsy with it. I REALLY dig it. She nailed my vague idea.

20190922_133054 by Michael Crawford, on Flickr
20191005_083837 by Michael Crawford, on Flickr
and this is the final visual product. It will receive the GRM sticker package, and some custom cut name vinyl in gainseville. The silver wheels have been scrubbed spotless, and the tires doped with used paint thinner. Far softer than they were, so hopefully more grippy.
I will do a summary of the challenge after we get home. I will say that the competition will be stiff this year. Much stiffer than I ever expected. I am still hopeful for top 10, nut doubt I will be able to hit much higher. It will be a fun and challenging weekend, full of friends, family, and thrashing. Mom and dad are doing the concourse presentation, pro-driver timed autocross runs, and if we crack open the bottle my friend Patrick will take those drag passes. I know I sound like a slacker in having others do the skilled portions, but ive always been a builder. Im becoming much better at the practical use of the car via presentation and driving, but im not ready for the big show yet.

20191015_140124 by Michael Crawford, on Flickr
So, since the last update, we did a bunch.
First, I pulled the stock seats back out, then ripped out the entire interior and roll bar. Again.
For the roll bar, I welded a tube from side to side for shoulder strap harness bar. The tube was leftover from the stick that came with the spec miata roll bar stuff that I traded for the top and deuce. So budget free! Sprayed it in some leftover satin black paint, and put it in along with my butlerbuilt seat and 5 points. While I was at it, I re-dyed every single piece of the interior with duplicolor medium beige. Really turned out nice! I also painted the radio and shifter surrounds in gloss black for a higher class look.
20190831_204452 by Michael Crawford, on Flickr
20190919_121211 by Michael Crawford, on Flickr
20190919_121252 by Michael Crawford, on Flickr
20190822_172146 by Michael Crawford, on Flickr
while were talking mechanical, I took the spring rubbers out, and re-aligned it. Not really picture worthy. I also installed the nitrous, in the process repainting and re-looming the trunk. I integrated the wide open throttle switch in the linkage on the accelerator pedal that was used for cruise control. It bottoms out on a bolt on the firewall. Easy. I put the arming switch where the key for the airbag shutoff would go, with a warning light integrated there as well. The bottle heater is operated by the switch where the cigarette lighter should be. Solenoids were bolted to the passengers side head, and the nozzle in the exhaust tube splice. I went ahead and changed the red intake elbow for black while I was in there.
20190902_153544 by Michael Crawford, on Flickr
20190902_153732 by Michael Crawford, on Flickr
20190921_120941 by Michael Crawford, on Flickr
I took the car to my vinyl guy. We tried a bunch of different things out, and what we ultimately decided on was a few things, that all work together. Most obvious is the 20 inch diameter white door gumballs. They are sized such that the challenge number plate will fit entirely within the circle. We had the vinyl to do another gumball and a side stripe on the hood, but decided it was visually too much. We did use some scrap gray vinyl to wrap the way too shiny and sharp steering wheel. Solved the issues there. I traded a pair of BMW battery cables for the materials. Rear mounted battery in his truck, stickers on my car. Win win!
We then added some specific family decals. The front fenders are the insignia from grandfather crawfords 305th bomber group in WW2. On the back bumper is the insignia from grandfather tarasis 34th infantry division. If it weren't for these two men, and the lives they forged in ww2 and the years afterwards, I would not have the parents, and therefore life, that I have today. I'm proud of my heritage.
We rounded out the package with a flyin miata on the roll bar, bilstein/american powertrain on the air dam, and a hellbilly hotrods sticker. In addition, I cut down the mazda emblems and painted them black.
20190919_113614 by Michael Crawford, on Flickr
Screenshot_20190830-172501 by Michael Crawford, on Flickr
20190920_081833 by Michael Crawford, on Flickr
20190920_081855 by Michael Crawford, on Flickr
stuff that was done, but not photographed: radiator and fans sealed up better. All hardware underhood with matching levels of gold zinc. Overspray cleaned from everything. Tailpipe turned black. Scrubbing, polishing, etc. tons and tons of detail work that isn't in and of itself photographic, but makes a qualitative difference overall.
Anyway, the final details were aero. I built a splitter out of the cheapest � plywood I could find, and cut the barn door sized spoiler down to XP limits. In addition, I had brother dustins wife get artsy with it. I REALLY dig it. She nailed my vague idea.
20190922_133054 by Michael Crawford, on Flickr
20191005_083837 by Michael Crawford, on Flickr
and this is the final visual product. It will receive the GRM sticker package, and some custom cut name vinyl in gainseville. The silver wheels have been scrubbed spotless, and the tires doped with used paint thinner. Far softer than they were, so hopefully more grippy.
I will do a summary of the challenge after we get home. I will say that the competition will be stiff this year. Much stiffer than I ever expected. I am still hopeful for top 10, nut doubt I will be able to hit much higher. It will be a fun and challenging weekend, full of friends, family, and thrashing. Mom and dad are doing the concourse presentation, pro-driver timed autocross runs, and if we crack open the bottle my friend Patrick will take those drag passes. I know I sound like a slacker in having others do the skilled portions, but ive always been a builder. Im becoming much better at the practical use of the car via presentation and driving, but im not ready for the big show yet.
20191015_140124 by Michael Crawford, on Flickr
Reply
1
1
 10-22-2019, 04:27 PM
#87
Junior Member
Thread Starter
Join Date: Nov 2017
Posts: 112
Total Cats: 7
If you're bored at work (or home) friday and Saturday, grassroots motorsports usually live broadcasts the challenge on facebook/youtube/their website. So you can even watch instead of waiting for the summary post!
Reply
0
0
10-28-2019, 05:17 PM
#88
Junior Member
Thread Starter
Join Date: Nov 2017
Posts: 112
Total Cats: 7
2019 challenge summary
TL R broke it in autocross, broke it in drags, 9th overall.
So, im finally getting my brain wrapped around this years challenge adventure. Im happy where it wound up. 9th overall. That's lower than we expected, but the level of hardware this year was greater than ever before. If this was last year, it would have been an easy top 5 car, and possibly top 3. but it wasn't last year. It was this year. That being said, im VERY please how well we did, despite our issues.
We had the truck and trailer all loaded up before my last update. All we had to do was stuff our personal gear in the cab and go. We were supposed to leave at 5am Thursday morning.
Instead, Dallas called me at about noon on Wednesday, and told me he was done with work early, and to see if I wanted to cannonball all night so we would have all day Thursday to screw around in the parking lot of the host hotel with the parking lot build, and at stampies bar. If I was a wise man, I would have stuck to our plan.
Im not a wise man.
We finally left out about 9pm, headed for gainseville. Got some dennys at a horrible truck stop, and hit the hotel at about 4am thursday morning. Slept till 9.
we then hitthe parking lot. I spent almost all day in a camp chair talking with everyone. The car received an amazing amount of attention, and we never unloaded it from the trailer. Lots of positive feedback, fantastic food, great friends and fellowship. Oh, and a golf cart being lifted, a 4th gen camaro being lowered, and an e55AMG being nitrous'd. You know, normal parking lot stuff.
In the late afternoon, I hooked up with a gentleman known on the internet as MNDSM. Awesome guy. He once posted a picture of a bowling ball he drew a maze on, and I asked him if he could do the same to my helmet. He did! All freehand, just sitting in the parking lot drinking and jawing with everyone. I think I may have inspired a new business for him, as the line of helmets may attest. Supposedly the maze has a solution. My daughter has already started trying.

1571969931_img_20191024_174825_mmthumb by Michael Crawford, on Flickr

20191026_084217 by Michael Crawford, on Flickr
We got registered, applied all the decals to some magnetic sheet and the car, unloaded the parts for others, loaded the parts for me, and took a nap.
Friday morning, we met mom and dad, the camper, and all my rowdy friends at the track. Course was pretty big, but not as big as our local courses. Grid and paddock were FANTASTIC in the way they were laid out. Got through tech, course walks, and drivers meeting without issues.
My first run was a 49.xxx on the course, and I screwed it up pretty good. I know I left time out there. But, my goal was to warm the tires, and get the car ready to hand to Alan mccrispin, the pro-driver from the AMC build. He was able to squeeze a 46.064 out of it. FTD was set by a super high mileage Cadillac CTSV at 43.7, and the top five were all under 45 seconds on course. Not far off the pace, but we were having trouble with the car understeering no matter what we did. Ultimately, we figured out we were bottoming out the shocks, and that the car just does NOT have enough negative camber. Plans there are to find some used extended ball joints or offset LCA bushings, and make extended top hats for all 4 corners. However, all things considered we did fantastic! Here's a picture of Alan driving.

20191025_120752 by Michael Crawford, on Flickr
our major failures on the autocross were twofold. First, we blew out the front left metal brake line. Apparently we had nicked it when doing fab work, and never saw it. Either that or my wife wants the life insurance money for me.
It ruptured on Alan's first run, losing all brakes. We got it back to the pits, sent Dallas in the truck up to the parts store for a new line, and started to get it fixed. All told, we were off course for less than 45 minutes.
Old and busted

20191025_162545 by Michael Crawford, on Flickr
new hotness
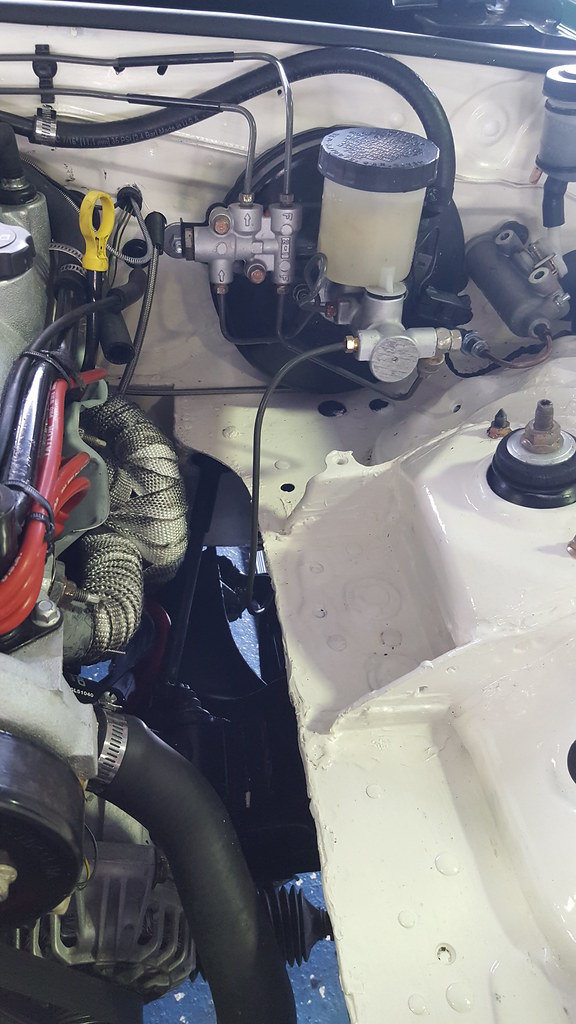
20191026_101407 by Michael Crawford, on Flickr
dallas took the car for about 8 fun runs after all the timed runs were done, eventually getting the car down to a 48.5 with him driving. He beat me in my own car. He sucks.
We then changed it to drag race setup. Pulled the spoiler, took the toe out out, put the drag slicks on, bolted the nitrous bottle in.

20191025_153642 by Michael Crawford, on Flickr
pulled up to the water box for an easy shakedown run. Experienced some NASTY wheelhop in the box, and aborted my burnout before I got smoke.
Lined up at the tree against the eventual overall winner, datsaniti. Brought the car to 4k, waited for the last yellow, and dumped the clutch. Car spun a little, and hooked. Buried the throttle, and heard some nasty noise from the rear suspension. Like the man I am, I ignored the hell out of it, and left my boot in it. Powershifted through 4th with some horrendous noise from the back. Very squirrelly. Very bad when I let off at the traps. Thought I was gonna meet Jesus there for a minute.

image000000 by Michael Crawford, on Flickr

IMG_20191025_181135 by Michael Crawford, on Flickr

IMG_20191025_181138 by Michael Crawford, on Flickr
got it pulled into the pits, and found that the rear diff was BROKE. Done. Kaput. Gave me the finger. Left the building. Quit the fight. Committed seppuku. My weekend was done.
Only time for the drags was a 15.17. had I made a pass like I did in testing, we would have been 7th or so. But im still ok with it.

20191028_150204 by Michael Crawford, on Flickr
we got it over to the pavilion for concourse. Loved peoples reactions as they walked by the “stock” appearing miata.....

20191026_101356 by Michael Crawford, on Flickr

20191026_101402 by Michael Crawford, on Flickr
20191026_102403 by Michael Crawford, on Flickr
got it loaded up after the concourse, hit the banquet, slept a few hours, and headed for home.

20191026_161904 by Michael Crawford, on Flickr
so, next steps.
TL
R broke it in autocross, broke it in drags, 9th overall.So, im finally getting my brain wrapped around this years challenge adventure. Im happy where it wound up. 9th overall. That's lower than we expected, but the level of hardware this year was greater than ever before. If this was last year, it would have been an easy top 5 car, and possibly top 3. but it wasn't last year. It was this year. That being said, im VERY please how well we did, despite our issues.
We had the truck and trailer all loaded up before my last update. All we had to do was stuff our personal gear in the cab and go. We were supposed to leave at 5am Thursday morning.
Instead, Dallas called me at about noon on Wednesday, and told me he was done with work early, and to see if I wanted to cannonball all night so we would have all day Thursday to screw around in the parking lot of the host hotel with the parking lot build, and at stampies bar. If I was a wise man, I would have stuck to our plan.
Im not a wise man.
We finally left out about 9pm, headed for gainseville. Got some dennys at a horrible truck stop, and hit the hotel at about 4am thursday morning. Slept till 9.
we then hitthe parking lot. I spent almost all day in a camp chair talking with everyone. The car received an amazing amount of attention, and we never unloaded it from the trailer. Lots of positive feedback, fantastic food, great friends and fellowship. Oh, and a golf cart being lifted, a 4th gen camaro being lowered, and an e55AMG being nitrous'd. You know, normal parking lot stuff.
In the late afternoon, I hooked up with a gentleman known on the internet as MNDSM. Awesome guy. He once posted a picture of a bowling ball he drew a maze on, and I asked him if he could do the same to my helmet. He did! All freehand, just sitting in the parking lot drinking and jawing with everyone. I think I may have inspired a new business for him, as the line of helmets may attest. Supposedly the maze has a solution. My daughter has already started trying.
1571969931_img_20191024_174825_mmthumb by Michael Crawford, on Flickr
20191026_084217 by Michael Crawford, on Flickr
We got registered, applied all the decals to some magnetic sheet and the car, unloaded the parts for others, loaded the parts for me, and took a nap.
Friday morning, we met mom and dad, the camper, and all my rowdy friends at the track. Course was pretty big, but not as big as our local courses. Grid and paddock were FANTASTIC in the way they were laid out. Got through tech, course walks, and drivers meeting without issues.
My first run was a 49.xxx on the course, and I screwed it up pretty good. I know I left time out there. But, my goal was to warm the tires, and get the car ready to hand to Alan mccrispin, the pro-driver from the AMC build. He was able to squeeze a 46.064 out of it. FTD was set by a super high mileage Cadillac CTSV at 43.7, and the top five were all under 45 seconds on course. Not far off the pace, but we were having trouble with the car understeering no matter what we did. Ultimately, we figured out we were bottoming out the shocks, and that the car just does NOT have enough negative camber. Plans there are to find some used extended ball joints or offset LCA bushings, and make extended top hats for all 4 corners. However, all things considered we did fantastic! Here's a picture of Alan driving.
20191025_120752 by Michael Crawford, on Flickr
our major failures on the autocross were twofold. First, we blew out the front left metal brake line. Apparently we had nicked it when doing fab work, and never saw it. Either that or my wife wants the life insurance money for me.
It ruptured on Alan's first run, losing all brakes. We got it back to the pits, sent Dallas in the truck up to the parts store for a new line, and started to get it fixed. All told, we were off course for less than 45 minutes.
Old and busted
20191025_162545 by Michael Crawford, on Flickr
new hotness
20191026_101407 by Michael Crawford, on Flickr
dallas took the car for about 8 fun runs after all the timed runs were done, eventually getting the car down to a 48.5 with him driving. He beat me in my own car. He sucks.
We then changed it to drag race setup. Pulled the spoiler, took the toe out out, put the drag slicks on, bolted the nitrous bottle in.
20191025_153642 by Michael Crawford, on Flickr
pulled up to the water box for an easy shakedown run. Experienced some NASTY wheelhop in the box, and aborted my burnout before I got smoke.
Lined up at the tree against the eventual overall winner, datsaniti. Brought the car to 4k, waited for the last yellow, and dumped the clutch. Car spun a little, and hooked. Buried the throttle, and heard some nasty noise from the rear suspension. Like the man I am, I ignored the hell out of it, and left my boot in it. Powershifted through 4th with some horrendous noise from the back. Very squirrelly. Very bad when I let off at the traps. Thought I was gonna meet Jesus there for a minute.
image000000 by Michael Crawford, on Flickr
IMG_20191025_181135 by Michael Crawford, on Flickr
IMG_20191025_181138 by Michael Crawford, on Flickr
got it pulled into the pits, and found that the rear diff was BROKE. Done. Kaput. Gave me the finger. Left the building. Quit the fight. Committed seppuku. My weekend was done.
Only time for the drags was a 15.17. had I made a pass like I did in testing, we would have been 7th or so. But im still ok with it.
20191028_150204 by Michael Crawford, on Flickr
we got it over to the pavilion for concourse. Loved peoples reactions as they walked by the “stock” appearing miata.....
20191026_101356 by Michael Crawford, on Flickr
20191026_101402 by Michael Crawford, on Flickr
20191026_102403 by Michael Crawford, on Flickr
got it loaded up after the concourse, hit the banquet, slept a few hours, and headed for home.
20191026_161904 by Michael Crawford, on Flickr
so, next steps.
- fix rearend
- fix oil leaks, and upgrade oiling system
- add seats and stereo.
- Paint black wheels silver, mount 200tw tires
- enjoy the fall
Reply
0
0
12-06-2019, 10:27 PM
#89
Junior Member
Thread Starter
Join Date: Nov 2017
Posts: 112
Total Cats: 7
pretty much gutted the works back down to miata and started over. Step one was adding way more sound deadening and insulation. No lie, this car melted brother Dustin sandal on a 45 minute street drive in July. I had wound up with some form of adhesive lined foam insulation, as well as a bit more f my favored reflectix. So, another full layer of the reflectix, followed by a layer of the foam stuff from cowl to gas tank cover. Seems to have made a significant difference in noise already, but cant comment on heat management as the thing hasn't run again yet.
 20191129_134204 by Michael Crawford, on Flickr
 20191129_122435 by Michael Crawford, on Flickr
 20191129_134151 by Michael Crawford, on Flickr
20191129_134204 by Michael Crawford, on Flickr20191129_122435 by Michael Crawford, on Flickr20191129_134151 by Michael Crawford, on Flickr
Reply
0
0
12-06-2019, 10:28 PM
#90
Junior Member
Thread Starter
Join Date: Nov 2017
Posts: 112
Total Cats: 7
I then spent 4 hours to hook up the heater core. Ultimately I cut the aluminum tubes to the core down, ran the rubber hose through grommets in the firewall, and hooked them up that way. There was just NOT enough room to do it otherwise. I almost gave up a couple of times thinking it was impossible. But, a couple of LS1 threads gave me different ideas, and here we are!
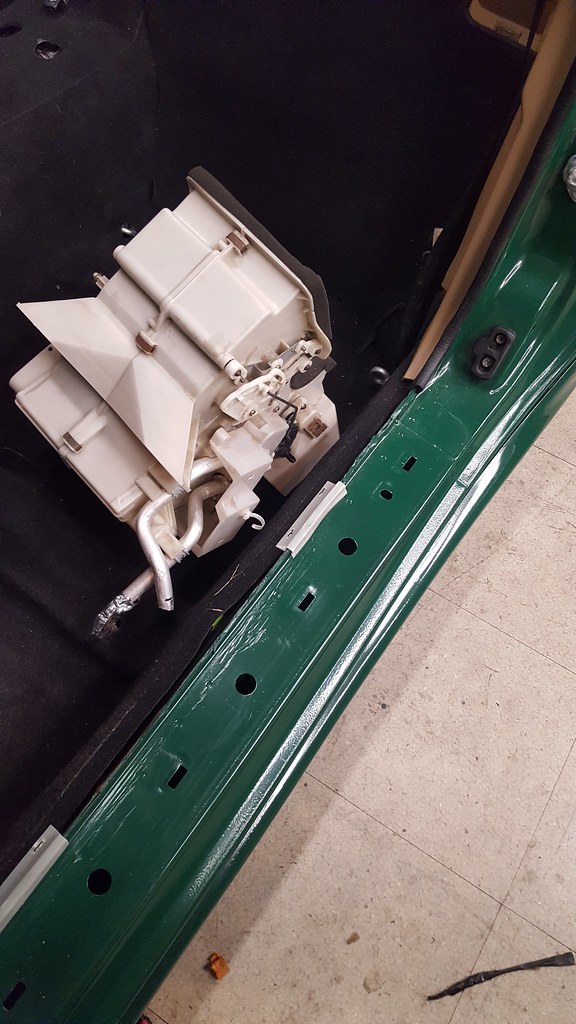 20191130_083837 by Michael Crawford, on Flickr
 20191130_094131 by Michael Crawford, on Flickr
 20191130_083827 by Michael Crawford, on Flickr
the rest of the HVAC firewall boxes went in like stock. And speaking of stock, the shifter I had made a dogleg in was always a little too far back and angled slightly funny. I know I fixed the too far back, and it seems the angled funny as well, but time will tell. Just a few minutes with a welder, and bobs your uncle!
 20191129_134208 by Michael Crawford, on Flickr
I then went after the wiring. All of it. Every stitch. That's a whole lotta boring there. So I will spare you the hours of tedium and mild insanity. At the end of the day, we added a stereo, created circuits to fire the aftermarket ac setup with the miata switches, relocated fan override switches, added warning lights for water temp and oil pressure, installed a hidden antenna, added a shift light, etc. lots of stuff, and its all done properly with crimps, adhesive heat shrink, relays, fuses, etc. put the replacement, undamaged dash in while I was at it as well.
 20191130_202352 by Michael Crawford, on Flickr
 20191130_110129 by Michael Crawford, on Flickr
 20191202_082758 by Michael Crawford, on Flickr
 20191203_171448 by Michael Crawford, on Flickr
 20191205_170839 by Michael Crawford, on Flickr
 20191206_105359 by Michael Crawford, on Flickr
 20191205_181058 by Michael Crawford, on Flickr
 20191206_190625 by Michael Crawford, on Flickr
underhood, I took the factory miata aluminum ac lines, a propane torch, and patience. Re-bent them to fit the new layout of things and added the proper fittings for the 508. still need to clamp the fittings and charge the system.
 20191204_160757 by Michael Crawford, on Flickr
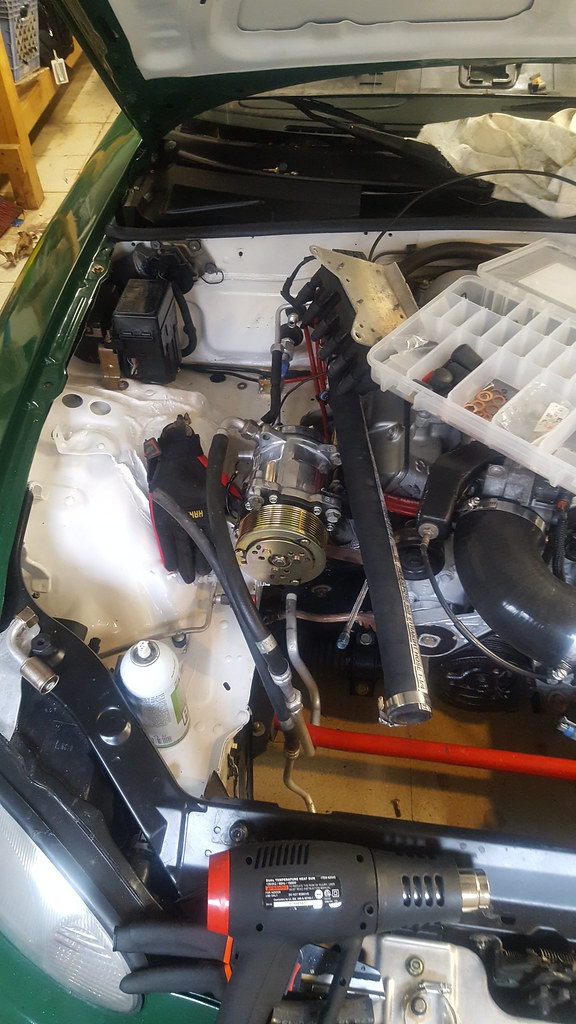 20191206_105416 by Michael Crawford, on Flickr
painting the ac compressor mount parts
 20191206_175359 by Michael Crawford, on Flickr
mounted the warning for water temp in the factory bleed hole at water pump outlet
 20191206_182558 by Michael Crawford, on Flickr
and lastly, started on the remote thermostat housing. Its a pair of mopar magnum 5.2 housings welded to 1 inch electrical conduit. At the mating point, the 185 thermostat is placed in between a sandwich of housing-gasket-spacer/thermostat-gasket-housing. I think this will work. Hopefully. Spacer is essentially a gasket traced onto 1/8 aluminum and cut out.
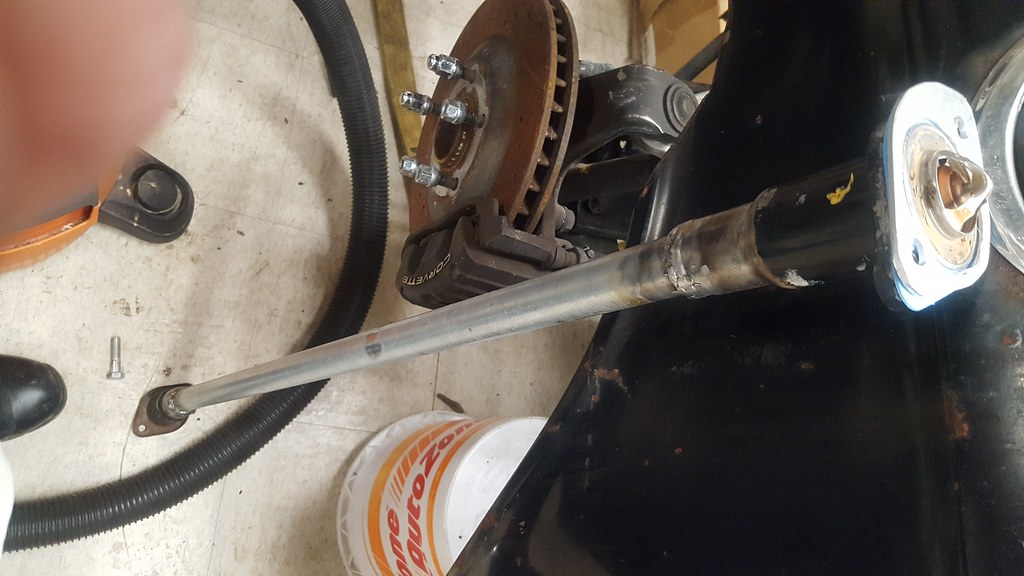 20191206_184245 by Michael Crawford, on Flickr
 20191206_184942 by Michael Crawford, on Flickr
20191130_083837 by Michael Crawford, on Flickr20191130_094131 by Michael Crawford, on Flickr20191130_083827 by Michael Crawford, on Flickrthe rest of the HVAC firewall boxes went in like stock. And speaking of stock, the shifter I had made a dogleg in was always a little too far back and angled slightly funny. I know I fixed the too far back, and it seems the angled funny as well, but time will tell. Just a few minutes with a welder, and bobs your uncle!
20191129_134208 by Michael Crawford, on FlickrI then went after the wiring. All of it. Every stitch. That's a whole lotta boring there. So I will spare you the hours of tedium and mild insanity. At the end of the day, we added a stereo, created circuits to fire the aftermarket ac setup with the miata switches, relocated fan override switches, added warning lights for water temp and oil pressure, installed a hidden antenna, added a shift light, etc. lots of stuff, and its all done properly with crimps, adhesive heat shrink, relays, fuses, etc. put the replacement, undamaged dash in while I was at it as well.
20191130_202352 by Michael Crawford, on Flickr20191130_110129 by Michael Crawford, on Flickr20191202_082758 by Michael Crawford, on Flickr20191203_171448 by Michael Crawford, on Flickr20191205_170839 by Michael Crawford, on Flickr20191206_105359 by Michael Crawford, on Flickr20191205_181058 by Michael Crawford, on Flickr20191206_190625 by Michael Crawford, on Flickrunderhood, I took the factory miata aluminum ac lines, a propane torch, and patience. Re-bent them to fit the new layout of things and added the proper fittings for the 508. still need to clamp the fittings and charge the system.
20191204_160757 by Michael Crawford, on Flickr20191206_105416 by Michael Crawford, on Flickrpainting the ac compressor mount parts
20191206_175359 by Michael Crawford, on Flickrmounted the warning for water temp in the factory bleed hole at water pump outlet
20191206_182558 by Michael Crawford, on Flickrand lastly, started on the remote thermostat housing. Its a pair of mopar magnum 5.2 housings welded to 1 inch electrical conduit. At the mating point, the 185 thermostat is placed in between a sandwich of housing-gasket-spacer/thermostat-gasket-housing. I think this will work. Hopefully. Spacer is essentially a gasket traced onto 1/8 aluminum and cut out.
20191206_184245 by Michael Crawford, on Flickr20191206_184942 by Michael Crawford, on Flickr
Reply
0
0
12-27-2019, 05:28 PM
#91
Junior Member
Thread Starter
Join Date: Nov 2017
Posts: 112
Total Cats: 7
Old money: 2526.08
new money:
inner fenders: 20
new total: 2546.08
we covered a lot of work last time, and had no payoff posted. I aim to fix that.
So, I buttoned up the interior, creating a harness for the NA headrest speakers, installing the shift light and rear view mirror, debugging everything, etc. very happy with how it all turned out, and the new autometers are NICE to look at and work with. The relocated shift light is very visible, and actually accurate this time. I also scrapped the thermostat plan. Unfortunately, the just isn't ROOM for it. Would have worked fine, but just no space. I also finished relocating the air filter, and plumbing the AC system. Need to get fittings pressed on, as the clamp on style are leaking. Also need to get the correct size belt.
 20191206_190035 by Michael Crawford, on Flickr
 20191206_190041 by Michael Crawford, on Flickr
20191206_190625 by Michael Crawford, on Flickr
 20191226_131741 by Michael Crawford, on Flickr
 20191227_162507 by Michael Crawford, on Flickr
 20191227_162522 by Michael Crawford, on Flickr
next up was finally fixing the broken diff. I didn't want to, and put it off as long as possible. The job wasn't fun, but wasn't hard.
First, assume the position!
 20191208_090221 by Michael Crawford, on Flickr
once I got the onld on out and on the bench, I found rust, pitting, gear wear, etc inside the case. It also appears to have been half full of water still judging by the color of the gear oil I drained out. No lie, I never even checked fluid level since ive owned this diff.....
 20191208_155920 by Michael Crawford, on Flickr
 20191208_192804 by Michael Crawford, on Flickr
 20191208_192811 by Michael Crawford, on Flickr
but its in. its noisy now, and im not sure if its just because I can hear it, if its actually louder, or if its due to delrin bushings. Regardless, its what I have. Id LOVE the 3.6 gears, but not for 1k. Or even 500. just not worth it to me. So for now, the 4.11 is back in and im calling it done.
 20191209_190607 by Michael Crawford, on Flickr
went ahead and finally installed the front inner fenders
 20191210_181436 by Michael Crawford, on Flickr
fixed the top weatherstripping, installed the splitter again, and test fit a potential spoiler option (it was free. Duct taped to the decklid. Appears to be the ebay $85 special. Im still torn on the looks.), then proceeded to beat on it for 75 miles, fix a few gremlins in the wiring that cropped up, and beat it some more!
 20191220_110313 by Michael Crawford, on Flickr
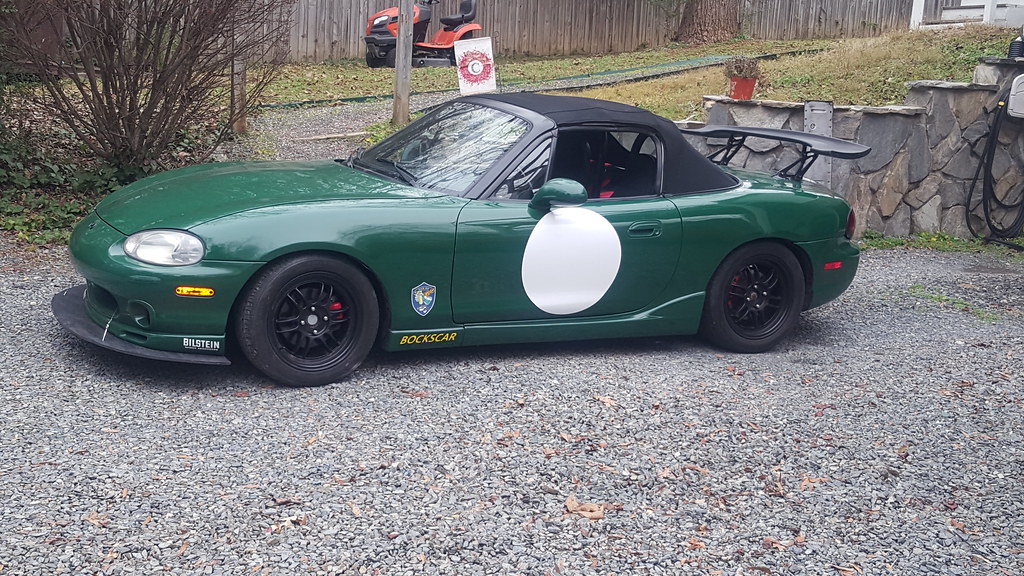 20191221_083200 by Michael Crawford, on Flickr
ive started mapping out next season of local autocross. My wheels are 15x7, and im currently debating 205/50/15 or 225/45/15 federal rs-rr for the next year. Either way, ill be ordering next month.
Also on the to do list is the oiling system upgrades (pan still isn't done), 3500 top swap with a bigger throttle body, and install my Christmas present from my wife: sierra auto tops seat covers
20191226_131741 by Michael Crawford, on Flickr
new money:
inner fenders: 20
new total: 2546.08
we covered a lot of work last time, and had no payoff posted. I aim to fix that.
So, I buttoned up the interior, creating a harness for the NA headrest speakers, installing the shift light and rear view mirror, debugging everything, etc. very happy with how it all turned out, and the new autometers are NICE to look at and work with. The relocated shift light is very visible, and actually accurate this time. I also scrapped the thermostat plan. Unfortunately, the just isn't ROOM for it. Would have worked fine, but just no space. I also finished relocating the air filter, and plumbing the AC system. Need to get fittings pressed on, as the clamp on style are leaking. Also need to get the correct size belt.
20191206_190035 by Michael Crawford, on Flickr20191206_190041 by Michael Crawford, on Flickr20191206_190625 by Michael Crawford, on Flickr20191226_131741 by Michael Crawford, on Flickr20191227_162507 by Michael Crawford, on Flickr20191227_162522 by Michael Crawford, on Flickrnext up was finally fixing the broken diff. I didn't want to, and put it off as long as possible. The job wasn't fun, but wasn't hard.
First, assume the position!
20191208_090221 by Michael Crawford, on Flickronce I got the onld on out and on the bench, I found rust, pitting, gear wear, etc inside the case. It also appears to have been half full of water still judging by the color of the gear oil I drained out. No lie, I never even checked fluid level since ive owned this diff.....
20191208_155920 by Michael Crawford, on Flickr20191208_192804 by Michael Crawford, on Flickr20191208_192811 by Michael Crawford, on Flickrbut its in. its noisy now, and im not sure if its just because I can hear it, if its actually louder, or if its due to delrin bushings. Regardless, its what I have. Id LOVE the 3.6 gears, but not for 1k. Or even 500. just not worth it to me. So for now, the 4.11 is back in and im calling it done.
20191209_190607 by Michael Crawford, on Flickrwent ahead and finally installed the front inner fenders
20191210_181436 by Michael Crawford, on Flickrfixed the top weatherstripping, installed the splitter again, and test fit a potential spoiler option (it was free. Duct taped to the decklid. Appears to be the ebay $85 special. Im still torn on the looks.), then proceeded to beat on it for 75 miles, fix a few gremlins in the wiring that cropped up, and beat it some more!
20191220_110313 by Michael Crawford, on Flickr20191221_083200 by Michael Crawford, on Flickrive started mapping out next season of local autocross. My wheels are 15x7, and im currently debating 205/50/15 or 225/45/15 federal rs-rr for the next year. Either way, ill be ordering next month.
Also on the to do list is the oiling system upgrades (pan still isn't done), 3500 top swap with a bigger throttle body, and install my Christmas present from my wife: sierra auto tops seat covers
20191226_131741 by Michael Crawford, on Flickr
Reply
0
0

Thread
Thread Starter
Forum
Replies
Last Post
Masonis1
General Miata Chat
37
08-02-2019 02:08 PM


