
93' Miata stolen and flipped build thread


You know, we should have a Jeffbucc Bakery thread where he shows us the cool things he bakes. Only having a Miata thread is not enough.
Jeff, when are you going to venture into donuts?
Jeff, when are you going to venture into donuts?
Reply
 0
0

0


Elite Member
Joined: Oct 2013
Posts: 2,764
Total Cats: 951
From: Cedar City, UT
Not going to venture into donuts, too much on my plate as is, and I don't have near enough physical space to have a commercial donut machine in the store(2k square feet).
In other news, my tuner is only in Vegas tomorrow then he goes to CO for a couple weeks, so I need to get everything ready before tomorrow if I want it tuned ASAP. Luckily my injector seals just showed up, so I can start buttoning things up.
Reply
0
0

Elite Member
Joined: Oct 2013
Posts: 2,764
Total Cats: 951
From: Cedar City, UT
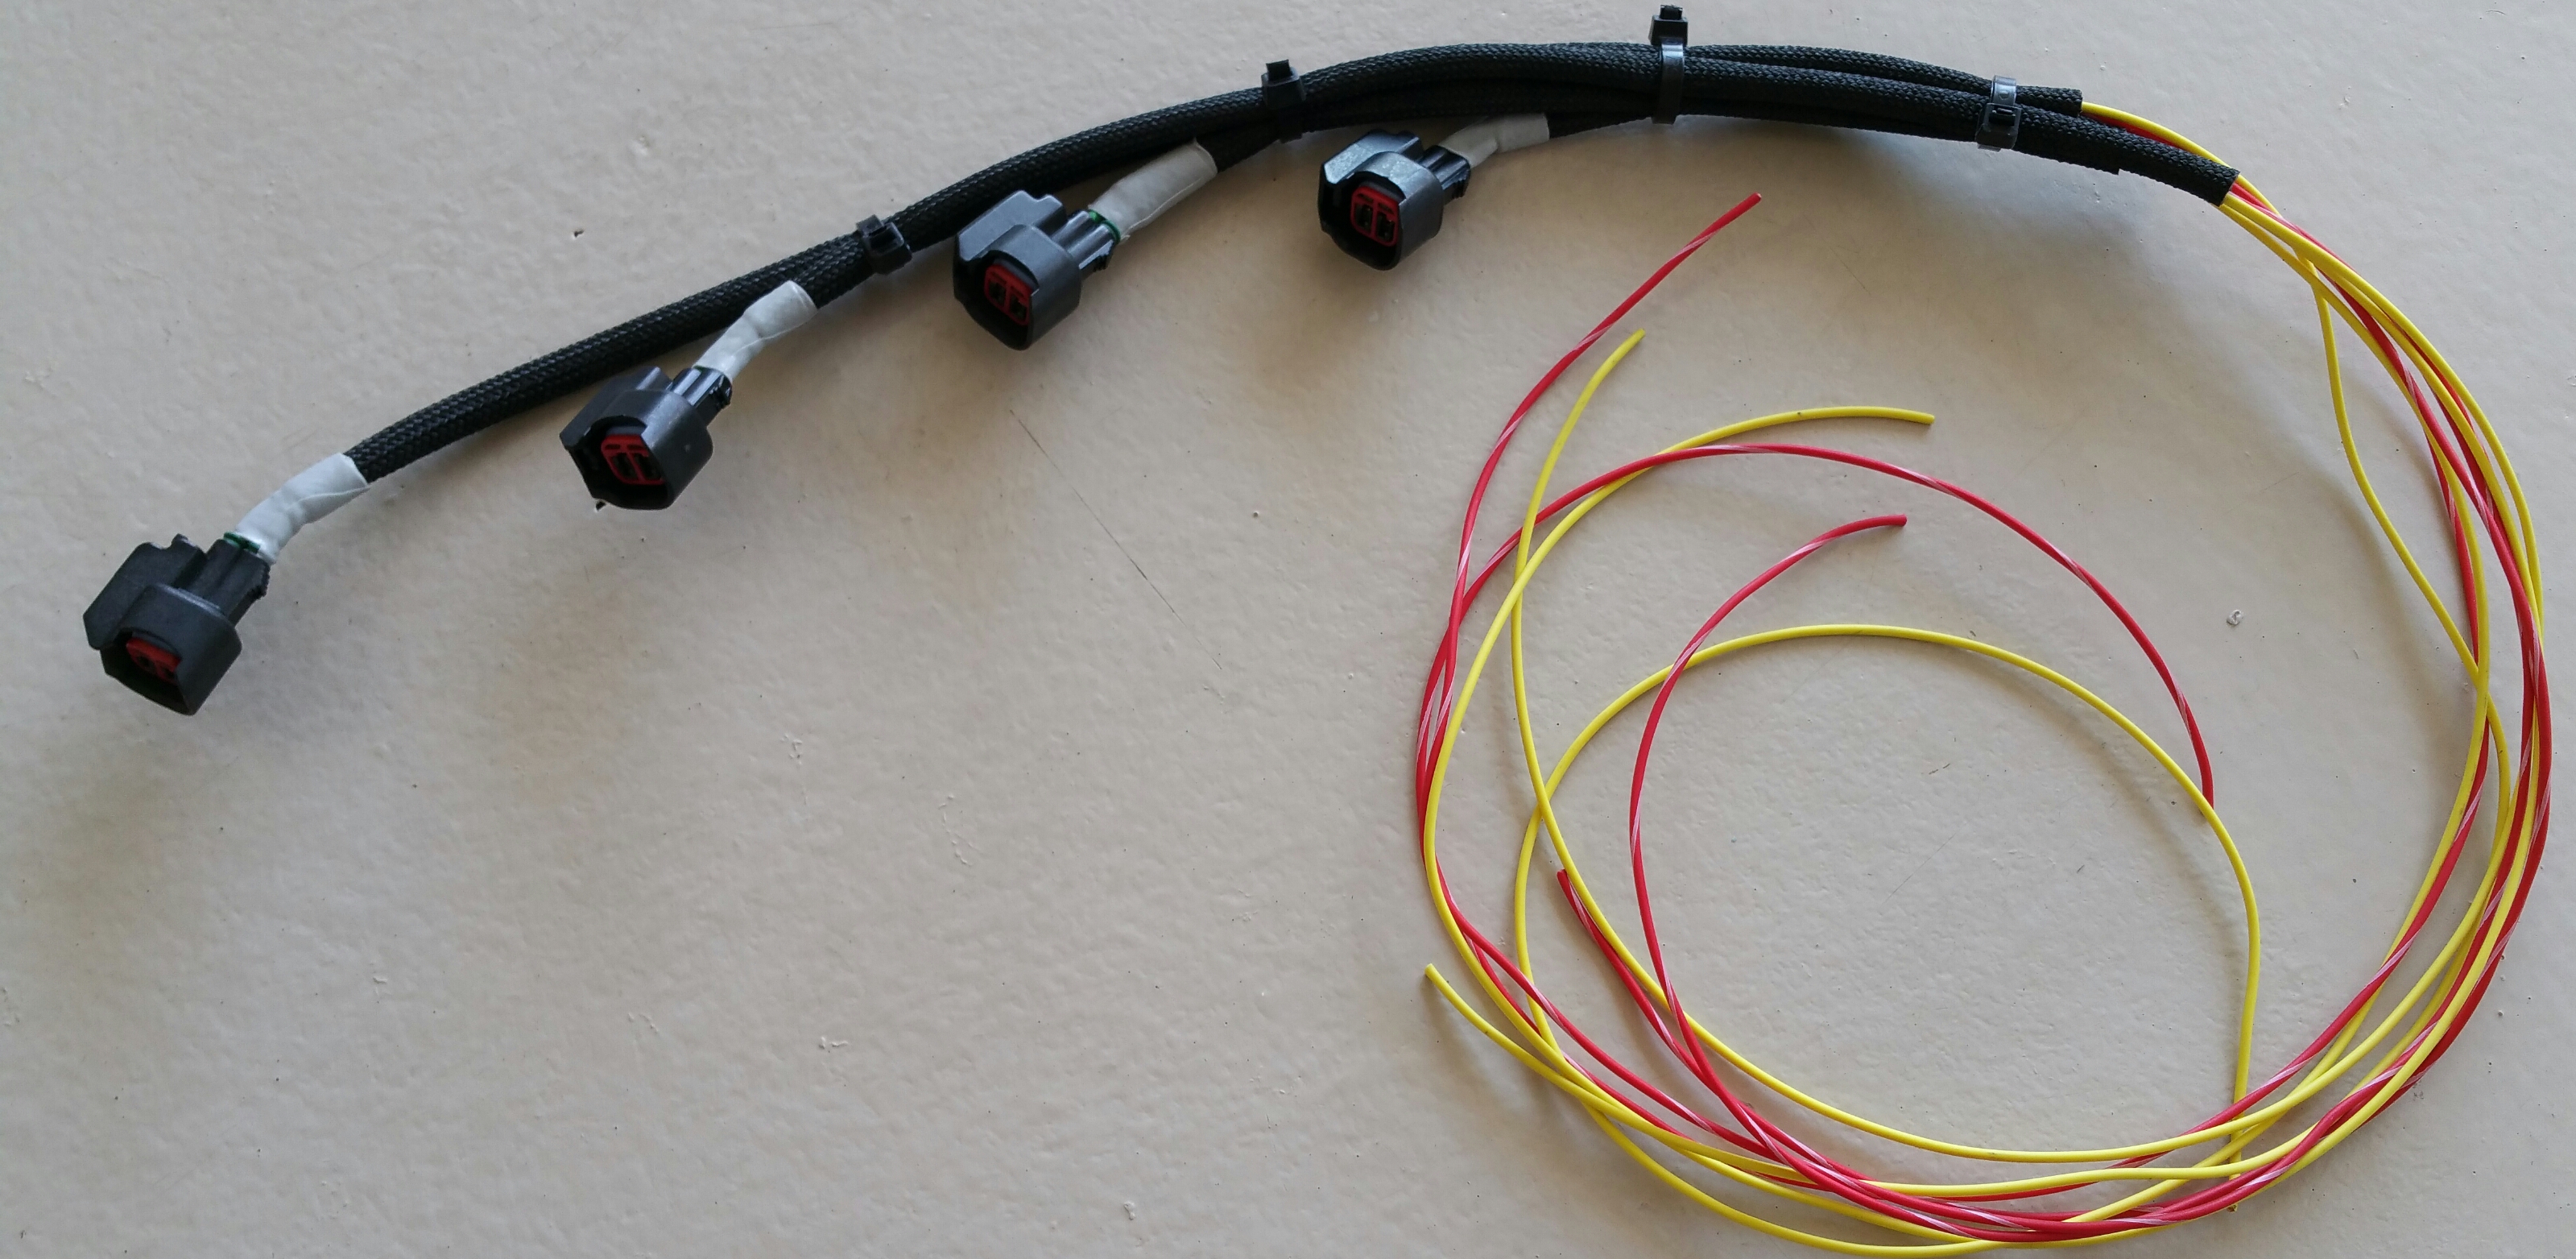
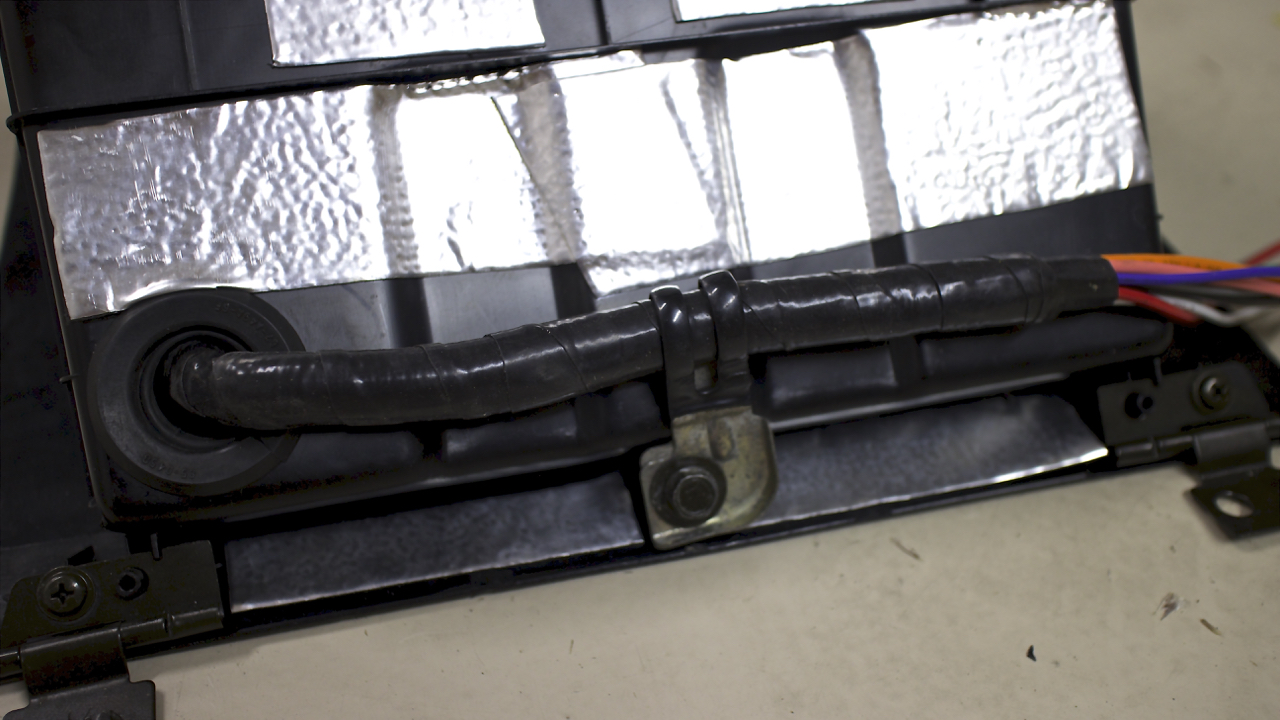
Finished up my injector harness. Took the pins out so I could slide on the high heat wrap(it isn't split) over the wires and used the ultra sticky grey tape to seal it all up. I'm pretty proud of this one, looks great!

Reply
2
2
Elite Member
Joined: Oct 2013
Posts: 2,764
Total Cats: 951
From: Cedar City, UT
Reply
0
0
Elite Member
Joined: Oct 2013
Posts: 2,764
Total Cats: 951
From: Cedar City, UT
Sobbing quietly
Only things left:
Install Meth tank and pump
Change oil
Hope to god it starts
Burp Radiator
Undertray
No idea if I wired the crank sensor correctly or not, Leaving it off until I get to Vegas for the tuner to mess with it.

Only things left:
Install Meth tank and pump
Change oil
Hope to god it starts
Burp Radiator
Undertray
No idea if I wired the crank sensor correctly or not, Leaving it off until I get to Vegas for the tuner to mess with it.
Reply
0
0

Newb
Joined: Oct 2013
Posts: 27
Total Cats: 4
From: Utah
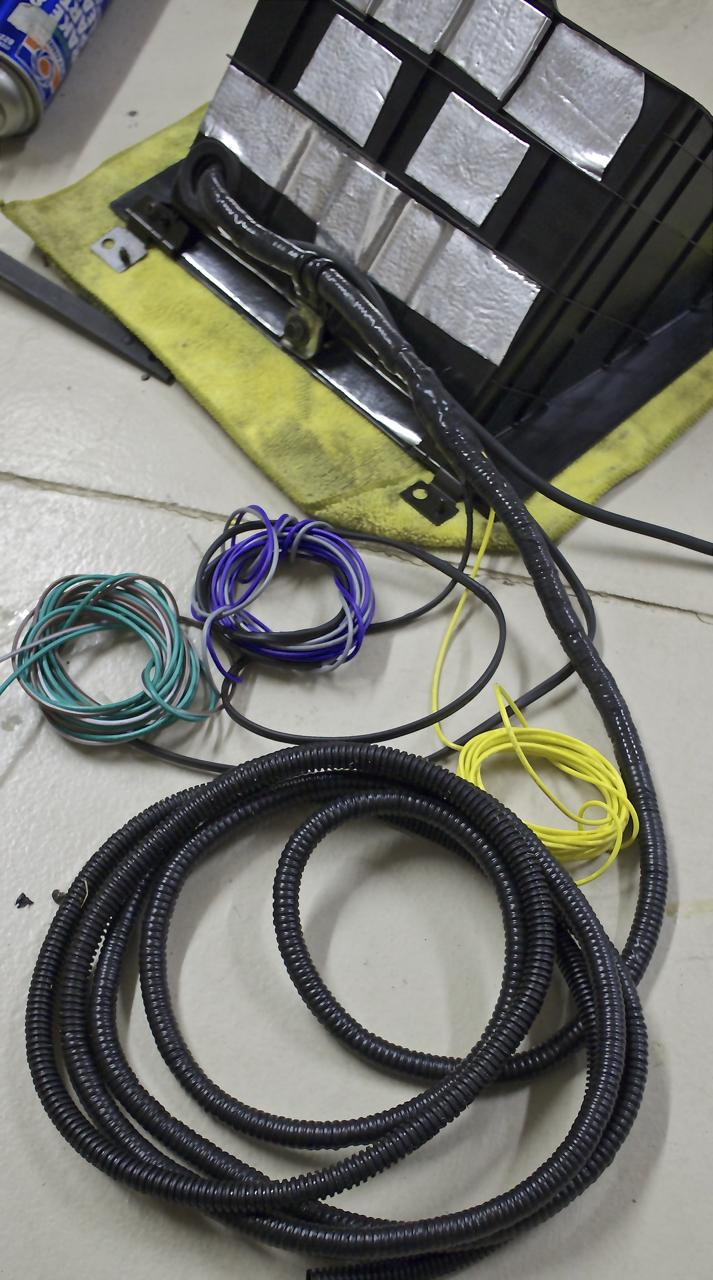
Third time's the charm on the Injector harness. Messed up each runner length last time and had a lot of bunched up wire that was bound to fail at some point. Also, it is my mission to get rid of all the home depot 16g wire I used. Bulky stuff and comparing wire sheaths, the MXL is leaps and bounds better quality.
Also love this vulcanized high temp sheathing I've had sitting around forever. Get a sharp knife to cut it otherwise it is a pain.
Still need to crimp the OEM Miata plugs into it to tie it into the factory harness but it is 115� in the garage!
Also love this vulcanized high temp sheathing I've had sitting around forever. Get a sharp knife to cut it otherwise it is a pain.
Still need to crimp the OEM Miata plugs into it to tie it into the factory harness but it is 115� in the garage!
Brands of:
Sheathing
Friction tape
wiring
etc
etc
etc
Thanks brother.
Reply
0
0
Elite Member
Joined: Oct 2013
Posts: 2,764
Total Cats: 951
From: Cedar City, UT
Insultherm High-Temp 1/4" & 3/8" wrap
Uninsulated 18g crimp splices
Self adhesive rubber tape(3M)
Milspec 18g wire(TXL)
1/4 & 3/8 shrink wrap
Reused the pins after pulling them from the connectors.
Nothing pricy or hard to get but it certainly makes it easy.
Uninsulated 18g crimp splices
Self adhesive rubber tape(3M)
Milspec 18g wire(TXL)
1/4 & 3/8 shrink wrap
Reused the pins after pulling them from the connectors.
Nothing pricy or hard to get but it certainly makes it easy.
Reply
0
0
Elite Member
Joined: Oct 2013
Posts: 2,764
Total Cats: 951
From: Cedar City, UT
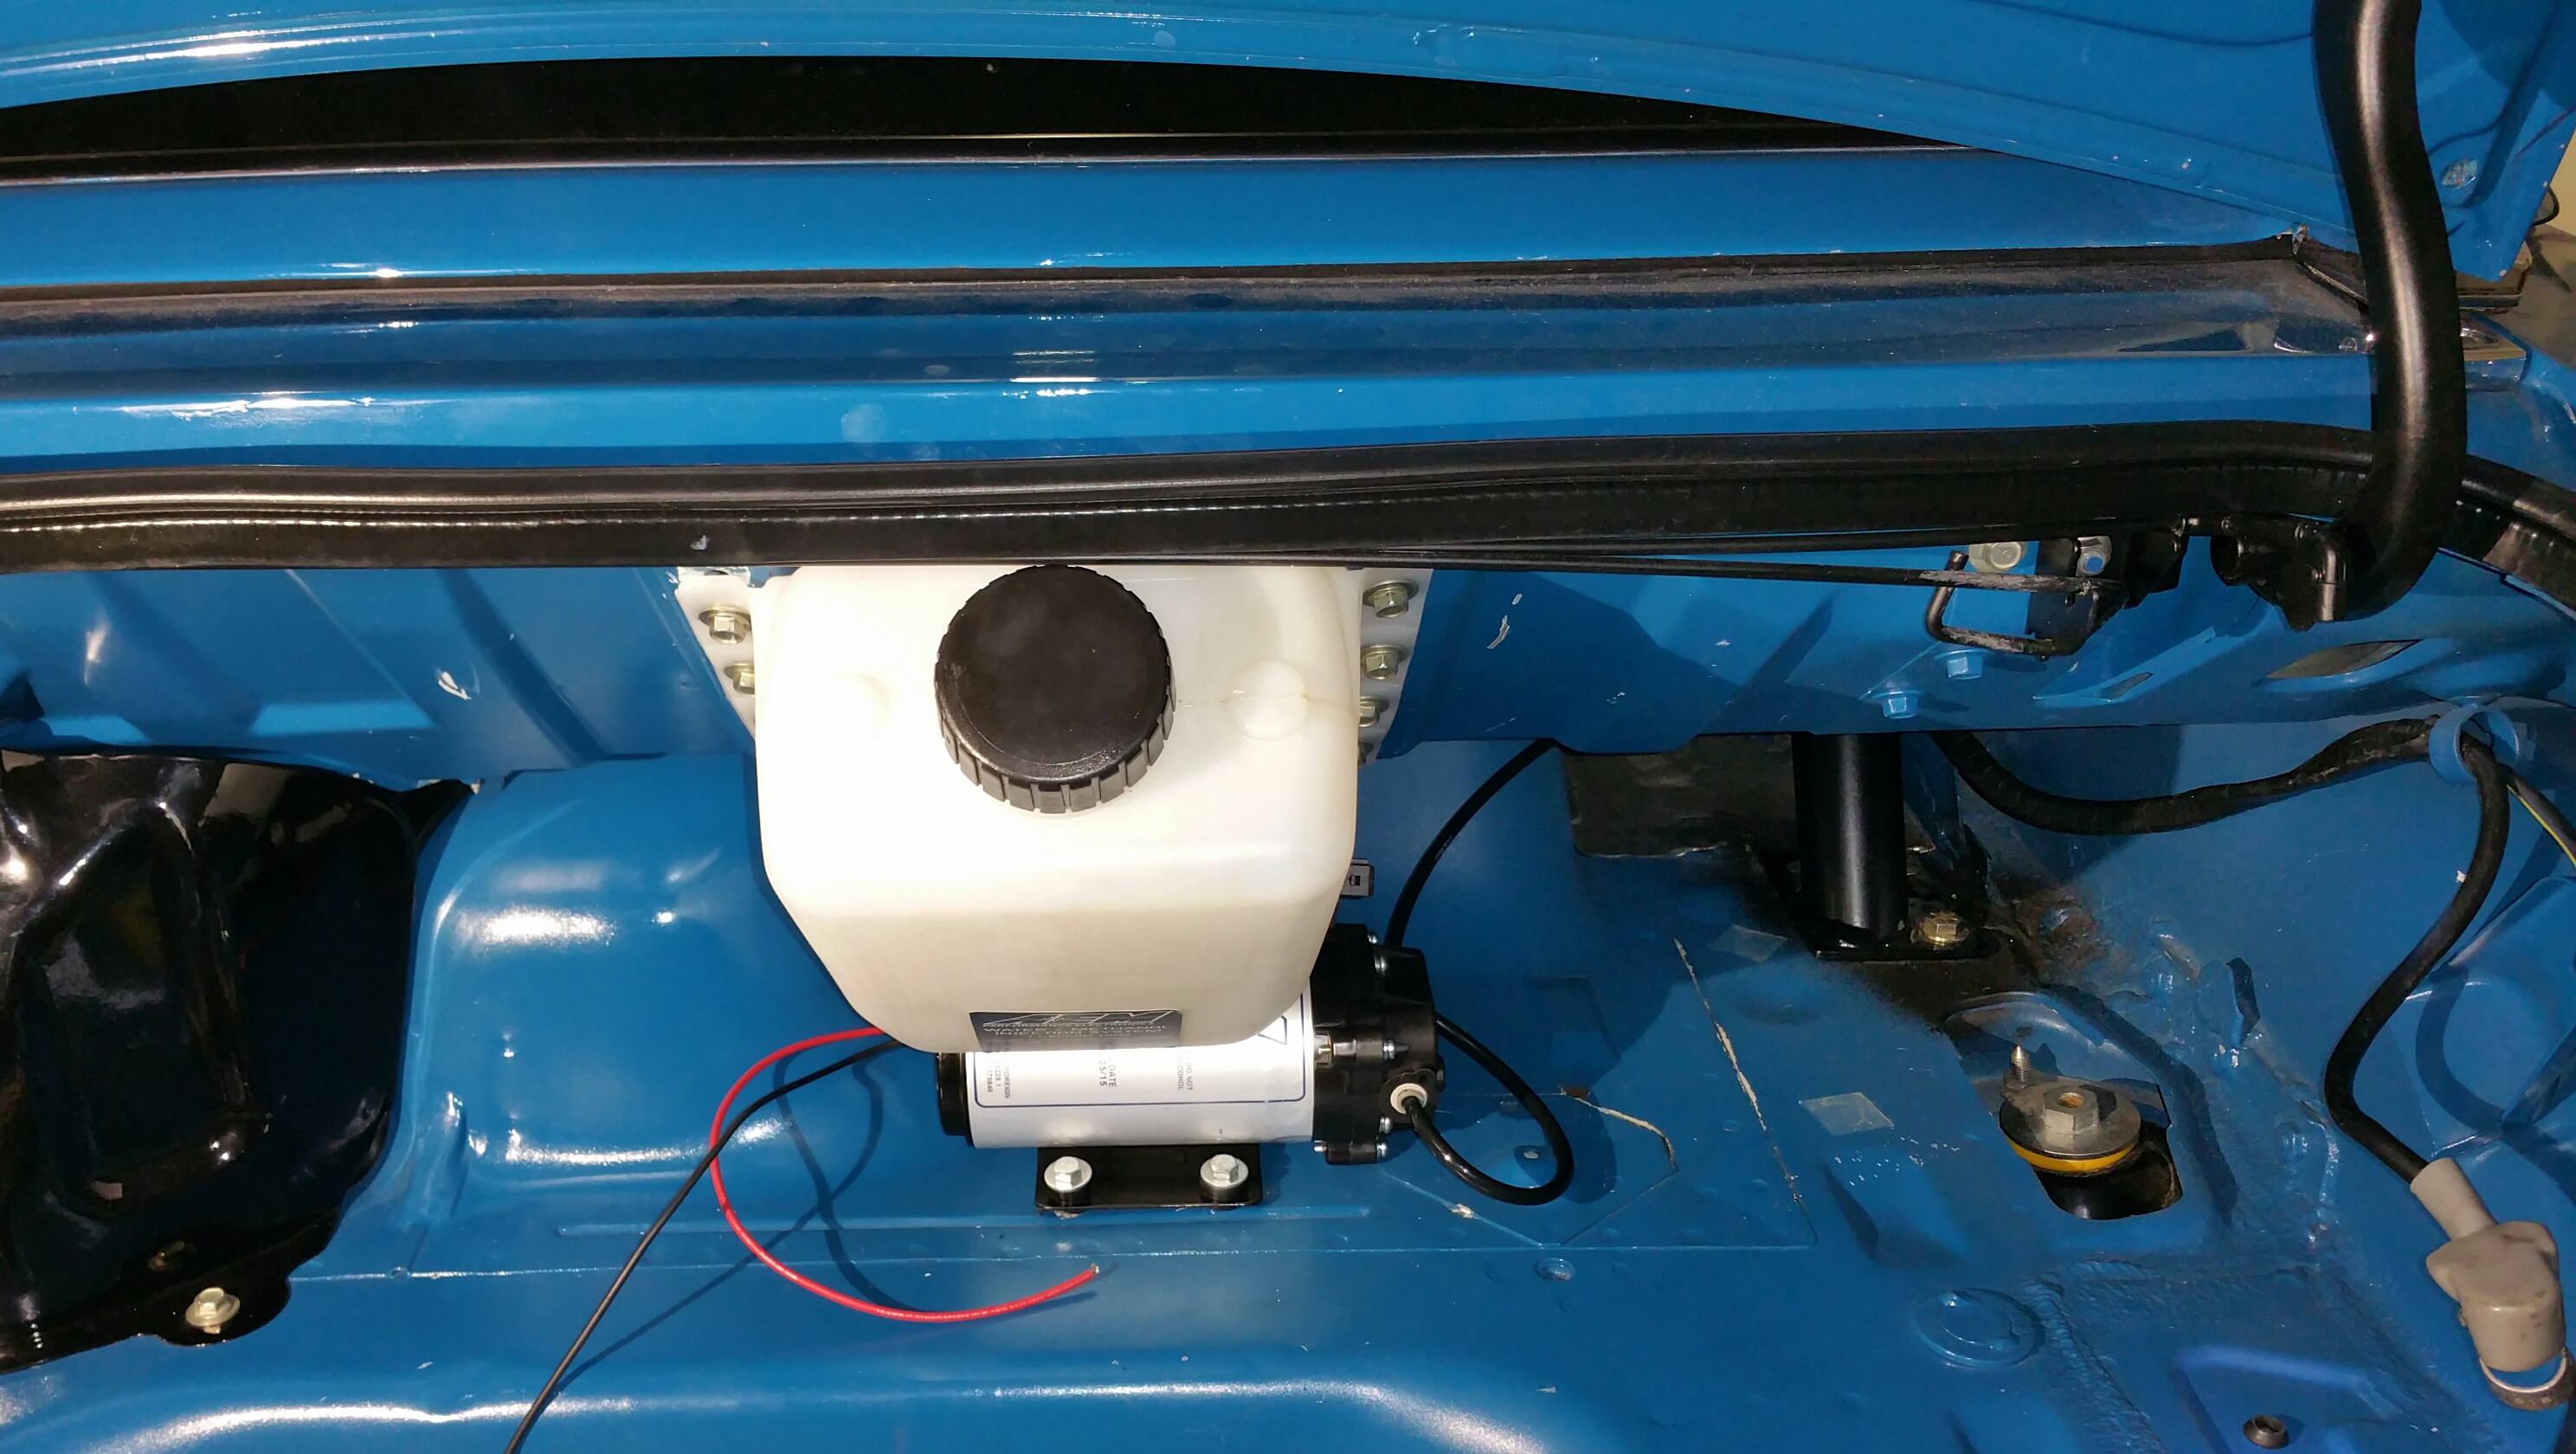
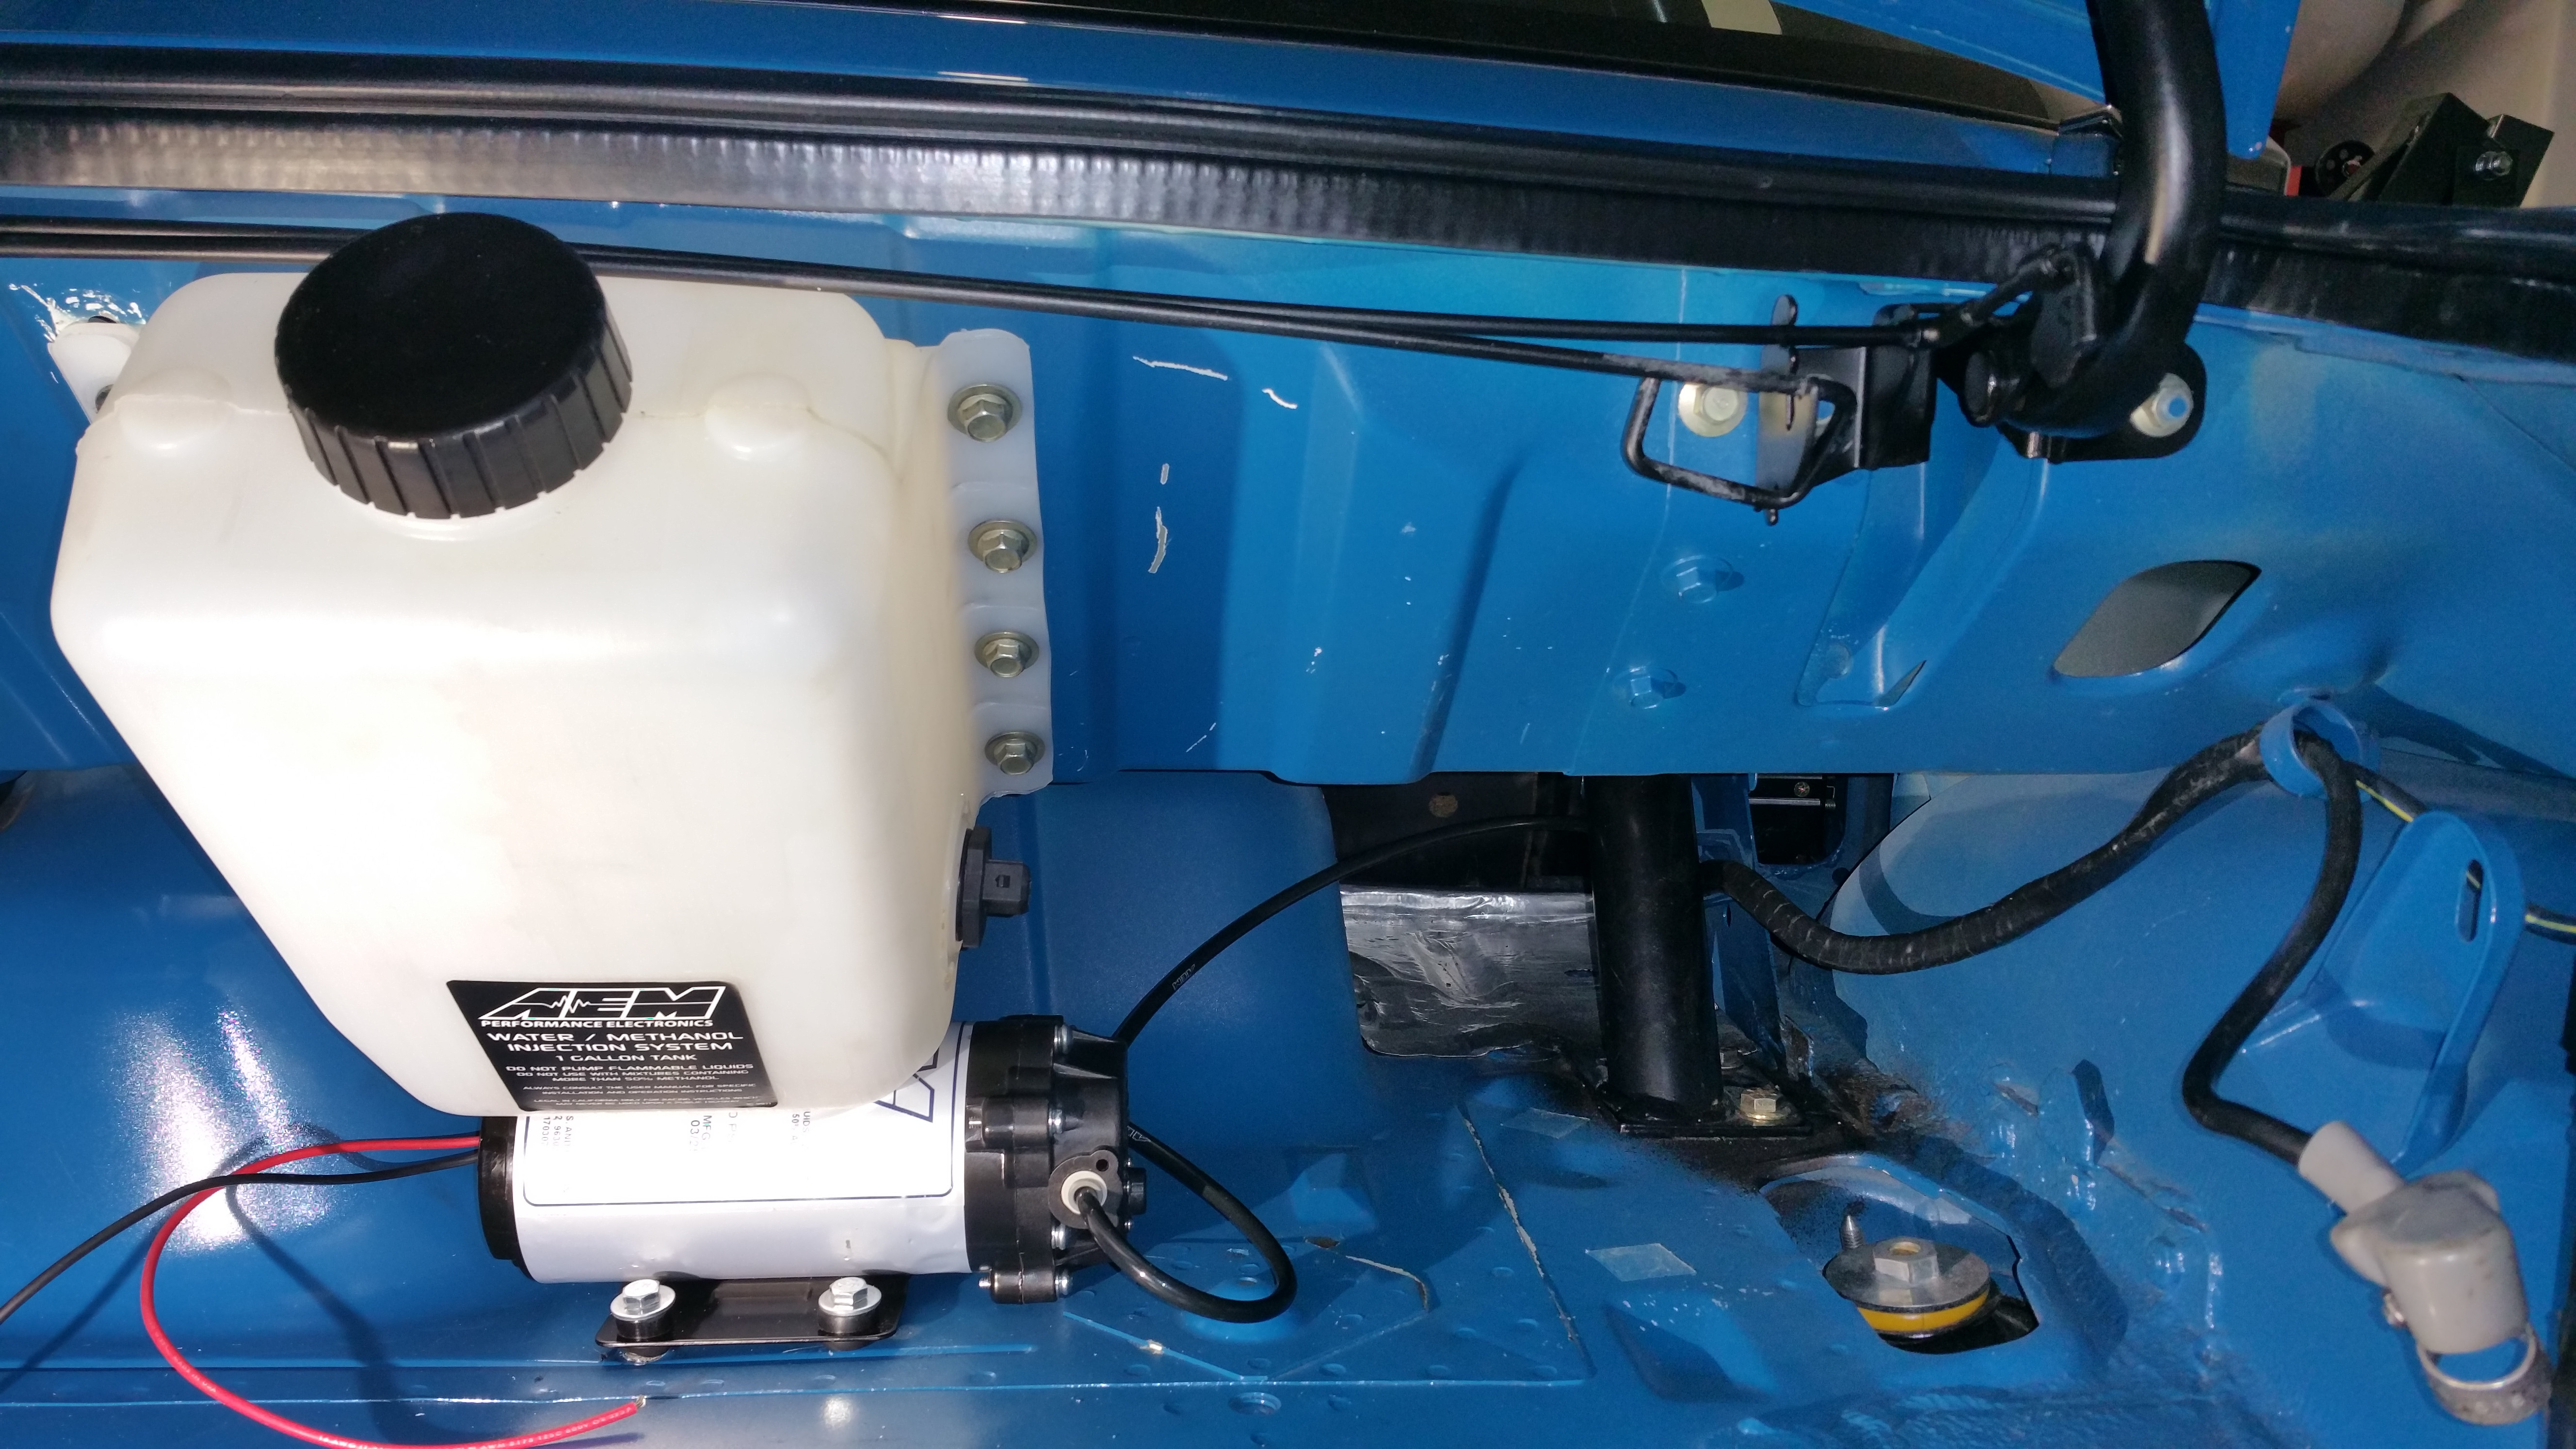
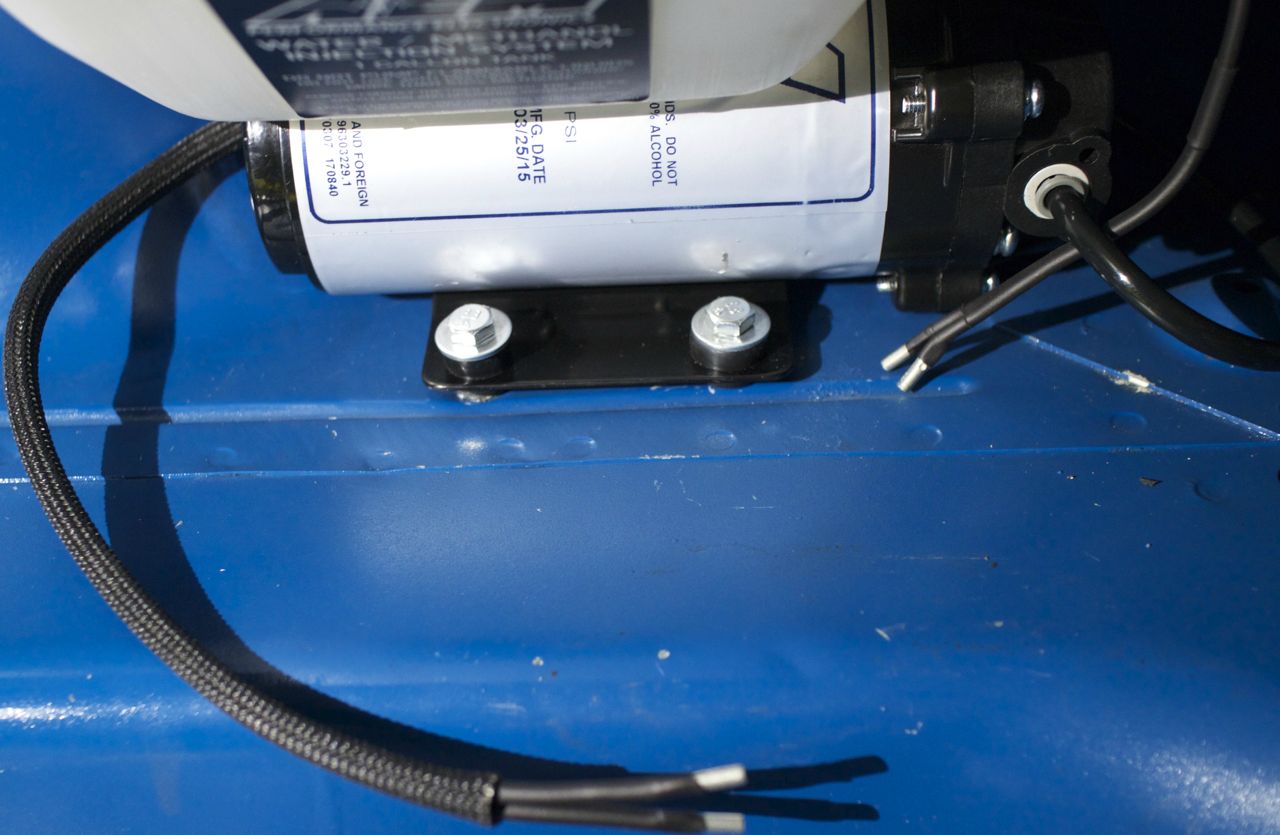
Well getting the Water/meth tank & pump mounted was sorta a pain in the ***, but I think it was worth the trouble, at least when it came to the requirements for myself/and how you need to mount them.
The pump has to be below the lowest point of the tank, and considering I wanted both to be accessible if there was an issue so I could easily remove it, it had to be inside the car away from debris/dust/et al, easily fillable, and out of the way it left me with limited option to do so. Also wanted to keep my trunk space open for carting crap around.
So I used rivnuts to create a captive nut. Basically it is a m6x1.0 sleeved nut that pinches the sheet metal so it doesn't spin. You can get them at Fastenal for .40 cents each.
Some scratches were made but after carrying jacks/stands/tools to the trunk, it is pretty scratched up as is.
Pump mounts right behind the tank.

Tank position is just close enough to vertical that I won't run into any issues. It is supposed to be vertical but I filled it with some water and it clears the low tank sensor on the side when run dry.
I ran the line through the wire harness grommet behind the roll bar and since I deleted the venting hard line, I'll merely pop it into the hard line retaining brackets along the frame rails to the intake manifold charge pipe.
Pretty happy with it and just about 0 trunk space lost! Also it does a lot better job tensioning the trunk tension rods than the little bracket did so my trunk actually springs open even with the BBfabworx wing on.
The pump has to be below the lowest point of the tank, and considering I wanted both to be accessible if there was an issue so I could easily remove it, it had to be inside the car away from debris/dust/et al, easily fillable, and out of the way it left me with limited option to do so. Also wanted to keep my trunk space open for carting crap around.
So I used rivnuts to create a captive nut. Basically it is a m6x1.0 sleeved nut that pinches the sheet metal so it doesn't spin. You can get them at Fastenal for .40 cents each.
Some scratches were made but after carrying jacks/stands/tools to the trunk, it is pretty scratched up as is.
Pump mounts right behind the tank.
Tank position is just close enough to vertical that I won't run into any issues. It is supposed to be vertical but I filled it with some water and it clears the low tank sensor on the side when run dry.
I ran the line through the wire harness grommet behind the roll bar and since I deleted the venting hard line, I'll merely pop it into the hard line retaining brackets along the frame rails to the intake manifold charge pipe.
Pretty happy with it and just about 0 trunk space lost! Also it does a lot better job tensioning the trunk tension rods than the little bracket did so my trunk actually springs open even with the BBfabworx wing on.
Reply
0
0
Elite Member
Joined: Oct 2013
Posts: 2,764
Total Cats: 951
From: Cedar City, UT
1 gallon. I figured I'd upgrade to the 5 gallon after I run it for a while and find myself refilling it often. Or at least I'll just keep aa spare jug of it in the tool bag if I run low.
Going to have my tuner make 2 maps that I can trigger it if I get a low fluid/pressure alarm it can switch to a safe map.
Going to have my tuner make 2 maps that I can trigger it if I get a low fluid/pressure alarm it can switch to a safe map.
Reply
0
0
When I was running WI, I used a float switch that automatically turned off EBC (wasn't enough obviously).
With the more advanced MS you run, I think you could run the float switch into the MS and do map switching.
1 gallon should serve you well even for 30 minute track sessions though.
With the more advanced MS you run, I think you could run the float switch into the MS and do map switching.
1 gallon should serve you well even for 30 minute track sessions though.
Reply
0
0

Yeah MS3 has a low level input that you can tie into the AFR safety system as well. I haven't started using it just yet but that's my game plan. I have my MS3 controlling pump & solenoid right now and I love it. I turn on the pump a few psi or so before I actually open the solenoid to make sure I have pressure in the line.
Reply
0
0
Elite Member
Joined: Oct 2013
Posts: 2,764
Total Cats: 951
From: Cedar City, UT
Ok, getting closer to finishing this up. There is a crap-load of wires so I just wanted to make sure I organized everything properly so everything looks factory. Just waiting to weld an aluminum bung into the throttle body pipe and I can get it all wrapped up once I throw this in the car.
Mounted the main controller in the glove box as it isn't necessary to "see" it at all times. They made mounting it pretty damn hard to make solid and clean. They expect you to zip tie the controller to hold it down(in the manual).
I of course did not like that solution. So I removed the back cover of the controller, drilled 4 holes and countersunk them and then mounted it on the glove box. I drilled a 1/4" hole in the glove box where the backing plate attaches to the circuit board so that if I need to remove it I can just undo the one screw rather than all 4.
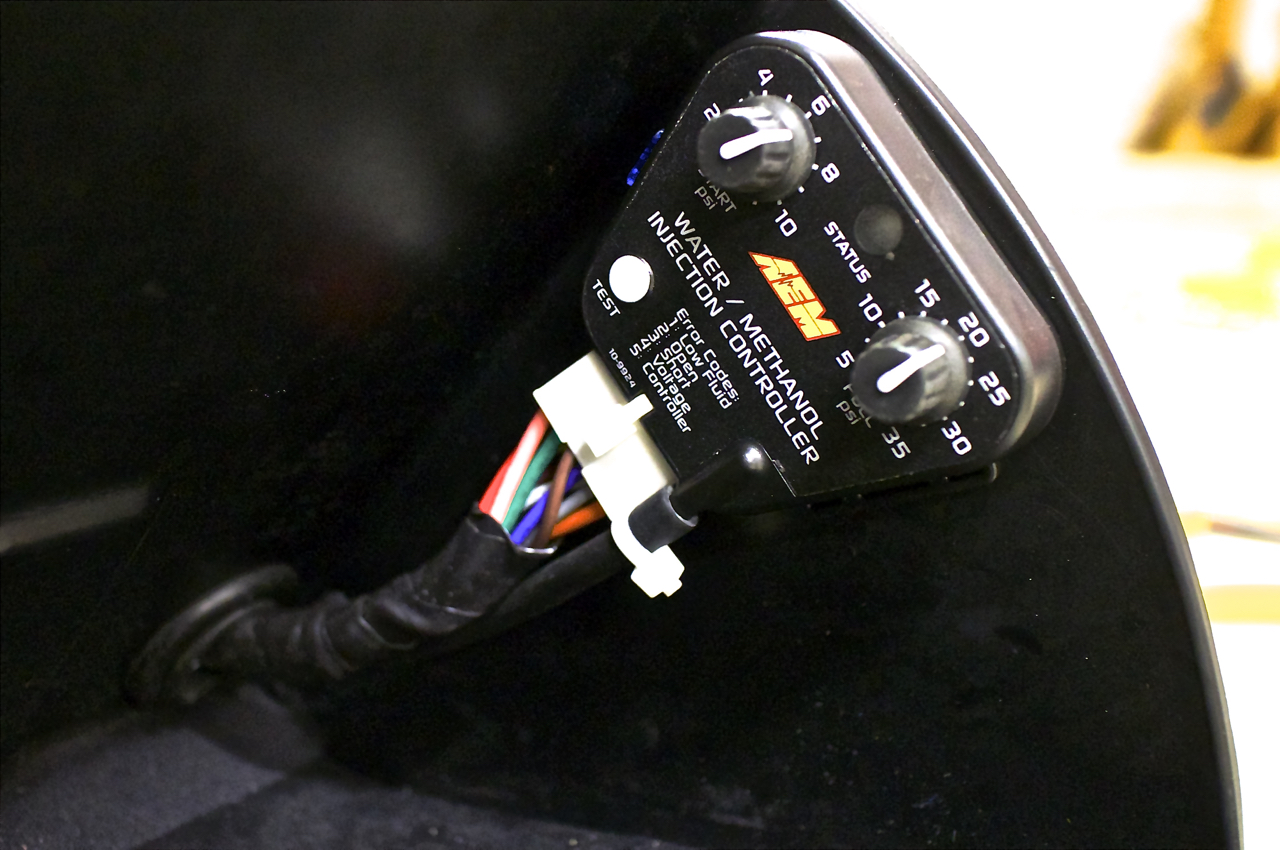
Then I used my 1/2" hole saw bit at the bottom of the glove box and put a rubber grommet on it to protect the wires from any sharp edges. The glove box has an unused screw mounting point in the middle and I used a random bracket to keep it from moving about and potentially disconnecting while driving hard. AEM uses 16g wiring and there is roughly 14 wires coming out of the controller. That is a lot of weight!
Separating the wires for their different locations. The big thick coil goes to the pump/tank/battery posts to the rear of the car. The controller is self fused so no need to worry about putting a fuse inline in the system.
These wires all cleaned up and crimped on one side ready to go.
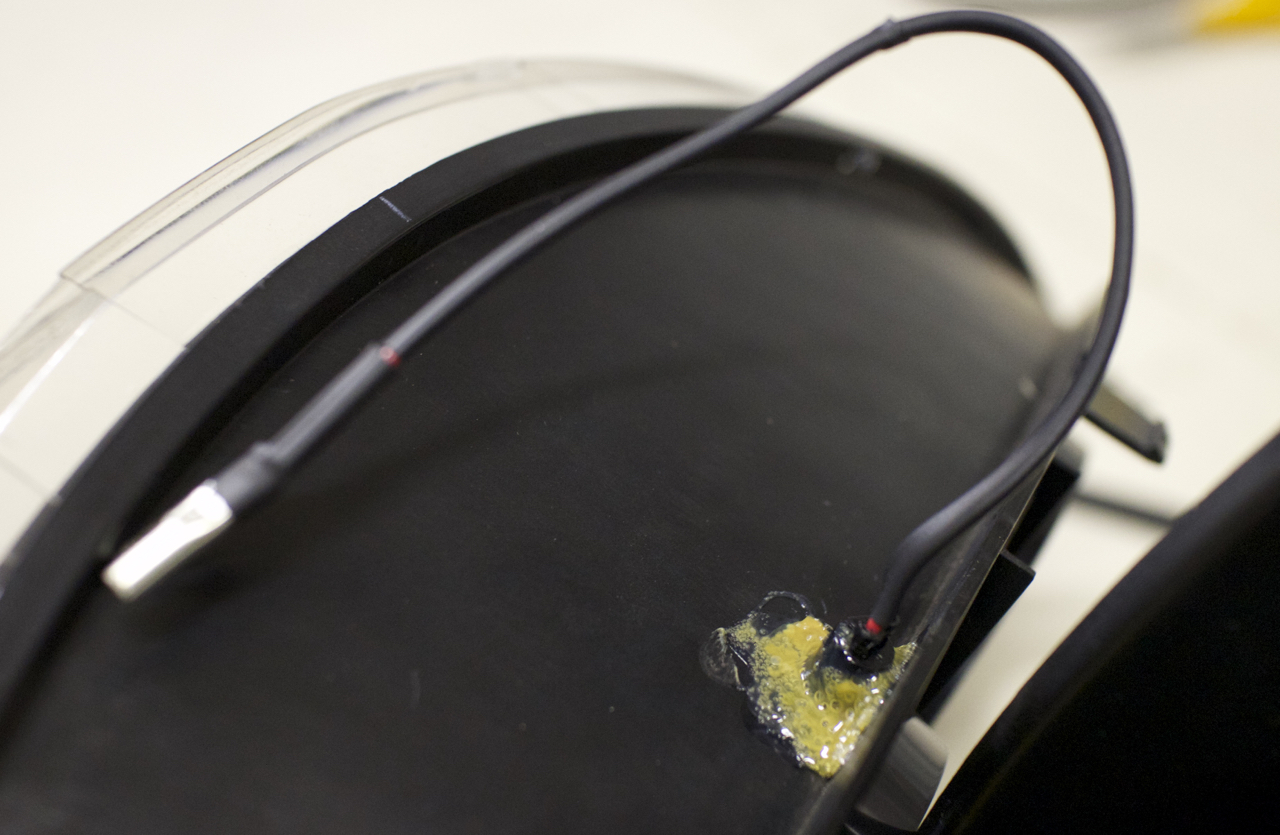
Where I decided to put the warning LED in case **** hits the fan and I don't notice or the EDU doesn't switch maps/retard timing properly.
Not sure what this plastic adhesive I used is. All I know is my dad bought a couple hundred dollars worth of tools/chemicals/adhesives from an old dudes estate sale(recently deceased) and a lot of it was from the 90s. I have never grabbed my charcoal filtered mask faster, got woozy just using it! Which is great, means it works well as an adhesive.
Mounted the main controller in the glove box as it isn't necessary to "see" it at all times. They made mounting it pretty damn hard to make solid and clean. They expect you to zip tie the controller to hold it down(in the manual).
I of course did not like that solution. So I removed the back cover of the controller, drilled 4 holes and countersunk them and then mounted it on the glove box. I drilled a 1/4" hole in the glove box where the backing plate attaches to the circuit board so that if I need to remove it I can just undo the one screw rather than all 4.
Then I used my 1/2" hole saw bit at the bottom of the glove box and put a rubber grommet on it to protect the wires from any sharp edges. The glove box has an unused screw mounting point in the middle and I used a random bracket to keep it from moving about and potentially disconnecting while driving hard. AEM uses 16g wiring and there is roughly 14 wires coming out of the controller. That is a lot of weight!
Separating the wires for their different locations. The big thick coil goes to the pump/tank/battery posts to the rear of the car. The controller is self fused so no need to worry about putting a fuse inline in the system.
These wires all cleaned up and crimped on one side ready to go.
Where I decided to put the warning LED in case **** hits the fan and I don't notice or the EDU doesn't switch maps/retard timing properly.
Not sure what this plastic adhesive I used is. All I know is my dad bought a couple hundred dollars worth of tools/chemicals/adhesives from an old dudes estate sale(recently deceased) and a lot of it was from the 90s. I have never grabbed my charcoal filtered mask faster, got woozy just using it! Which is great, means it works well as an adhesive.
Reply
0
0
Elite Member
Joined: Oct 2013
Posts: 2,764
Total Cats: 951
From: Cedar City, UT
Damn...I knew I forgot something.
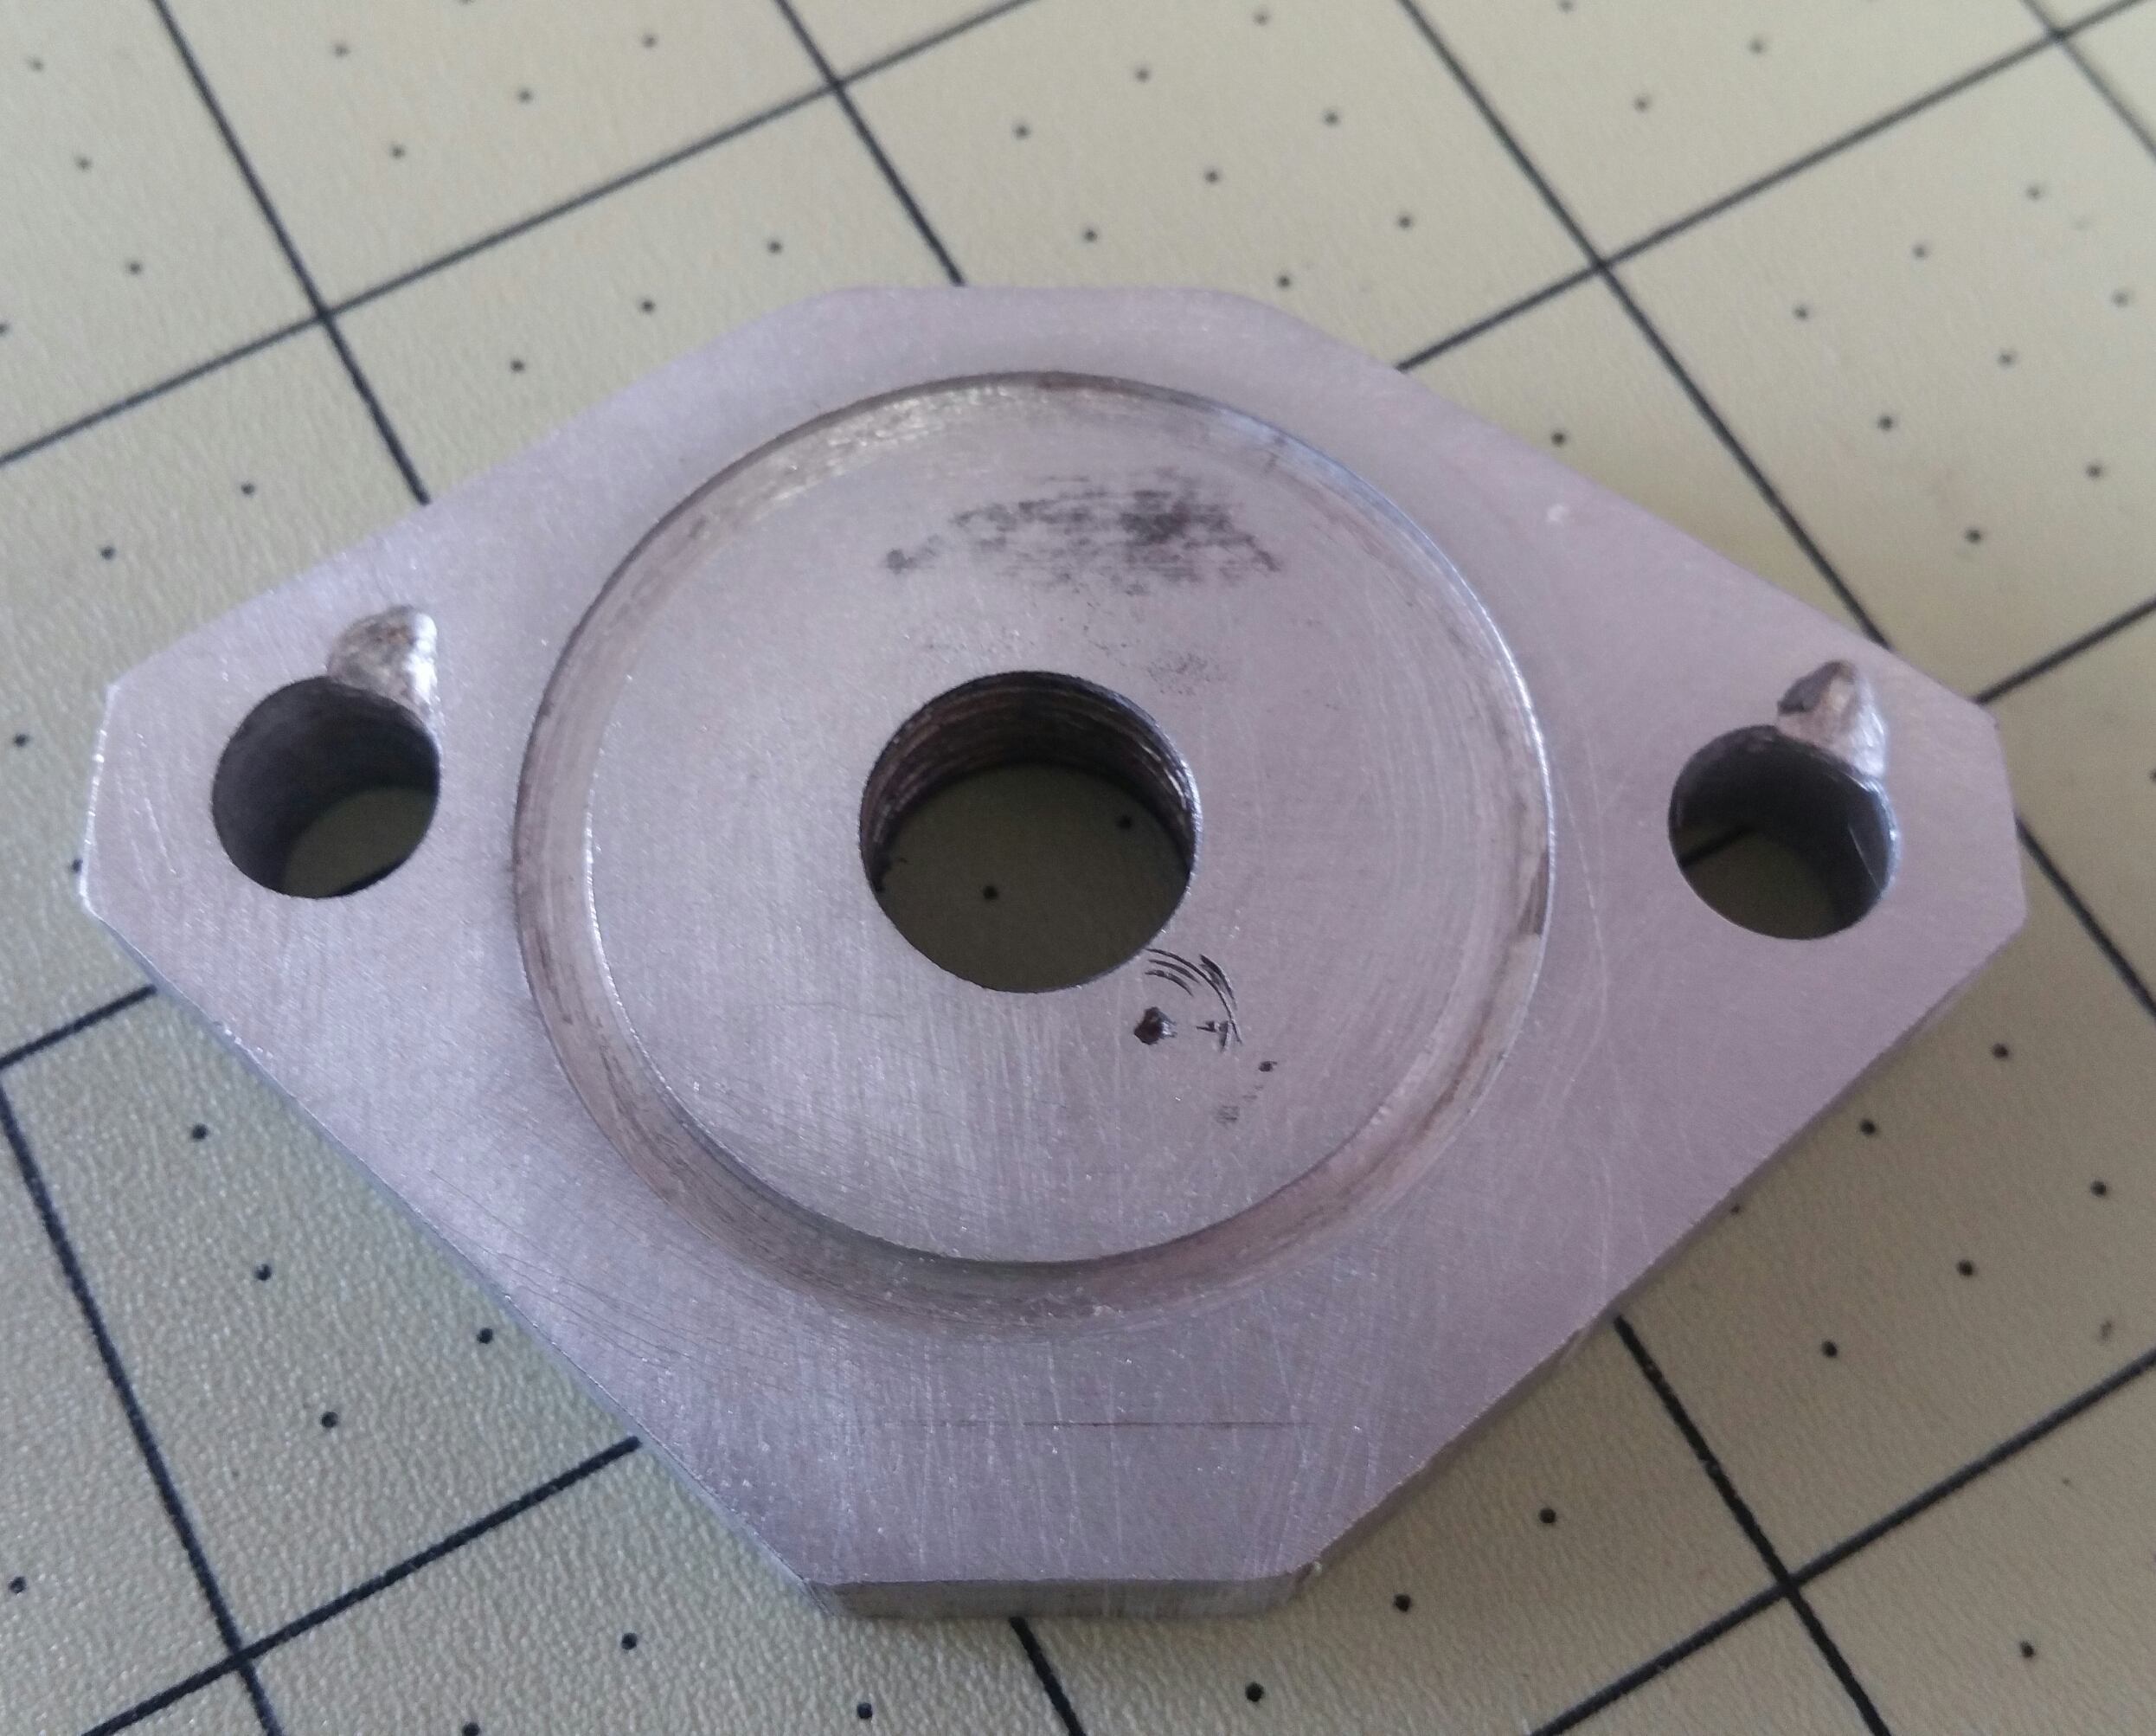
Was filling up the radiator getting ready to start the motor and saw water dripping from the head. After mildy freaking out I noticed it came from the front water neck block off plate(although mines tapped for the turbo)
Time to go to ace hardware and see if I can find the right gasket size. So close!
Reply
0
0


