
Need More Towing Power........


Thread Starter
Senior Member
iTrader: (2)
Joined: Sep 2009
Posts: 1,193
Total Cats: 29
From: Edmonton, AB, Canada
So it runs great under boost but idle is all over the place.
Before I get into the tuning aspect of the idle can I get some help on the mechanical / OEM parts. Here are a few questions I have:
My IAC valve should be working because when I turn on the AC the idle goes up - is that a correct assumption of it working fine?
I was going to replace the front O2 sensor as the car has 145K miles on it. Do they get less accurate or slow as they age ??
Knot knowing that there was an proper idle screw I played with the throttle stop, should I set it back to fully closed (watching the arm move) plus a half turn ??
Can I play with the proper idle screw after its warmed up ?
I have a leak in the exhaust at the BEGI DP flex section which is after the O2 sensor so i believe that wont affect the idle correct ??
I sprayed and sprayed 3/4 of a can of cleaner for vacuum leaks but couldnt find anything. What is the correct idle vacuum (in HF) for a 2002 NB ??
I have XEDE and have received help for it from BEGI but a lot of times i work on the car after hours. Anyone have a good map with a similar set up? First though I want to check all the OEM bits. Lot of items on the car were taken apart so there is always a chance of something not plugged in or working right/leaking.
How does timing affect idle - can anyone explain in noob terms ?
Thanks.
Reply
 0
0

0

Joined: Jun 2006
Posts: 29,085
Total Cats: 375
From: Republic of Dallas
lol @ people thinking the miata can't pull that "safely." I've had 375lb on my tire trailer before (tools, track rubber, 10-gallons of fuel, steel jack and stands, luggage) and even pulled in the rain through the Ozark Mountains and its no problem at all to pull that stuff with the Miata. Its still grossly faster than a new SS Camero with the trailer on too and handles just fine.
No, you don't need a Peterbilt to pull a Harbor Freight trailer.
No, you don't need a Peterbilt to pull a Harbor Freight trailer.
Reply
0
0

lol @ people thinking the miata can't pull that "safely." I've had 375lb on my tire trailer before (tools, track rubber, 10-gallons of fuel, steel jack and stands, luggage) and even pulled in the rain through the Ozark Mountains and its no problem at all to pull that stuff with the Miata. Its still grossly faster than a new SS Camero with the trailer on too and handles just fine.
No, you don't need a Peterbilt to pull a Harbor Freight trailer.
No, you don't need a Peterbilt to pull a Harbor Freight trailer.
http://www.harborfreight.com/870-lb-...res-42708.html
Reply
0
0

Joined: Jun 2006
Posts: 29,085
Total Cats: 375
From: Republic of Dallas
Reply
0
0
Thread Starter
Senior Member
iTrader: (2)
Joined: Sep 2009
Posts: 1,193
Total Cats: 29
From: Edmonton, AB, Canada
So it runs great under boost but idle is all over the place.
Before I get into the tuning aspect of the idle can I get some help on the mechanical / OEM parts. Here are a few questions I have:
My IAC valve should be working because when I turn on the AC the idle goes up - is that a correct assumption of it working fine?
I was going to replace the front O2 sensor as the car has 145K miles on it. Do they get less accurate or slow as they age ??
Knot knowing that there was an proper idle screw I played with the throttle stop, should I set it back to fully closed (watching the arm move) plus a half turn ??
Can I play with the proper idle screw after its warmed up ?
I have a leak in the exhaust at the BEGI DP flex section which is after the O2 sensor so i believe that wont affect the idle correct ??
I sprayed and sprayed 3/4 of a can of cleaner for vacuum leaks but couldnt find anything. What is the correct idle vacuum (in HF) for a 2002 NB ??
I have XEDE and have received help for it from BEGI but a lot of times i work on the car after hours. Anyone have a good map with a similar set up? First though I want to check all the OEM bits. Lot of items on the car were taken apart so there is always a chance of something not plugged in or working right/leaking.
How does timing affect idle - can anyone explain in noob terms ?
Thanks.
Before I get into the tuning aspect of the idle can I get some help on the mechanical / OEM parts. Here are a few questions I have:
My IAC valve should be working because when I turn on the AC the idle goes up - is that a correct assumption of it working fine?
I was going to replace the front O2 sensor as the car has 145K miles on it. Do they get less accurate or slow as they age ??
Knot knowing that there was an proper idle screw I played with the throttle stop, should I set it back to fully closed (watching the arm move) plus a half turn ??
Can I play with the proper idle screw after its warmed up ?
I have a leak in the exhaust at the BEGI DP flex section which is after the O2 sensor so i believe that wont affect the idle correct ??
I sprayed and sprayed 3/4 of a can of cleaner for vacuum leaks but couldnt find anything. What is the correct idle vacuum (in HF) for a 2002 NB ??
I have XEDE and have received help for it from BEGI but a lot of times i work on the car after hours. Anyone have a good map with a similar set up? First though I want to check all the OEM bits. Lot of items on the car were taken apart so there is always a chance of something not plugged in or working right/leaking.
How does timing affect idle - can anyone explain in noob terms ?
Thanks.
BTW those trailers are so cheap in the US - not fair!
Reply
0
0


Thread Starter
Senior Member
iTrader: (2)
Joined: Sep 2009
Posts: 1,193
Total Cats: 29
From: Edmonton, AB, Canada
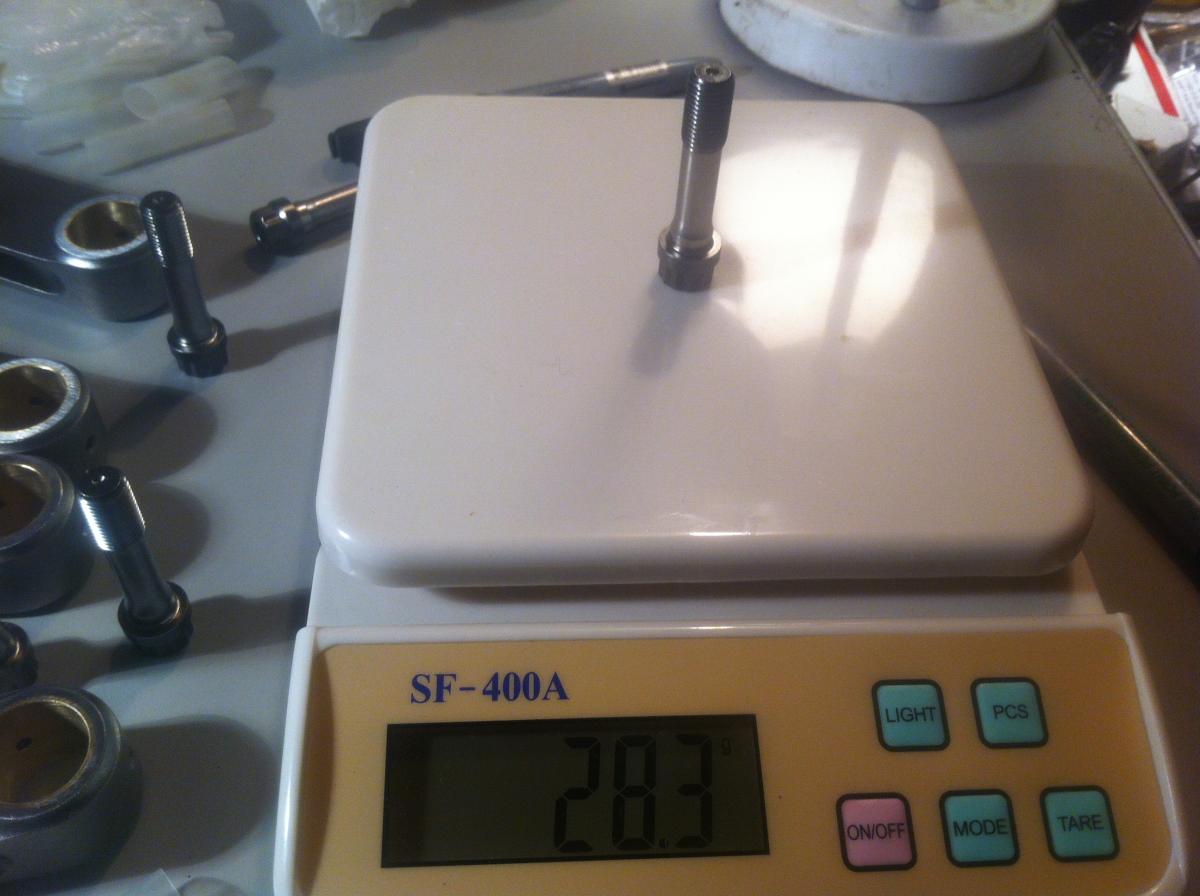
So it begins again. Built motor with lots of the goodies.
Here is the first part of a long saga that will take me through the next 2 months.
Balancing the ebay rods and my Wiseco's. I'm aiming for within .5g. My scale is also an ebay special so I check and double check to be safe. More to follow including all my build parts and some areas im unsure of......
Pins and bolts were all within .1g of each other.
I was really scared to remove weight from the pistons so I just chamferred the edges around the pins inside bosses. Hope that is not a hugely critical mistake, but really there is not many other places to remove material that isn't a critical outside face or already thin like under the crown. Chime in on this please.
I did note that the lightest rod visible had a tight bottom end, to tight to really push the pin all the way in so that will have to be machined by my machinist. Just thought I'd inform those buying cheap rods. These are pretty much the Insert Name brand of rods that most of us end up buying.
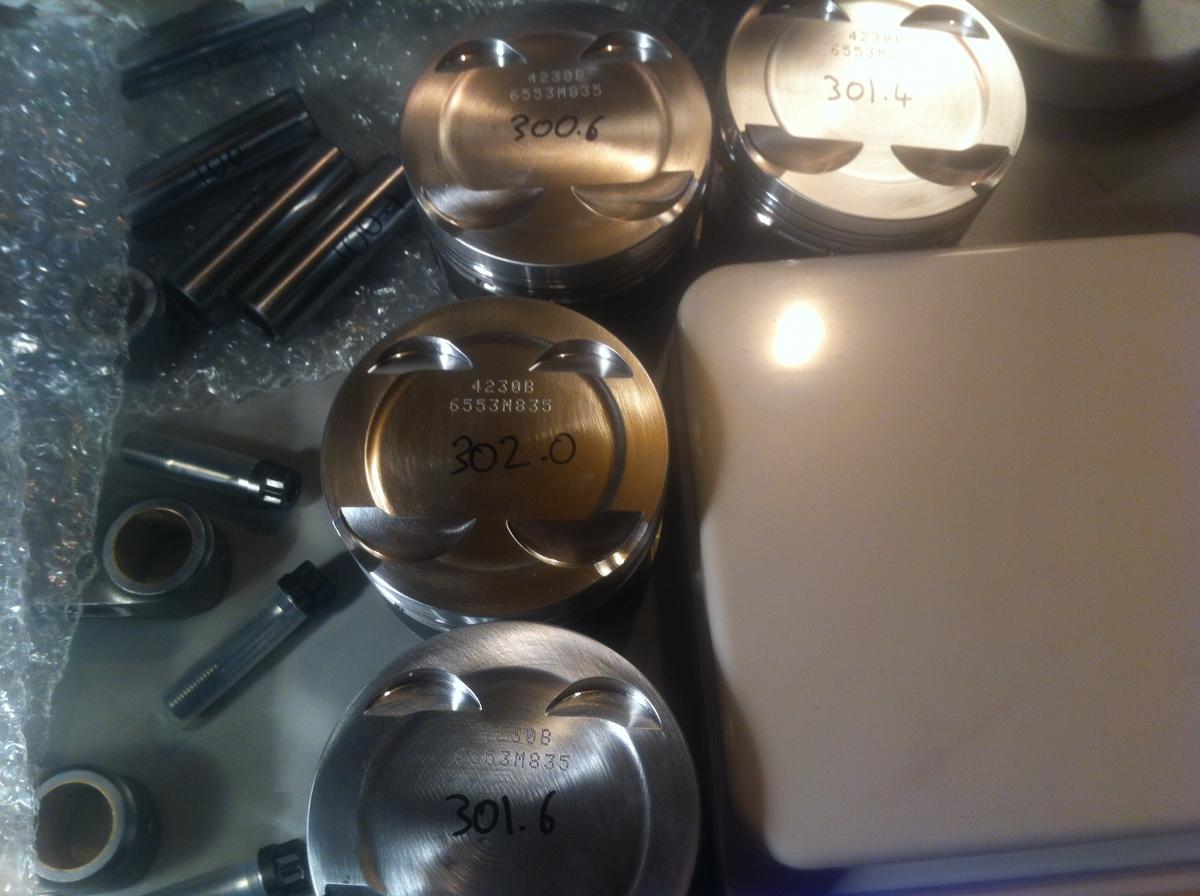
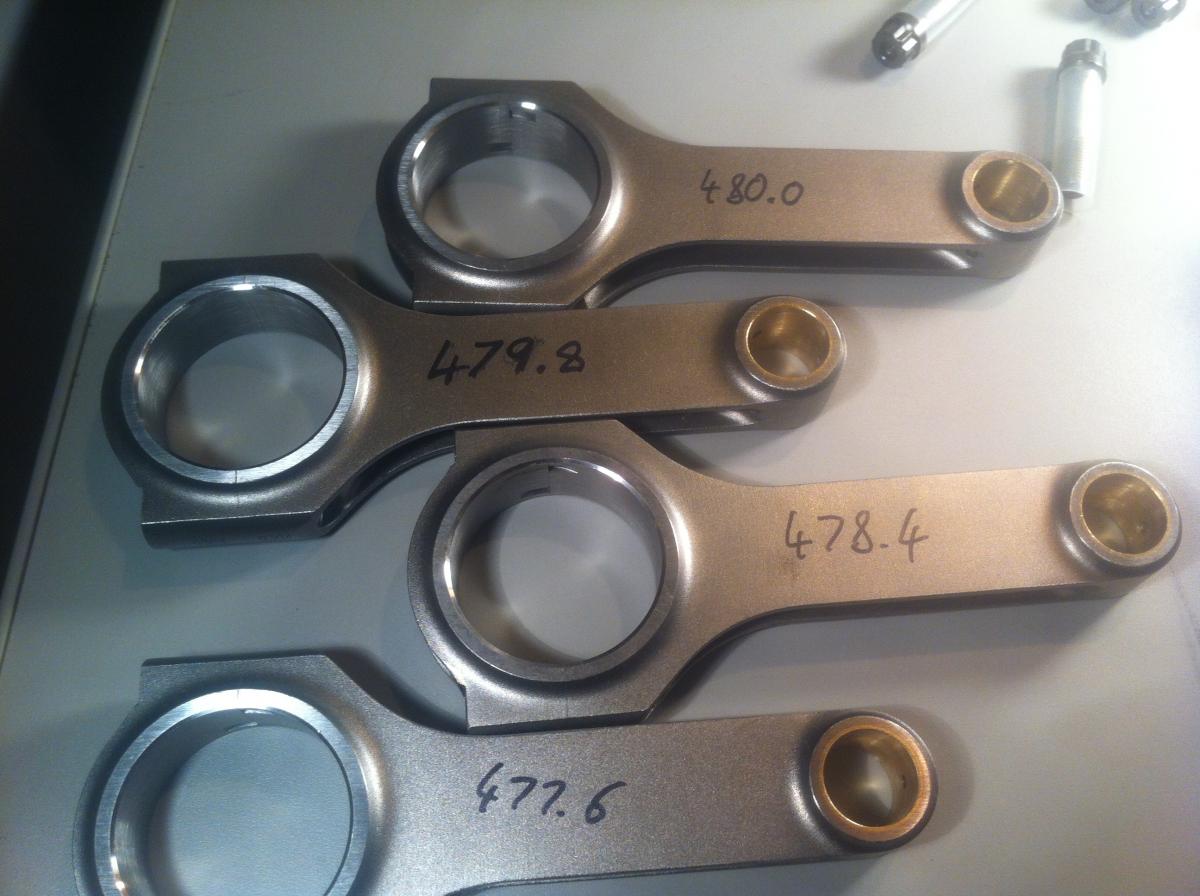
I'll be back with final weights later on tomorrow or Monday....
Here is the first part of a long saga that will take me through the next 2 months.
Balancing the ebay rods and my Wiseco's. I'm aiming for within .5g. My scale is also an ebay special so I check and double check to be safe. More to follow including all my build parts and some areas im unsure of......
Pins and bolts were all within .1g of each other.
I was really scared to remove weight from the pistons so I just chamferred the edges around the pins inside bosses. Hope that is not a hugely critical mistake, but really there is not many other places to remove material that isn't a critical outside face or already thin like under the crown. Chime in on this please.
I did note that the lightest rod visible had a tight bottom end, to tight to really push the pin all the way in so that will have to be machined by my machinist. Just thought I'd inform those buying cheap rods. These are pretty much the Insert Name brand of rods that most of us end up buying.
I'll be back with final weights later on tomorrow or Monday....
Reply
0
0
Thread Starter
Senior Member
iTrader: (2)
Joined: Sep 2009
Posts: 1,193
Total Cats: 29
From: Edmonton, AB, Canada
Block still at machine shop. Going to order some Eibach EVS valve springs (the singles) for the head.
Machine shop is taking the weight ring off the flywheel for $60 so that's not to bad.
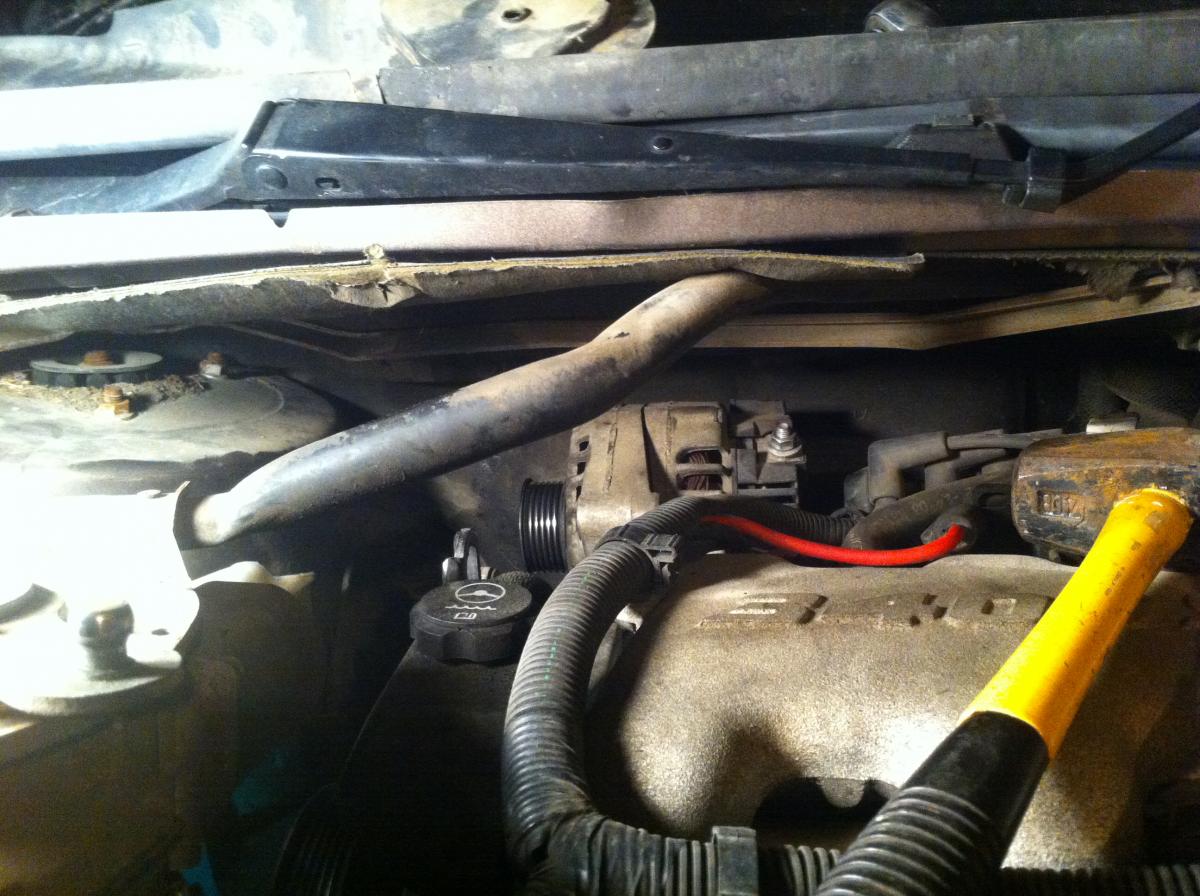
I barely got into depowering the rack and then my Chevy Venture alternator died. Made it to my house (it died on the return leg of a 6 hour drive, had about 45min to go and I got home with the VM saying 9.XXvolts) on the last bit of juice the battery had.
If you've ever changed Venture/Montana/Slihoutte spark plugs or alternator you will feel my pain. The manual says you have to take the intake plenum off to get clearance! Found a post online that had a better trick with the wiper arms and motor. Still many of the bolts are blind and all 3 rear plugs changes are blind. My wrist and forarms are bruised up.
Look I'm hiding under a foot of windshield - tee hee
Machine shop is taking the weight ring off the flywheel for $60 so that's not to bad.
I barely got into depowering the rack and then my Chevy Venture alternator died. Made it to my house (it died on the return leg of a 6 hour drive, had about 45min to go and I got home with the VM saying 9.XXvolts) on the last bit of juice the battery had.
If you've ever changed Venture/Montana/Slihoutte spark plugs or alternator you will feel my pain. The manual says you have to take the intake plenum off to get clearance! Found a post online that had a better trick with the wiper arms and motor. Still many of the bolts are blind and all 3 rear plugs changes are blind. My wrist and forarms are bruised up.
Look I'm hiding under a foot of windshield - tee hee
Reply
0
0

Thread Starter
Senior Member
iTrader: (2)
Joined: Sep 2009
Posts: 1,193
Total Cats: 29
From: Edmonton, AB, Canada
It was a tired motor (240,000kms when I boosted it) I used all 12psi and them some and with the comp. ratio it just seemed so sensetive to anything under 93 octane. When it went it was somewhat sudden and just started blowing oil and then i parked it. I have some slightly bent rods, and some decent skirt wear.
I was sad but also looking forward to the bionic rebuild, it was a good excuse to go for a just under 300whp build.
I was sad but also looking forward to the bionic rebuild, it was a good excuse to go for a just under 300whp build.
Reply
0
0
Thread Starter
Senior Member
iTrader: (2)
Joined: Sep 2009
Posts: 1,193
Total Cats: 29
From: Edmonton, AB, Canada
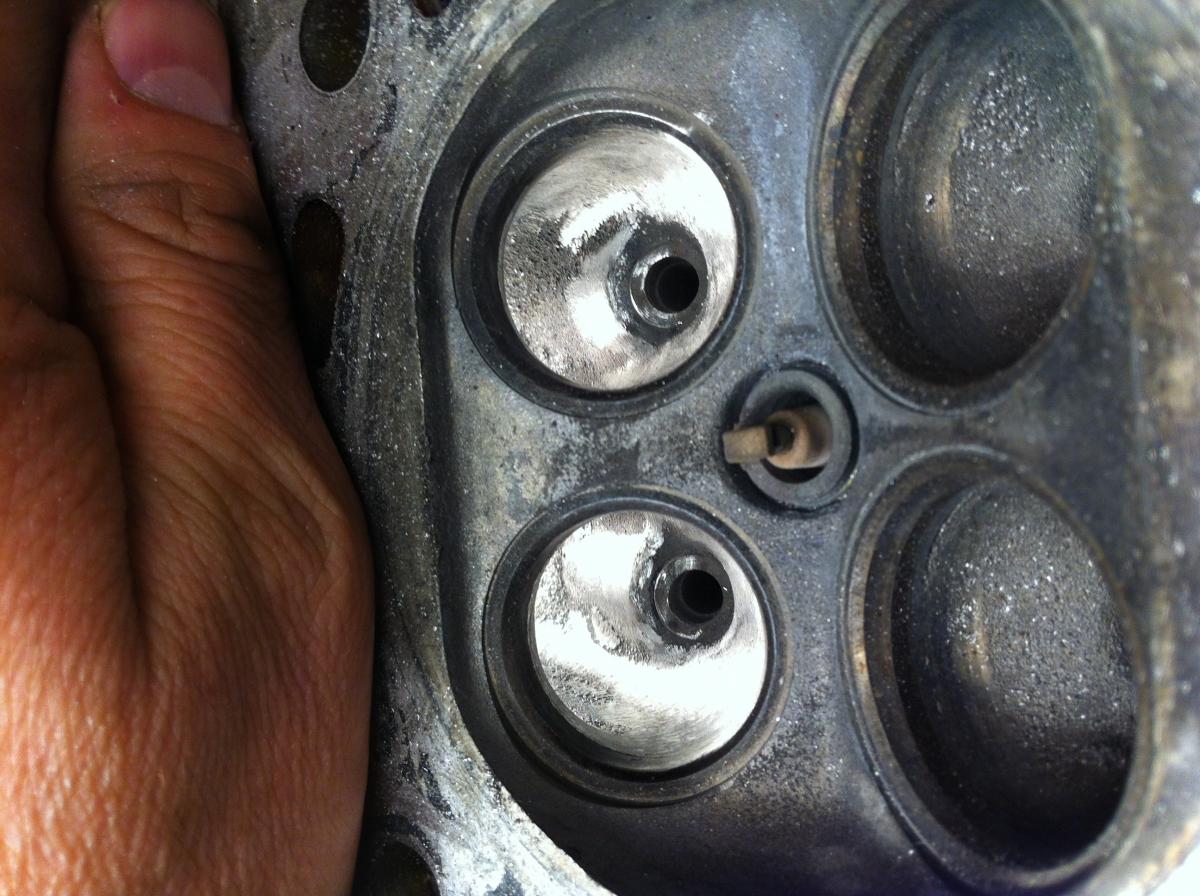
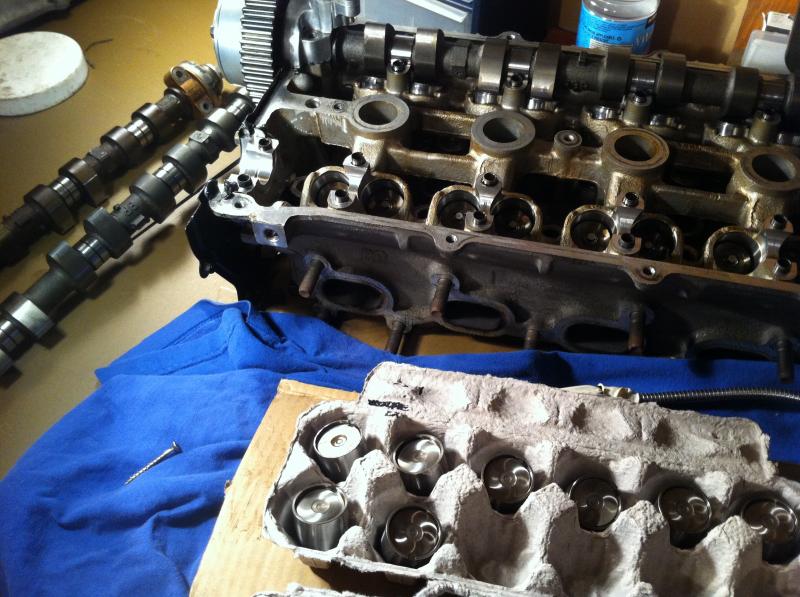
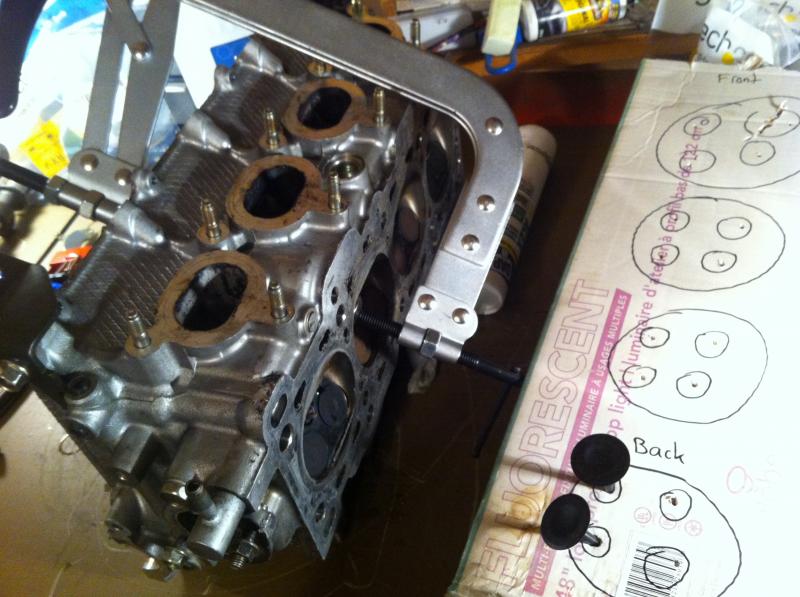
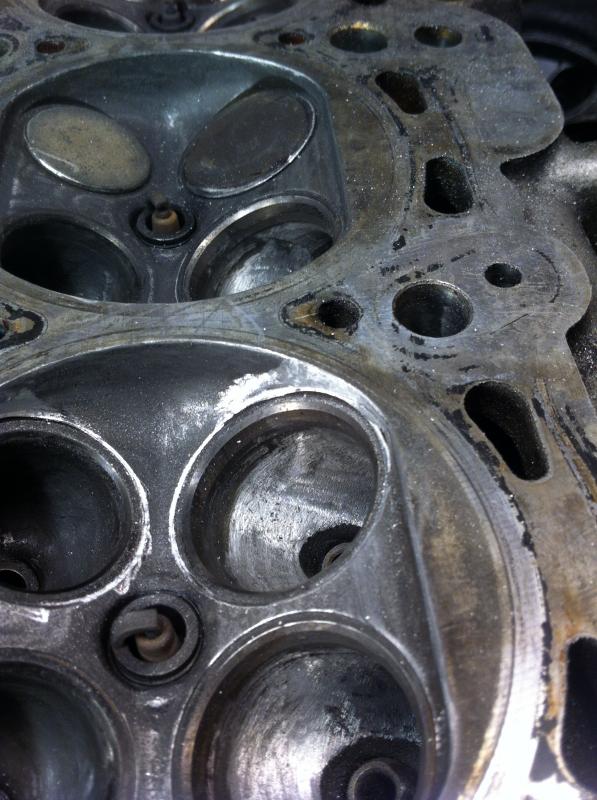
Making slow progress. Block is done jsut need to pick up and assemble. Parts waiting to ship from the US still. Water tested the head and it had 4 of 8 exhaust valves leaking and 1 intake. The actual intake valves look new but the exhausts were a bit dirty. Either way machine shop is surfacing, cleaning and handling seats/valves.
I decided to do a port cleanup just to remove the rough castings and so forth, not trying to remove lots of material. Just some free labour done by me.
My biggest pain will be reassembly and trying to get proper valve clearance. I have 2 sets of heads so I can hope for enough shims but I doubt I'll have what I need. That will be time consuming if I dont get the math perfected.
Here are some progress shots:
Reply
0
0
Thread Starter
Senior Member
iTrader: (2)
Joined: Sep 2009
Posts: 1,193
Total Cats: 29
From: Edmonton, AB, Canada
See the casting flaws, oh and the "I just grazed the valve guide" human flaws.....
[IMG]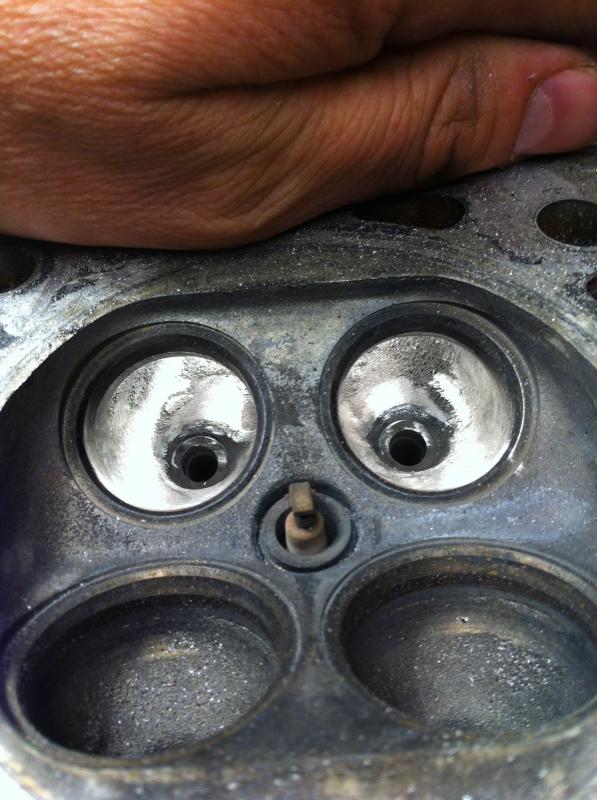 [/IMG]
Organized as much as I've ever been.
Hows it's all done like a pro. Notice the non-compass use of making a circle template to keep things in order. It's that type of free hand control and precision that allows me the endorsed (by me) use of a B&D dremel tool to clean up the ports.
[IMG]
 [/IMG]
Organized as much as I've ever been.

Hows it's all done like a pro. Notice the non-compass use of making a circle template to keep things in order. It's that type of free hand control and precision that allows me the endorsed (by me) use of a B&D dremel tool to clean up the ports.

Last edited by Landrew; Jun 19, 2013 at 02:38 PM.
Reply
0
0
Thread Starter
Senior Member
iTrader: (2)
Joined: Sep 2009
Posts: 1,193
Total Cats: 29
From: Edmonton, AB, Canada
I have a man in the US welding this for me. He shares a name with Homer's dad, but tells none of the "Onion on my Belt" stories. Too bad as those are always entertaining.
We can't bust heads like we used to, but we have our ways. One trick is to tell 'em stories that don't go anywhere - like the time I caught the ferry over to Shelbyville. I needed a new heel for my shoe, so, I decided to go to Morganville, which is what they called Shelbyville in those days. So I tied an onion to my belt, which was the style at the time. Now, to take the ferry cost a nickel, and in those days, nickels had pictures of bumblebees on 'em. “Give me five bees for a quarter,” you'd say.
Now where were we? Oh yeah: the important thing was I had an onion on my belt, which was the style at the time. They didn't have white onions because of the war. The only thing you could get was those big yellow ones...
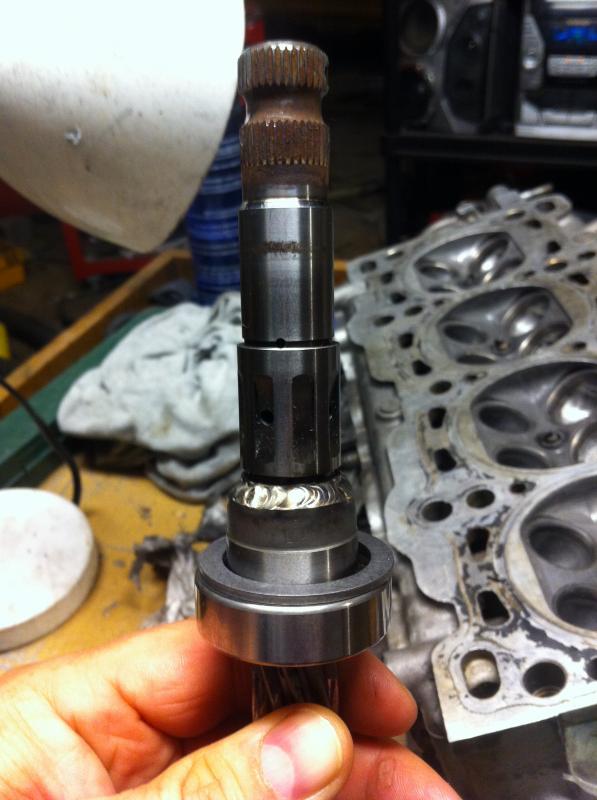
PRE-WELD (Post weld coming soon)
BTW when I took it all apart I could not find any of those ultra thin spacer washers? Did I drop them or are some cars set up so precise they were not needed. Oh and I did look around for a few minutes for them, about an hour after realizing "hey there were supposed to be some spacers someplace on this thing"
We can't bust heads like we used to, but we have our ways. One trick is to tell 'em stories that don't go anywhere - like the time I caught the ferry over to Shelbyville. I needed a new heel for my shoe, so, I decided to go to Morganville, which is what they called Shelbyville in those days. So I tied an onion to my belt, which was the style at the time. Now, to take the ferry cost a nickel, and in those days, nickels had pictures of bumblebees on 'em. “Give me five bees for a quarter,” you'd say.
Now where were we? Oh yeah: the important thing was I had an onion on my belt, which was the style at the time. They didn't have white onions because of the war. The only thing you could get was those big yellow ones...
PRE-WELD (Post weld coming soon)

BTW when I took it all apart I could not find any of those ultra thin spacer washers? Did I drop them or are some cars set up so precise they were not needed. Oh and I did look around for a few minutes for them, about an hour after realizing "hey there were supposed to be some spacers someplace on this thing"
Reply
0
0
Thread Starter
Senior Member
iTrader: (2)
Joined: Sep 2009
Posts: 1,193
Total Cats: 29
From: Edmonton, AB, Canada
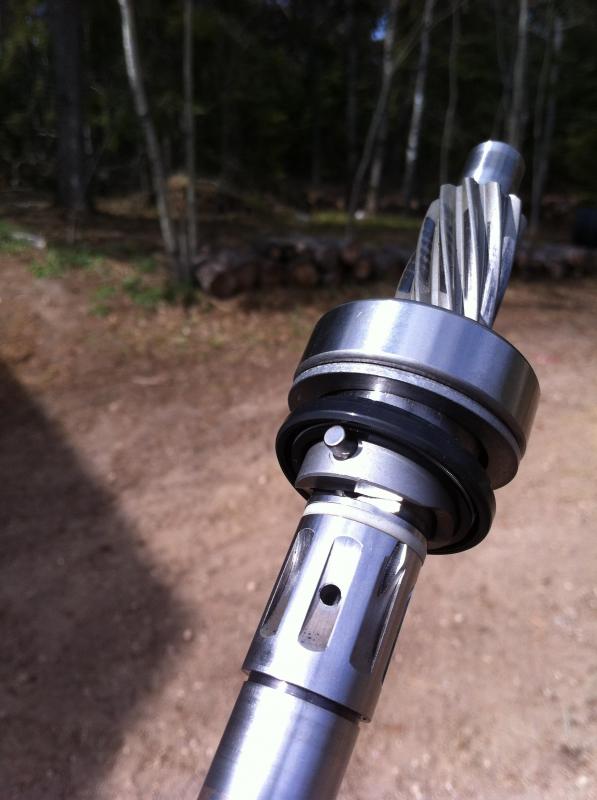
Received my steering pinion all welded up:
Doing some minor shroud cleanup and will cleanup and polish after I'm done. Used old valves in there to keep me from damaging the seats sealing surface. The head is getting looked at this week or next I hope at the machine shop. Droping it of today or tomorrow.
I expect a tiny bit from this as far as HP or spool, not tons but since I have the time I wanted to do it and if I have something apart I can't help but to fiddle with it to improve it. Let's hope I did and the machinist doesn't vomit a bit in his mouth when he sees this. I mean it wasn't much material and it's basically remove the casting flaws and in the combustion chamber just remove the obvious restrictions and ridges where possible.

Doing some minor shroud cleanup and will cleanup and polish after I'm done. Used old valves in there to keep me from damaging the seats sealing surface. The head is getting looked at this week or next I hope at the machine shop. Droping it of today or tomorrow.

I expect a tiny bit from this as far as HP or spool, not tons but since I have the time I wanted to do it and if I have something apart I can't help but to fiddle with it to improve it. Let's hope I did and the machinist doesn't vomit a bit in his mouth when he sees this. I mean it wasn't much material and it's basically remove the casting flaws and in the combustion chamber just remove the obvious restrictions and ridges where possible.
Last edited by Landrew; Jun 19, 2013 at 02:49 PM.
Reply
0
0


