Turbo Smurfette - Build in progress (slow)
 04-04-2014, 08:42 PM
#41
Elite Member
Thread Starter
iTrader: (4)

Join Date: Mar 2012
Location: Northern VA
Posts: 4,648
Total Cats: 544
Still applying all over the place. One opportunity might land me at ZF in Germany...I don't think my car would be T�V approved.
Have any leads for a mechanical engineer?
Have any leads for a mechanical engineer?

Reply
 0
0

0
 04-04-2014, 09:24 PM
#43
Elite Member
Thread Starter
iTrader: (4)
Join Date: Mar 2012
Location: Northern VA
Posts: 4,648
Total Cats: 544
That's what they tell us, then no company seems to want to hire. There is still another two months till 'hiring season' so I'm sure once graduation rolls around, companies will be sending their offers.
we'll see.
we'll see.
Reply
0
0

 04-05-2014, 12:38 PM
#47
Junior Member


Join Date: Jan 2014
Location: Madison
Posts: 316
Total Cats: 30
Leveraging this information:
https://www.miataturbo.net/megasquir...e2/#post941776
The TPS in my BP4W, pins from top to bottom, and what they match w/ on my weirdo pigtail:
signal (brown/yellow stripe)
ground (orange)
vref (pink/black stripe)
HTH
https://www.miataturbo.net/megasquir...e2/#post941776
The TPS in my BP4W, pins from top to bottom, and what they match w/ on my weirdo pigtail:
signal (brown/yellow stripe)
ground (orange)
vref (pink/black stripe)
HTH
Reply
0
0
04-06-2014, 08:41 AM
#48
Elite Member
Thread Starter
iTrader: (4)
Join Date: Mar 2012
Location: Northern VA
Posts: 4,648
Total Cats: 544
thanks so much!!
did you run the front crank/cam sensor from the stock CAS plug or did you re-use the NA CAS
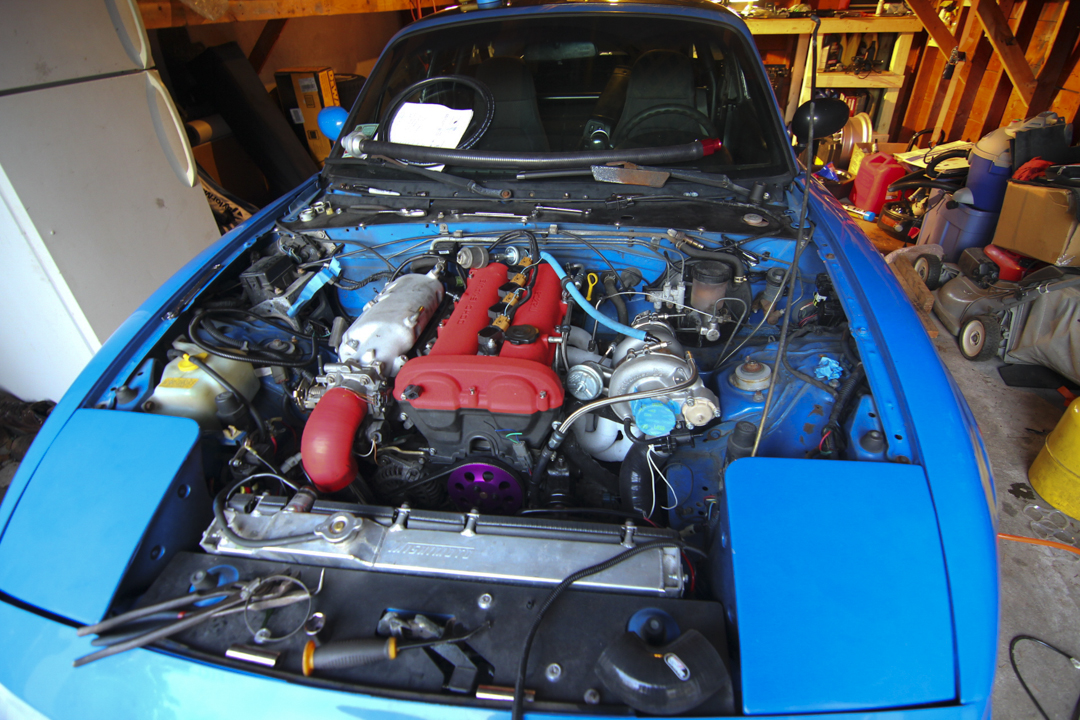
Yesterday with the help of some awesome folks, we were able to pull the old motor and install the new one w/ the 6 spd as well as the turbo, downpipe and intercooler. I have to extend a couple wires and merge the TPS and CMP/CKP stuff and figure out which wire to piggback for power and ground back to the MS for boost control.
The hot side charge pipe is proving tricky since there isn't much room to work with since I'm determined to keep AC, and I'm not an NB so I don't have access to any open space behind the headlight. The coolant inlet on the radiator also points at the elbow to the throttlebody so I have to get creative there.
I hope it runs today so I can figure out which breakin method I want to use. But I have to get crank signal in the very least.
did you run the front crank/cam sensor from the stock CAS plug or did you re-use the NA CAS
Yesterday with the help of some awesome folks, we were able to pull the old motor and install the new one w/ the 6 spd as well as the turbo, downpipe and intercooler. I have to extend a couple wires and merge the TPS and CMP/CKP stuff and figure out which wire to piggback for power and ground back to the MS for boost control.
The hot side charge pipe is proving tricky since there isn't much room to work with since I'm determined to keep AC, and I'm not an NB so I don't have access to any open space behind the headlight. The coolant inlet on the radiator also points at the elbow to the throttlebody so I have to get creative there.
I hope it runs today so I can figure out which breakin method I want to use. But I have to get crank signal in the very least.
Reply
1
1
04-08-2014, 12:13 AM
#50
Elite Member
Thread Starter
iTrader: (4)
Join Date: Mar 2012
Location: Northern VA
Posts: 4,648
Total Cats: 544
Man, i'm feeling pretty defeated.
We were able to trouble shoot the starter not working, and get the oil primed but the fuel pump won't prime and I cannot get the trigger wheel to register in Tuner Studio.
Brain suggested I jump the fuel pump through the AFM, but I don't really know what this means. I no longer have the AFM connector and it primes if I plug MS1 back in.
pulled a plug and I don't have spark or fuel...on the plus side, TPS works wonderfully!
Last edited by psyber_0ptix; 04-08-2014 at 12:26 AM.
Reply
0
0
04-08-2014, 04:53 PM
#51
Elite Member
Thread Starter
iTrader: (4)
Join Date: Mar 2012
Location: Northern VA
Posts: 4,648
Total Cats: 544
Going to try again once more tonight.
The plan:
EBC
reassign 2k (Lt Green/Red)to MS3 as EBC (-)
Tap Diagnostic Connector (White/red) as EBC (+)
Fuel Pump
Connect 2o (red) to supply ground to light green which are both on the AFM wiring
I hope we can get spark to work. But then again, I am unsure if I overwrote the map on MS3 because I'm an idiot having updated Tuner Studio and the opening screen came up different that what I was used to when I had MS1.
I may need a basemap to start over from scratch.
I noticed an oil leak somewhere on the bell housing. I don't know the source. Motivation is diminishing and I have to get this car out of this garage.
Reply
0
0
04-08-2014, 10:50 PM
#53
Elite Member
Thread Starter
iTrader: (4)
Join Date: Mar 2012
Location: Northern VA
Posts: 4,648
Total Cats: 544
Tonight offered no progress. No crank signal...Therefore no spark or fuel.
thanks to Scott, fuel pump primes. Got ebc wired up.
Crank sensor is getting 12v and ground. It's wired through the cas wiring. I just dont know what I need to do for the MS3 unit to see it
thanks to Scott, fuel pump primes. Got ebc wired up.
Crank sensor is getting 12v and ground. It's wired through the cas wiring. I just dont know what I need to do for the MS3 unit to see it
Last edited by psyber_0ptix; 04-09-2014 at 06:09 AM.
Reply
0
0
04-09-2014, 05:57 PM
#54
Elite Member
Thread Starter
iTrader: (4)
Join Date: Mar 2012
Location: Northern VA
Posts: 4,648
Total Cats: 544
Turned R56 pot 3.5 turns clockwise and have awesome cranks signal.
Unfortunately, now the problem has moved onto ignition. Set up for batch fire, only cylinders 2 and 3 are sparking but 1 and 4 are dead. I switched the coils from 1/4 to 2/3 and they also work...so that rules out bad coils.
Continuity across the COPS harness is fine so it's not that. Is it a positive pulse being sent to trigger the coils? I just don't know if I stick a multimeter on it, it would be too fast for it to register.
Is there a way to make sure it isn't the BrainMS3?
Reply
0
0
04-13-2014, 04:30 PM
#55
Elite Member
Thread Starter
iTrader: (4)
Join Date: Mar 2012
Location: Northern VA
Posts: 4,648
Total Cats: 544
So I got it working by switching to Wasted COP and using Spark C to trigger cylinder 1 and 4.
After a quick start, I notice it leaking oil. Somewhere in the area of the alternator tab. I don't know if it's the oil pump itself not sealing or if its the crank seal. At this point I'm thinking of throwing in the towel and just taking it to a shop. I feel I've overstayed my welcome at my buddies place and I really don't want to put them through another engine removal.
I saw another thread mentioning oil leaking around the alternator but all the photos are broken. Any ideas?
Reply
0
0
04-13-2014, 07:09 PM
#56
Junior Member

Join Date: Mar 2012
Posts: 65
Total Cats: 15
So I got it working by switching to Wasted COP and using Spark C to trigger cylinder 1 and 4.
After a quick start, I notice it leaking oil. Somewhere in the area of the alternator tab. I don't know if it's the oil pump itself not sealing or if its the crank seal. At this point I'm thinking of throwing in the towel and just taking it to a shop. I feel I've overstayed my welcome at my buddies place and I really don't want to put them through another engine removal.
I saw another thread mentioning oil leaking around the alternator but all the photos are broken. Any ideas?
After a quick start, I notice it leaking oil. Somewhere in the area of the alternator tab. I don't know if it's the oil pump itself not sealing or if its the crank seal. At this point I'm thinking of throwing in the towel and just taking it to a shop. I feel I've overstayed my welcome at my buddies place and I really don't want to put them through another engine removal.
I saw another thread mentioning oil leaking around the alternator but all the photos are broken. Any ideas?
1. Pull Cam Cover.
2. Pull lower Plastic Cam Cover.
3. Inspect for oil around cam cover gasket area.
4. Check oil relief valve for oil
5. Check behind cam gears for oil.
Basically, if you have an oil leak near or above the same level as the water pump pulley, you shouldn't have to pull the motor/front subframe. If it's below that... welp...
Bear in mind that's talking about the SOURCE of the leak.
Most common is the Cam Cover Gasket. I've never had luck hitting the designated "RTV Here" corners, even using an OEM gasket. Always wound up doing mine this way:
1. Clean the cam cover gasket seating area on the cam cover.
2. Apply RTV to the cam cover gasket seating area.
3. Install Gasket.
4. Clean head - Cover gasket seating area.
5. Apply RTV to exposed side of cam cover gasket, including plug gaskets.
6. Apply RTV to both cam carriers, and the rear CAS area, adding a bit more to the area where the half moon meets the flat plane of the head.
7. Carefully set the cam cover
8. Tighten in a spiral, just like head bolts. Go through this sequence 4 times before you torque the bolts down.
Did you put the motor together yourself? Are the Cam Carrier Seals new? Did they use hylomar, or RTV when they set the cam carriers?
Hint: Q-Tips are there to show you where the oil is; it's a new build, so you should pay attention to clean oil, or wet oil. Don't pay attention to greasy sludgy crap, that's been there for years. (Unless it's "wet")
Reply
0
0
04-13-2014, 11:11 PM
#57
Elite Member
Thread Starter
iTrader: (4)
Join Date: Mar 2012
Location: Northern VA
Posts: 4,648
Total Cats: 544
Thanks for the response!
I'm really not sure if it's the valve cover gasket as the side of the block is pretty clear. It's localized to the driver side and I cannot see behind the cam gear because of that black plate that the timing covers are bolted onto obstructs the view.
The motor is brand spanking rebuilt and completely clean. It's difficult to see because the block has been painted glossy black (bad idea in retrospect)
From pulling the timing cover, I don't see any oil near the water pump. Just down by the alternator tab.
Q-tips seem like a great idea, probing hard to reach areas for oil. It also only leaks when engine is running (so under pressure) which leads me to believe in oil pump :(
Reply
0
0
04-14-2014, 01:28 PM
#58
Junior Member
Join Date: Mar 2012
Posts: 65
Total Cats: 15
1. Watch This:
2. Read This:
https://www.miataturbo.net/diy-turbo...t-46614/page2/
3. Check your ****. (If the wrong size bolt is installed, I think it will still seep out)
4. If it isn't there, do the following:
4a. Clean off the front of the engine.
4b. No, really clean it.
4c. Done cleaning? Clean behind the black cover as well.
4d. Run Engine for a bit.
4e. Shut engine down. (This is important!)
4f. Run your thumbnail along the smooth side of your timing belt. Does it come back even slightly oily? If so, go to 4g. If not, go to 4g anyway.
4f-1 - If your finger comes back half-off, or missing massive amounts of skin, you did not pay attention to step 4e. Proceed to 4g, or to the hospital.
4g. Check the cam cover behind the cam gears. Oily? Y/N?
4h. Is a pretty cool club.
4i. Start looking, from the top of the motor down, for fresh oil. See any?
Basically, if the cam belt has oil on it, and the back shield doesn't, then it probably isn't the Cam Carriers, and it probably IS the front main seal. The belt is picking up oil from backscatter from the pulley. If it's the cam carrier seals, it will backscatter to the shield and the timing belt. (most likely).
If the cam belt is dry, the shield is dry, then your problem is most likely the oil pump. (It may BE the oil pump, or it simply may be a bolt ON the oil pump.)
Also check the oil accessory Hex Bolt Thingy.
http://forum.miata.net/vb/archive/in.../t-475466.html
Ain't too many other areas that offer a chance to leak except the oil pan gaskets, and if it's one of those, may god have mercy on your soul.
Last edited by Calmdown; 04-14-2014 at 01:42 PM.
Reply
1
1
04-18-2014, 10:08 PM
#59
Elite Member
Thread Starter
iTrader: (4)
Join Date: Mar 2012
Location: Northern VA
Posts: 4,648
Total Cats: 544
So I pulled the motor out after having investigated with UV dye. It was definitely the oil pump.
That dye was a mess; it made everything tacky and gross. It took a lot of time to clean all the surfaces from the old RTV and I put down a new bead on the oil pump, replaced the front crank seal, and reset the timing belt. I hope to god that it works this time. I seriously don't know what I'd do if it started leaking again because at this point, I couldn't have done it any other way.
Hopefully back in the car tomorrow.
Reply
0
0


