When you click on links to various merchants on this site and make a purchase, this can result in this site earning a commission. Affiliate programs and affiliations include, but are not limited to, the eBay Partner Network.
Very nice Seat Drop Set up Cwatson. I install the Hanks Hotrod Pan kit, simple design, but easy install. What heat wrap material are you using on the exhaust pipe? Very clean looking.
Thank you, here are the details: I have it directly on the manifold and wastegate too - no issues even with track use. 0.25'' thick stuff where space is tight, 0.50'' where there's more space. Don't wrap a catalytic converter, excessive heat can damage it. And leave a gap to allow moisture to escape.
Use fender washers on these bolts.
As it is, you barely using 20% or so of the surface of the bolt as the clamping area, it's rather unsafe and can tear right through in a crash.
Good point, thank you for bring this to our attention. We allow for 8 bolts for the side bracket to slider interface but some normal-sized washers to this location would definitely add some security. There are a few mm from the bolt head to the seat bottom that allow for this. We had an uncomfortable amount of deformation near a rear slider bolt after hitting a wall at WGI around 80mph with 4X SHCS on the sliders to chassis interface, which is why we allow for 4 bolts on the rear of the sliders (6 total) and use the button-heads which fill out the available space in the sliders. We use some huge washers on the seat bracket to seat interface to prevent pullout there:
Thanks to Roda's willingness to trial the installation process, we've uploaded some more images of the various bits and installation along with getting a guide started: https://drive.google.com/open?id=1QF...GA3Y5sfQFAU-vJ
Twibs, we put this together to try and better explain the height and fore/aft position:
The seat height was set for good visibility over the dash and the slider mounting angle results in equal eye heights for drivers ranging from a 5�5 125 lb female to 6�0 220 lb male. Taller drivers have driven and found the car comfortable. The submarine belt pickup points were located to maintain an appropriate camlock position across the occupant range.
Backward travel of the seat is limited by the rear bulkhead. The forwardmost position, which is approximately 5�� forward of the rearmost position, is limited by the cutout in the transmission tunnel with the seat centered on the steering wheel.
In the forwardmost position, with sliders, the seat height is equivalent to placing a racing seat directly on the stock floor. In the rearmost position, with sliders, the seat position is roughly equivalent to sitting directly on the stock floor (without a seat) with the �humps� removed. A lower position (~10mm) is possible with modified sliders, but we would not recommend pursuing this. Without sliders, the seat can easily be positioned ~15-25mm lower.
We use some huge washers on the seat bracket to seat interface to prevent pullout there:
Actually this is overkill in this case because those bolts are loaded in sheer, so a normal size washer to increase the clamping surface just a little bit more than the head of the bolt is going to work A-okay.
For that interface I would typically use a 12.9 grade bolts.
The bolts I noted in the previous post are loaded in tension, which is where the washer is required to increase the clamping area.
The slots also appear to be slightly oversized for an M8 bolt, my eyechrometer says it's around 3/8" of slot width which is too much... I realize it makes installation easier but it's at the expense of clamping area, so I'd spec it to a more appropriate slot width of D+1/32" if it must be a slot, but always prefer a hole over a slot if the option exists.
Here are pictures of the floor drop kit from Hanksvilles Hot installed. Miata Floor Lowering Kit - Hanksville Hot Rods I took about 7 hours to install from start to finish. I cut the floor out and was welded in by a local welder. The seat sits on the floor pan in the rear and with a 2" bar in the front mounting of the seat to give it about a 20 deg of tilt. I am 6'-3", so I was looking to get the sit as low as possible and as far back to the rear bulkhead. This kit achieved just that. No adjustable slider, I am the only one driving this track car. My head now with helmet is approx 3" below the roll bar.
Actually this is overkill in this case because those bolts are loaded in sheer, so a normal size washer to increase the clamping surface just a little bit more than the head of the bolt is going to work A-okay.
For that interface I would typically use a 12.9 grade bolts.
The bolts I noted in the previous post are loaded in tension, which is where the washer is required to increase the clamping area.
The slots also appear to be slightly oversized for an M8 bolt, my eyechrometer says it's around 3/8" of slot width which is too much... I realize it makes installation easier but it's at the expense of clamping area, so I'd spec it to a more appropriate slot width of D+1/32" if it must be a slot, but always prefer a hole over a slot if the option exists.
Thank you again for the feedback - we opted for 10.9 for the flange heads (making interface with a wrench next to the tunnel much easier), JIS consistency/availability, the compromise of strength/elongation/impact energy, and consideration of the FIA's spec of 4X M8 8.8, as referenced by OMP (Schroth specifies 8.8 for belt fasteners as well). The brackets allow for seat height and angle adjustment without removing the fasteners, which requires some extra space in the slots to be able to move the seat from one position to another. The oversized washers on the side are used to ensure the seat remains contained even if a bolt becomes loose (due to installation error or elongation) and the "fingers" separating each slot are never in bending.
Good eyechrometer - the slots on the bracket to slider interface are cut at 10mm wide (a bit less with powder coating) and could stand to be a bit tighter. We don't think this is a concern using up to 8X flange head bolts with washers.
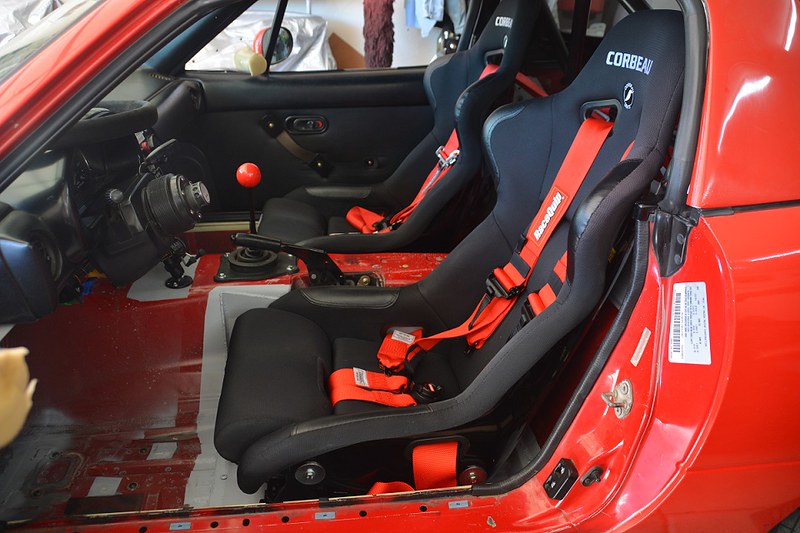
So, a couple final pics, and my thoughts on the Watson Racing kit...
Seat in, with new harness
Underside:
I really like this kit! Our car is an HPDE/TT car, which my wife and I both drive. I needed sliders to accomodate both of us comfortably, and this kit goes far beyond the other available kits in how well thought out and complete it is. Previously I had the seat mounted on a PCI fixed bracket on the stock mounts. Even with the sliders, the seat ended up ~1" lower after the installation of the kit.
The kit fit just about perfectly, and contained all of the parts needed for the install. For what you are getting, it is very reasonably priced, IMHO. And kudos to CWatson, whose communication throughout the process was fantastic.
Quick update - we made some revisions to our kit based on our usage over the past year and feedback from our other users. We have a handful available to ship first thing in October. Please use FB messenger to contact us (facebook.com/GuarinoWatsonRacing) with any questions, it takes a while for me to see PMs. Here be details: https://docs.google.com/presentation/d/1eYNphsjCqokin5Y5AlKrlJUBJDrrN7lXwPp5qrnZIeY/edit?usp=sharing
Quick update - we made some revisions to our kit based on our usage over the past year and feedback from our other users. We have a handful available to ship first thing in October. Please use FB messenger to contact us (facebook.com/GuarinoWatsonRacing) with any questions, it takes a while for me to see PMs. Here be details: https://docs.google.com/presentation/d/1eYNphsjCqokin5Y5AlKrlJUBJDrrN7lXwPp5qrnZIeY/edit?usp=sharing
Quick update - we made some revisions to our kit based on our usage over the past year and feedback from our other users. We have a handful available to ship first thing in October. Please use FB messenger to contact us (facebook.com/GuarinoWatsonRacing) with any questions, it takes a while for me to see PMs. Here be details: https://docs.google.com/presentation/d/1eYNphsjCqokin5Y5AlKrlJUBJDrrN7lXwPp5qrnZIeY/edit?usp=sharing
This fits NA right.?? I noticed it is based on a '99 NB but floor looks the same to me.
This fits NA right.?? I noticed it is based on a '99 NB but floor looks the same to me.
Yes, as far as we know. Roda's car above is an NA. V2 brackets are designed to work with the NB sliders, Corbeau Sliders, or bolt directly to the chassis. We don't know if they work with NA sliders. Hole spacing is 300mm if you wish to check.
Quick update - we made some revisions to our kit based on our usage over the past year and feedback from our other users. We have a handful available to ship first thing in October. Please use FB messenger to contact us (facebook.com/GuarinoWatsonRacing) with any questions, it takes a while for me to see PMs. Here be details: https://docs.google.com/presentation/d/1eYNphsjCqokin5Y5AlKrlJUBJDrrN7lXwPp5qrnZIeY/edit?usp=sharing
I've been looking through the instructions and pictures. The kit replaces at least sections of the factory frame rail. I have the KPower (KMiata) BMW 6 speed swap, which includes frame rail reinforcements that the transmission mounts to. Will aftermarket frame rail reinforcements bolt up to these like stock? Am I looking at this wrong, and typical frame rail reinforcements are in a different place?
I've been looking through the instructions and pictures. The kit replaces at least sections of the factory frame rail. I have the KPower (KMiata) BMW 6 speed swap, which includes frame rail reinforcements that the transmission mounts to. Will aftermarket frame rail reinforcements bolt up to these like stock? Am I looking at this wrong, and typical frame rail reinforcements are in a different place?
Dan, have you had a chance to determine if and what modifications are needed to work with the Kmiata brace?
If any others are wondering, here are measurements from the interior rear bulkhead (V2 kits). Our frame rail wraps closely around the OE frame rail (~2mm or so).
Additional images here. Description here.
Chris, I have not yet. My plan is to have a shop install the drop floor first, then make the K Power kit work second. Ultimately, its more important to me that my rollbar not split my head open in a fender bender than having a BMW trans. The drop floor will probably go in around the Jan-Feb time frame, and the transmission in the spring once the weather is warm. I'll post an update once I make some progress
Just finishing up my install of the GuarinoWatsonRacing kit. Will be posting pictures soon. My car has the full Boss Frog LS swap setup including the front subframe, trans crossmember and rear subframe. Also dual exhaust. I went ahead and made a notch in the front inside corner of the pan once installed and fabricated a panel to allow for more clearance for the exhaust, this seems like it was unnecessary though. Looks like the trans crossmember and exhaust could fit without interference as provided.
I definitely DID have to modify two things:
1. The Boss Frog rear subframe forward brace (same as the rear subframe ladder braces on a stock subframe) had to be shortened to clear the floor drop. The mounting point was not impacted, only the extra material on the brace past the mounting point was removed.
2. The frame rail had to be modified. I considered two options: Using Chris' supplied brace and adding a mounting location for the trans crossmember, or shortening the Boss Frog brace. I chose to shorten the Boss Frog brace and boxed the end at an angle that mimicked Chris' supplied parts. I made mine bolt-on instead of weld-on by retaining the flange and drilling holes for mounting on the floor pan drop.
End of the day, only issue was putting the cross member into location with the frame braces tight to the car. It meant sliding in from the front instead of the back and that required some BFH assistance as the exhaust notches had interference with the passenger side floor.
Here are two pics that show the clearance of the trans crossmember to the t56 with the Boss Frog kit and the GuarinoWatsonRacing kit. Pics also show the modified frame rail brace.
View from center under car View from driver side under car


 1
1