93' Miata stolen and flipped build thread


 04-16-2014, 04:01 AM
#2163
Elite Member

Join Date: Oct 2013
Location: Cedar City, UT
Posts: 2,764
Total Cats: 951
So the good and the bad news.
Good:
My wiring wasn't the cause of my engine suddenly not turning over. After reviewing all of my wiring several times, I couldn't find the issue.
Bad:
So, seeing that there were no issues with the wiring, I started pouring over the rest of the engine bay to see if something had broke, I had knocked a connection loose, or something to indicate the problem.
So while I was looking at my alternator, I noticed that the alternator post wire seemed loose, so I went to tighten it and the hole thing snapped off the alternator. Unfortunately including the terminal/post. I was using a 1/4" socket wrench and to ensure I didn't over-torque, I was holding it by the head of the wrench. The post must have already been damaged at some point.
Hopefully I can find a shop to weld a new post on tomorrow and get the engine started after. I must have damaged it while I was removing the oil pressure sensor from the engine. My own fault, but at least I now know why the engine wouldn't turn over, which is comforting.

Reply
 0
0

0
 04-16-2014, 09:52 AM
#2167

Jeff that's going to be a tough one. There are a couple of things that might be troublesome...
1. There is a nylon isolator around that post so it doesn't ground out to the housing and that's absolutely going to melt unless it's removable.
2. In order to weld that they'll need to clamp the ground cable to something of the same polarity on that alternator and there isn't much to work with.
This sounds strange but if you're really trying to keep that alternator and that post is not a serviceable part - your best bet might be to drill and tap it. Then use a bolt and a washer to keep your lead in place. I'd use your judgement on weather or not you have enough material to do so.
Second possible solution - locally we have a place that rebuilds alternators and I'm sure they would be able to re-use the housing. Maybe you have something similar near you?
Reply
1
1

 04-16-2014, 11:55 AM
#2169
Supporting Vendor


iTrader: (1)
Join Date: Sep 2010
Location: Lake Forest, CA
Posts: 7,953
Total Cats: 1,007
Idea:
1. buy a new alternator and pay the core charge, take it home.
2. swap the housings
3. return your old guts in the new housing and get your core charge refunded.
1. buy a new alternator and pay the core charge, take it home.
2. swap the housings
3. return your old guts in the new housing and get your core charge refunded.
Reply
2
2
04-16-2014, 12:06 PM
#2170
Elite Member
iTrader: (37)

Join Date: Apr 2010
Location: Very NorCal
Posts: 10,441
Total Cats: 1,899
+1. Just don't return it as new/unused. Not that I think you would do this, but I got an alternator for my truck from a FLAPS where someone did this. I was not a happy camper.
Reply
0
0
04-16-2014, 12:35 PM
#2172
Elite Member
iTrader: (37)
Join Date: Apr 2010
Location: Very NorCal
Posts: 10,441
Total Cats: 1,899
The fun part is where they accused ME of doing that when I tried to return it. It had a "Lifetime Warranty" so I just made them test it, listen to the crunchy bearings and give me a new one anyway. 
Reply
0
0
 04-16-2014, 07:01 PM
#2176
Elite Member
Join Date: Oct 2013
Location: Cedar City, UT
Posts: 2,764
Total Cats: 951
I actually got really lucky on this one. There isn't an alternator rebuild shop here in town but one of the shops down here whom I'm good friends with, recommended me this guy who had just retired and had been doing it for 20+ years.
Called him up and he said he'll have a new stud on for me tomorrow and rethread it to m6x1.0 for me as well. When I brought it by he said he'd resolder all the copper joints on the internals and replace the brushes for free as well. Very nice older gentleman, pretty much had an entire alternator repair shop in his garage.
This is yet another reason why I try to make friends with people rather than meaningless financial transactions. They will go above and beyond for yah when you are nice!
Reply
2
2

 04-17-2014, 08:05 AM
#2179
Elite Member
Join Date: Oct 2013
Location: Cedar City, UT
Posts: 2,764
Total Cats: 951
Decided to distract myself a little until my alternator gets done. I was always less than happy with the lighting inside the Miata. Seeing anything is a laugh, let alone trying to find something on the floor.
So instead of making a visor blank I decided to hack it up and install an LED. I had some spare plastic from an old side marker on my Jetta laying around, so I cut a circle out of it, and then cut a matching hole. Then spent way way way to long getting the plastic to be flush with the visor plate. A little epoxy to seal the plastic so no light bleeds through the edges and a ghetto mount for the light later, and we have brilliance! Everything is easily visible inside the car.
It isn't perfect looking even after polishing the plastic for 15-20 minutes, but it works, it's bright, and unless it was pointed out to you, you probably wouldn't notice. Far cheaper than anything aftermarket out there. $5 for the LED, scavenged light socket from the old car, $2 for an inline fuse, and soldered to the contact points on the passenger footwell lights.
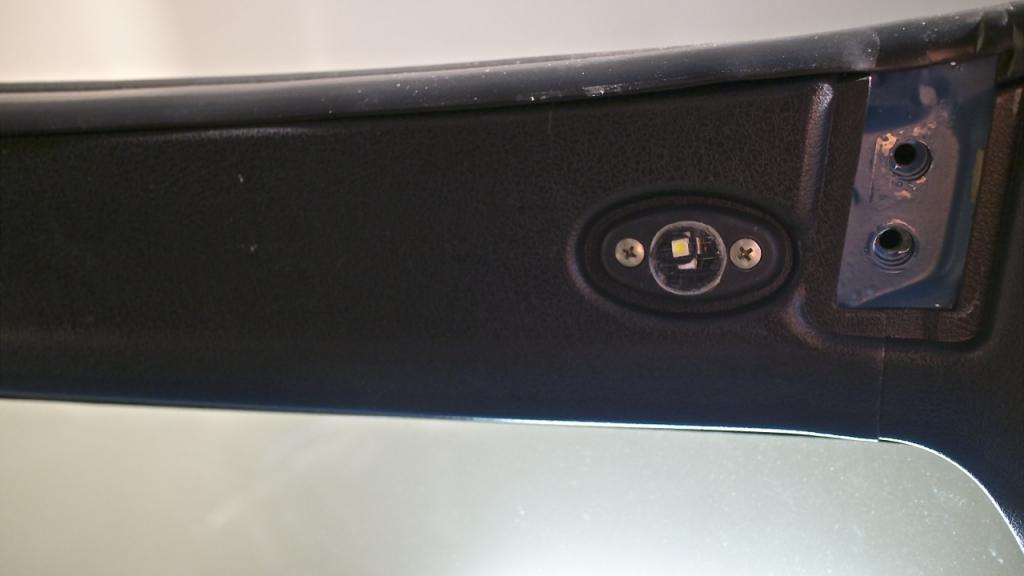
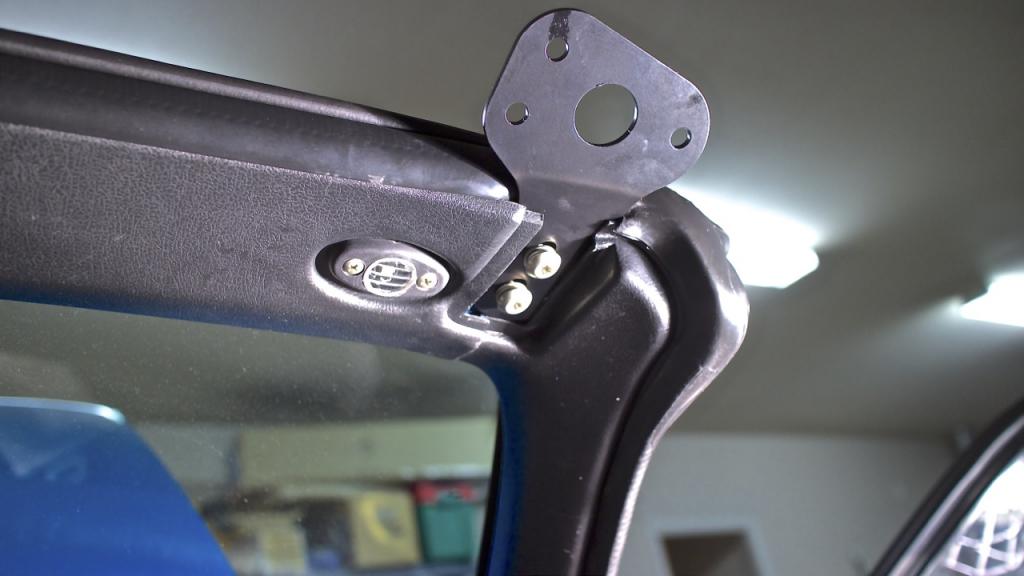
Also put the Rennenmetal hardtop bracket on in preparation of the hard top being done today. Decided to use the stock bolts rather than the ones provided with the brackets. I like the gold zinc rather than silver hex bolts. I'll probably trim the plastic around the bracket OR cut up a spare trim piece and make a cover that will velcro on for easy removal to really hide the bracket.
Also put a new LED inside the footwell light. Talk about a powerful LED! I may have ordered an unnecessarily strong one, but no complaints.

Light difference between stock and new is very apparent.
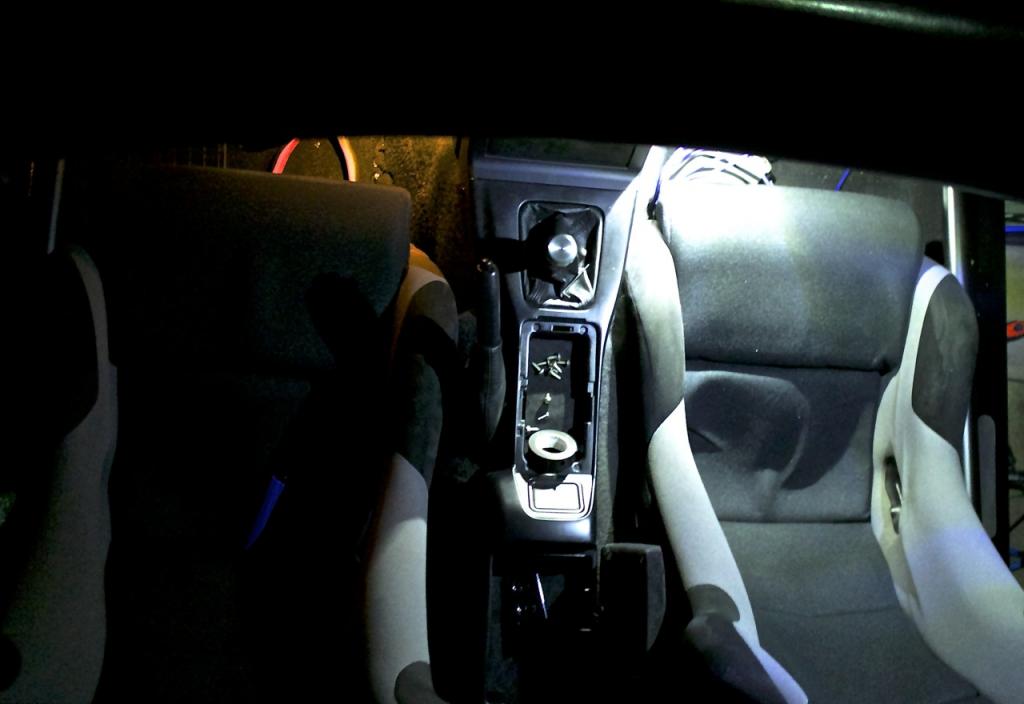
So much light it even lights up the drivers side!
That was a fun little mod, and much more useful than a blanking plate. If I did it again, I have some thoughts on making it look really clean, but for now, it ain't too shabby.
So instead of making a visor blank I decided to hack it up and install an LED. I had some spare plastic from an old side marker on my Jetta laying around, so I cut a circle out of it, and then cut a matching hole. Then spent way way way to long getting the plastic to be flush with the visor plate. A little epoxy to seal the plastic so no light bleeds through the edges and a ghetto mount for the light later, and we have brilliance! Everything is easily visible inside the car.
It isn't perfect looking even after polishing the plastic for 15-20 minutes, but it works, it's bright, and unless it was pointed out to you, you probably wouldn't notice. Far cheaper than anything aftermarket out there. $5 for the LED, scavenged light socket from the old car, $2 for an inline fuse, and soldered to the contact points on the passenger footwell lights.

Also put the Rennenmetal hardtop bracket on in preparation of the hard top being done today. Decided to use the stock bolts rather than the ones provided with the brackets. I like the gold zinc rather than silver hex bolts. I'll probably trim the plastic around the bracket OR cut up a spare trim piece and make a cover that will velcro on for easy removal to really hide the bracket.

Also put a new LED inside the footwell light. Talk about a powerful LED! I may have ordered an unnecessarily strong one, but no complaints.

Light difference between stock and new is very apparent.

So much light it even lights up the drivers side!

That was a fun little mod, and much more useful than a blanking plate. If I did it again, I have some thoughts on making it look really clean, but for now, it ain't too shabby.
Last edited by Jeffbucc; 04-17-2014 at 08:44 AM.
Reply
4
4


