
Fireindc's attempt to build a decent miata. (the search for more torque).


Here is the plastigauge kit I bought --->
My buddy who's built a fair number of motors said the brand doesn't really matter, they are all basically the same. That's heresay though so take it as you will.
The only thing I don't like about my kit is the measurement ranges didn't fit that great with the mazda clearances. For example, the Mazda main bearing clearances was 0.008" - 0.014" or something like that but the kit I have only has measurements for 0.01" and 0.015". So I couldn't really measure exactly what my clearances were, just that they were more than 0.01" and less than 0.015".
SO, whatever plastiguage kit you buy just make sure to check the ranges and scales you are getting.
Reply
 0
0

0

Keep in mind that all Mazda specifications started in mm and were then converted (and poorly rounded) to inches. If possible, get a metric plastigauge kit and use the original metric specifications.
Reply
0
0


Err, your main bearing clearance should be closer to .0008 and .0014, no? I could be wrong.
I've always just gotten plasti gauge at my local auto store, and you can select .0005-.005, or .005-.010 I think. Or something like that.
I've always just gotten plasti gauge at my local auto store, and you can select .0005-.005, or .005-.010 I think. Or something like that.
Reply
0
0

Thread Starter
Elite Member
iTrader: (13)
Joined: Dec 2006
Posts: 7,742
Total Cats: 915
From: Taos, New mexico
OKAY guys, ski season is gone. I haz a sad, the closing day was yesterday and there was 10" of fresh snow overnight for it, which was truly kickass.
However this means lots of energy going towards finishing the miata (and other summer toys), some updates.
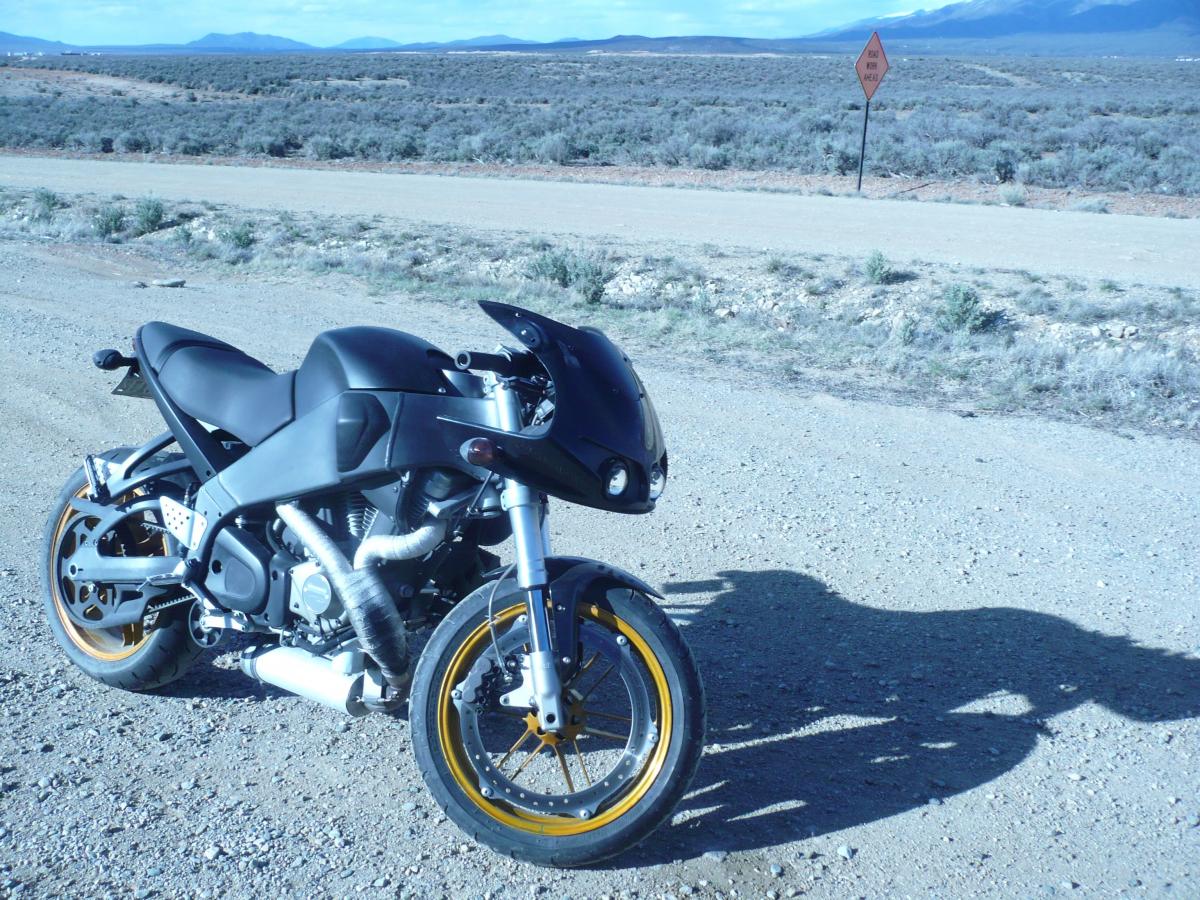
Got a new seat for the Buell, plastidipped the seatrails black, and shortened the fairing so it's not as huge in the front. I'm loving the new look, it's good to go for summer.
However this means lots of energy going towards finishing the miata (and other summer toys), some updates.
Got a new seat for the Buell, plastidipped the seatrails black, and shortened the fairing so it's not as huge in the front. I'm loving the new look, it's good to go for summer.
Reply
0
0
Thread Starter
Elite Member
iTrader: (13)
Joined: Dec 2006
Posts: 7,742
Total Cats: 915
From: Taos, New mexico
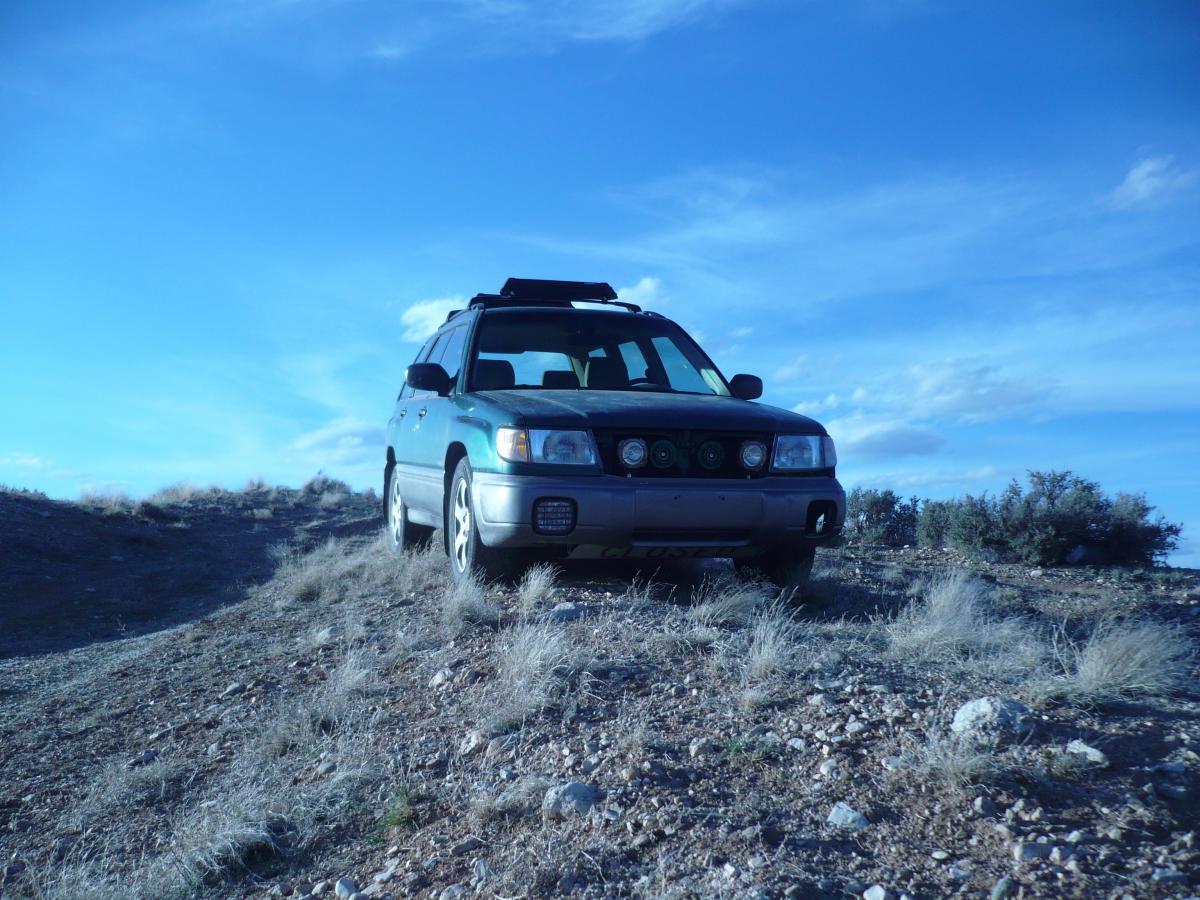
Also did some typical subaru mods, lots of dirt road driving and exploring. Super fun at night with the HID spots, they are seriously SUPER bright and you can see damn near a mile with them on a clear night. Yes, the grill will go back on as well, already modified it to fit around the lights.
Reply
0
0
Thread Starter
Elite Member
iTrader: (13)
Joined: Dec 2006
Posts: 7,742
Total Cats: 915
From: Taos, New mexico
And... QUICK before anyone says ****.. miata content.
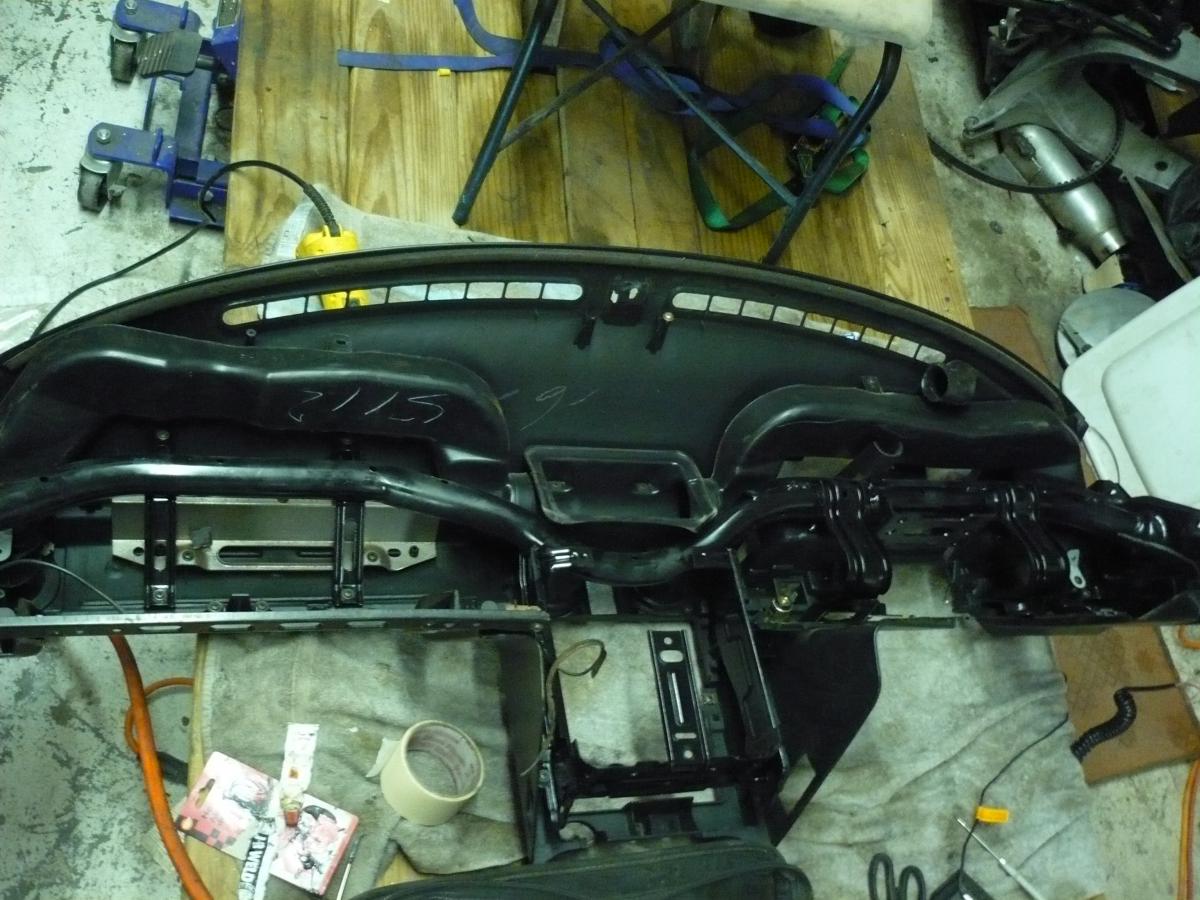
Been working on this dash, as it will be going into my car soon. I cleaned up the dash bar (seriously, was SUPER rusty) with a wire wheel and sprayed it with some rustoleum. Sure, nobody will see the dash bar.. but I'll know it is there.
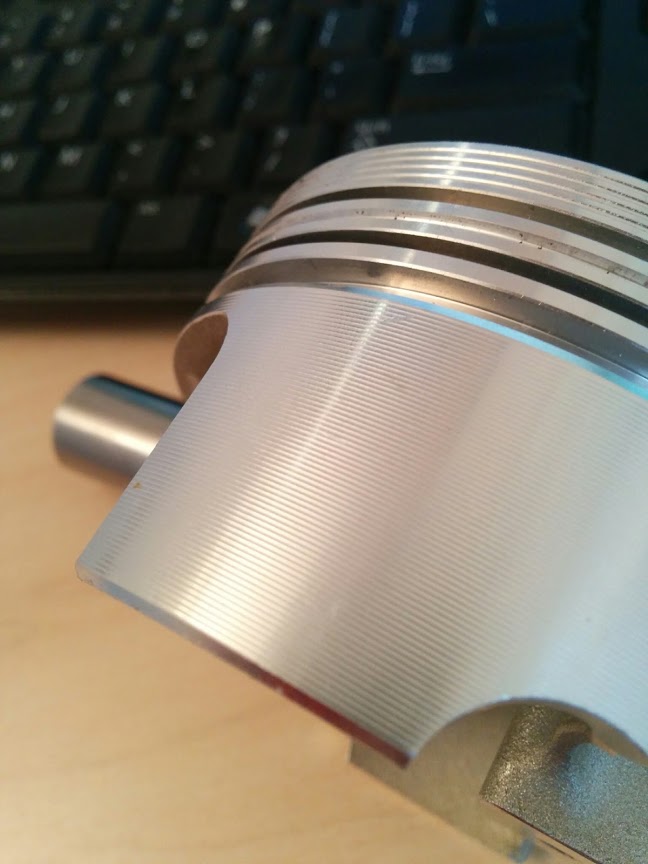
Soaked these pistons over the weekend in my parts cleaner (basically lots of purple power), then scrubbed them with a nylon brush. These are the OEM pistons going back into my build.
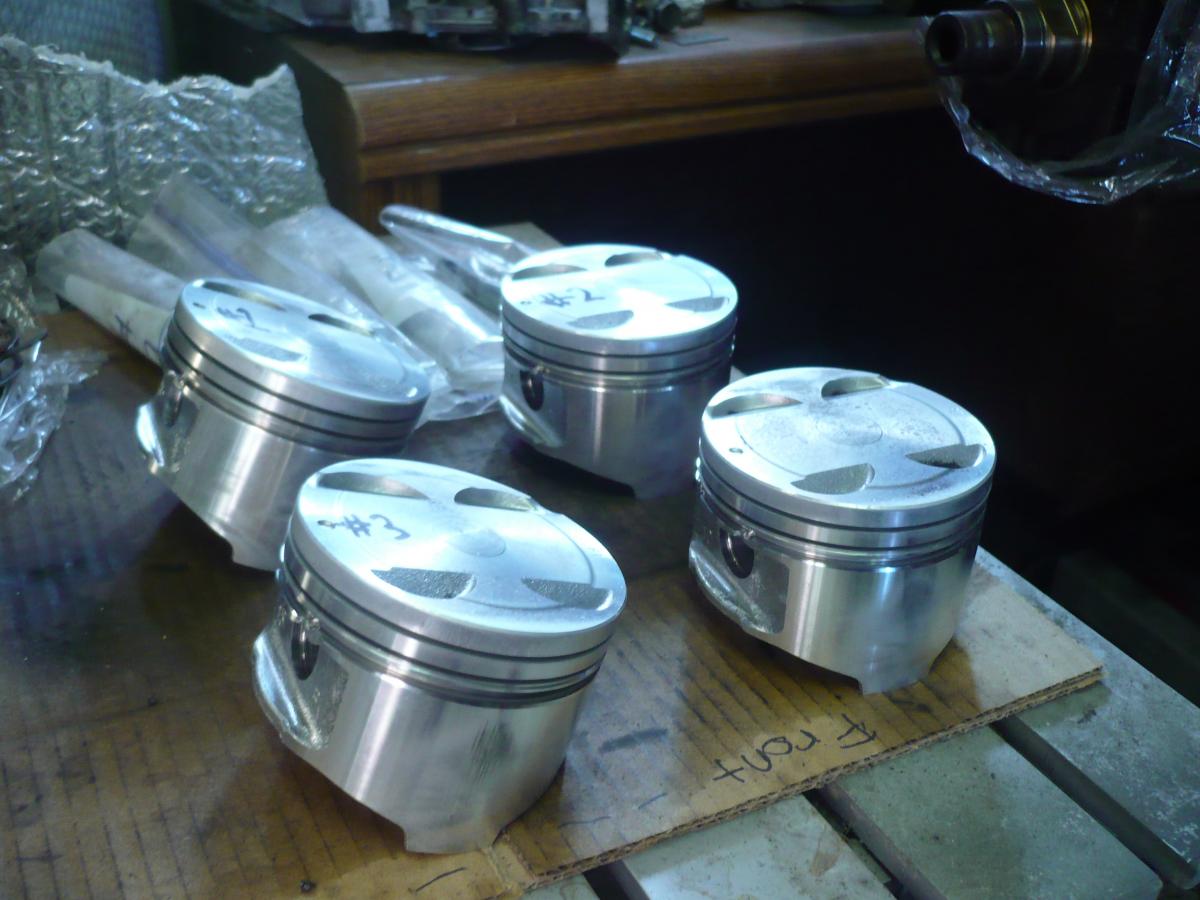
Would you guys do anything about the slight scuffing on the skirts? I'm thinking i'll hit it with a super high grit (2,000+) wetsand to buff em out, but I'm not sure if that is the best idea. To give you an idea of how deep they are, the deepest ones you can barely feel with a fingernail, but they are there. I know the skirts "shouldn't" touch the cyl walls, but i figured in a worst case scenario they could, and I want the skirts to be smooth as possible.
Thoughts?
Been working on this dash, as it will be going into my car soon. I cleaned up the dash bar (seriously, was SUPER rusty) with a wire wheel and sprayed it with some rustoleum. Sure, nobody will see the dash bar.. but I'll know it is there.
Soaked these pistons over the weekend in my parts cleaner (basically lots of purple power), then scrubbed them with a nylon brush. These are the OEM pistons going back into my build.
Would you guys do anything about the slight scuffing on the skirts? I'm thinking i'll hit it with a super high grit (2,000+) wetsand to buff em out, but I'm not sure if that is the best idea. To give you an idea of how deep they are, the deepest ones you can barely feel with a fingernail, but they are there. I know the skirts "shouldn't" touch the cyl walls, but i figured in a worst case scenario they could, and I want the skirts to be smooth as possible.
Thoughts?
Reply
0
0

Thread Starter
Elite Member
iTrader: (13)
Joined: Dec 2006
Posts: 7,742
Total Cats: 915
From: Taos, New mexico
Thanks guys. So i got a few local quotes on headwork, and to lap the existing valves, re-shim and re assemble the head everyone wants >$400. Not going to pay that, so it looks like another project I'll take on for myself.
Another question for yous guys, just picked up some "DNJ" piston rings from Luke, and from all my research they should be fine in my mild build, but does anyone have personal experience with them?
They are these, from rockauto:
More Information for DNJ ENGINE COMPONENTS PR490
I'm thinking about skipping on the chrome rings from what i've read, as they are much more picky to break-in AND they will wear the bores more than cast/moly.
Also, going to follow this hone procedure and use my "medium" grit 3 stone style hone.
Untitled Document
I'm kind of just thinking outloud here, but any input is appreciated.
Reply
0
0

That sucks, I was being quoted about $100 more than that out this way, and everyfuckinghting is more expensive in California. Maybe ask them how much less it would be if you delivered everything disassembled? A huge part of the bill I got was shop labor for disassembly/reassembly. I know I can assemble a head, I just don't have the tools to do the valve service.
Reply
1
1
- valve seal pliers
- valve spring compressor
- magnet stick
- feeler gauge
- valve lapping tool
- valve lapping compound
Reply
1
1
Thread Starter
Elite Member
iTrader: (13)
Joined: Dec 2006
Posts: 7,742
Total Cats: 915
From: Taos, New mexico
It's looking more and more like this is something I get to learn soon. The head is running fine on my motor now with less than 15% leak on all cylinders, some of which is probably rings. I feel like a quick relapping of all the valves should get the head sealing well enough.
Thanks much for the tips, Rob. My dad made a similar comment and thinks we should just do it ourselves. The good thing is i'll have his help and he's done a few motors like this himself. I'm thinking if i go easy on the lapping the valve tolerances shouldn't get too out of spec, but that is something else i will be checking for at the time.
Thanks much for the tips, Rob. My dad made a similar comment and thinks we should just do it ourselves. The good thing is i'll have his help and he's done a few motors like this himself. I'm thinking if i go easy on the lapping the valve tolerances shouldn't get too out of spec, but that is something else i will be checking for at the time.
Reply
0
0

With the head off you should at least perform a DIY seat/valve sealing test with rubbing alcohol and or with air also. Just to see if they are sealing well and then sealing under a bit of pressure. I was surprised to see I had a bunch of decent leaks on a low mile VVT head I had purchased. If you have leaks see if lapping cures them and then go from there. Does the money ever stop bleeding - no. But you'll have a sub 2200lb missile on your hands soon.
BTW Oven Cleaner makes the perfect carbon cleaner on the exhaust side of the head, it discolors the aluminum but doesn't pit or hurt the head really. Since your in there stick the dremel on all the casting flaws and remove them, might not net you anything but it just takes some time and it might do some good. Better HP gains than a Mugen sticker.....
I broke down and paid $300CDN for head cleaning, surfacing, 3 angle valve job and seat finishing etc. Everything except assembly, which will take the most man hours but I can tediously set the clearance's myself. Because material was removed from the valve/seat he also ground the stems down but basically it'll be a guessing game on shims. He said that's where all the labor time comes in. I'm cheap labor I guess.
Reply
1
1
Thread Starter
Elite Member
iTrader: (13)
Joined: Dec 2006
Posts: 7,742
Total Cats: 915
From: Taos, New mexico
Yes, i may go with a poor mans leak test on the head. Although I'm not sure that I understand how you are supposed to apply pressurized air to it?
I just took the car out for its first drive this spring, it's insured/registered and ready to go. Fired it up for the first time in 5 months or so, runs like a goddamn champ. Topped it up with some 91 octane and did a few pulls. Wow, driving a slow car really made this thing feel fast. I only did a few wot pulls because it felt so damn fast I didn't want to stay in it past 3rd gear on any of the roads I was on. A few things I noticed:
On cold startup it takes a few seconds to show oil pressure on my gauge, and you can hear the head is a little chattery until the gauge shows pressure. Definitely no bottom end knocking or anything that you can hear, so i think it's getting at least some oil pressure right away, it just takes a sec to flow everywhere and build "pressure" on the gauge. I have the FM feed line for my turbo tee'd off the oil pressure sending unit, so that could be part of the lag as well? It's acted like this since i got the setup together. Warm startup is fine and shows pressure pretty much immediately.
The t25 turbo makes a VERY funny noise at about 1200-1400 rpm if you hold the throttle here. It's a low pitch humming which is really loud, and I don't think it's right at all. Starting to think the turbo itself might be the source of my oil consumption on this setup, but i still don't know if i want the 2860 on this motor anyways. Engine build is still proceeding ASAP as planned.
A few things that are priority right now:
#1) fix the pass side upper ball joint. Obviously has play, i can feel it when tugging on the wheel. Funny thing is this happened a few months after getting some real sticky tires on it for the first time, i think the extra force just sheared the old joint. I've got a spare UCA that i'm just going to swap in on wed.
#2) raise the ****** suspension. I dont know what was wrong with me to think having it this low is acceptable. It handles so damn well on the road, but seriously I have to drive down a LONG *** dirt road to get to the street and it's almost unbearable. I'm hoping to get the ride height at least an inch higher, and the new UCA on sometime on wed.
#4) my rollbar makes contact with the hardtop, because of this down my dirt road it makes the most absurd racket. The hardtop still fits fine and whatnot, its just a slight rubbing on the corners of the bar. It sucks, i've got to figure out some kind of solution here. I might glue some silicone hose onto the hardtop where it makes contact to act as a buffer, then bolt the hardtop on with SM style brackets. If i can keep it from rattling I'll be happy.
It's a HDHCDD bar, (non hardtop). From what I've read, most of these have no problem and should clear the hardtop (just not the side latches, which i'm not using anyways). However, there are reports of others having this issue as well. I'm not sure what i could do, short of getting the bar lower in the car somehow which would require some serious cutting/welding.
Last edited by Fireindc; Apr 22, 2014 at 02:24 PM.
Reply
0
0
Decent oil filter (anti-drainback valve)?
On the noise . . . exhaust leaks or some kind of contact somewhere (including shields)?
On ball joint . . . you sure it's not the hub? That's what usually goes bad on Miatas.
On the noise . . . exhaust leaks or some kind of contact somewhere (including shields)?
On ball joint . . . you sure it's not the hub? That's what usually goes bad on Miatas.
Reply
1
1
Thread Starter
Elite Member
iTrader: (13)
Joined: Dec 2006
Posts: 7,742
Total Cats: 915
From: Taos, New mexico

I had a bosch miata specific filter on it before when it did this, and have since upgraded to a higher capacity napa gold filter for an integra. Both the same. The oil pressure thing has been a concern since i got this engine running, it has great oil pressure after it builds and honestly i suspect the oil pump relief valve from what I've read. This (and burning 1 qt / 1000) is why I'm building a motor.
The turbo thing, is DEFINITELY resonating through the intake. It is seriously so loud it sounds like a horn at the right RPM, you can clearly hear it from within the car with the windows up, and i have a very loud exhaust. It's not an exhaust leak, but its coming from the center section. I'm not sure if the turbo ITSELF is making the noise, or if its a resonating frequency from the air moving through my intake pipe. And again, i do have a new turbo going on the new motor as well.. so i'm just going to run it as is for now and see what happens.
Ball joint, i'll find out on Wed most likely. Thanks for the tip, i'll keep that in mind when i tear the front apart. I have a spare hub at the shop too, so either way I can get it running asap.
Reply
0
0

I know the feels. My 202k mile 1.6 is feeling its age with unrelenting boost, gradually losing its lifeblood. Threads like yours are driving me to build up a 1.8 too. Actually almost exactly like you're doing it, minus the E85 and turbo upgrade (maybe a 2560 instead? Depends how the potato treats you). You make the DIY strong in me.
Reply
0
0
Thread Starter
Elite Member
iTrader: (13)
Joined: Dec 2006
Posts: 7,742
Total Cats: 915
From: Taos, New mexico
I know the feels. My 202k mile 1.6 is feeling its age with unrelenting boost, gradually losing its lifeblood. Threads like yours are driving me to build up a 1.8 too. Actually almost exactly like you're doing it, minus the E85 and turbo upgrade (maybe a 2560 instead? Depends how the potato treats you). You make the DIY strong in me.
Anyways, all that said - does anyone have an opinion on the "DNJ" rings I got? They are these: More Information for DNJ ENGINE COMPONENTS PR490
DNJ Piston Rings consist of 3 Types of Materials:
Cast Iron: Resistant to destruction and weakening by oxidation for longer lasting rings.
Steel: Controls qualities such as hardness ductility and tensile strength.
Ductile: Ability to change form without breaking for a more precise cylinder seal.
I'm leaning against the chrome rings at this point, i really just want something that is going to seat as easy and well as possible, and last ~50k miles @ 260whp daily driven.
Edit: let me put it this way, i got the above rings for very cheap and they are sitting on my desk right now. Should i go ahead and run em, or is it completely silly to be putting ARP main/head studs on this motor with forged rods and cheap rings? If i don't use them on this motor, i'll use them on the other BP bottom end i have laying around, or something.
Reply
0
0


