
Round 2: Wannabe turbo NB6C

Thread Starter
Junior Member

Joined: Aug 2005
Posts: 440
Total Cats: 17
From: Cayman Islands
Thanks man.
We do get some pretty nice cars down here yeah.
We used to have a 1/8th mile strip but that went sour. Up until last year we did have a monthly Auto cross. We use an industrial estate as it's all we can get permission to use. 2016 we may have a better venue lined up.
We do get some pretty nice cars down here yeah.
We used to have a 1/8th mile strip but that went sour. Up until last year we did have a monthly Auto cross. We use an industrial estate as it's all we can get permission to use. 2016 we may have a better venue lined up.
Reply
 0
0

0
Thread Starter
Junior Member
Joined: Aug 2005
Posts: 440
Total Cats: 17
From: Cayman Islands
no ATS carbon. Opted to get an new ORC single plate instead. Worked out cheaper than the FM kit. Everything will be here in September so if the damned rain would stop I could get a move on and have the car put back together by then.
Reply
0
0
Thread Starter
Junior Member
Joined: Aug 2005
Posts: 440
Total Cats: 17
From: Cayman Islands
I have gotten absolutely nothing done since I last posted.
Hurricane season started on June 1st and the weather has only now just gotten better. The company I was working for out sourced the store I was working at so I had to dedicate my time to re-interviewing for my position with the new company (which I got thankfully )
)
I did manage to order a few bits and pieces
V8roadster frame rails, HD sway bar mounts & the engine bay re-enforcement plates for when you have to cut the wings to clear a V8.
Delrin engine mounts
ARP head studs
Cometic head gasket
Felpro rear main seal
Mac 3 port solenoid to wire into the Haltech
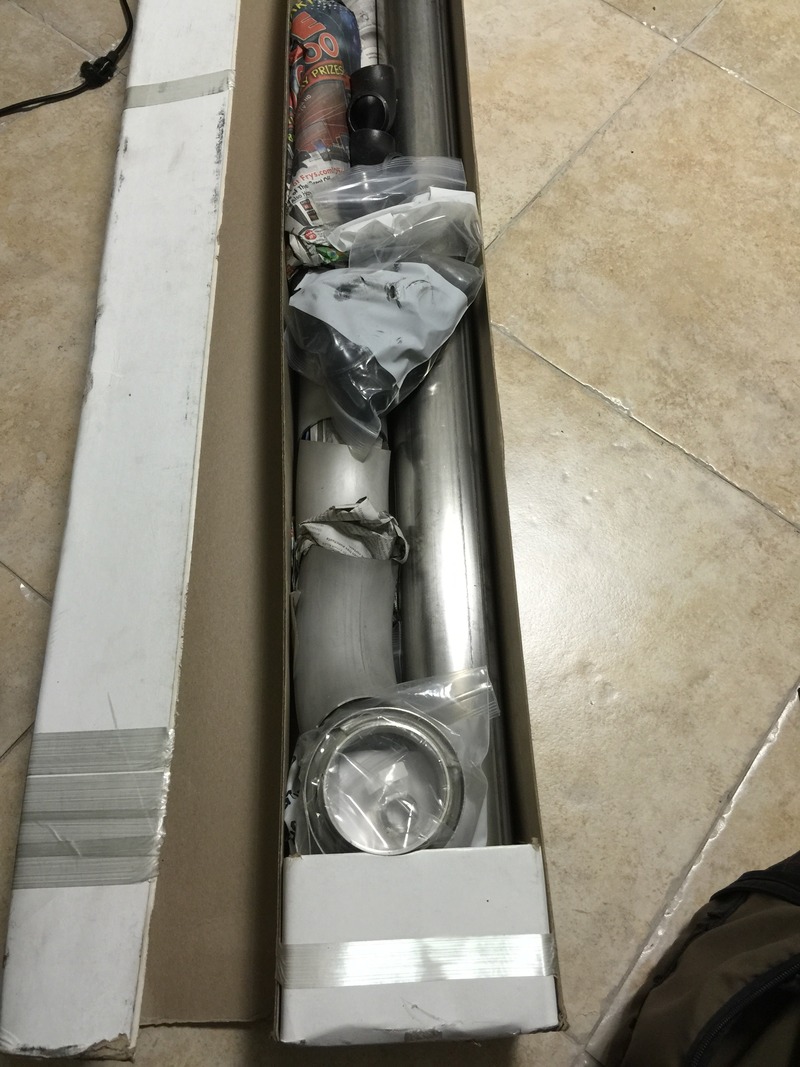
3" compressor inlet adapter
The hardtop, suspension, diff & clutch/flywheel will be here end of August
Tuesday is my next day off and if it's not raining I'll finish the wheel wells & prep the frame rails with the bfh.
Hurricane season started on June 1st and the weather has only now just gotten better. The company I was working for out sourced the store I was working at so I had to dedicate my time to re-interviewing for my position with the new company (which I got thankfully
)I did manage to order a few bits and pieces
V8roadster frame rails, HD sway bar mounts & the engine bay re-enforcement plates for when you have to cut the wings to clear a V8.
Delrin engine mounts
ARP head studs
Cometic head gasket
Felpro rear main seal
Mac 3 port solenoid to wire into the Haltech
3" compressor inlet adapter
The hardtop, suspension, diff & clutch/flywheel will be here end of August
Tuesday is my next day off and if it's not raining I'll finish the wheel wells & prep the frame rails with the bfh.
Reply
0
0
Thread Starter
Junior Member
Joined: Aug 2005
Posts: 440
Total Cats: 17
From: Cayman Islands
Finally remembered to go pick up the calipers I got off Scrambles part out.
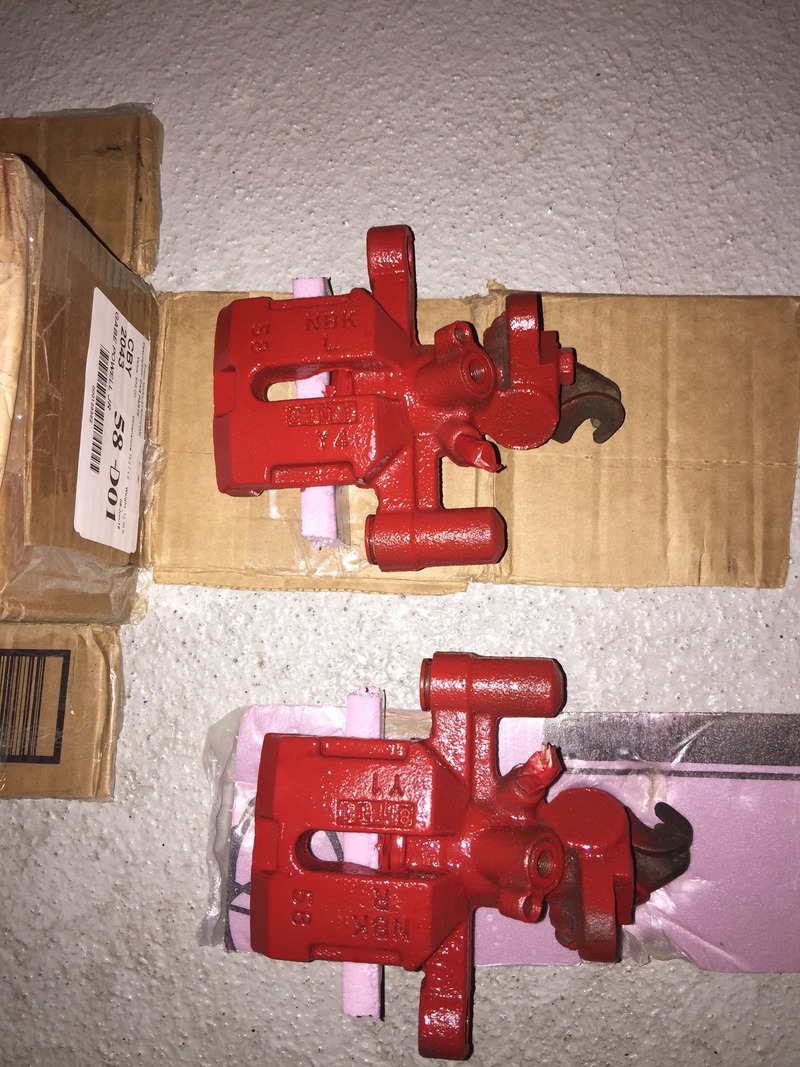
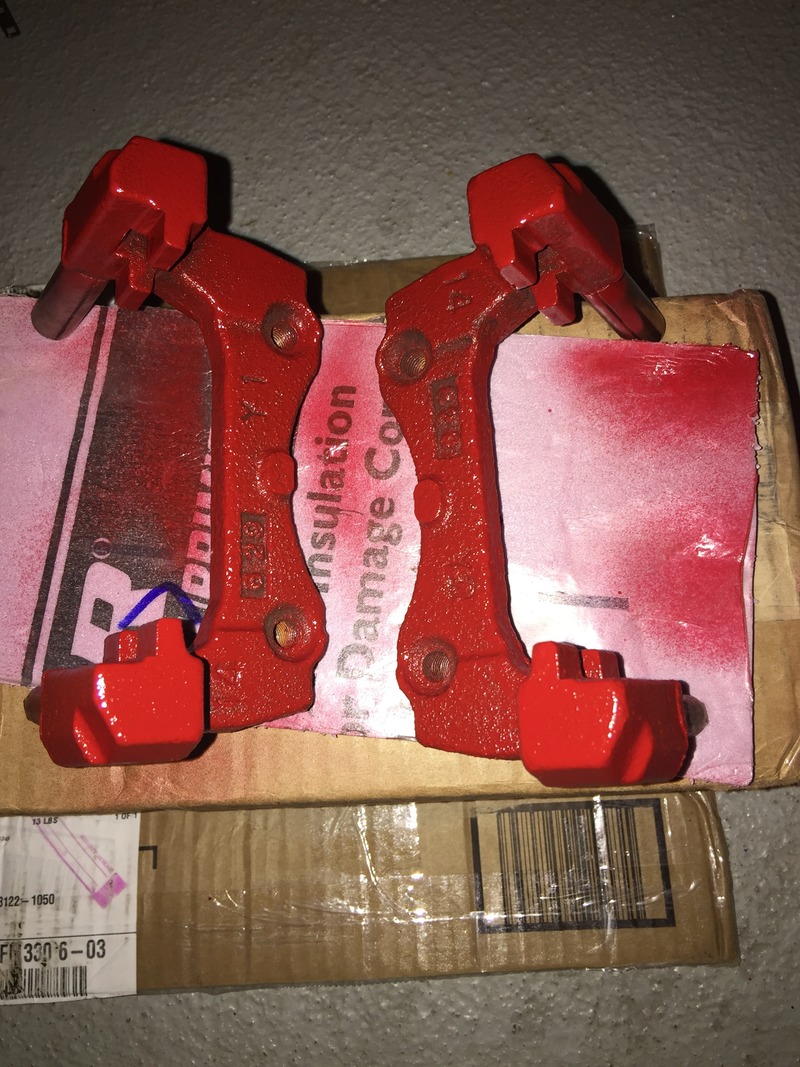
Cleaned them up and shot them with Duplicolor red caliper paint.
Realized a bit too late that I ordered the 0.040" head gasket and not the 0.070". Would have been nice to drop the compression from the 9.4:1. I guess I'll have to keep the boost low :(
Cleaned them up and shot them with Duplicolor red caliper paint.
Realized a bit too late that I ordered the 0.040" head gasket and not the 0.070". Would have been nice to drop the compression from the 9.4:1. I guess I'll have to keep the boost low :(
Reply
0
0
Thread Starter
Junior Member
Joined: Aug 2005
Posts: 440
Total Cats: 17
From: Cayman Islands
The only picture I managed to snap was this. I still need to clean and weld the bottom part of the piece that goes across the rear of the wheel well.
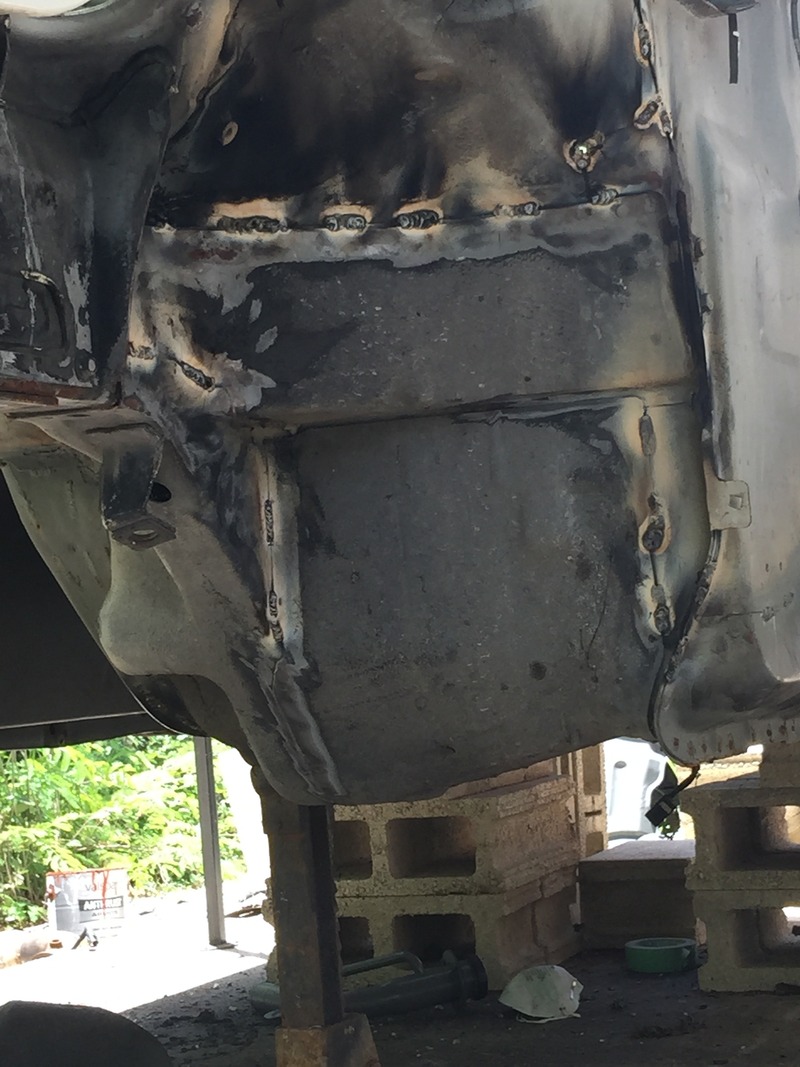
The rear is finished, rear base plates for the cage are in and I cut the rust out front behind the drivers side seat belt tower. The seams are cleaned for the drivers side wheel wells but I just did not have the stamina to finish them (went to the gym this morning)
I can't wait to douse this thing in degreaser and pressure wash the crap out of it so my brother can paint the interior and bay.
Reply
0
0
Thread Starter
Junior Member
Joined: Aug 2005
Posts: 440
Total Cats: 17
From: Cayman Islands
Well the hard top didn't fit in the container  . Will be coming later on in the year on the next one. But the clutch, diff & coilovers are coming so I have that going for me which is nice.
Freight forwarder says next week for all the other **** from Miami.
Also ordered manifold and down pipe materials
The head flange & turbine inlet I ordered from Turbo-Flanges.com: Alloy, Stainless Steel and Titanium flange products for the head, turbine inlet and outlet. and the rest from acerace
Hoping to take some time off in august to speed the process up.
. Will be coming later on in the year on the next one. But the clutch, diff & coilovers are coming so I have that going for me which is nice.Freight forwarder says next week for all the other **** from Miami.
Also ordered manifold and down pipe materials
The head flange & turbine inlet I ordered from Turbo-Flanges.com: Alloy, Stainless Steel and Titanium flange products for the head, turbine inlet and outlet. and the rest from acerace
Hoping to take some time off in august to speed the process up.
Reply
0
0
Thread Starter
Junior Member
Joined: Aug 2005
Posts: 440
Total Cats: 17
From: Cayman Islands
Decided to make the best of the hard top not coming on this container so I ordered 3 friends to keep it company.
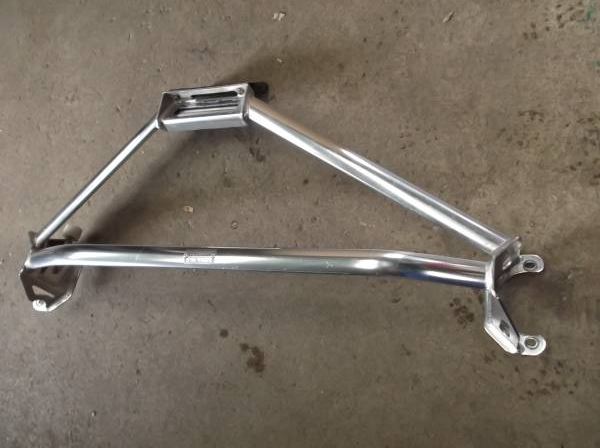
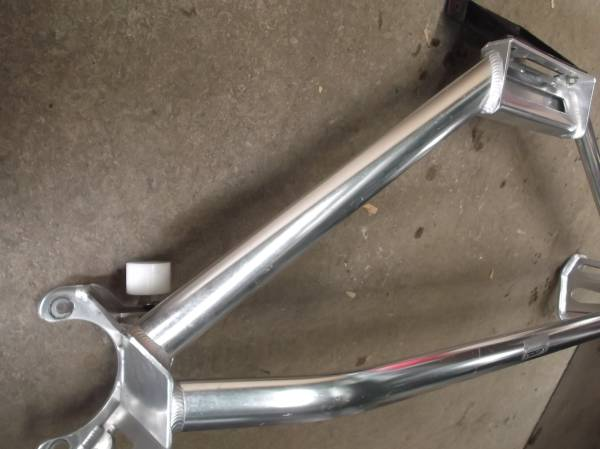
Got some used AutoExe underbraces and a Mazdaspeed 3 point front strut tower brace.

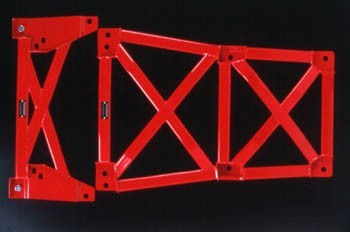
I didn't save a pic of the AutoExe auction before it ended so just for reference
What I want to take a look at when I get the rear one mounted is if there is any way I can tie the diff end of the PPF into it.
Once I get fender braces & the 949 swaybar package the chassis/suspension will be complete.
Got some used AutoExe underbraces and a Mazdaspeed 3 point front strut tower brace.
I didn't save a pic of the AutoExe auction before it ended so just for reference
What I want to take a look at when I get the rear one mounted is if there is any way I can tie the diff end of the PPF into it.
Once I get fender braces & the 949 swaybar package the chassis/suspension will be complete.
Reply
0
0
Thread Starter
Junior Member
Joined: Aug 2005
Posts: 440
Total Cats: 17
From: Cayman Islands
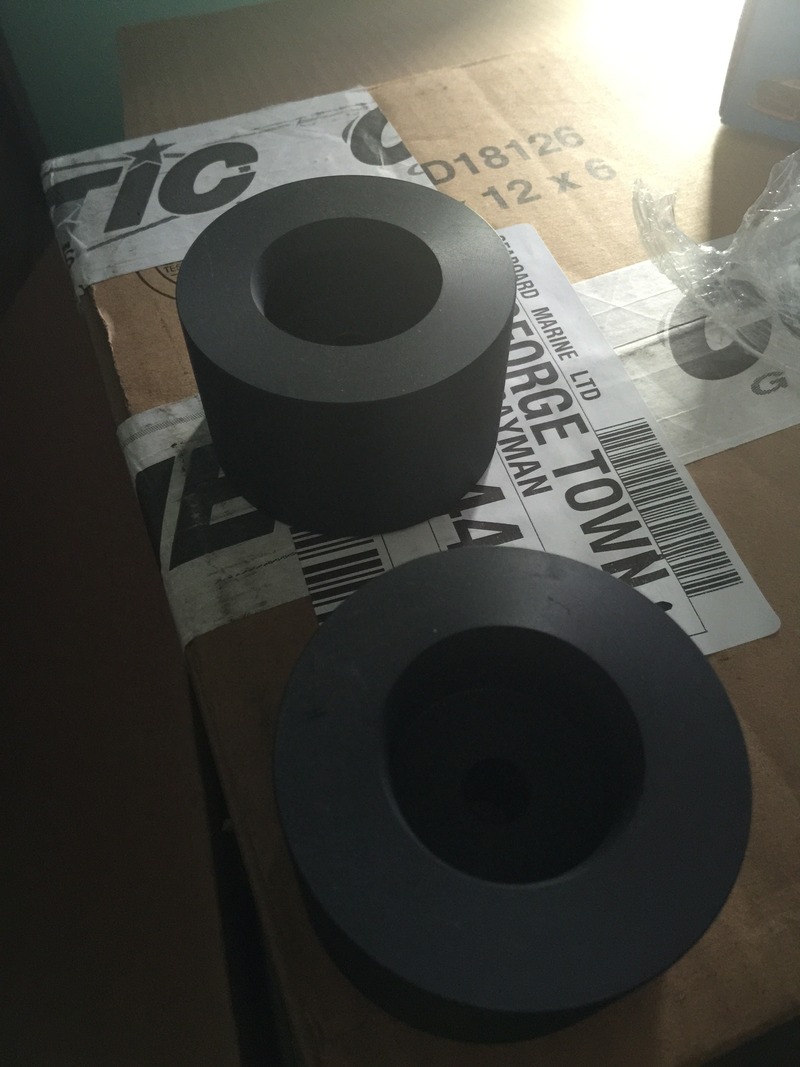
A friend want's me to redo his intercooler setup on his Evo3 so he's bought me the Vibrant 18x6.5x3.25 core for the Miata as payment for the work.
Plan is to use some 3/16" sheet to make some end tanks to point the piping up so I can do an over the rad setup.
All I need now is some 2" aluminum bends & piping and the oil/water lines for the turbo kit to be complete.
This is all coming together alot quicker than I imagined. Need to get my *** in gear and finish the seam welding.
Reply
0
0
Thread Starter
Junior Member
Joined: Aug 2005
Posts: 440
Total Cats: 17
From: Cayman Islands
Pics!
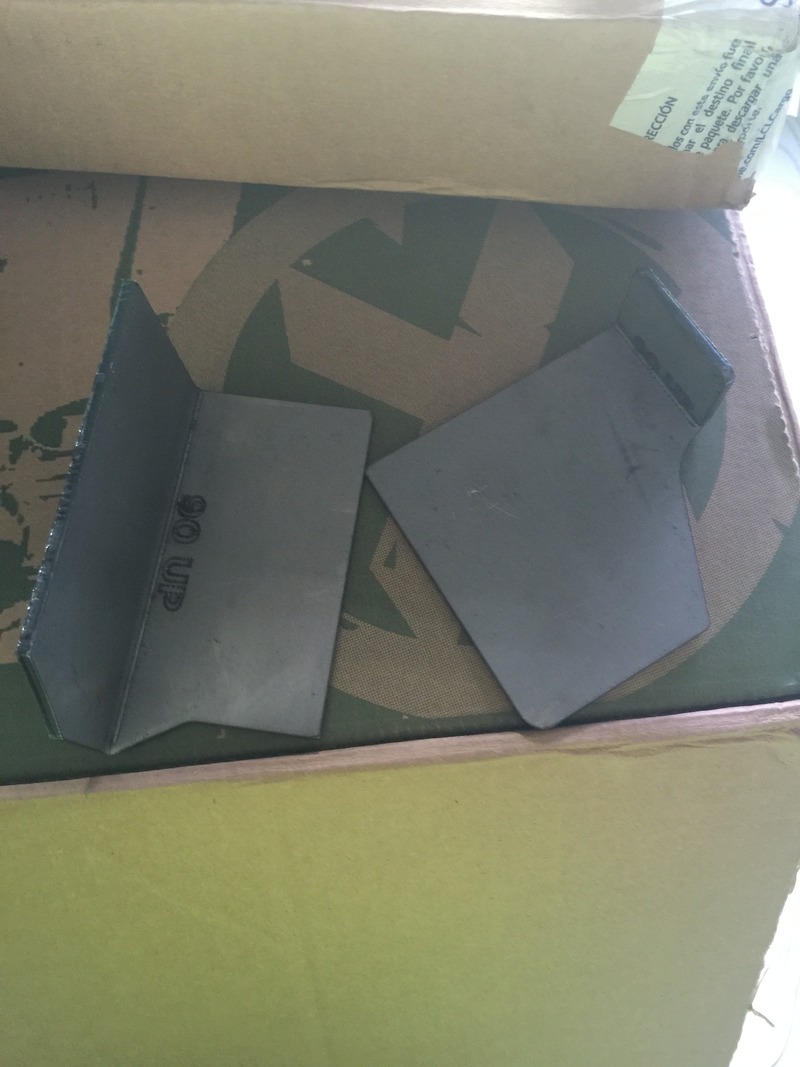
V8R engine bay gussets
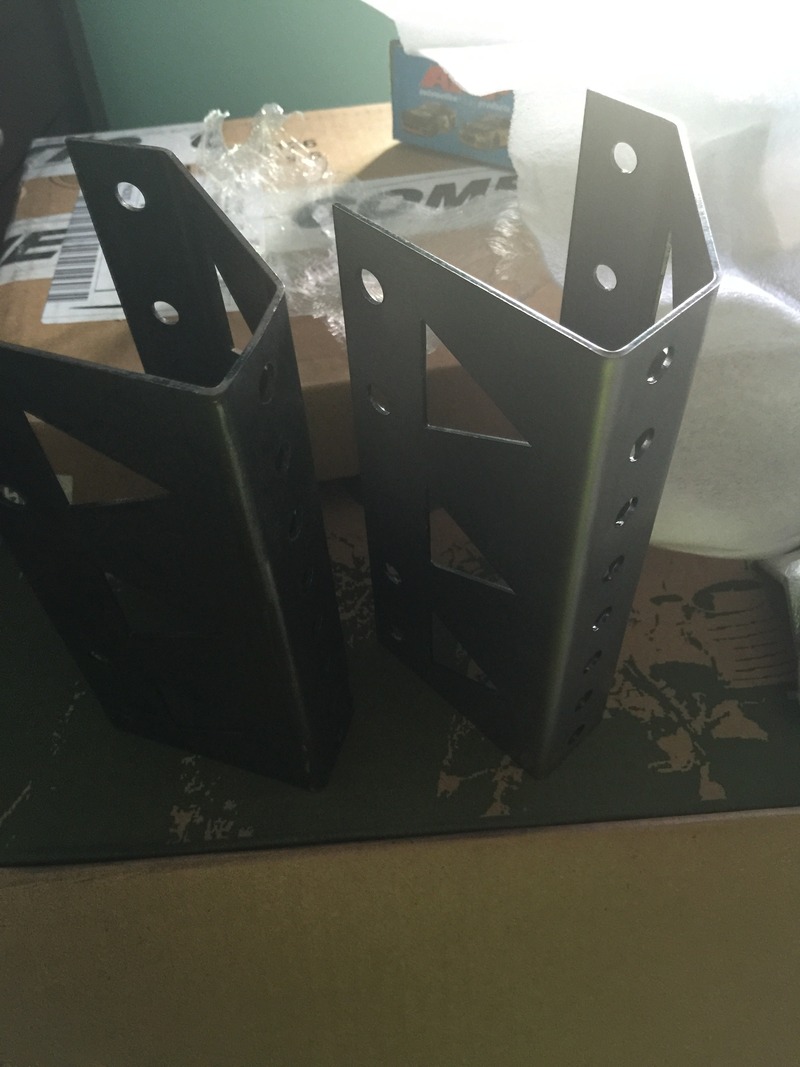
V8R sway bar mounts. I might add some end caps/gussets for the hell of it

V8R frame rails. I asked if they could send me some uncoated ones so I could weld them in. The bolts feel like they weigh more than the frame rails.
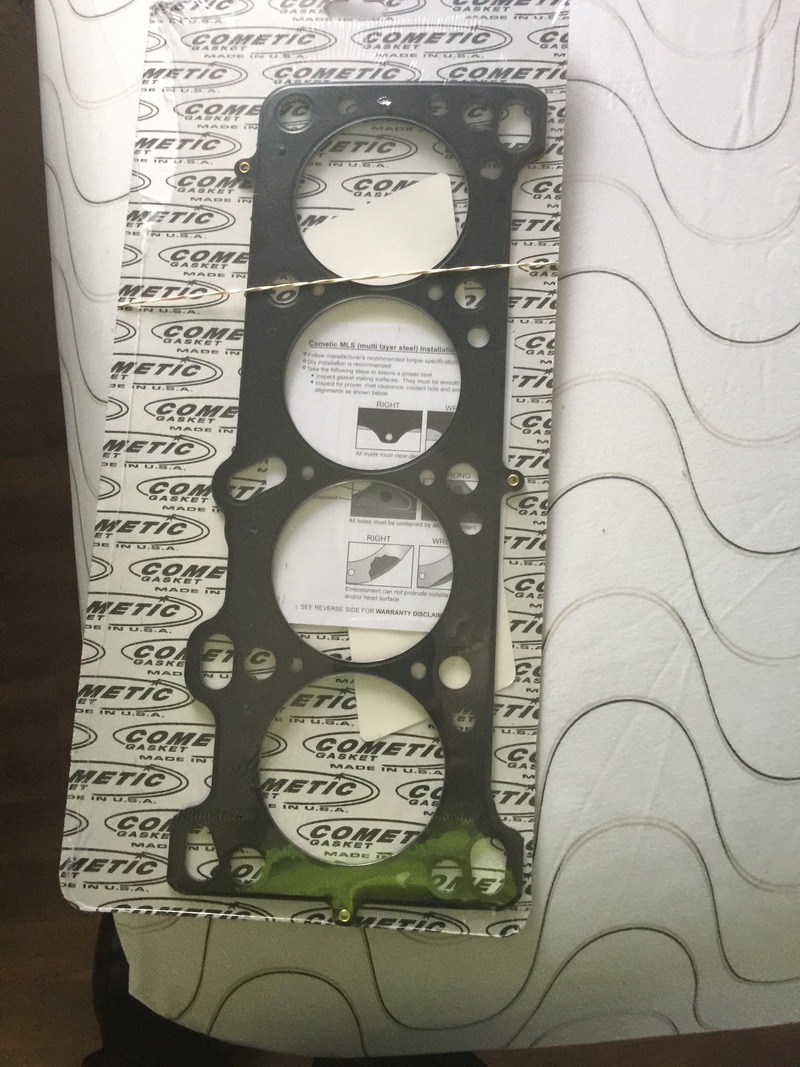
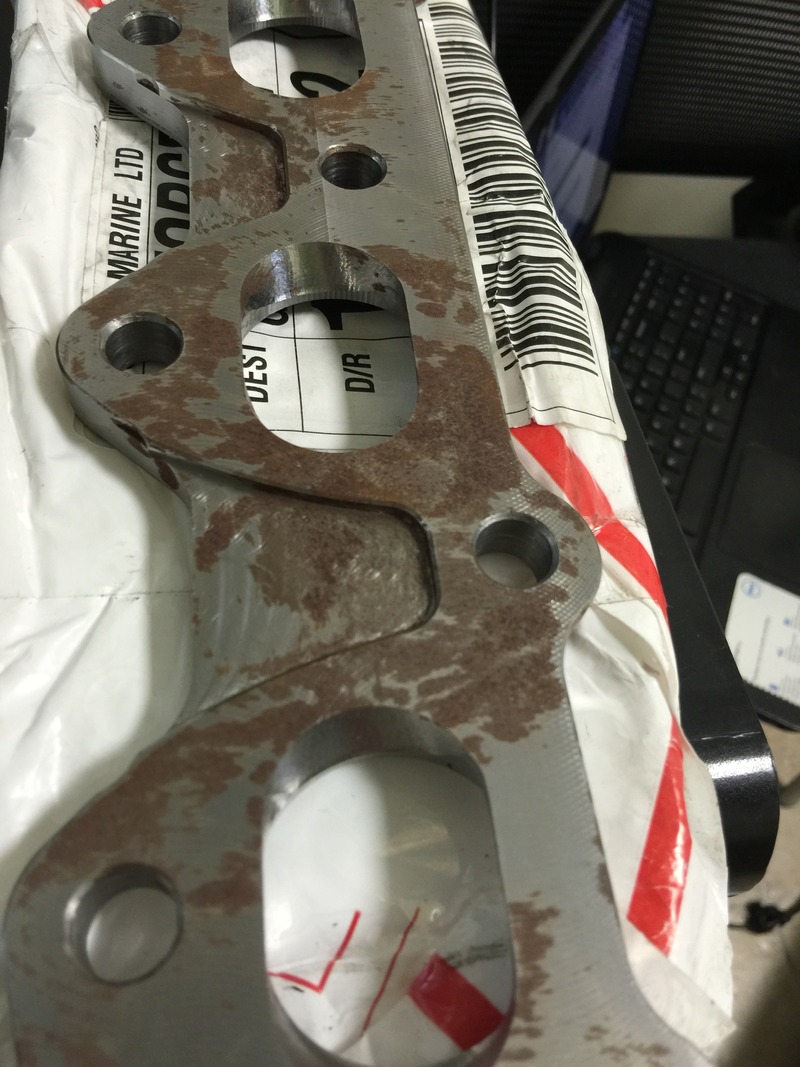
Cometic 0.040" head gasket. I ordered what I thought were head studs but turned out to be main studs. A slight mis-click of the mouse as it were
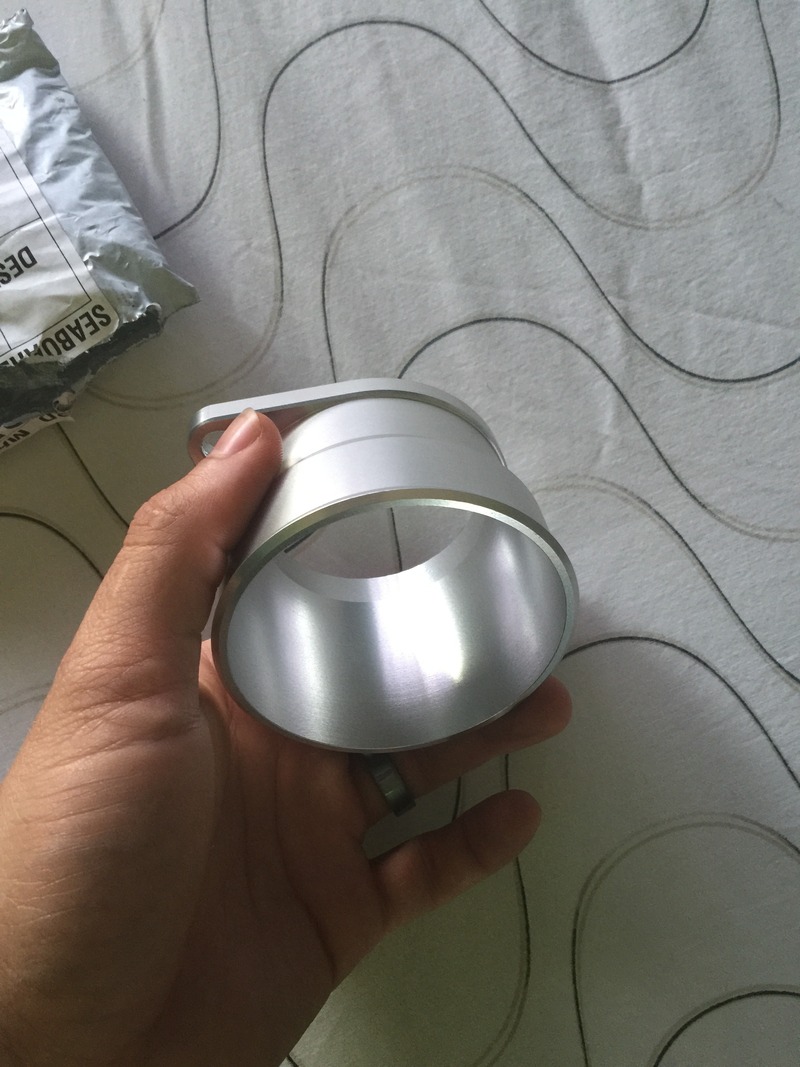
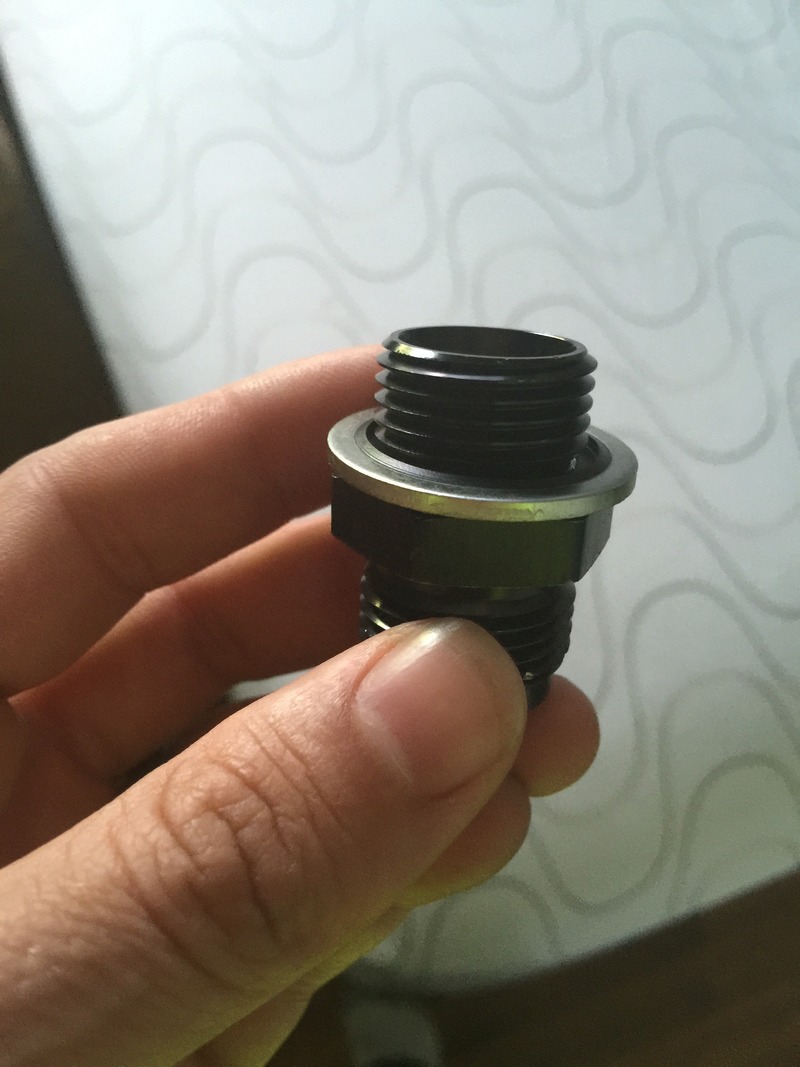
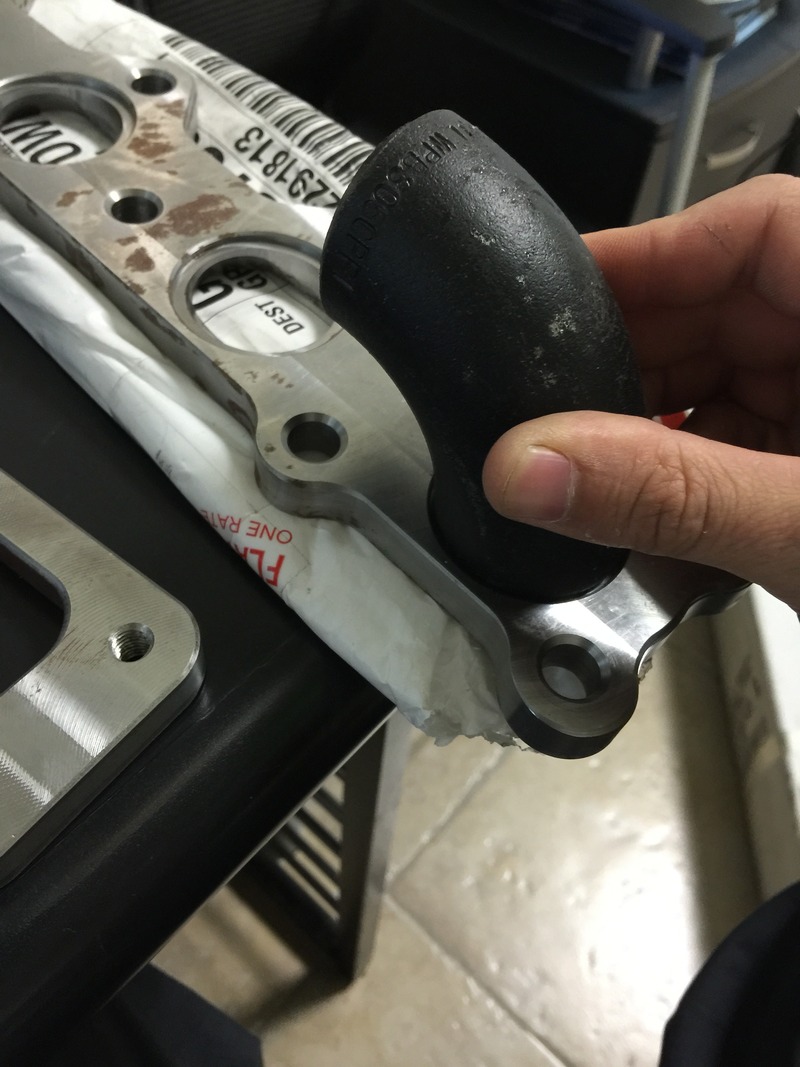
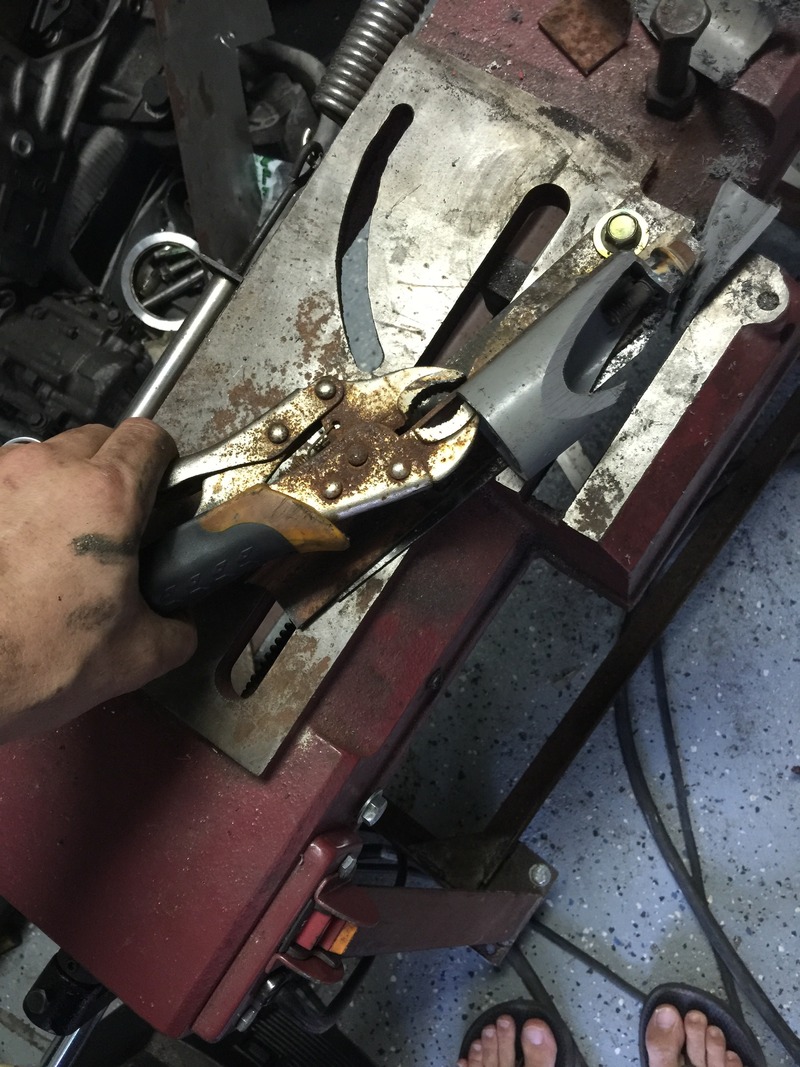
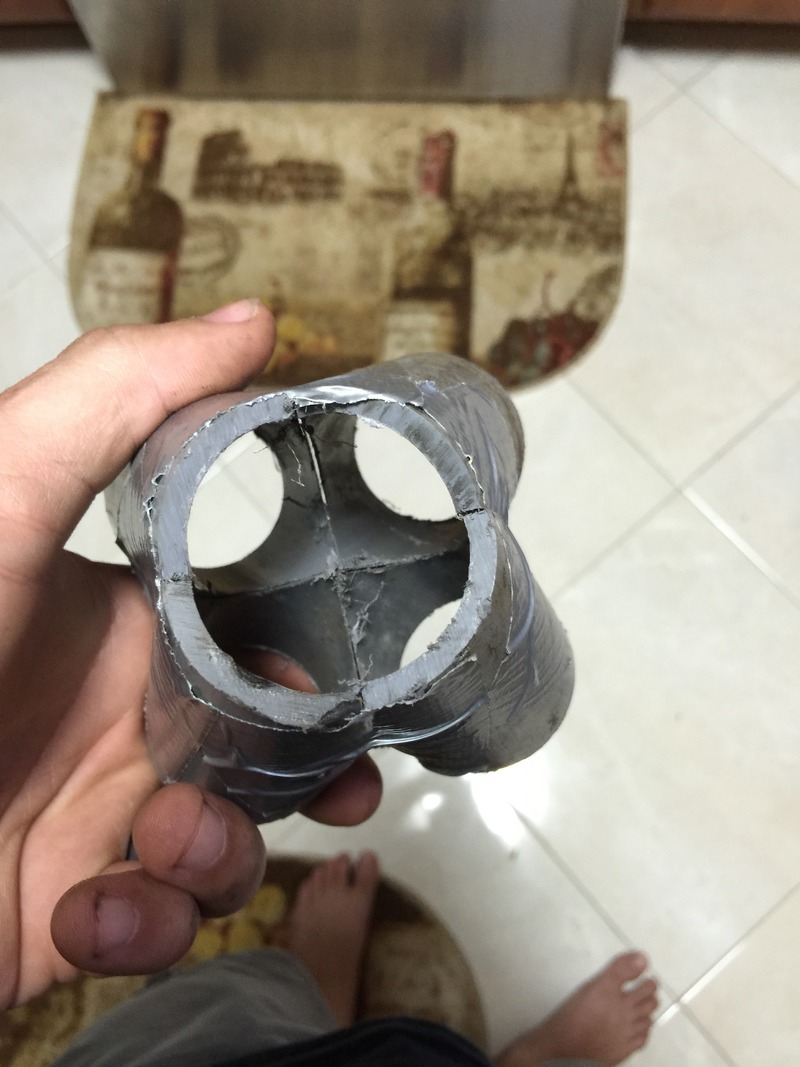
3" inlet adapter for the T25. I got it from ebay seller custom.control. It did not come with an O-ring which seems kinda lame but it's ebay so *shrug*
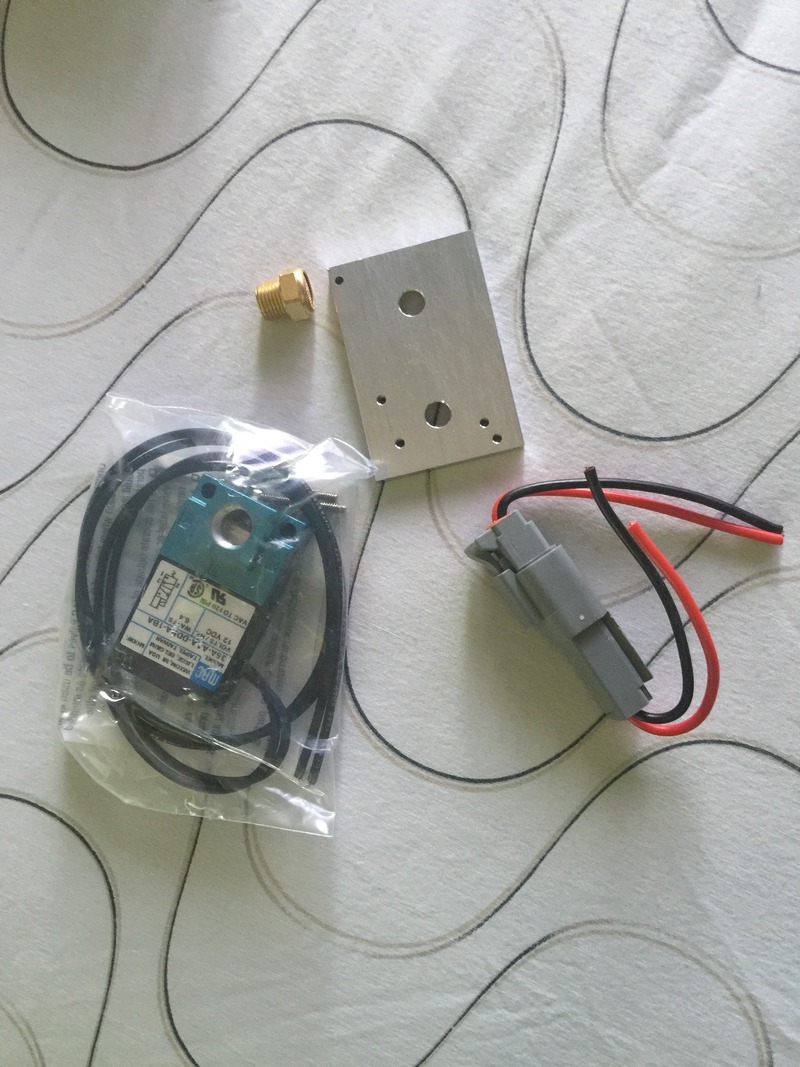
Mac 3 port to wire into the Haltech
I'll see how long my fillings stay in with these delrin engine mounts
Other than those I ordered some small bits from Andrew at Trackspeed, front coolant block off since I have the Skou reroute and some fittings for a Mocal sandwich adapter I had left over from another project.
V8R engine bay gussets
V8R sway bar mounts. I might add some end caps/gussets for the hell of it
V8R frame rails. I asked if they could send me some uncoated ones so I could weld them in. The bolts feel like they weigh more than the frame rails.
Cometic 0.040" head gasket. I ordered what I thought were head studs but turned out to be main studs. A slight mis-click of the mouse as it were
3" inlet adapter for the T25. I got it from ebay seller custom.control. It did not come with an O-ring which seems kinda lame but it's ebay so *shrug*
Mac 3 port to wire into the Haltech
I'll see how long my fillings stay in with these delrin engine mounts
Other than those I ordered some small bits from Andrew at Trackspeed, front coolant block off since I have the Skou reroute and some fittings for a Mocal sandwich adapter I had left over from another project.
Reply
0
0
Thread Starter
Junior Member
Joined: Aug 2005
Posts: 440
Total Cats: 17
From: Cayman Islands
Well I got some work done last weekend and tomorrow I'm at it again with the wire wheel.

Spent about an hour cleaning the undercoating off the passenger side and swatting the frame rail with a hammer to get it into decent enough shape to test fit the V8roadster rails. As you can see...still much more cleaning to be done before I can weld *ugh*
Also some goodies came today
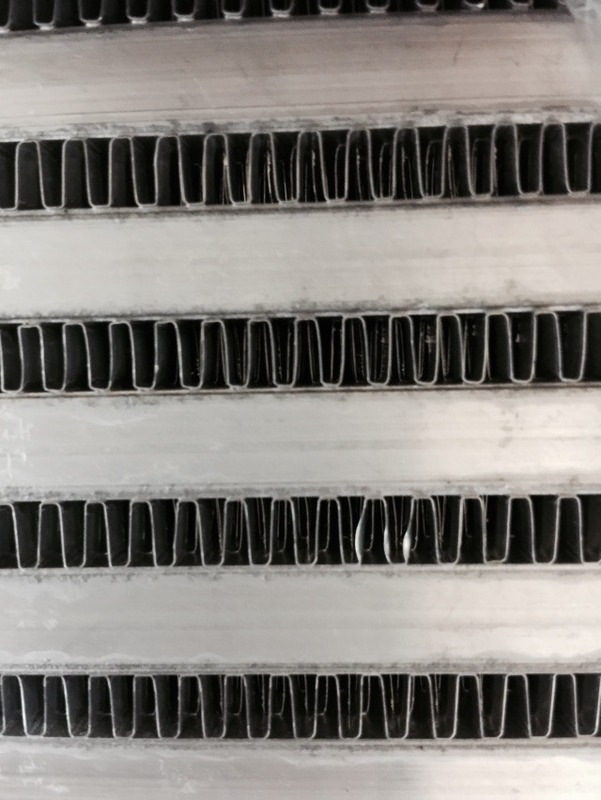
The Vibrant cores look pretty good on the inside. I got the 18x6.5x3.25 core and some 3/16" aluminum sheet to make end tanks
]img]http://img.photobucket.com/albums/v489/Sirnixalot/Miata%20Turbo%20Pix/557E83EB-C484-4A40-80A3-92DDD9888A05_zpsevjoogfr.jpg[/img]
Some surface rust on the flanges but other than that in great shape. Got them from Turbo-Flanges.com: Alloy, Stainless Steel and Titanium flange products for the head, turbine inlet and outlet.
1.25" weld el's are so small compared to the 1.5" ones I am used to
Weld el's, pipe and down pipe materials from acestainless
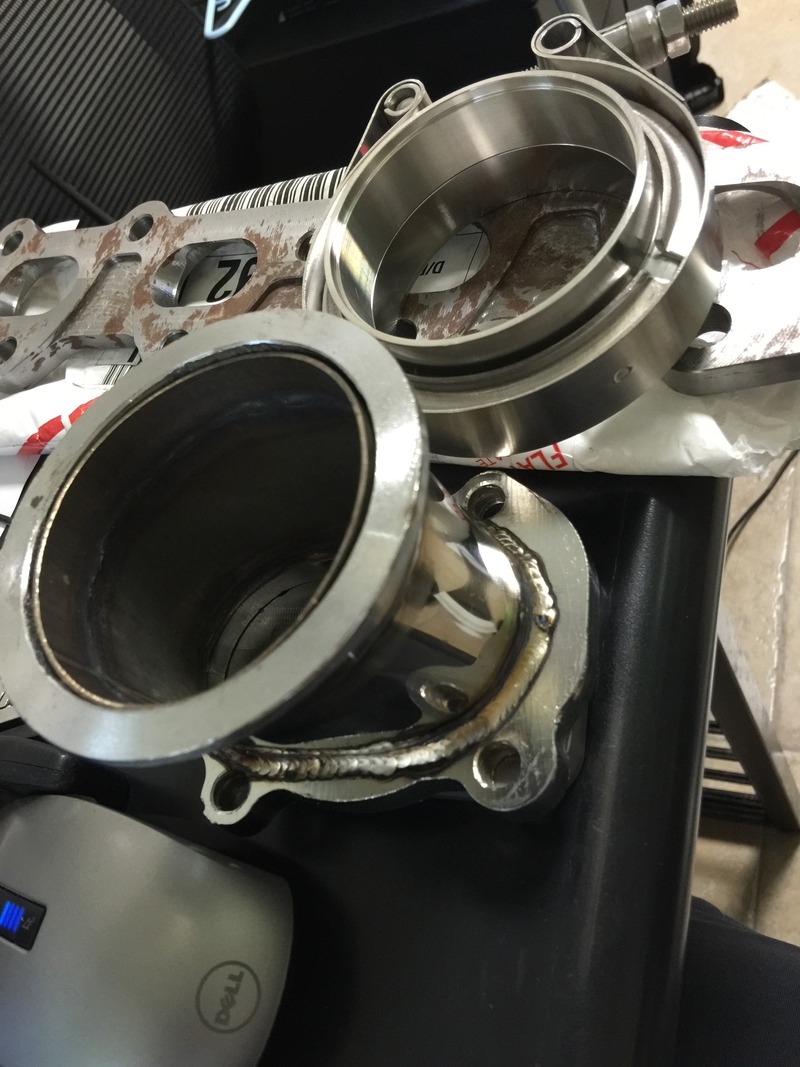
I'll be cutting that V-band off and just welding a bend directly to the adapter
Tomorrow the plan is to get the rest of the underside cleaned up so I can finish all the welding next week. I MIGHT see if I can get the engine and transmission back in the engine bay.
Spent about an hour cleaning the undercoating off the passenger side and swatting the frame rail with a hammer to get it into decent enough shape to test fit the V8roadster rails. As you can see...still much more cleaning to be done before I can weld *ugh*
Also some goodies came today
The Vibrant cores look pretty good on the inside. I got the 18x6.5x3.25 core and some 3/16" aluminum sheet to make end tanks
]img]http://img.photobucket.com/albums/v489/Sirnixalot/Miata%20Turbo%20Pix/557E83EB-C484-4A40-80A3-92DDD9888A05_zpsevjoogfr.jpg[/img]
Some surface rust on the flanges but other than that in great shape. Got them from Turbo-Flanges.com: Alloy, Stainless Steel and Titanium flange products for the head, turbine inlet and outlet.
1.25" weld el's are so small compared to the 1.5" ones I am used to
Weld el's, pipe and down pipe materials from acestainless
I'll be cutting that V-band off and just welding a bend directly to the adapter
Tomorrow the plan is to get the rest of the underside cleaned up so I can finish all the welding next week. I MIGHT see if I can get the engine and transmission back in the engine bay.
Reply
1
1
Thread Starter
Junior Member
Joined: Aug 2005
Posts: 440
Total Cats: 17
From: Cayman Islands
Holy **** it's hot today.
I called it quits at about 1pm.
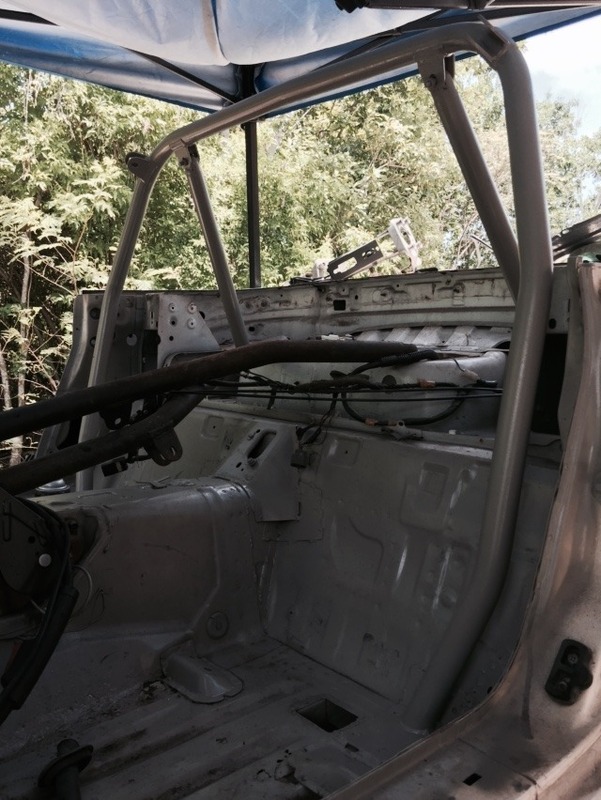
Aligned and welded in the main hoop and rear legs of the cusco cage. Gussets will be made to tie the main hoop to the B pillar and I might see if I can tie the rear tubes to the seat belt towers some how. I am going to leave the front half as bolt in. I have the hardware to weld to the A pillar and top of the windshield opening to bolt the 3 pieces of the cage to.
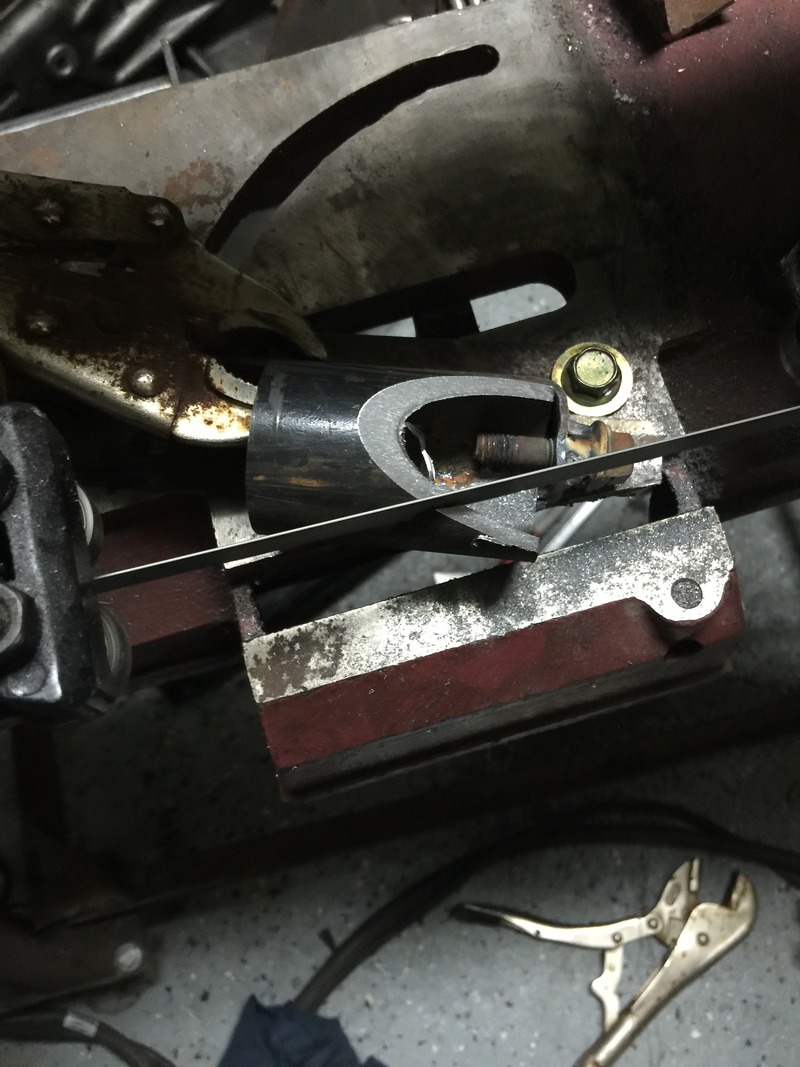
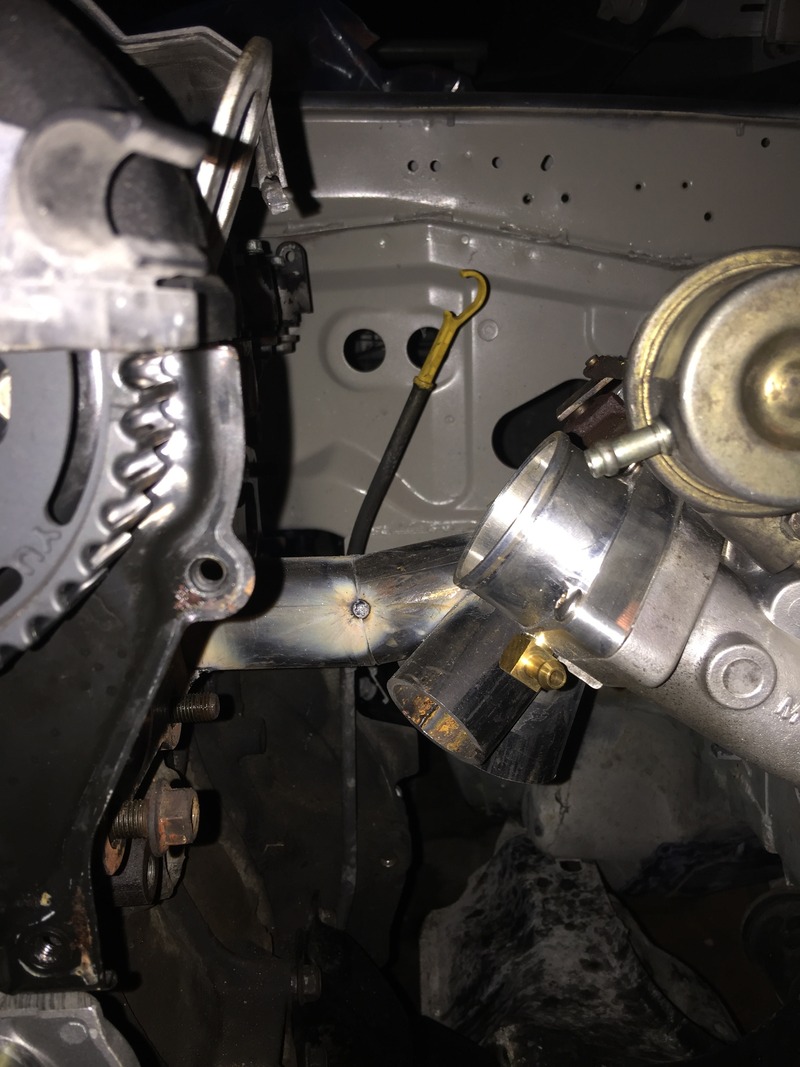
I cut the v-band off the adapter from acerace and hammered it back into round so I can weld it directly to the 90* when the time comes. Also added a divider wall.
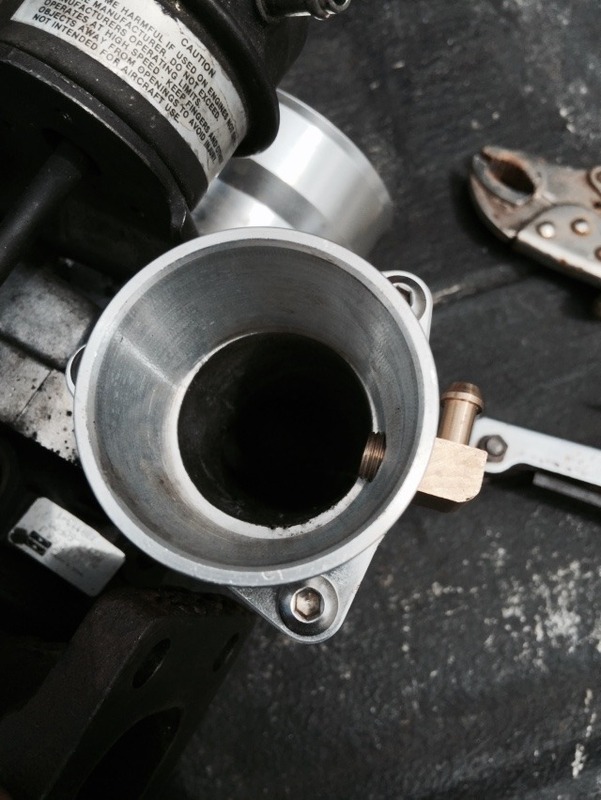
Ebay compressor outlet adapter is a little.....off center. Will be running it as is. I plan on blocking off the boost port.
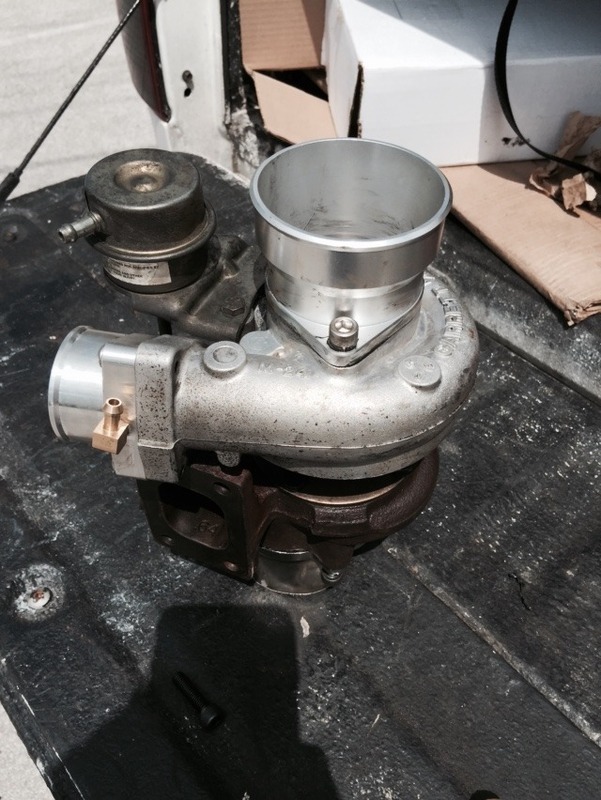
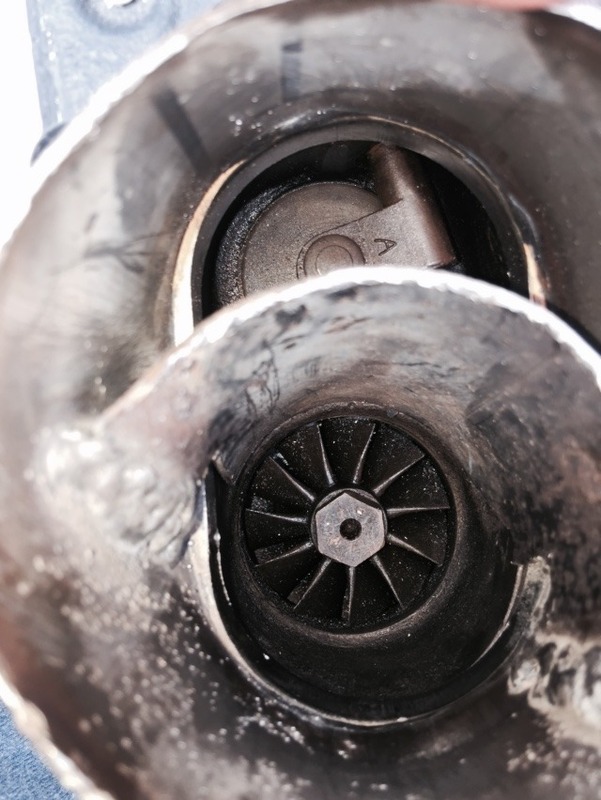
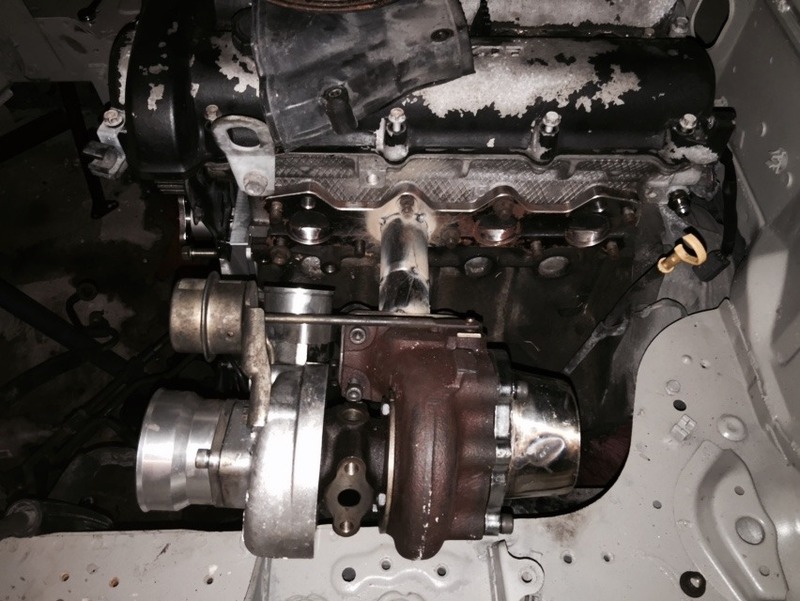
The T25 in all it's old glory
I got the drive train ready to slide back under the car for the manifold and downpipe fab. I am trying to use that as my "reward" if I stop procrastinating in regards to the seam welding
I called it quits at about 1pm.
Aligned and welded in the main hoop and rear legs of the cusco cage. Gussets will be made to tie the main hoop to the B pillar and I might see if I can tie the rear tubes to the seat belt towers some how. I am going to leave the front half as bolt in. I have the hardware to weld to the A pillar and top of the windshield opening to bolt the 3 pieces of the cage to.
I cut the v-band off the adapter from acerace and hammered it back into round so I can weld it directly to the 90* when the time comes. Also added a divider wall.
Ebay compressor outlet adapter is a little.....off center. Will be running it as is. I plan on blocking off the boost port.
The T25 in all it's old glory
I got the drive train ready to slide back under the car for the manifold and downpipe fab. I am trying to use that as my "reward" if I stop procrastinating in regards to the seam welding
Reply
0
0
Thread Starter
Junior Member
Joined: Aug 2005
Posts: 440
Total Cats: 17
From: Cayman Islands
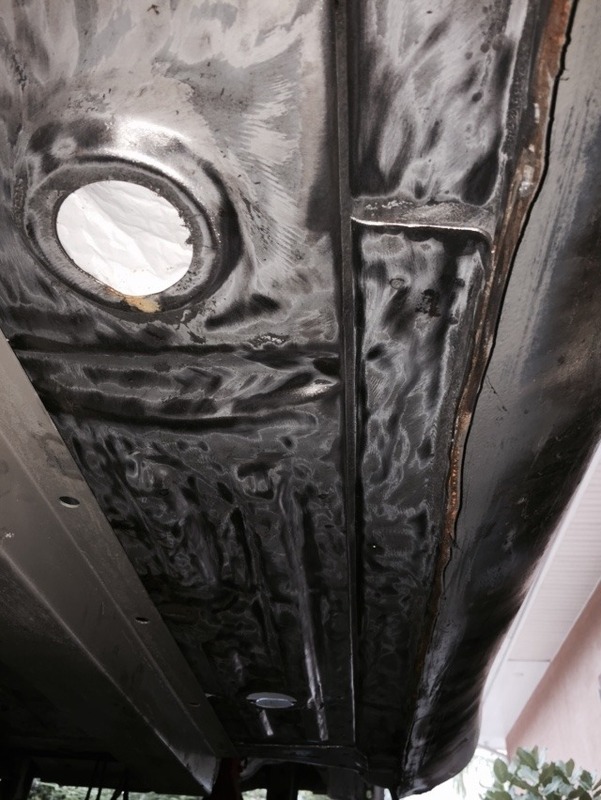
Rust repair!
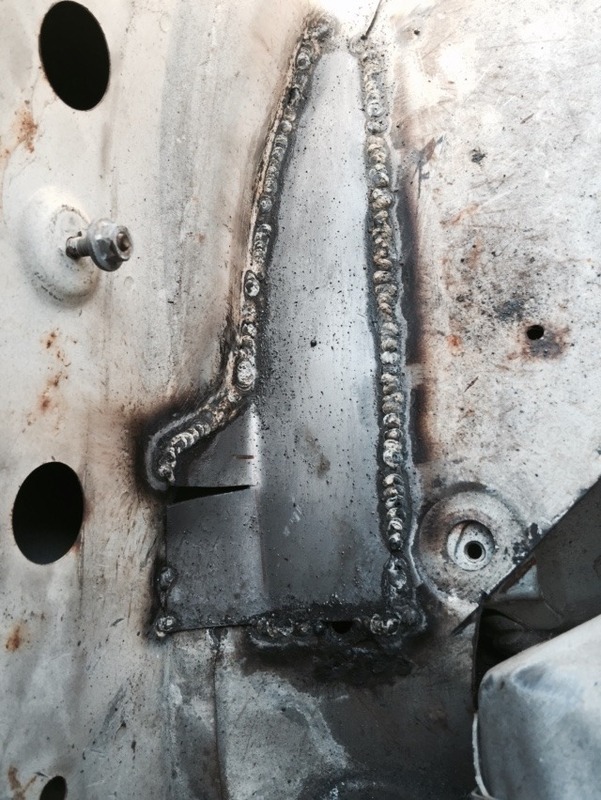
Not quite finished but it looks a ton better than it was before. I still have the piece on the right of the pic to repair as well
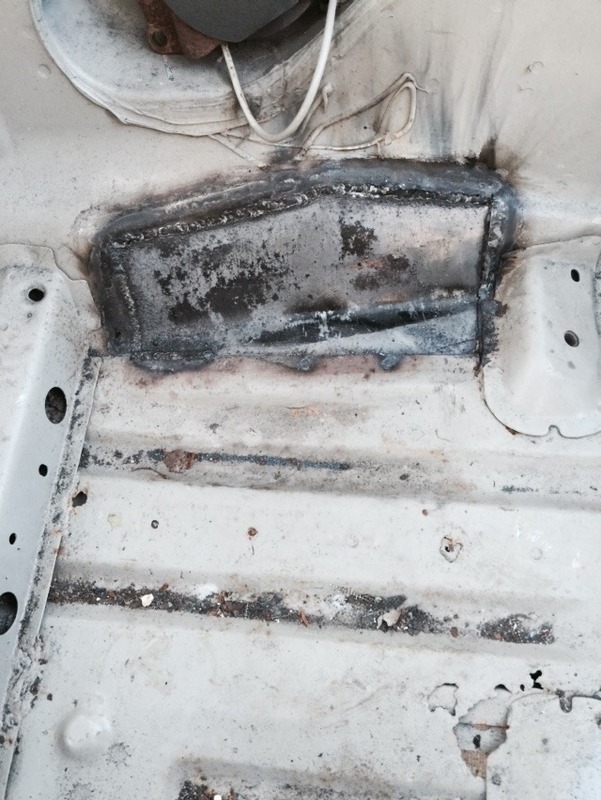
Passenger side trans tunnel. It's fully welded on the underside and I still have to finish the welds on the top side before I slather the welds in sealant
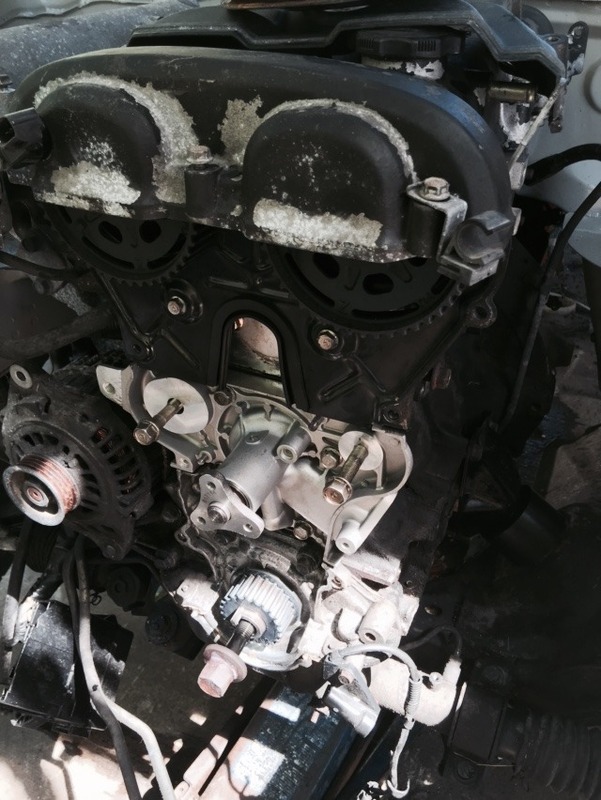
A friend helped me get the motor/trans back in the car for manifold and down pipe mocking up. You can spy one of the $40 ebay delrin engine mounts.
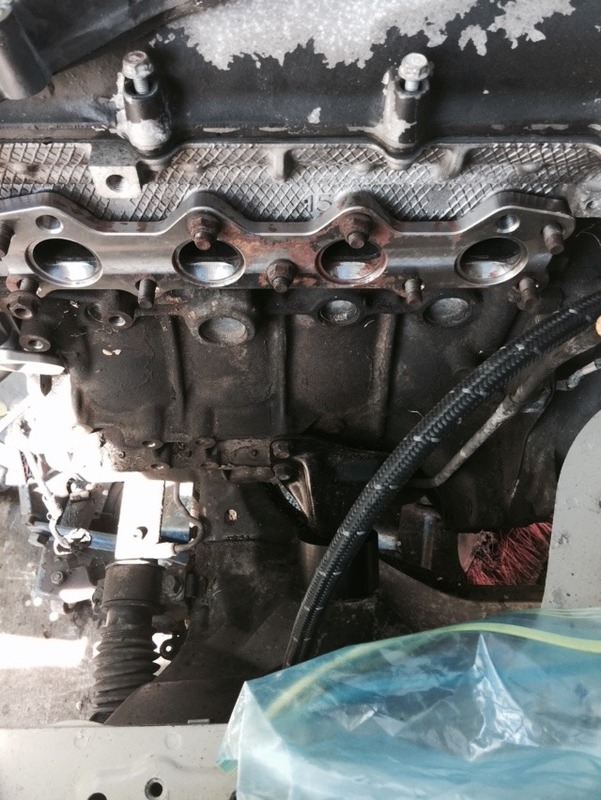
Degreased the front of the motor, installed the TSE reroute block off, changed the front main seal and water pump.
Inspecting under the valve cover I found caked oil residue on all the things Since I am taking the head off to do the head gasket I'll just oven cleaner and diesel the crap out of it before re-installation.
I got pretty much all of the drivers side, gas tank area and transmission tunnel wire wheeled. Next challenge is the drivers side wheel wells and underside.
The coilovers, torsen diff & clutch/flywheel will be here next weekend. A friend is bringing back the windshield seal and some oem stuff from Canada in 2 weeks. Things are coming together, I just need 2 solid days of over cast skys to finish the welding.....it's ******* HOT down here
Not quite finished but it looks a ton better than it was before. I still have the piece on the right of the pic to repair as well
Passenger side trans tunnel. It's fully welded on the underside and I still have to finish the welds on the top side before I slather the welds in sealant
A friend helped me get the motor/trans back in the car for manifold and down pipe mocking up. You can spy one of the $40 ebay delrin engine mounts.
Degreased the front of the motor, installed the TSE reroute block off, changed the front main seal and water pump.
Inspecting under the valve cover I found caked oil residue on all the things
Since I am taking the head off to do the head gasket I'll just oven cleaner and diesel the crap out of it before re-installation.I got pretty much all of the drivers side, gas tank area and transmission tunnel wire wheeled. Next challenge is the drivers side wheel wells and underside.
The coilovers, torsen diff & clutch/flywheel will be here next weekend. A friend is bringing back the windshield seal and some oem stuff from Canada in 2 weeks. Things are coming together, I just need 2 solid days of over cast skys to finish the welding.....it's ******* HOT down here
Reply
0
0
Thread Starter
Junior Member
Joined: Aug 2005
Posts: 440
Total Cats: 17
From: Cayman Islands
The wife gave me a few hours this evening so I set to work on the manifold.
Made a jig
Test cuts on pcv successful
Time for the real thing!
Fast forward a bit and I have the collector and easiest runner tacked
Pizza slices are in my down pipes future
I am hoping I can get away with a cast 2" elbow off the compressor for over the radiator piping. It looks a little tight with the timing cover. The intake piping is dead simple at least

Made a jig

Test cuts on pcv successful

Time for the real thing!

Fast forward a bit and I have the collector and easiest runner tacked

Pizza slices are in my down pipes future
I am hoping I can get away with a cast 2" elbow off the compressor for over the radiator piping. It looks a little tight with the timing cover. The intake piping is dead simple at least
Reply
0
0


Looking good!
Hopefully I finish my manifold before you do haha.
I wish I would have followed your posts on seam welding... That tar glue stuff gave me some trouble this weekend...
Hopefully I finish my manifold before you do haha.
I wish I would have followed your posts on seam welding... That tar glue stuff gave me some trouble this weekend...
Reply
0
0
Thread Starter
Junior Member
Joined: Aug 2005
Posts: 440
Total Cats: 17
From: Cayman Islands
I'll be back at the car on friday. I really need to concentrate on finishing the chassis so my brother can paint it and I can get it back to a rolling shell. Something tells me I will be distracted by the manifold and down pipe fab.
That seam sealant stuff is the worst. I do NOT envy you for using a Tig for those door bar mounts. I am wondering if I shouldn't make some door bar's as well but my main issue is lack of a tubing bender or DOM tube locally. Not sure if I will see the same benefit after having seam welded the door openings as well as all the rocker panel seams?
That seam sealant stuff is the worst. I do NOT envy you for using a Tig for those door bar mounts. I am wondering if I shouldn't make some door bar's as well but my main issue is lack of a tubing bender or DOM tube locally. Not sure if I will see the same benefit after having seam welded the door openings as well as all the rocker panel seams?
Reply
0
0
Thread Starter
Junior Member
Joined: Aug 2005
Posts: 440
Total Cats: 17
From: Cayman Islands
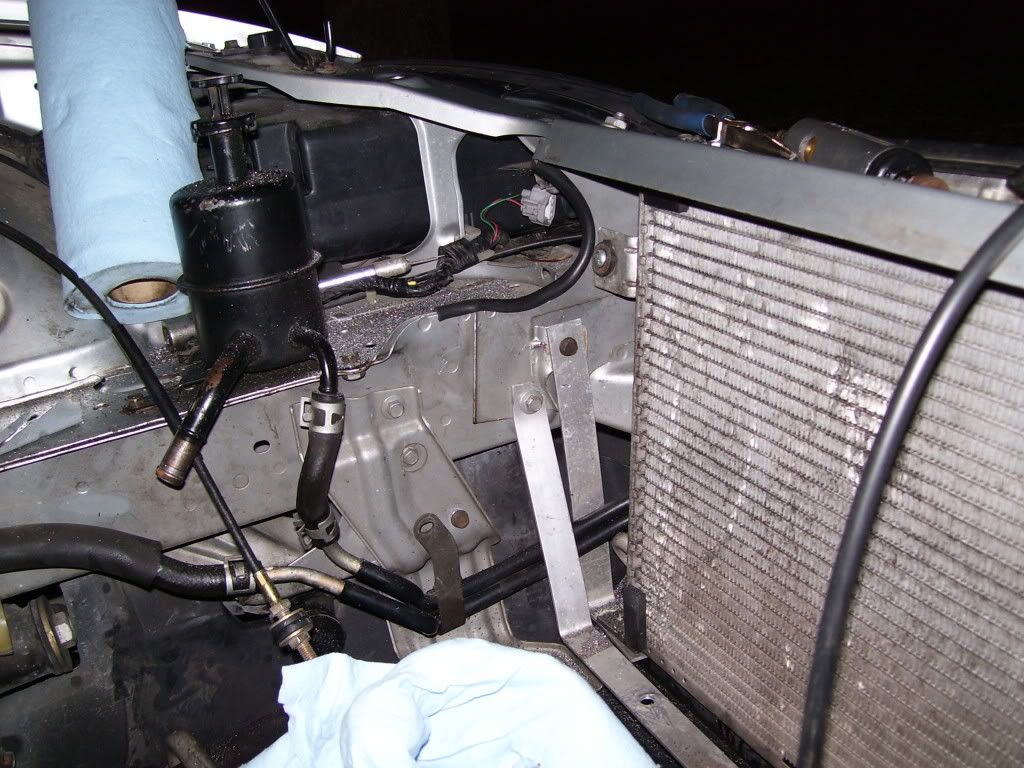
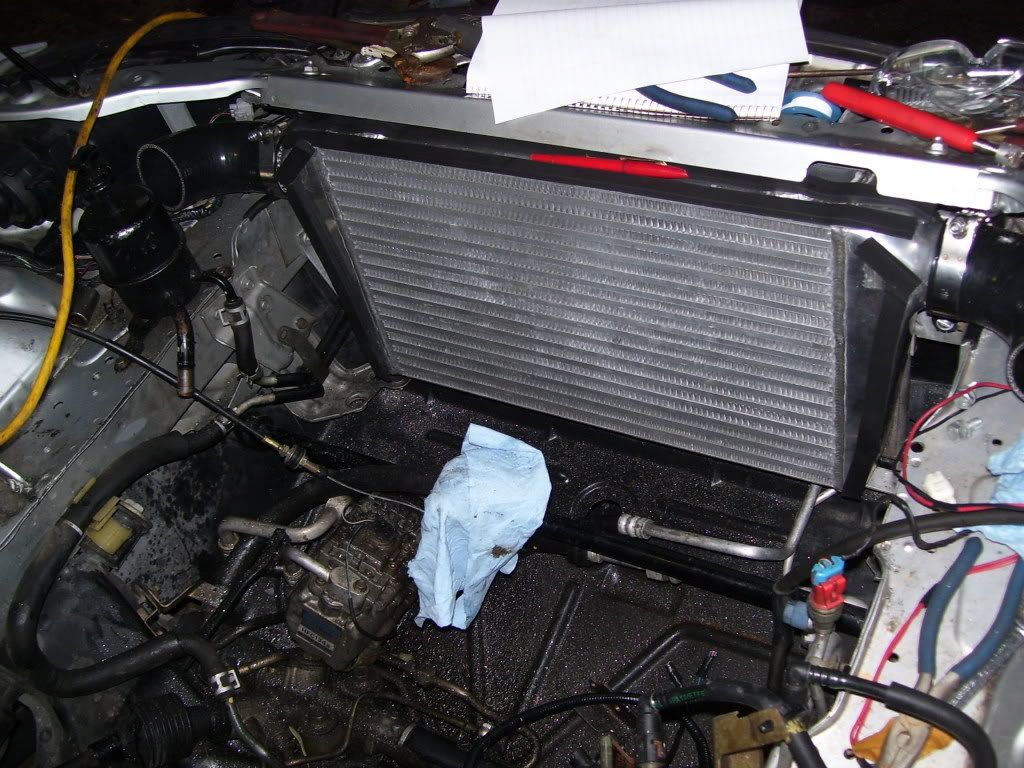
Not sure if I am mistaking a brain tumor for an idea or not. Around the side of the radiator intercooler piping? I am trying to keep the run short but I'm not really feeling the over the radiator routing.
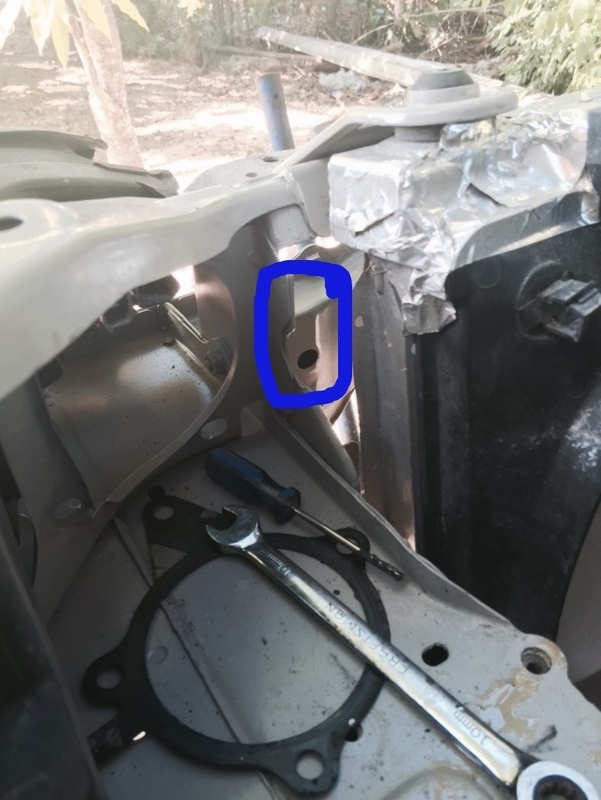
I know if I cut out this area I can fit 2"
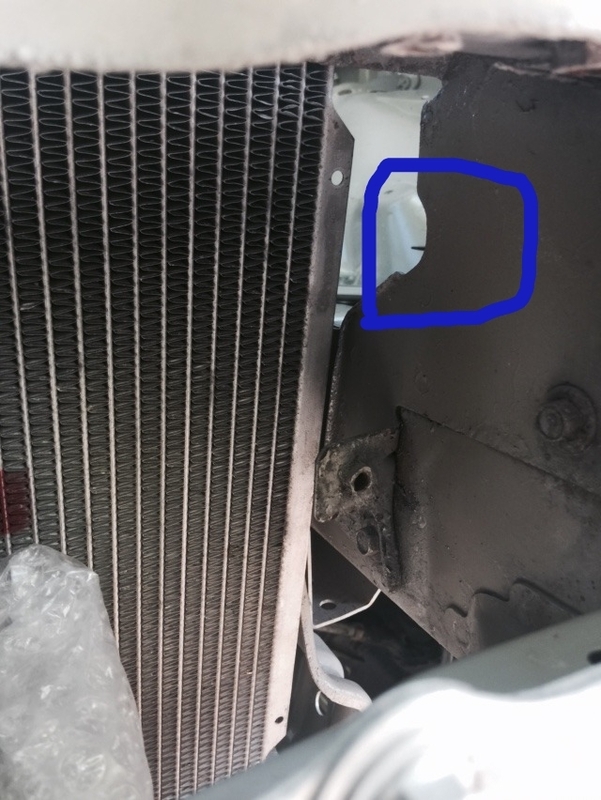
View from the front
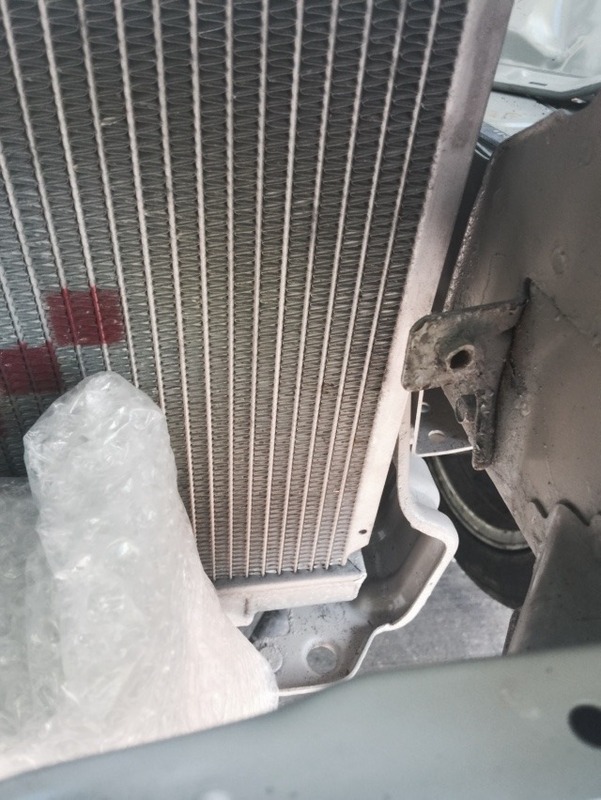
The thing in the bubble wrap is the vibrant core. I can get a nice angled shot at the core.
The cold side is a fairly similar ordeal. *scratches chin*
I know if I cut out this area I can fit 2"
View from the front
The thing in the bubble wrap is the vibrant core. I can get a nice angled shot at the core.
The cold side is a fairly similar ordeal. *scratches chin*
Reply
0
0

Thread Starter
Junior Member
Joined: Aug 2005
Posts: 440
Total Cats: 17
From: Cayman Islands
I was hunting for a while and that didn't show up in any searches. Really didn't feel like necromancing a thread from 2011. Thanks for the pictures.
I'll have to think about it some more. I don't honestly think the extra 3-4ft of piping will really matter in the grand scheme but I want to try and keep it as short as possible because 1.6
I'll have to think about it some more. I don't honestly think the extra 3-4ft of piping will really matter in the grand scheme but I want to try and keep it as short as possible because 1.6
Reply
0
0


