
RWyatt's "It's takin forever" Build Thread


Thread Starter
Senior Member
Joined: Dec 2007
Posts: 1,460
Total Cats: 132
From: ATL
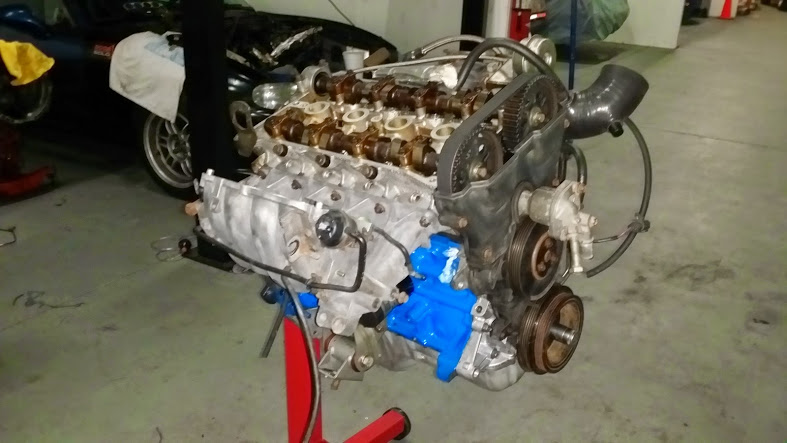
Since the last time I've been busy. Cleaned and painted the block;
Before

After

BTW - the color is "Ford competition blue". I was assured by the guys at Autozone that it's worth 5 extra HP (at least)
All valve seats lapped and new Supertech exhaust and refurbished intake valves in. Crank w/ new ACL bearings & refurbished pistons w/ new Eagle rods and ACL bearings installed (no pics).
BE pump on w/ new timing belt cog and new water pump;

But then I ran into a snag...look at the left-hand corner of the new pump. Now look at the same corner of the old pump;

Notice something different (aside from the mount point for the pulley)? For those that don't see, there's a tab on the side of the old water pump where the bracket for the alternator bolts to. That tab is MISSING on the new pump - WTF!!!
I went back and checked on my order and it's supposed to be a pump for a '99, but obviously something is different! I now have two options;
1. "The right thing to do" - get in touch w/ Rock Auto, find out what happened and RMA the pump for the right part.
2. "The RWyatt - quick 'n dirty way" - clean up the old pump, check for play in the rotating parts, pray and re-install. Then do #1 and worry until the right part arrives and I get an opportunity to swap it in (or suffer a catastrophic failure in the mean-time).
Let me think... I'll do #2!
Anyway...I'll be installing and setting the timing on the cams and finalizing the bottom end tonight. After that, it'll just be putting on the manifolds and alternator (no PS, no AC to worry about) and cleaning up the trans. I should be "powered" by the end of the week (sooner if I can play hooky from "domestic duties").
Before
After
BTW - the color is "Ford competition blue". I was assured by the guys at Autozone that it's worth 5 extra HP (at least)
All valve seats lapped and new Supertech exhaust and refurbished intake valves in. Crank w/ new ACL bearings & refurbished pistons w/ new Eagle rods and ACL bearings installed (no pics).
BE pump on w/ new timing belt cog and new water pump;
But then I ran into a snag...look at the left-hand corner of the new pump. Now look at the same corner of the old pump;
Notice something different (aside from the mount point for the pulley)? For those that don't see, there's a tab on the side of the old water pump where the bracket for the alternator bolts to. That tab is MISSING on the new pump - WTF!!!
I went back and checked on my order and it's supposed to be a pump for a '99, but obviously something is different! I now have two options;
1. "The right thing to do" - get in touch w/ Rock Auto, find out what happened and RMA the pump for the right part.
2. "The RWyatt - quick 'n dirty way" - clean up the old pump, check for play in the rotating parts, pray and re-install. Then do #1 and worry until the right part arrives and I get an opportunity to swap it in (or suffer a catastrophic failure in the mean-time).
Let me think...
I'll do #2!Anyway...I'll be installing and setting the timing on the cams and finalizing the bottom end tonight. After that, it'll just be putting on the manifolds and alternator (no PS, no AC to worry about) and cleaning up the trans. I should be "powered" by the end of the week (sooner if I can play hooky from "domestic duties").
Reply
 0
0

0
Thread Starter
Senior Member
Joined: Dec 2007
Posts: 1,460
Total Cats: 132
From: ATL
Quick update; didn't touch the bottom end yesterday (sounds sleazy when it's typed out), just cleaned the crap off the old WP, starter and alternator and cleaned off the tranny and oil pan.
I'm gonna pay particular attention to the main seal and oil pan seal 'cause I don't want to have to deal with another oily, grimy mess like this again!
The plan is to have the engine and trans back together tonight and ready to drop in on Friday. I only get 2+ hours a night to work on this during weekdays and that's just enough time to get into something, and then have to stop
So I'm gonna take the day off Friday and get this thing back on the road!! It's been 2 weeks and I'm tired of driving around like a tool in the wife's PT Cruiser
Reply
0
0
Thread Starter
Senior Member
Joined: Dec 2007
Posts: 1,460
Total Cats: 132
From: ATL
Didn't have enough time to do what I wanted to last night so I settled for cleaning the grime out of the engine bay. It ain't the prettiest engine bay but it's a helluva lot cleaner than it was;
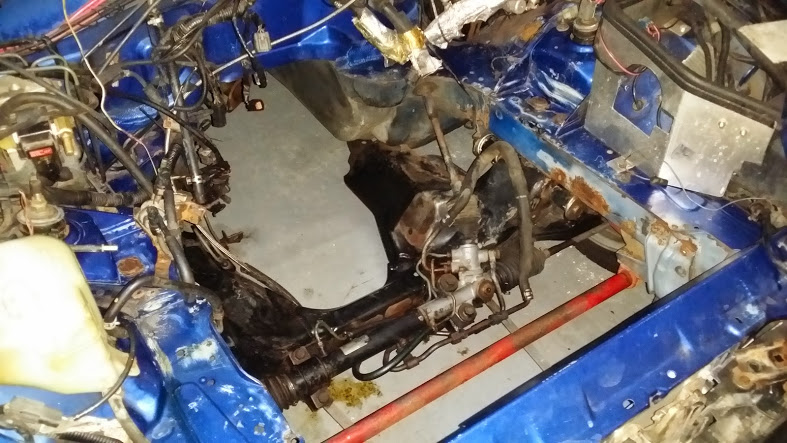
Notice the rust along the frame rails (thank you Michigan salt trucks)? Taking care of that with some POR-15 tonight.
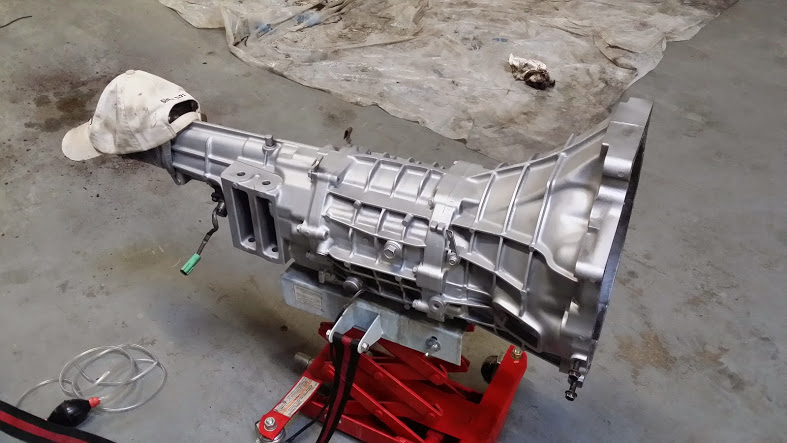
Trans is de-gunked and painted;
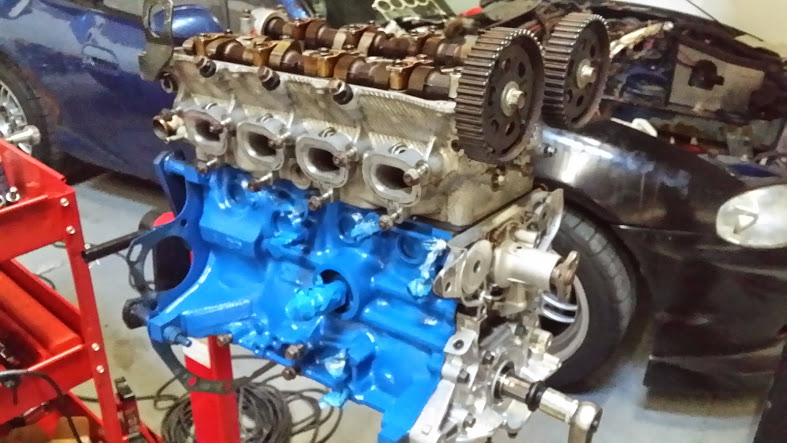
...and the head is on (bottom end installed and torqued down, of course). I had to take the timing belt off 'cause of the WP snafu from the other day. Old pump in back in place, checked and cleaned up of course.
Why is my car (in the background of the shot above) blue in the back and black in the front? That's a remnant of the accident. I just never got around to painting the car the same color front to back. Why bother when the rear quarters on both sides have significant rust damage (so sue me, it's a DD w/ 290K+ miles on the clock, and 10 years of midwestern, salt-laden winters). When I'm through with this rebuild I'm gonna clean up the paint (leave it black-n-blue) and rechristen my car "FrankenMiata"!
Notice the rust along the frame rails (thank you Michigan salt trucks)? Taking care of that with some POR-15 tonight.
Trans is de-gunked and painted;
...and the head is on (bottom end installed and torqued down, of course). I had to take the timing belt off 'cause of the WP snafu from the other day. Old pump in back in place, checked and cleaned up of course.
Why is my car (in the background of the shot above) blue in the back and black in the front? That's a remnant of the accident. I just never got around to painting the car the same color front to back. Why bother when the rear quarters on both sides have significant rust damage (so sue me, it's a DD w/ 290K+ miles on the clock, and 10 years of midwestern, salt-laden winters). When I'm through with this rebuild I'm gonna clean up the paint (leave it black-n-blue) and rechristen my car "FrankenMiata"!
Reply
0
0


Thread Starter
Senior Member
Joined: Dec 2007
Posts: 1,460
Total Cats: 132
From: ATL

Reply
0
0
Thread Starter
Senior Member
Joined: Dec 2007
Posts: 1,460
Total Cats: 132
From: ATL
Paint on the block was easy(ish) - an hour or two with a wire brush and voila!
The body...meh. That might be a quick-hit on the rust spots, some primer and a day with some Plastidip. Remember, I've got this BRG beauty squirreled away, just waiting for for me to get off my butt and swap components into;
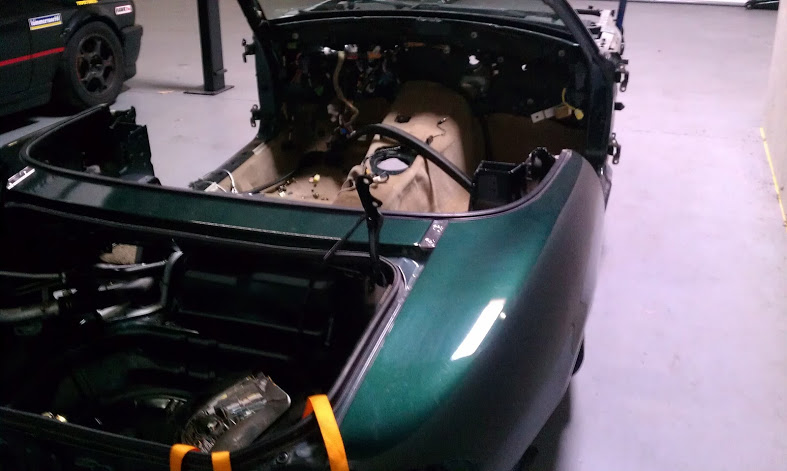
The body...meh. That might be a quick-hit on the rust spots, some primer and a day with some Plastidip. Remember, I've got this BRG beauty squirreled away, just waiting for for me to get off my butt and swap components into;
Reply
0
0

Thread Starter
Senior Member
Joined: Dec 2007
Posts: 1,460
Total Cats: 132
From: ATL
Engine is in the car, needs connections made and fluids. Hopefully it'll get started this evening.
Reply
0
0
Thread Starter
Senior Member
Joined: Dec 2007
Posts: 1,460
Total Cats: 132
From: ATL
Didn't get it started ("tar 'n damnation!!") yet. I blame;
Anyway...pics;
Engine bay cleaned and "rust-proofed" (but, sadly, still cluttered w/ wiring - I don't have the time nor patience to do anything about that).

Engine right profile
Engine left profile
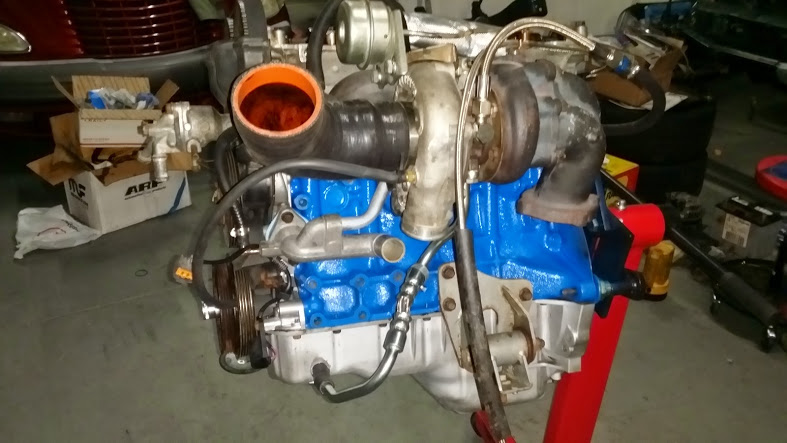
Note; FM oil return hardline, "competition" motor mounts
Engine in the car (Saturday night)!

Note; repainted RB sway (red), and what happened to the water neck?! Well...since I got the heater core routing figured out I removed it, plugged the hole and installed a block-off plate. Of course, that meant pulling the front covers and timing belt to get to it and then putting everything back together again (more time wasted). The effort is worth it 'cause the front of my engine is "prettier" w/o that wart sticking out from the front and the associated hose (to the heater) making things ugly.
Other un-noticeable things;
Also...anyone have a "VICS actuator" (on the front of the IM, the vacuum actuator that turns the VICS butterflys) laying around collecting dust? I managed to break off the nipple for the hose on it when installing the engine. I JB Welded it back together, but I know it's gonna break off so I want to replace it. Usually I'd goto The Partsgroup, but Tom is in the process of moving and is kinda busy.
Any "love"?
Anybody?
- A missing pressure plate bolt
- Having to drive 2 hours to get a 90* fitting for the BEGI reroute spacer to feed the heater core
- Finding a nut to fit the new driveshaft bolt that I bought a month ago (didn't I buy the nut too?!)
- Figuring out why the linkage for the clutch slave cylinder is now mysteriously 1/8 inch too long
- Freakin' downpipe bolts!!
- A 9PM curfew each night
Anyway...pics;
Engine bay cleaned and "rust-proofed" (but, sadly, still cluttered w/ wiring - I don't have the time nor patience to do anything about that).
Engine right profile
Engine left profile
Note; FM oil return hardline, "competition" motor mounts
Engine in the car (Saturday night)!
Note; repainted RB sway (red), and what happened to the water neck?! Well...since I got the heater core routing figured out I removed it, plugged the hole and installed a block-off plate. Of course, that meant pulling the front covers and timing belt to get to it and then putting everything back together again (more time wasted). The effort is worth it 'cause the front of my engine is "prettier" w/o that wart sticking out from the front and the associated hose (to the heater) making things ugly.
Other un-noticeable things;
- PS pump delete is complete. Previously, I had looped the lines and there was no belt to the pump, but the pump was left in place because the PS fluid resevoir was still in-place. All of that is gone now.
- Also, that big chunk of iron that was the AC mount point is now gone (hooray, more weight loss)
- Cleaned and painted the rear LCA (the uppers are relatively new and in good shape)
- Charcoal canister (in the engine bay) is now gone. But there's one "issue", I referenced a write-up on mx5nutz for the removal and it was all good, except for connecting the vent hardline from the rear of the car to another hardline that disappears towards the front of the car. On my car - vent hardline "yes", front facing hardline "no". I'm going to "cap the vent line and do some research about how to handle this.
Also...anyone have a "VICS actuator" (on the front of the IM, the vacuum actuator that turns the VICS butterflys) laying around collecting dust? I managed to break off the nipple for the hose on it when installing the engine. I JB Welded it back together, but I know it's gonna break off so I want to replace it. Usually I'd goto The Partsgroup, but Tom is in the process of moving and is kinda busy.
Any "love"?
Anybody?
Last edited by rwyatt365; Aug 4, 2014 at 08:40 AM.
Reply
0
0


Couple things:
Did you reinstall the oil pump bolt when you removed the AC bracket? Make sure you do.
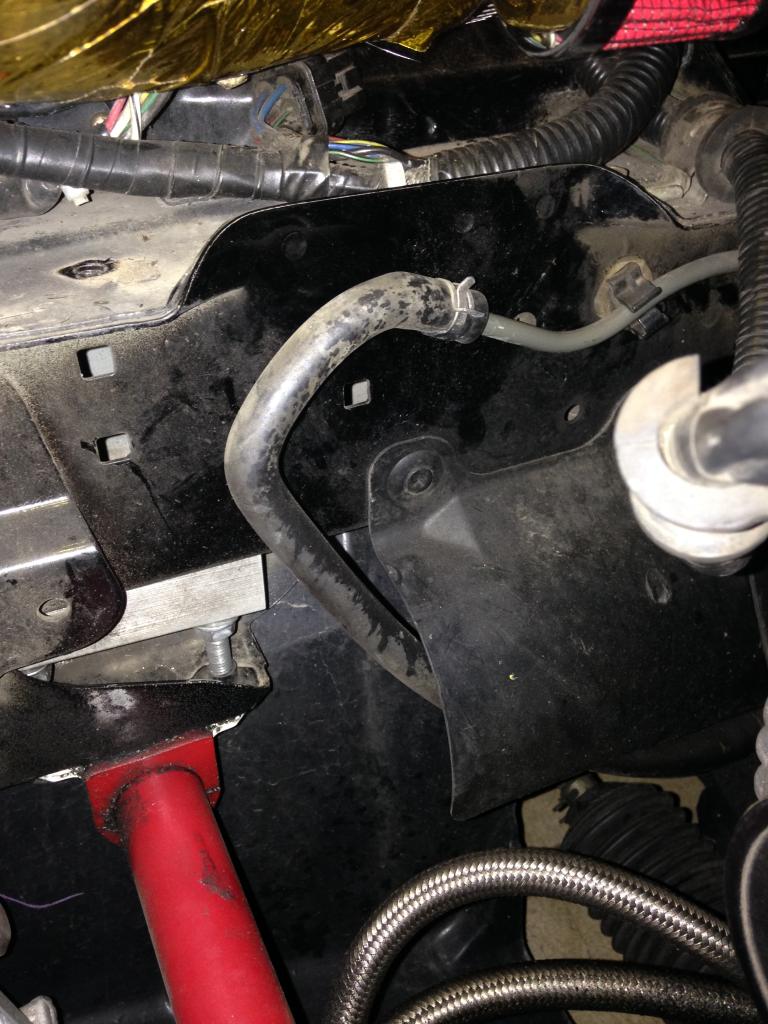
As for the charcoal delete, if you follow that 2nd small hardline, you'll see that it's only about 6" long, and connects to a soft line that vents to a hole in the subframe. Remove that 2nd hardline, bend the long hardline (that goes to the tank) so it's horizontal, facing the front of the car, and connect the soft line to the subframe to it. Voila.
Like so:
Also, I might have a vics actuator. Are they the same as the VTCS actuator? I've installed both, and they look very similar, not sure if they're compatible though.
Did you reinstall the oil pump bolt when you removed the AC bracket? Make sure you do.
As for the charcoal delete, if you follow that 2nd small hardline, you'll see that it's only about 6" long, and connects to a soft line that vents to a hole in the subframe. Remove that 2nd hardline, bend the long hardline (that goes to the tank) so it's horizontal, facing the front of the car, and connect the soft line to the subframe to it. Voila.
Like so:

Also, I might have a vics actuator. Are they the same as the VTCS actuator? I've installed both, and they look very similar, not sure if they're compatible though.
Reply
0
0
Thread Starter
Senior Member
Joined: Dec 2007
Posts: 1,460
Total Cats: 132
From: ATL
As for the charcoal delete, if you follow that 2nd small hardline, you'll see that it's only about 6" long, and connects to a soft line that vents to a hole in the subframe. Remove that 2nd hardline, bend the long hardline (that goes to the tank) so it's horizontal, facing the front of the car, and connect the soft line to the subframe to it. Voila.
Also, I might have a vics actuator. Are they the same as the VTCS actuator? I've installed both, and they look very similar, not sure if they're compatible though.
Reply
0
0
Thread Starter
Senior Member
Joined: Dec 2007
Posts: 1,460
Total Cats: 132
From: ATL
Tonight if "F-night" - I'm going to finish, or I'm f**ked. Not too much to do though, finish bolting up the exhaust, install the O2 sensors, get the heater core hoses heat-wrapped and connected, install the injectors and fuel rail, make some electrical connections and fill up the fluids...then pray...
Reply
0
0

What fluid and from where? 99% of the engine swaps I've done have leaked at the heater core lines. A small amount of tightening on the clamps and it stops. This presents a problem if you still have the OEM spring clamps though.
I have no idea what I'm doing wrong 99% of the time, but it's an easy solve.
I have no idea what I'm doing wrong 99% of the time, but it's an easy solve.
Reply
0
0
Thread Starter
Senior Member
Joined: Dec 2007
Posts: 1,460
Total Cats: 132
From: ATL
It's coolant, and from the capped off line from that normally goes to the stock oil warmer (/heater?). I used a generic worm-gear clamp on the cap and I'm sure that's the issue. At least, that's where I'll start.
Reply
0
0
The little canister in the engine compartment of a NB1 is just a hollow canister. I think it acts as a means to prevent slugs of re-condensed fuel vapors from getting sucked into the intake.
There is weight to be lost by pulling the actual charcoal canister that is near the gas tank. On my winter project list.
See TorqueZombie's thread
There is weight to be lost by pulling the actual charcoal canister that is near the gas tank. On my winter project list.
See TorqueZombie's thread
Reply
0
0
Thread Starter
Senior Member
Joined: Dec 2007
Posts: 1,460
Total Cats: 132
From: ATL
Yeah, I've been toying with the idea of making a "return system" for the fuel (using that hardline and getting rid of the rear canister). But threads I've seen have left me confused. So I'm going to leave that to when I get to the point of swapping everything into the "new" shell. Then I can experiment with a clean(er) slate.
Reply
0
0


