
COP Thread


we should mock up a plate and get a few of them water jetted.
anyone near me have a spare 1.6 cam cover I could hang on to for a couple weeks?
anyone near me have a spare 1.6 cam cover I could hang on to for a couple weeks?
Reply
 0
0

0


Ok, so installation pics on a 1.6.
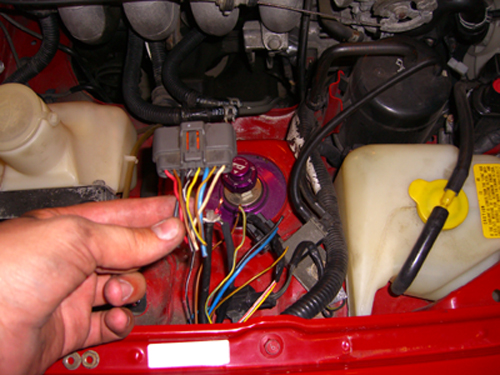
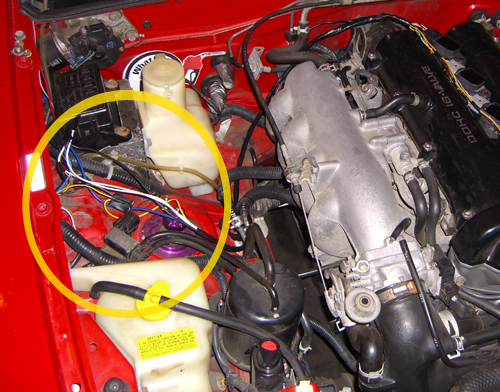
Step 1: Cut out your igniter box(leaving enough wire on the plug just in case things get fubar). Relocate the EGR plug and ground wire to the front bolt hole for the mounting plate of the igniter. (Is 1/2 hidden by the big wire loom on the right). Also tape up the red and white wires, you won't need these to be connected to anything anymore.
Step 2: Get your connecters and label them so that they follow this pattern (TOYOTA PLUGS/CONNECTORS ONLY, anything else may be different)
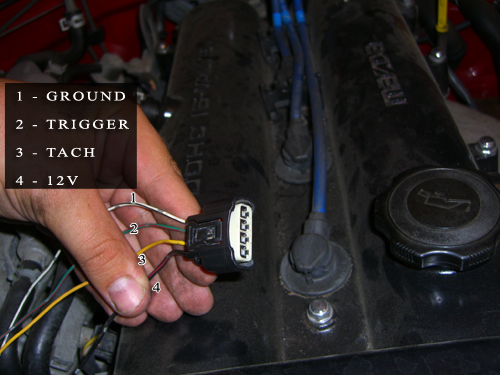
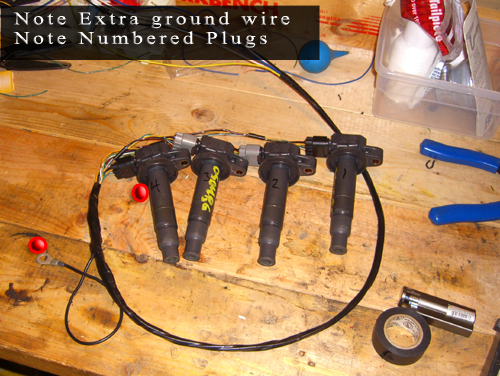
Step 3: Using Lazzers diagram FOUND HERE wire your plugs together and add the required length of wire to reach where the igniter box was. It's best to use 12gauge wire for power and ground and 16gauge wire for the trigger and tach. *Also, note the extra ground wire and how the coils are numbered (it's a good idea just to ensure you don't mix anything up while connecting all the wires)
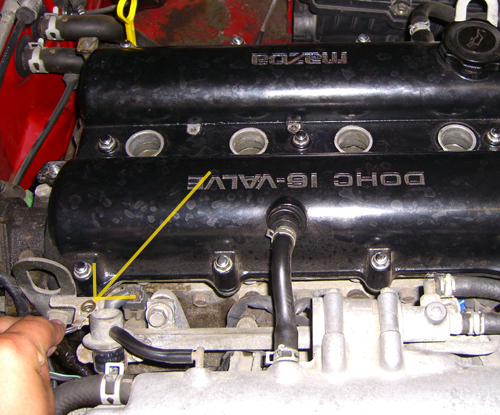
Step 4: Here a good ground location for the extra ground on the head is shown (it has a bolt in it, it's just removed in this picture)
Step 5: Using Lazzers diagram again, connect the Ground, Triggers, Tach, and 12v to the wires that were going into the igniter box.
Step 6: Wrap all the wires in electrical tape and tuck them away however you like.
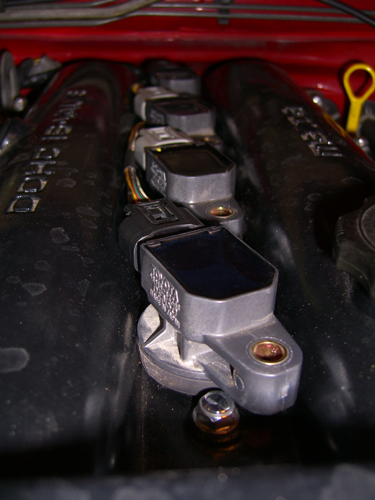
Step 7: The plugs will vibrate up off the valve cover if you don't fasten them to it. You can still drive the car, but doing so for an extended period of time will cause some problems. This parts up to you how you'd like to do it. I'm planning on JB Welding(or just regular welding) on 4 nuts to the valve cover and bolting the coils down to them.
Enjoy!
Step 1: Cut out your igniter box(leaving enough wire on the plug just in case things get fubar). Relocate the EGR plug and ground wire to the front bolt hole for the mounting plate of the igniter. (Is 1/2 hidden by the big wire loom on the right). Also tape up the red and white wires, you won't need these to be connected to anything anymore.
Step 2: Get your connecters and label them so that they follow this pattern (TOYOTA PLUGS/CONNECTORS ONLY, anything else may be different)
Step 3: Using Lazzers diagram FOUND HERE wire your plugs together and add the required length of wire to reach where the igniter box was. It's best to use 12gauge wire for power and ground and 16gauge wire for the trigger and tach. *Also, note the extra ground wire and how the coils are numbered (it's a good idea just to ensure you don't mix anything up while connecting all the wires)
Step 4: Here a good ground location for the extra ground on the head is shown (it has a bolt in it, it's just removed in this picture)
Step 5: Using Lazzers diagram again, connect the Ground, Triggers, Tach, and 12v to the wires that were going into the igniter box.
Step 6: Wrap all the wires in electrical tape and tuck them away however you like.
Step 7: The plugs will vibrate up off the valve cover if you don't fasten them to it. You can still drive the car, but doing so for an extended period of time will cause some problems. This parts up to you how you'd like to do it. I'm planning on JB Welding(or just regular welding) on 4 nuts to the valve cover and bolting the coils down to them.
Enjoy!
Reply
0
0
Thread Starter
Joined: May 2005
Posts: 80,552
Total Cats: 4,368
From: Chantilly, VA
Reply
0
0

You mean the connectors? Re-read the thread if you're looking for plugs, it mentions a couple places. I got mine on ebay.
Right now the connectors are solely coming from junkyards from what I understand.
Right now the connectors are solely coming from junkyards from what I understand.
Reply
0
0
Nice pics Sean!
 Worth 1000 words especially pointing out the extra ground wire and location for grounding.
Reply
0
0

Junior Member
Joined: Oct 2006
Posts: 312
Total Cats: 0
I can find what appear to be the correct COPs easily but I can't find the wires. PM me if you find the harness that hooks up to the COPs. Thanks.
Those of you who already PMed me, keep up the good work.
Those of you who already PMed me, keep up the good work.
Reply
0
0
I did a bit of investigating and I THINK these connectors are manufactured by a company which I've already contacted about the connector. They seem to make connectors ranging from injectors to atx power supply type. (molex) I'll keep you updated. =)
Company Name: Yueqing Brifar Electric Co., Ltd.
Contact Person: Kevin ****
Address: 917 Xinfu East Road, Hongqiao Town, Yueqing City, Zhejiang Province. China
Zip: 325608
Telephone: 86-577-61313666
Mobile Phone: 86-13968727921
Fax: 86-577-27813588
Website: http://www.brifar.com
http://brifar.en.alibaba.com
Here's some more coils on ebay.
http://cgi.ebay.com/ebaymotors/TOYOT...spagenameZWD1V
http://cgi.ebay.com/ebaymotors/TOYOT...spagenameZWD1V 16 available $14.62 each.
Just to update another piece of information. The coils are used in the following vehicles.
Chevy Prism '98-'02
Pontiac Vibe '03-'07
TOYOTA Corolla '98-02
TOYOTA MR2 Spider '00-05
TOYOTA AVENSIS 1.6i 3ZZ-FE N/A 2000-03
TOYOTA AVENSIS 1.8i 1ZZ-FE N/A 2000-03
TOYOTA AVENSIS 1.8i N/A N/A 2003-
TOYOTA CELICA 1.8i 1ZZ-FE N/A 1999-
TOYOTA COROLLA 1.4i 4ZZ-FE N/A 2002-
TOYOTA COROLLA 1.6i 3ZZ-FE N/A 2000-
TOYOTA COROLLA VERSO 1.6i N/A N/A 2001-
TOYOTA COROLLA VERSO 1.8i N/A N/A 2001-
TOYOTA MR2 1.8i VVTi 1ZZ-FE N/A 2000-
TOYOTA RAV 4 1.8i 1ZZ-FE N/A 2000-
Last edited by lazzer408; Jul 28, 2007 at 06:22 AM.
Reply
1
1
There are a lot of companies (mainly in China) that make a compatible molded connector. Problem is they will have large minimum orders (1000 or3000 are typical) plus you have to wait for manufacturing + shipping time from China. Could take 90 days.
While having the harness would be easiest, what it looks like I am going to do is get some crimp-on/solder-on mini spades and make my own leads. It's not tough: solder on the spades to 4 wires, plug spades into the indiviudal terminals, and fill the connector with epoxy.
While having the harness would be easiest, what it looks like I am going to do is get some crimp-on/solder-on mini spades and make my own leads. It's not tough: solder on the spades to 4 wires, plug spades into the indiviudal terminals, and fill the connector with epoxy.
Reply
0
0

I have a Hydra and intend to do this swap. I assume the Hydra can handle sequential coil firing. I have to figure out how to configure it for sequential. With COPs like this, esp from a different vehicle, and firing sequential, how should the coil dwell settings be changed?
Reply
0
0
There are a lot of companies (mainly in China) that make a compatible molded connector. Problem is they will have large minimum orders (1000 or3000 are typical) plus you have to wait for manufacturing + shipping time from China. Could take 90 days.
While having the harness would be easiest, what it looks like I am going to do is get some crimp-on/solder-on mini spades and make my own leads. It's not tough: solder on the spades to 4 wires, plug spades into the indiviudal terminals, and fill the connector with epoxy.
While having the harness would be easiest, what it looks like I am going to do is get some crimp-on/solder-on mini spades and make my own leads. It's not tough: solder on the spades to 4 wires, plug spades into the indiviudal terminals, and fill the connector with epoxy.

Reply
0
0


