
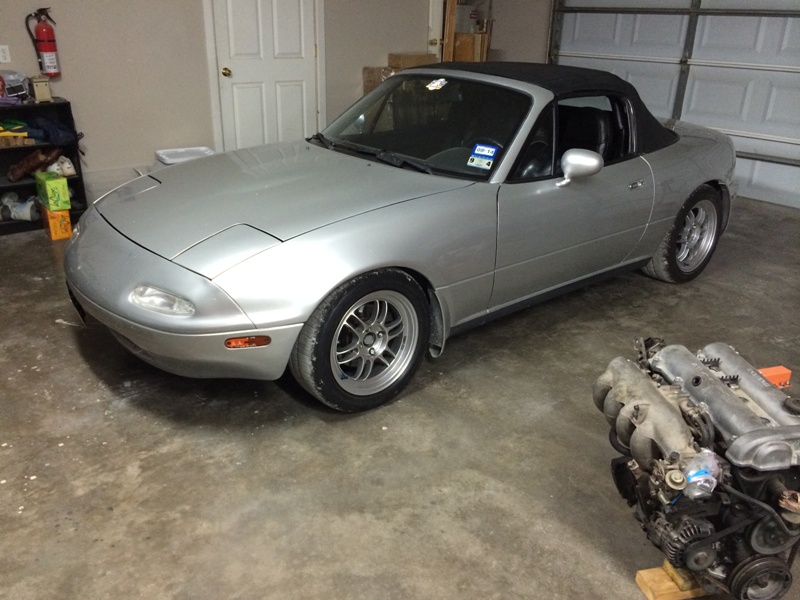
HornetBall's Build #2: Meet Red


That is some nice work you have done there. The seat bracket is a very interesting design. I really like how you welded the nuts to the bracket. So much easier to service.
Reply
 0
0

0


Thread Starter
Elite Member
iTrader: (4)
Joined: Mar 2008
Posts: 6,301
Total Cats: 697
From: Granbury, TX
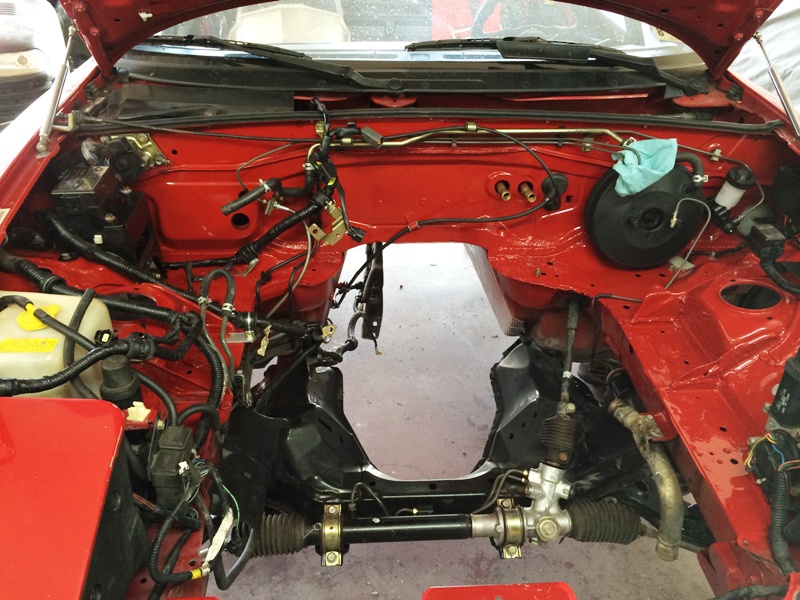
Engine bay prep:
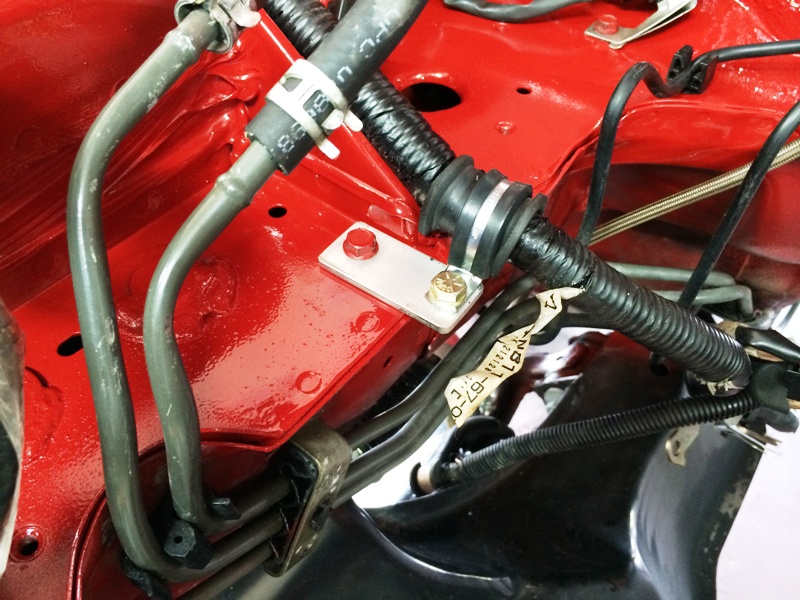
Re-installed plumbing. Fixed missing clamp.
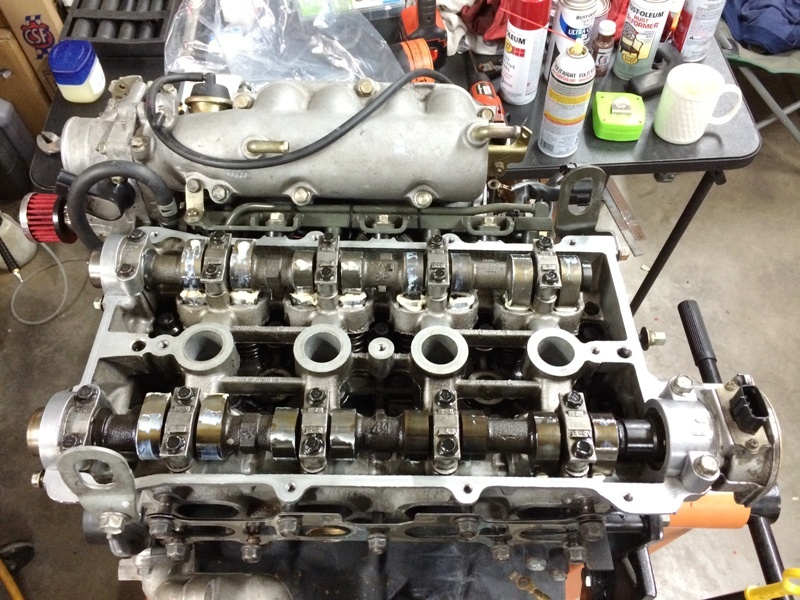
Engine prep work:
BP5A intake cam installed and slathered with assembly lube. I got lucky on the lifter shims, after moving some around I only needed to buy one to get proper clearances.
Cleaned up the RTV mess around the dipstick. When I removed the dipstick, I found a dried-out, flatenned O-ring. Replaced that.
Drilled, tapped and plugged the small coolant elbow in the mixing manifold.
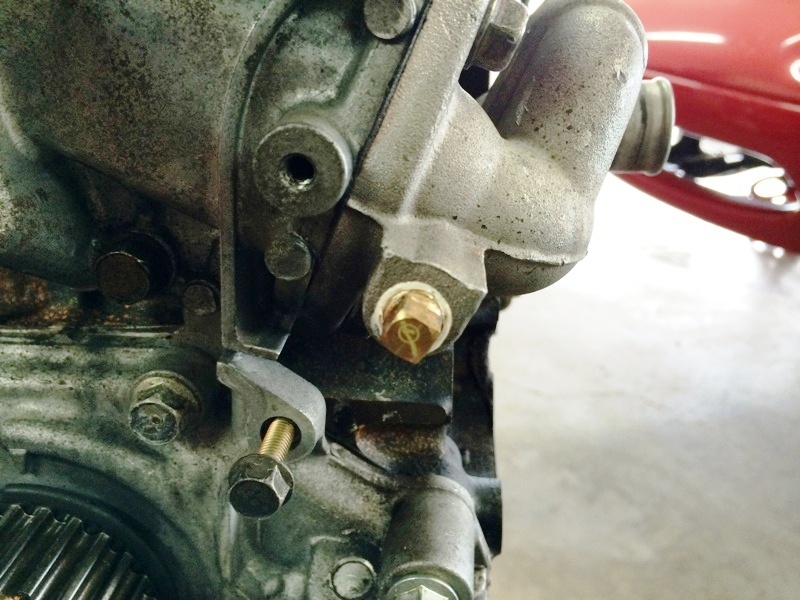
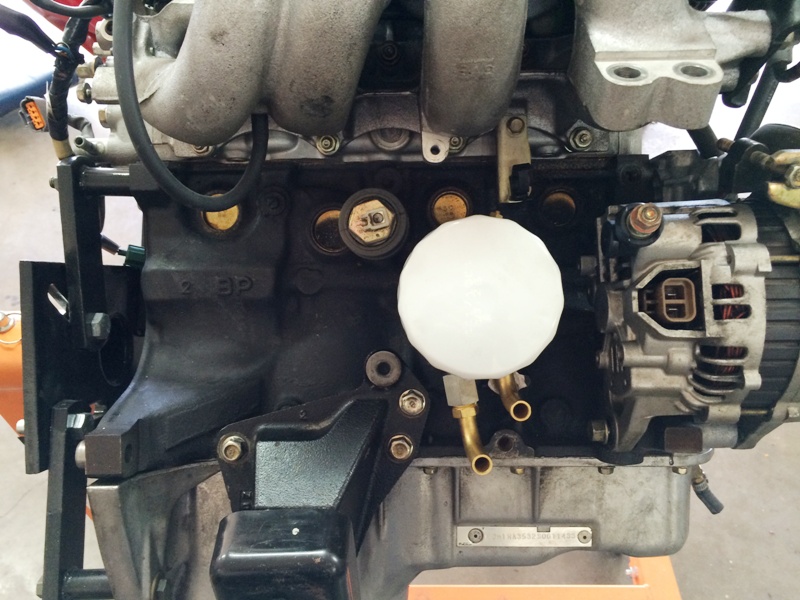
Coolant block-off. Replaced missing oil pump bolts. Retorqued water pump and oil pump bolts. Added breather filter to idle valve.
Got a Hayden medium duty tube and fin oil cooler kit. Came with heat exchanger, thermostatic sandwich plate, fittings and hose (0.5"ID or -8). Kit cost ~$120 (partsgeek).
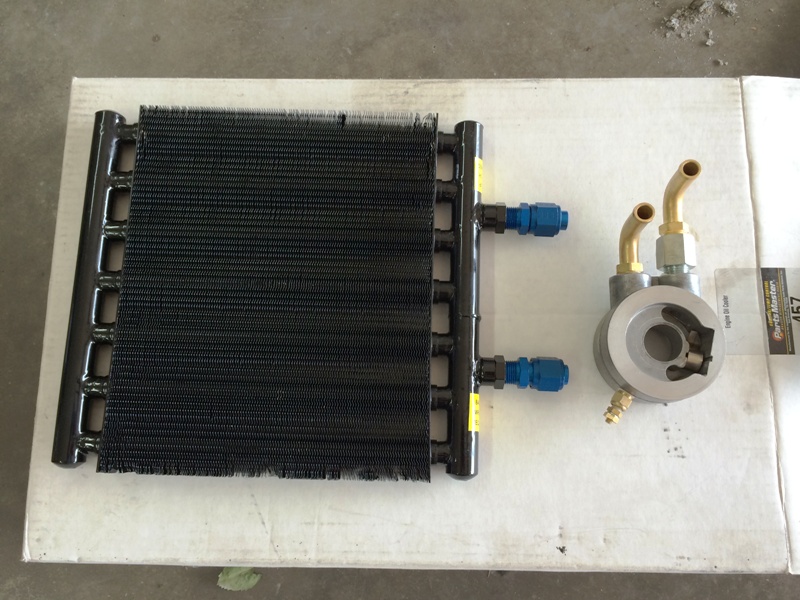
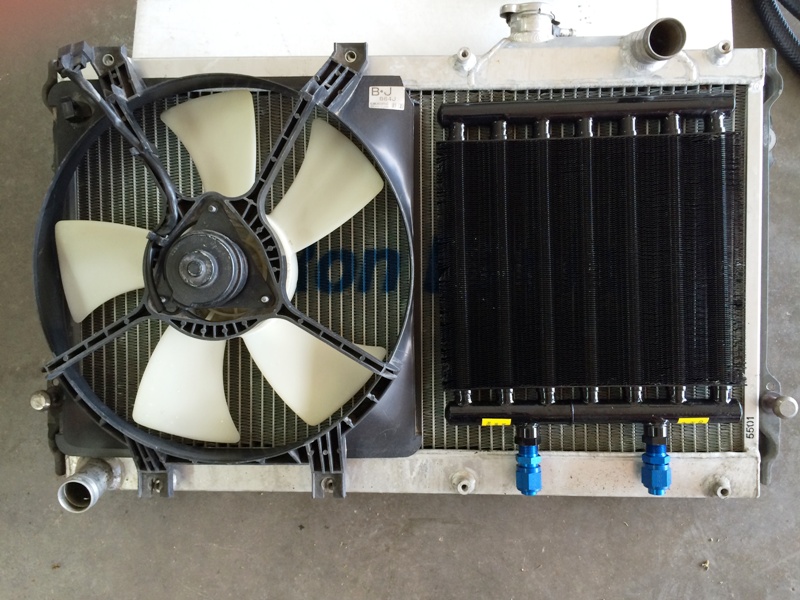
Plan is to mount it to the radiator in place of the AC fan. The AC fan mounting bosses will be re-used for this. The order of heat exchangers follows good engineering practice (cooler fluid in front, warmer fluid in back).
Drilled and tapped the sandwich plate for my oil temperature gauge sensor.
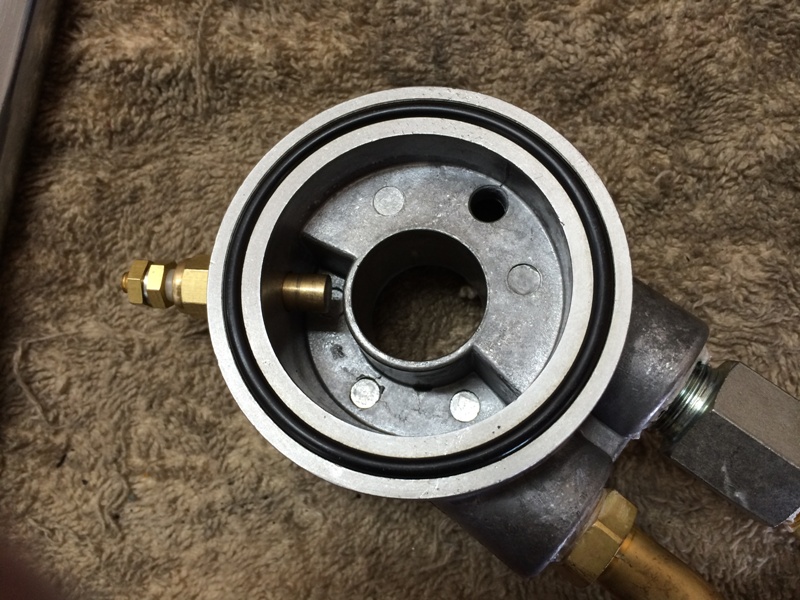
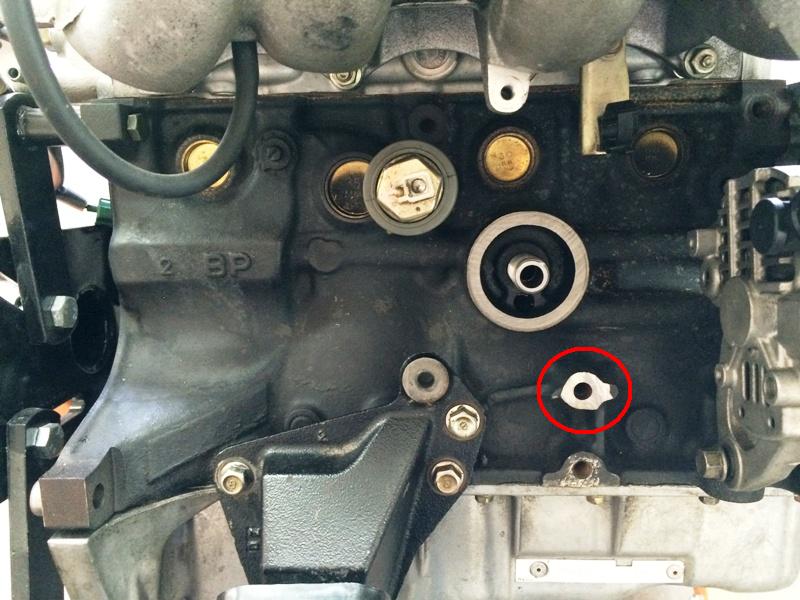
Sandwich plate adapter fit the engine well. One of the vestigial bosses (circled) needed just a touch of grinding for fitting clearance.
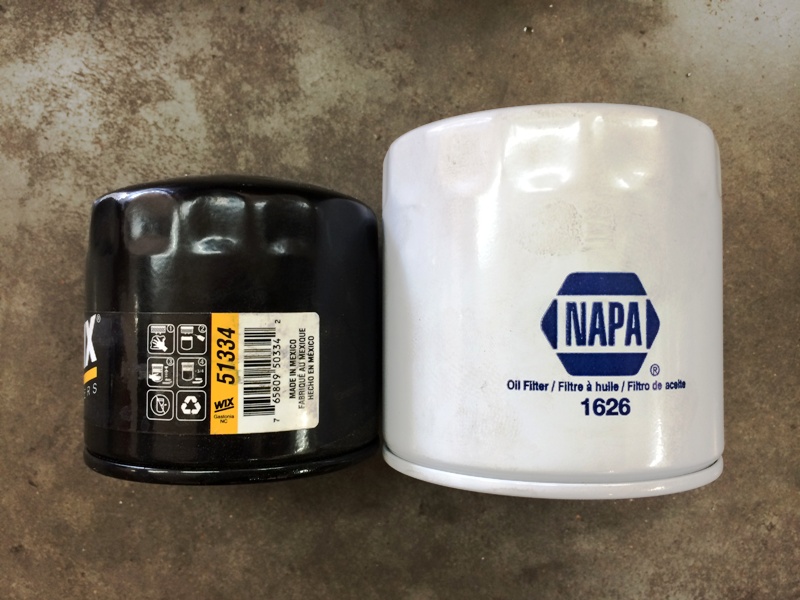
The sandwich plate requires an oil filter with a larger diameter than normal Miata filters. The upside is that you end up with a much larger oil filter. Note that the Wix 51334 in the picture is already quite a bit larger than the stock Miata filter. The NAPA 1626 (Wix 51626) dwarfs it.
Now for the reroute. Clearance issues.

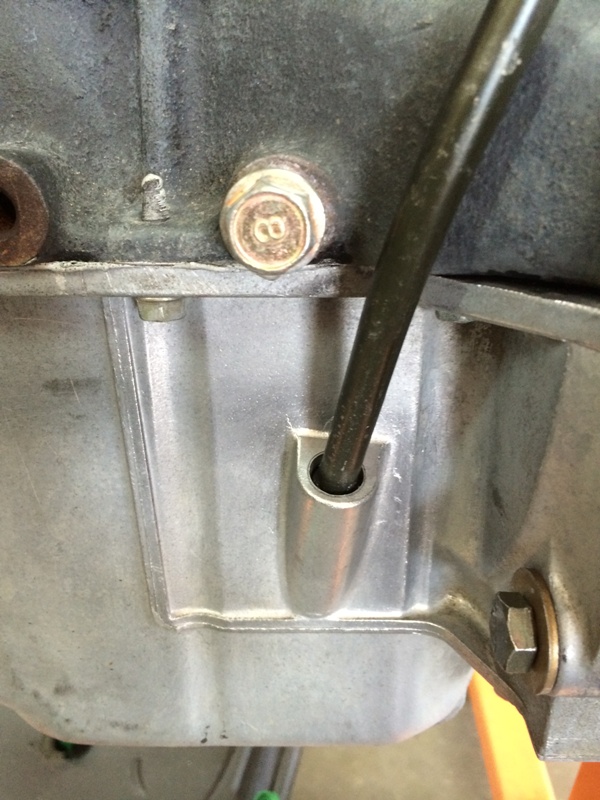
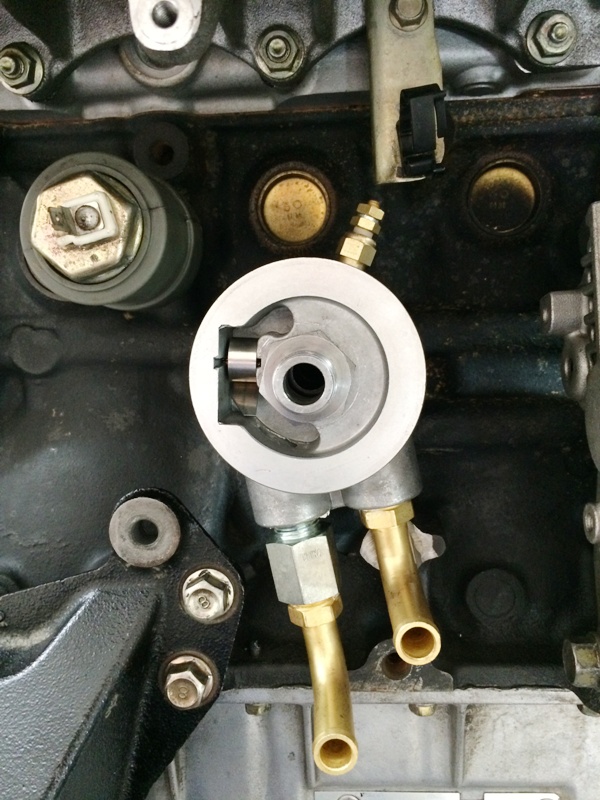
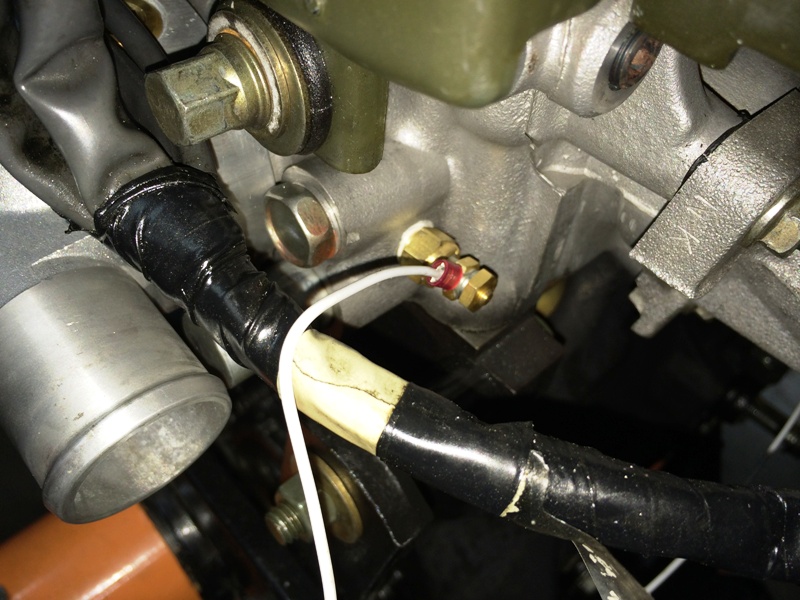
I ended up relocating the ECU temperature sensor to the far end of the BEGI adapter. This required splicing in about a 3" extension to the wiring -- protected by heat shrink tubing.
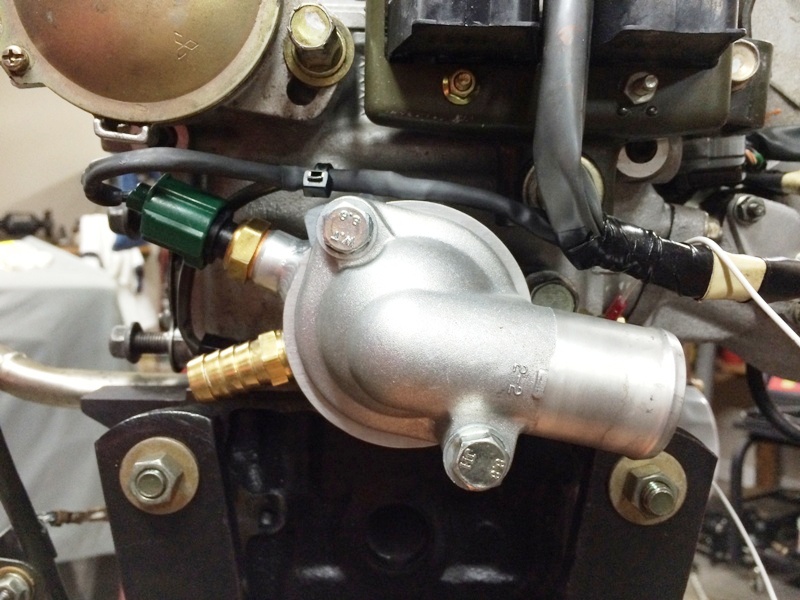
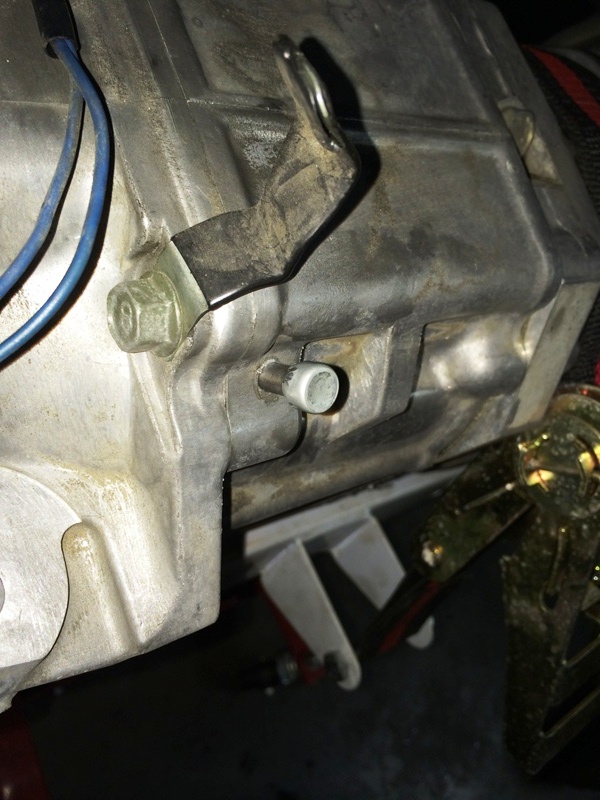
As for the new water temperature gauge sensor, I drilled and tapped the head for that. The outlet for the OEM water-oil heat exchanger (under the wire bundle in the picture) was plugged with a 1/4-28 set screw and JB Weld and then covered with a rubber plug from a 1.6 (i.e., "cursed water plug").
Transmission prep work:
Drained and flushed the turret oil (it was filthy) and added a Mazda OEM shifter bushing kit.
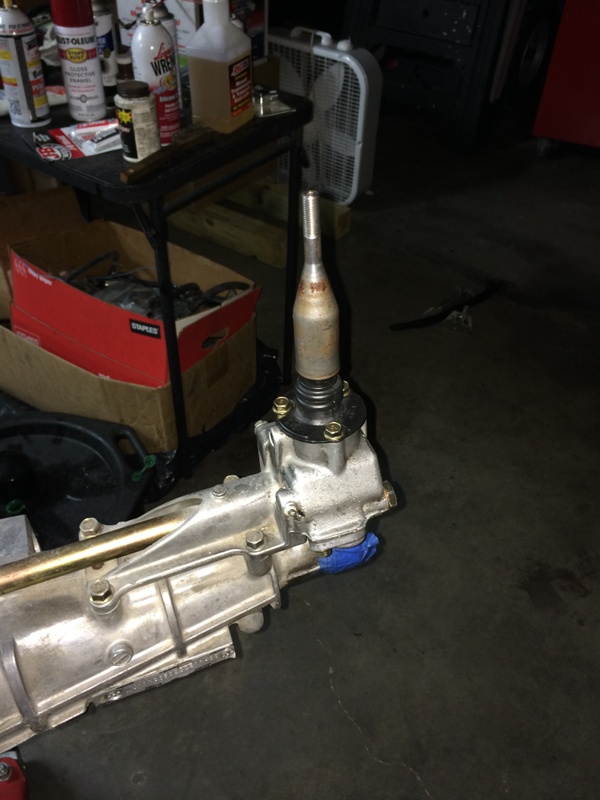
The breather on this transmission was missing, which creates a great entry point for dirt. Got a new breather from Mazda and tapped it in with a brass drift.
So, after all that, I discovered a crunchy clutch throw-out bearing as I was getting ready to mate the engine and transmission. Will have one tomorrow morning, but I'm stuck for now. Should have known, I had to replace the pilot bearing too.
Re-installed plumbing. Fixed missing clamp.
Engine prep work:
BP5A intake cam installed and slathered with assembly lube. I got lucky on the lifter shims, after moving some around I only needed to buy one to get proper clearances.
Cleaned up the RTV mess around the dipstick. When I removed the dipstick, I found a dried-out, flatenned O-ring. Replaced that.
Drilled, tapped and plugged the small coolant elbow in the mixing manifold.
Coolant block-off. Replaced missing oil pump bolts. Retorqued water pump and oil pump bolts. Added breather filter to idle valve.
Got a Hayden medium duty tube and fin oil cooler kit. Came with heat exchanger, thermostatic sandwich plate, fittings and hose (0.5"ID or -8). Kit cost ~$120 (partsgeek).
Plan is to mount it to the radiator in place of the AC fan. The AC fan mounting bosses will be re-used for this. The order of heat exchangers follows good engineering practice (cooler fluid in front, warmer fluid in back).
Drilled and tapped the sandwich plate for my oil temperature gauge sensor.
Sandwich plate adapter fit the engine well. One of the vestigial bosses (circled) needed just a touch of grinding for fitting clearance.
The sandwich plate requires an oil filter with a larger diameter than normal Miata filters. The upside is that you end up with a much larger oil filter. Note that the Wix 51334 in the picture is already quite a bit larger than the stock Miata filter. The NAPA 1626 (Wix 51626) dwarfs it.
Now for the reroute. Clearance issues.
I ended up relocating the ECU temperature sensor to the far end of the BEGI adapter. This required splicing in about a 3" extension to the wiring -- protected by heat shrink tubing.
As for the new water temperature gauge sensor, I drilled and tapped the head for that. The outlet for the OEM water-oil heat exchanger (under the wire bundle in the picture) was plugged with a 1/4-28 set screw and JB Weld and then covered with a rubber plug from a 1.6 (i.e., "cursed water plug").
Transmission prep work:
Drained and flushed the turret oil (it was filthy) and added a Mazda OEM shifter bushing kit.
The breather on this transmission was missing, which creates a great entry point for dirt. Got a new breather from Mazda and tapped it in with a brass drift.
So, after all that, I discovered a crunchy clutch throw-out bearing as I was getting ready to mate the engine and transmission. Will have one tomorrow morning, but I'm stuck for now. Should have known, I had to replace the pilot bearing too.
Last edited by hornetball; May 3, 2014 at 07:59 AM.
Reply
2
2


Thread Starter
Elite Member
iTrader: (4)
Joined: Mar 2008
Posts: 6,301
Total Cats: 697
From: Granbury, TX
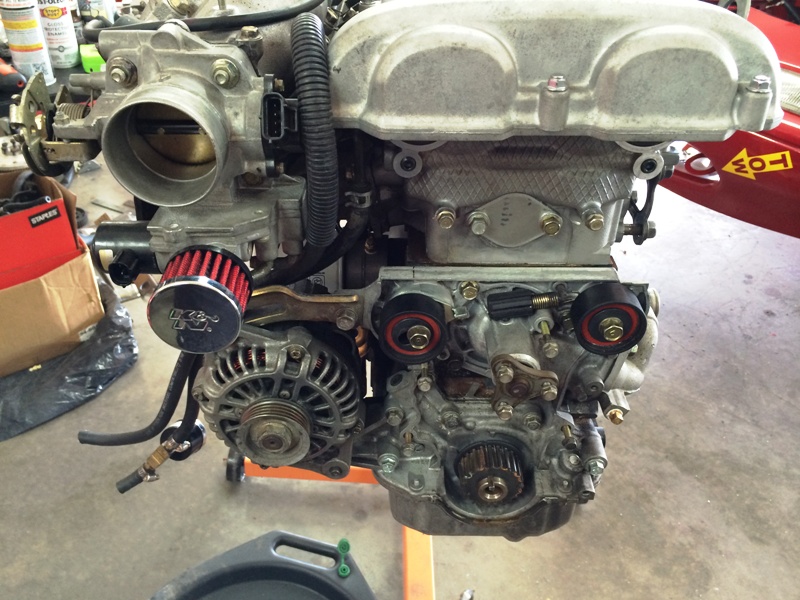
90 degree silicone elbow ==> straight aluminum tube ==> a bit of SCEET for engine movement ==> K&N mounted in airbox fed by headlight lid. All 2.5" KISS. Should be a lot more maintanable and flow better than that JR CAI monstrosity that was on the car.
Reply
0
0
Thread Starter
Elite Member
iTrader: (4)
Joined: Mar 2008
Posts: 6,301
Total Cats: 697
From: Granbury, TX
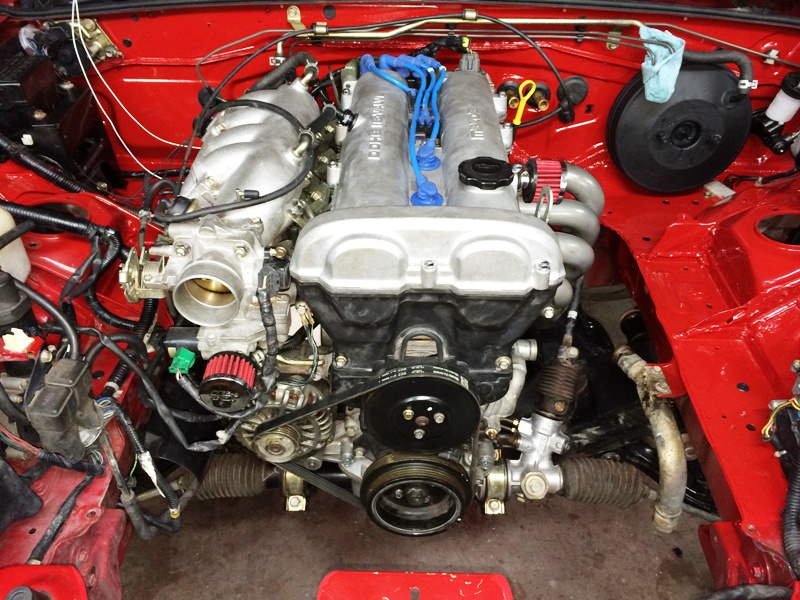
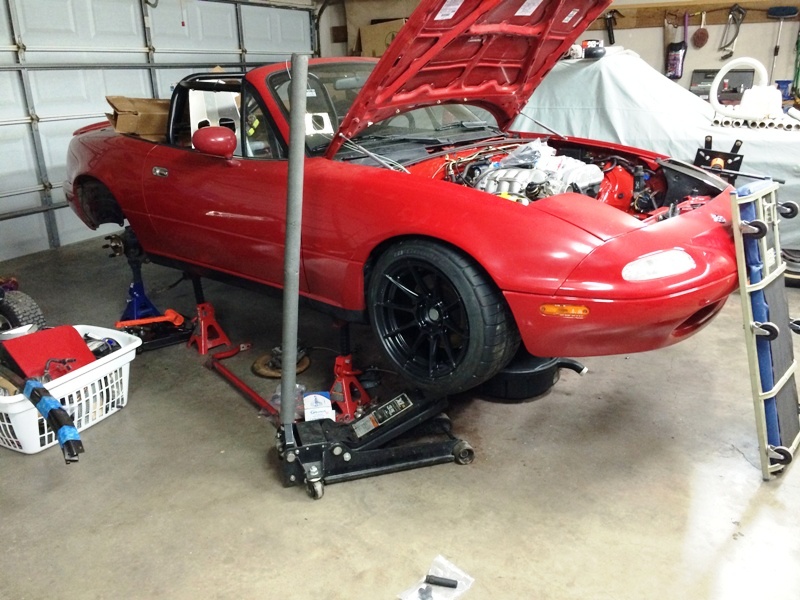
It's in!!!! List of things left is dwindling as is the pile of parts in the garage. Got most everything under the car buttoned up, PPF, clutch, exhaust. Car came with a nice 2.5" Magnaflow exhaust system that I plan to keep running. A bit on the heavy side, but has the nice Magnaflow muffler everybody likes. Mounted the exhaust with poly hangers.
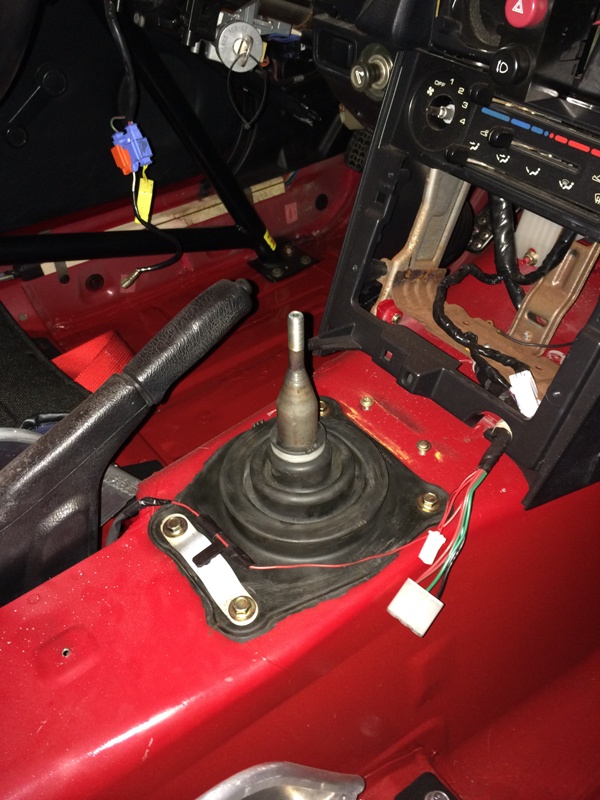
Look Ma! A shifter!
My list is dwindling. In the engine compartment:
1. Brake master with Wilwood prop valve.
2. Radiator/oil cooler.
3. Intake and cold air box.
Interior:
1. Oil temp, water temp and WBO2 gauges.
2. Fix ECU wiring.
3. Flex conduit and Adel clamps to protect wiring along doorsills.
4. Fabricate seatback braces.
5. Seat harnesses.
6. Fire extinguisher.
7. Cage padding.
Exterior:
1. Mount sway bars (RB hollow front, stock rear) and suspension.
2. Clean up disks for Carbotech brake pads, mount disk and pads with new brake hoses.
3. Chin spoiler and brake cooling ducts.
4. Bolt on hardtop.
Plus odds and ends.
On the suspension, I think there has been further delay on the Xidas. Trying to confirm with Emilio. That being the case, I'll just put the Koni Sports back on, get a cheap 4-wheel alignment and hit the track to start sorting the car. I have an event May 31. When the Xidas do arrive, I'll be able to do a back-to-back video and laptime comparison. That should be interesting.
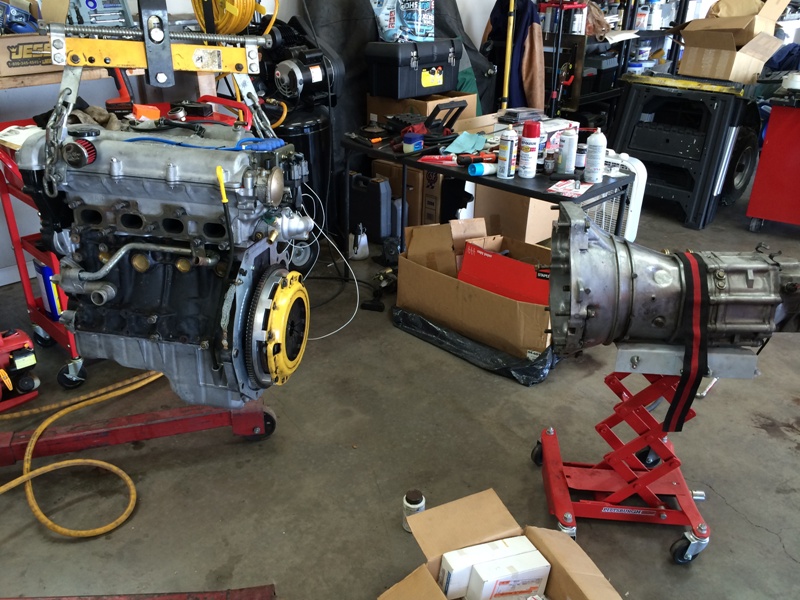
Next victim . . . need to find out what happened to cylinder #2. $250 used motor in foreground.
Look Ma! A shifter!
My list is dwindling. In the engine compartment:
1. Brake master with Wilwood prop valve.
2. Radiator/oil cooler.
3. Intake and cold air box.
Interior:
1. Oil temp, water temp and WBO2 gauges.
2. Fix ECU wiring.
3. Flex conduit and Adel clamps to protect wiring along doorsills.
4. Fabricate seatback braces.
5. Seat harnesses.
6. Fire extinguisher.
7. Cage padding.
Exterior:
1. Mount sway bars (RB hollow front, stock rear) and suspension.
2. Clean up disks for Carbotech brake pads, mount disk and pads with new brake hoses.
3. Chin spoiler and brake cooling ducts.
4. Bolt on hardtop.
Plus odds and ends.
On the suspension, I think there has been further delay on the Xidas. Trying to confirm with Emilio. That being the case, I'll just put the Koni Sports back on, get a cheap 4-wheel alignment and hit the track to start sorting the car. I have an event May 31. When the Xidas do arrive, I'll be able to do a back-to-back video and laptime comparison. That should be interesting.
Next victim . . . need to find out what happened to cylinder #2. $250 used motor in foreground.
Last edited by hornetball; May 4, 2014 at 08:49 AM.
Reply
0
0

Thread Starter
Elite Member
iTrader: (4)
Joined: Mar 2008
Posts: 6,301
Total Cats: 697
From: Granbury, TX
Not much to report. Spent the day under the car doing all those little things that invariably eat up a day. Everything under the car is now completely buttoned up and torqued, so hopefully I can spend more time on my feet.
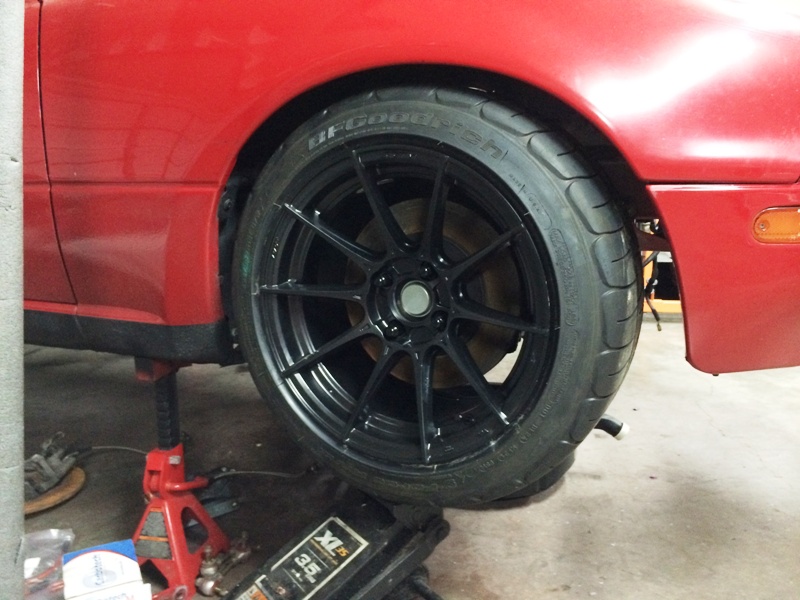
But, don't want to leave you gays hanging. Here's some bling:
Excited to get this thing on track. It's going to be fast.
But, don't want to leave you gays hanging. Here's some bling:
Excited to get this thing on track. It's going to be fast.
Reply
1
1


All your "out of the bay" engine prep has me longing for those days again. Now that my engine is in, everything has become 10x harder.
Progress looks awesome. Are you running without the intake brace? I know the SPEC guys run 'em due to NHV issues at sustained high revs - I know a few have sheared intake bolts.
-Zach
Progress looks awesome. Are you running without the intake brace? I know the SPEC guys run 'em due to NHV issues at sustained high revs - I know a few have sheared intake bolts.
-Zach
Reply
0
0
Thread Starter
Elite Member
iTrader: (4)
Joined: Mar 2008
Posts: 6,301
Total Cats: 697
From: Granbury, TX
No brace. It was missing from the red car when I got it (it's pulled from the silver car too). Gets in the way of reroutes, plus now I have that giant oil filter. I have heard of the issue, so we'll see. Wouldn't be hard to fab a brace that's less bulky than the OEM piece.
As for doing things with the engine pulled . . . I was going to take a picture of torqueing the reroute elbow with 5 feet of straight ratchet extensions. But then I decided that was too cruel. LOL.
Since I'm on track all the time, I find myself pulling engines a lot more than I used to.
As for doing things with the engine pulled . . . I was going to take a picture of torqueing the reroute elbow with 5 feet of straight ratchet extensions. But then I decided that was too cruel. LOL.
Since I'm on track all the time, I find myself pulling engines a lot more than I used to.
Reply
0
0
Thread Starter
Elite Member
iTrader: (4)
Joined: Mar 2008
Posts: 6,301
Total Cats: 697
From: Granbury, TX
Talked to Emilio yesterday. He's really excited about the Gen 2 Xidas. Almost like the Gen 2s are to the Gen 1s as the Gen 1s are to whatever there was before Xidas.
He said the shocks are expected at AST in Dallas mid-month, so were looking at deliveries starting end of May through June. He also said I was #1 on the list!! (Yes, Emilio said I was #1, LOL).
Based on the info, put the Konis back on the car so I can start sorting it out. Will do a track event May 31 on the Konis and then get the Xidas mounted early June. So standby for comparison track video between the Konis and the Xidas! (Emilio said something about a knife in a gunfight)
I expect to be driving this thing next week. Excitement!
Reply
0
0

Thread Starter
Elite Member
iTrader: (4)
Joined: Mar 2008
Posts: 6,301
Total Cats: 697
From: Granbury, TX
With your fab skills, should turn out awesome. I'm just going for maximum simplicity/reliability + a proven track formula. Emilio already did all the heavy lifting. I keep finding myself looking at the 949 95R vids and anticipating having that fun myself.
Reply
0
0
Thread Starter
Elite Member
iTrader: (4)
Joined: Mar 2008
Posts: 6,301
Total Cats: 697
From: Granbury, TX
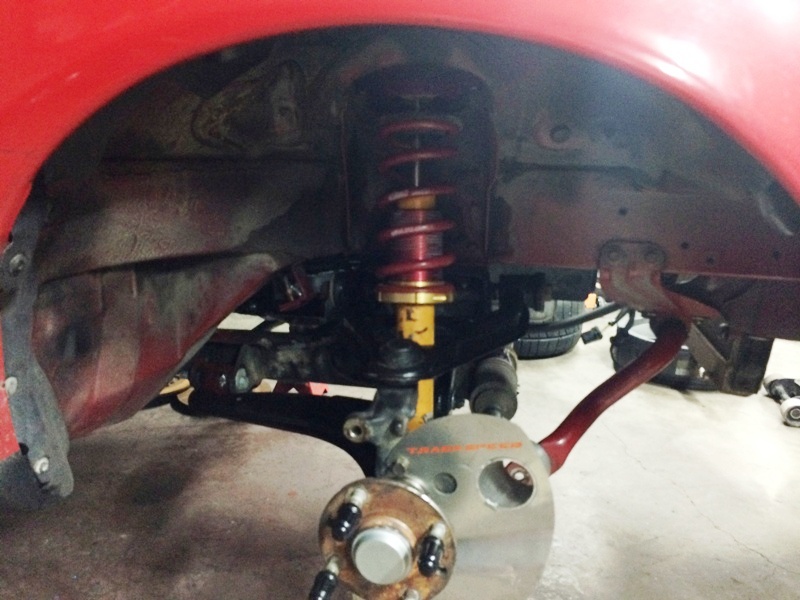
Welp . . . Koni's back on. 
Good news is I got another call from Emilio. Xidas will definitely be at AST next week and 949 the week after. I'll be getting them this month!
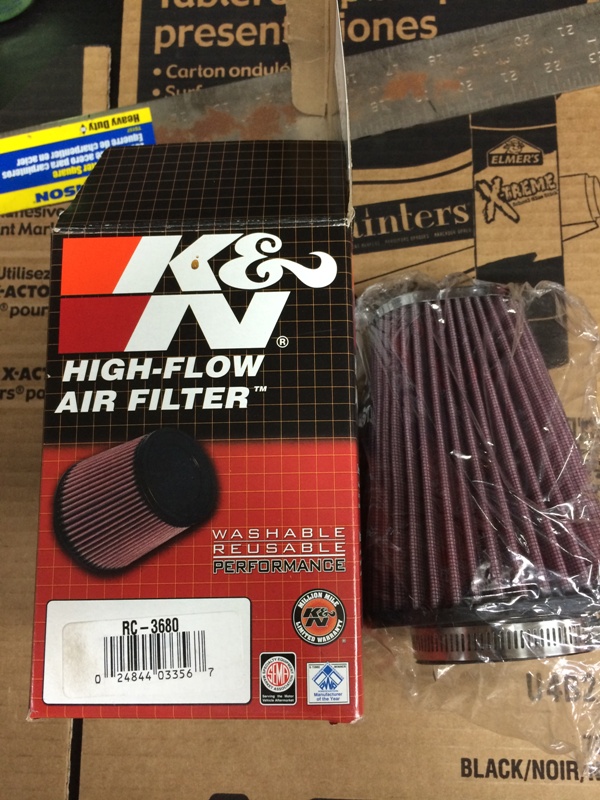
Constructed my intake. A lot of the raw materials were things I already had on hand from other projects. Everything is 2.5"ID. A 90 degree silicone elbow, 2x 45 degree silicone elbows, a length of straight aluminum tubing and some aluminum sheet. I ordered an air filter (K&N RC-3680), two aluminum flanges (Aircraft Spruce & Specialty) and some bulb trim seal (Amazon).

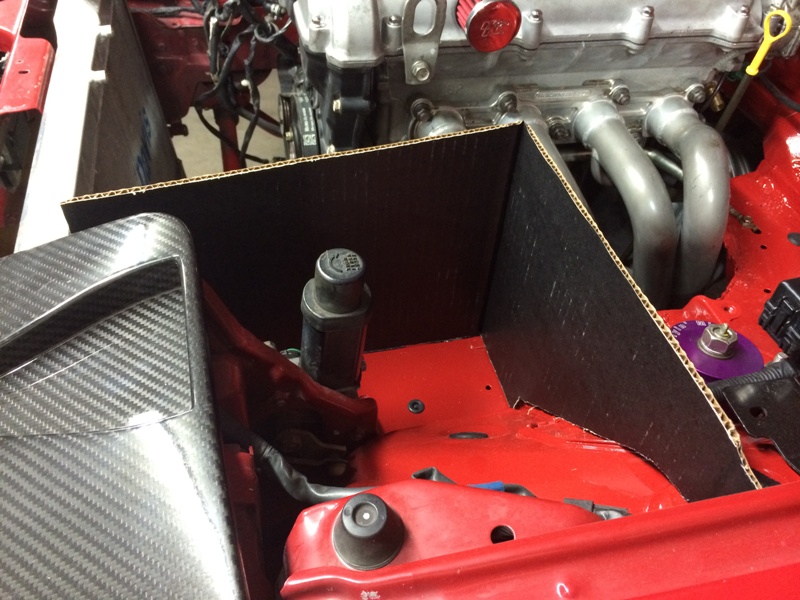
I followed the "cardboard/stick" method to create a pattern for the airbox (see https://www.miataturbo.net/diy-turbo...-shield-35127/). Starting with some cardboard, make a rough pattern.
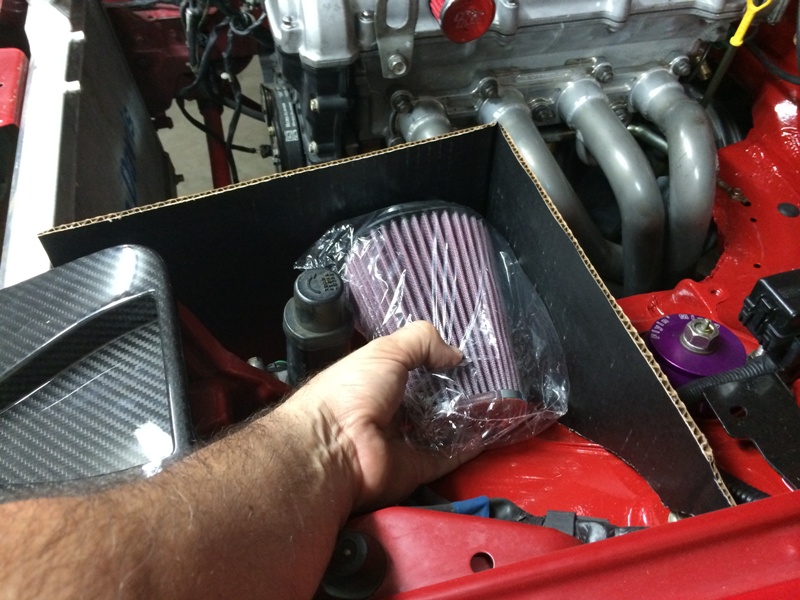
Make sure the air filter fits.
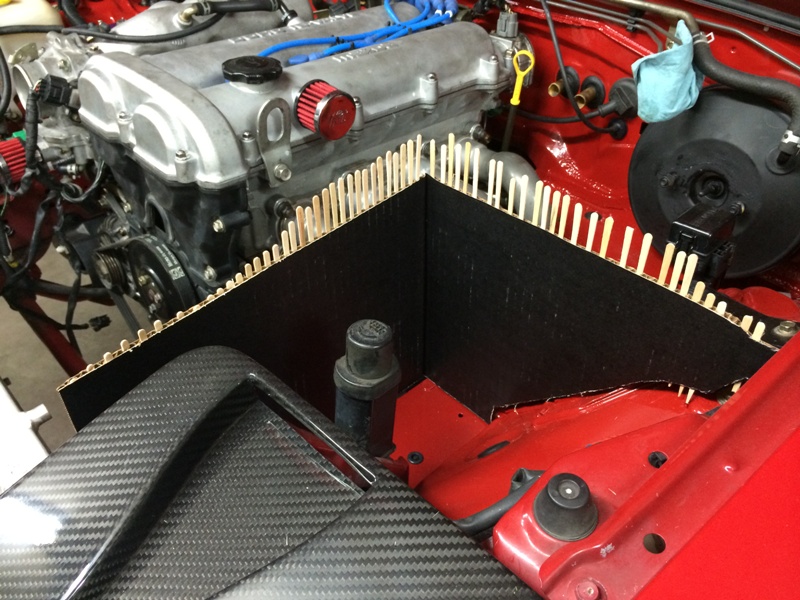
Stick a bunch of little sticks from a craft store into the cardboard.
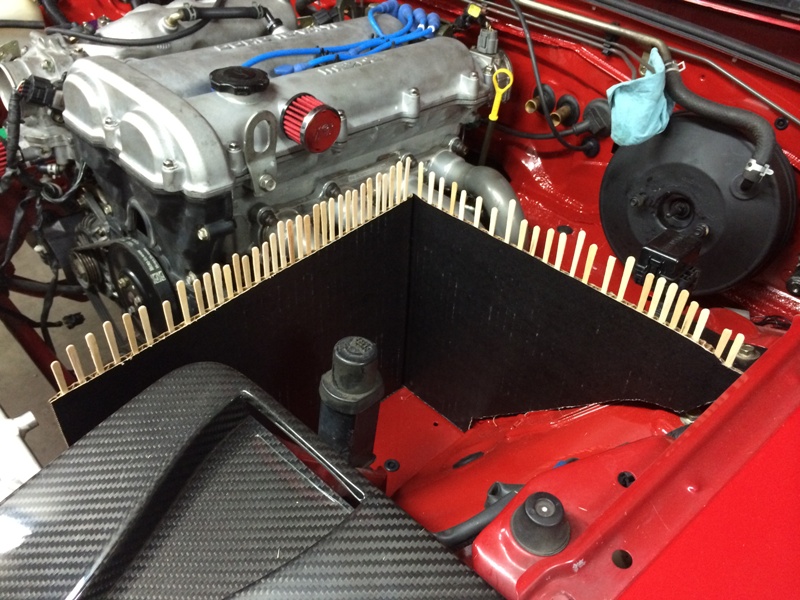
Close hood. Open hood. Voila!
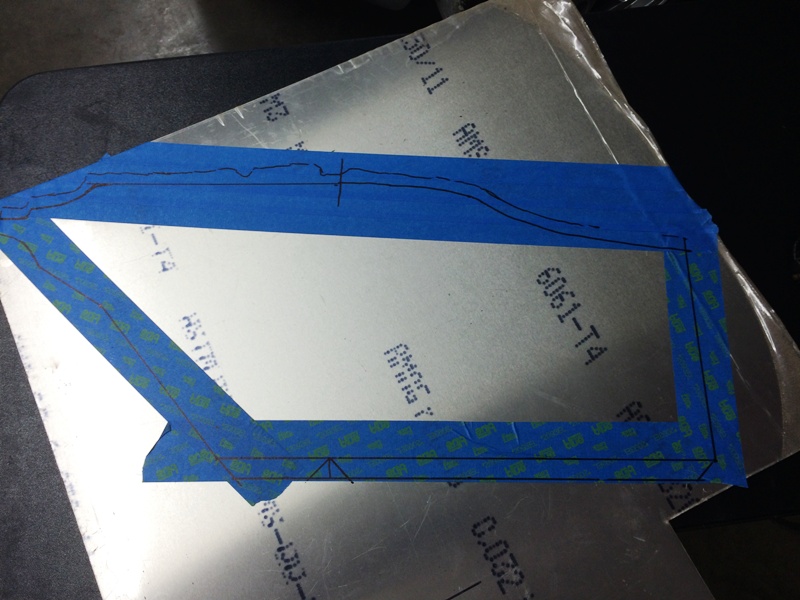
Transfer the pattern to the aluminum sheet (note that I'm leaving room for the trim seal at the top plus adding tabs at the bottom).
Cut it out, make your bends and put the box in place. A bit of grease on the air filter neck marks its location.
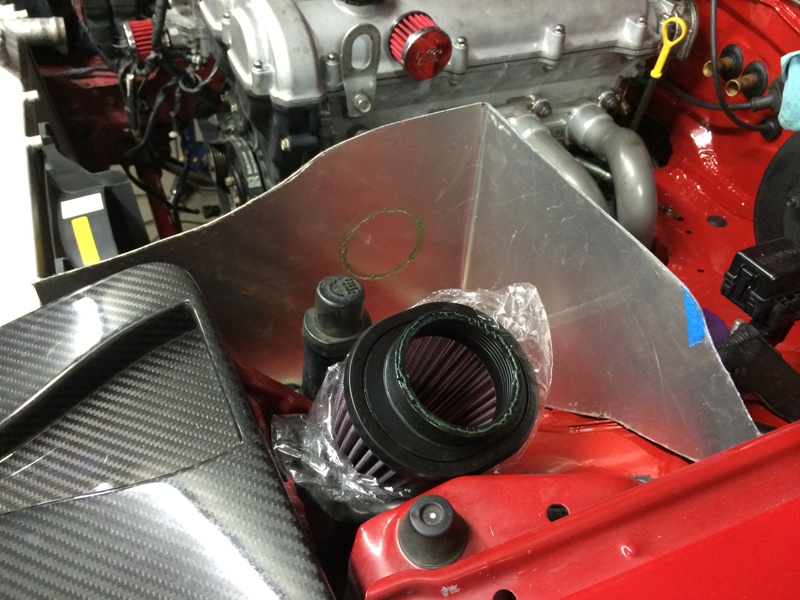
Drill the air filter hole and pop-rivet the flanges in with some RTV. The flanges and bends do a nice job of stiffening the aluminum sheet.
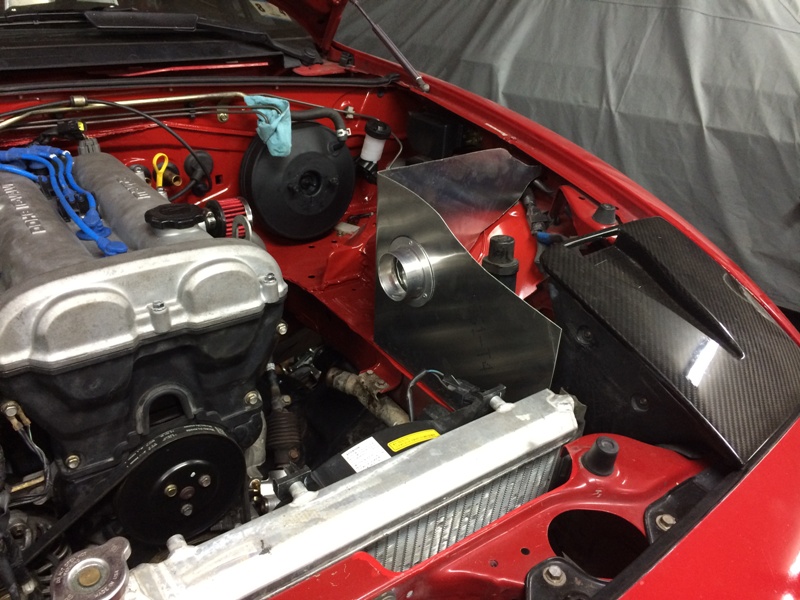
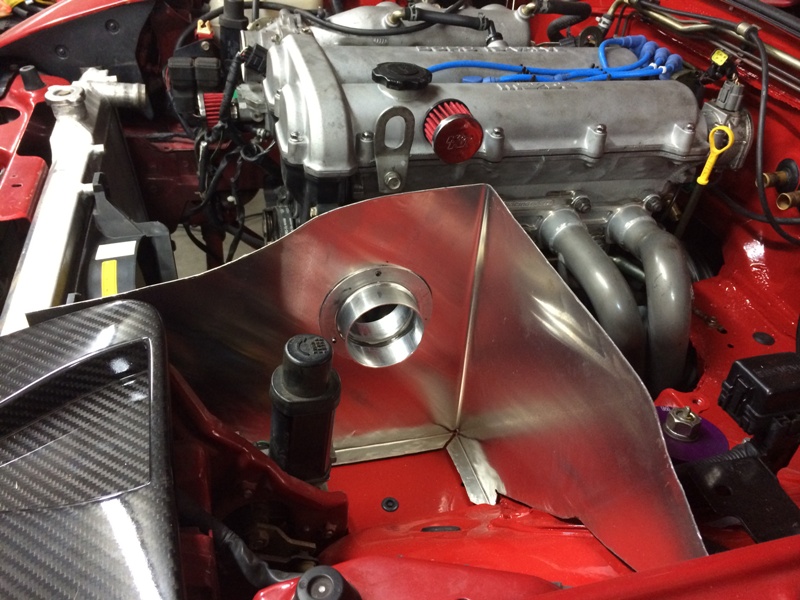
Add some brackets to secure the air box to factory threaded mounting points on the shelf and put the rest of the parts in place.
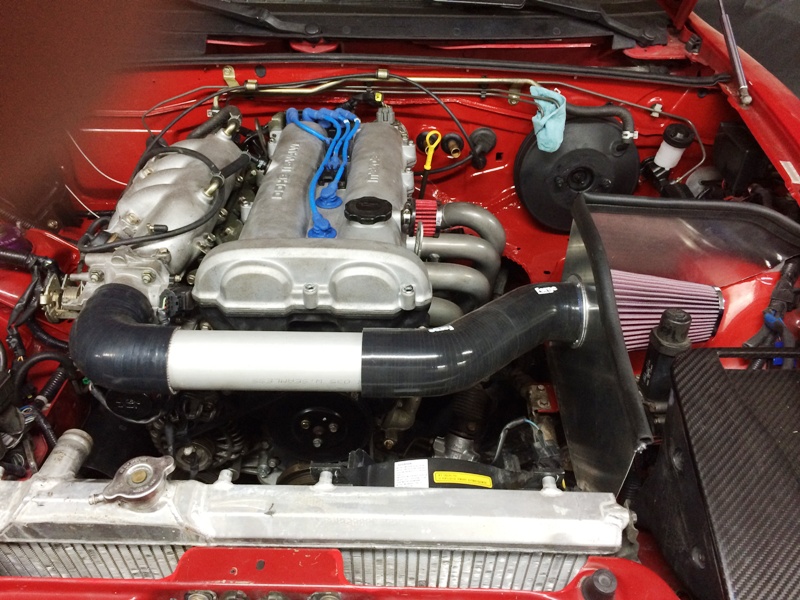
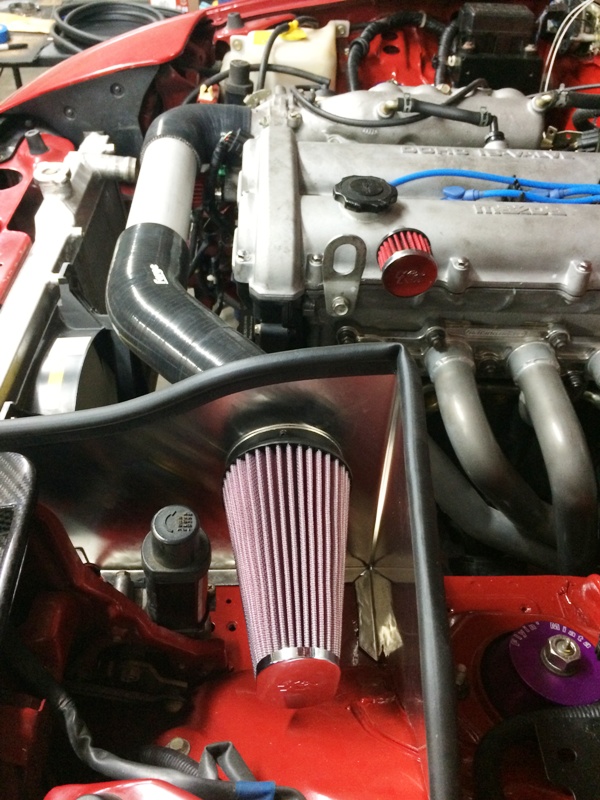
Simple and effective. This is A LOT better than the JR intake that was there before.
So nice to be doing things standing up for a change. Really gets old being under a Miata on jack stands.
The march continues . . . .
Good news is I got another call from Emilio. Xidas will definitely be at AST next week and 949 the week after. I'll be getting them this month!
Constructed my intake. A lot of the raw materials were things I already had on hand from other projects. Everything is 2.5"ID. A 90 degree silicone elbow, 2x 45 degree silicone elbows, a length of straight aluminum tubing and some aluminum sheet. I ordered an air filter (K&N RC-3680), two aluminum flanges (Aircraft Spruce & Specialty) and some bulb trim seal (Amazon).
I followed the "cardboard/stick" method to create a pattern for the airbox (see https://www.miataturbo.net/diy-turbo...-shield-35127/). Starting with some cardboard, make a rough pattern.
Make sure the air filter fits.
Stick a bunch of little sticks from a craft store into the cardboard.
Close hood. Open hood. Voila!
Transfer the pattern to the aluminum sheet (note that I'm leaving room for the trim seal at the top plus adding tabs at the bottom).
Cut it out, make your bends and put the box in place. A bit of grease on the air filter neck marks its location.
Drill the air filter hole and pop-rivet the flanges in with some RTV. The flanges and bends do a nice job of stiffening the aluminum sheet.
Add some brackets to secure the air box to factory threaded mounting points on the shelf and put the rest of the parts in place.
Simple and effective. This is A LOT better than the JR intake that was there before.
So nice to be doing things standing up for a change. Really gets old being under a Miata on jack stands.
The march continues . . . .
Last edited by hornetball; May 9, 2014 at 12:47 AM.
Reply
23
23


