
Building a blonde young beefcake wearing nothing but skimpy shorts named Rocky


 What's the shop charging for assembly and shouldn't you wait for their measurements before buying bearings?

Thread Starter
Senior Member
iTrader: (7)
Joined: Sep 2009
Posts: 754
Total Cats: 68
From: Royal Oak Michigan
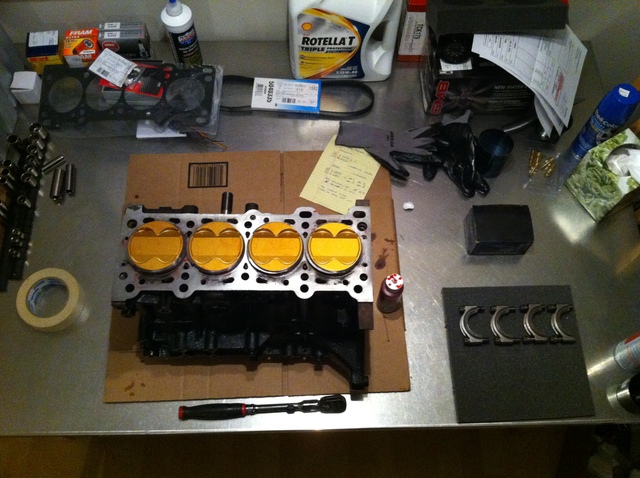
Alright - The machine shop will be finished this week or early next week. In the mean time I've ordered some items for the reassembly. Let me run this past you guys so I'm not missing anything.
Items Ordered:
- Oil pan gaskets
- Front and rear oil pan seals
- Thermal intake manifold gasket
- Rear main seal
- Valve cover gasket
- Thermostat - 180 degrees
- NGK 4644 V spark plugs (1 set for break in, another for tuning)
- Exhaust manifold gasket
- GMB water pump with seals
- Accessory belt
- Rotella T 10-30 oil for break in
- Oil pump seals
Items to be ordered
- GATES timing belt
- Tensioner and idler pulley
- Mazda OEM MLS Head Gasket
What am I overlooking?
Reply
 0
0

0
Thread Starter
Senior Member
iTrader: (7)
Joined: Sep 2009
Posts: 754
Total Cats: 68
From: Royal Oak Michigan
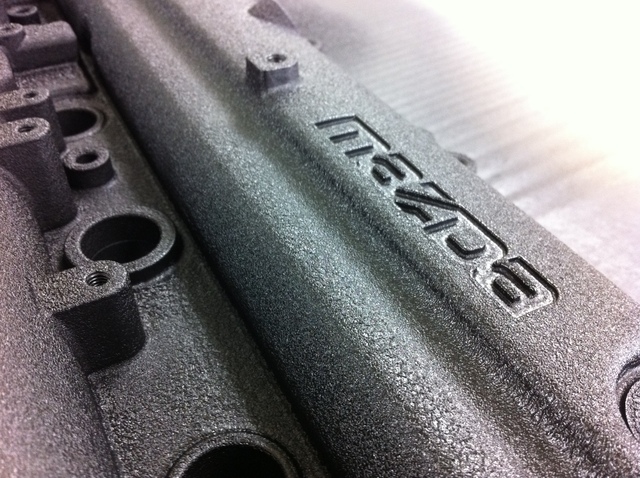
Did a little detail work tonight since I have not gotten the block back.
I decided to wrinkle black my valve cover. I started out with a parts cleaner, then pressure washed it and I primed it with self etching primer.
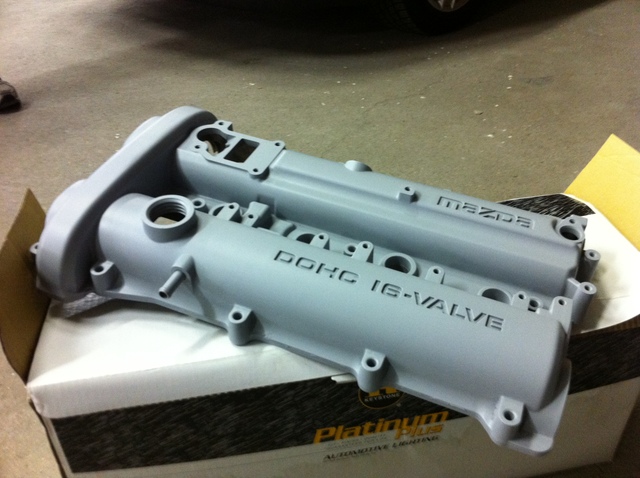
The deal with Wrinkle black is to do think, multiple coats and very evenly. I used to paint professionally so an aerosol can is hard to mess up.

Gave it about 5 minutes between the three coats and then baked it.

She came out perfect.


Reply
0
0


Junior Member

Joined: Nov 2011
Posts: 45
Total Cats: 7
From: Helsinki, Finland
honestly, i just find this thread and run out of bits to read :0
I wont get my MX till possibly Feb hopefully Jan as it sits awaiting some parts in UK just now then me to save some extra cash to fly home a drive it here to Finland. Meanwhile i have to digest you guys build threads. I am loving this car very very clean build philosophy i hope i can manage something along these lines once my old girl gets here. that wrinkle finish is the nuts!
I wont get my MX till possibly Feb hopefully Jan as it sits awaiting some parts in UK just now then me to save some extra cash to fly home a drive it here to Finland. Meanwhile i have to digest you guys build threads. I am loving this car very very clean build philosophy i hope i can manage something along these lines once my old girl gets here. that wrinkle finish is the nuts!
Reply
0
0


Thread Starter
Senior Member
iTrader: (7)
Joined: Sep 2009
Posts: 754
Total Cats: 68
From: Royal Oak Michigan
Engine machine work complete. Starting the assembly tonight my fools:
I started with a clean checklist of items I'd need to complete the build and the engine torque specs on hand. A good torque wrench and organization is all it really takes to build an engine.
I started by taping off the block and hitting it with a wire wheel. The hot tank cant clean up these iron blocks like you see with the aluminum ones. Then I applied a couple thick layers of VHT engine enamel. I went with black because I actually want this thing to look clean after 11 miles of use. This stuff dries quickly and provides a durable finish.

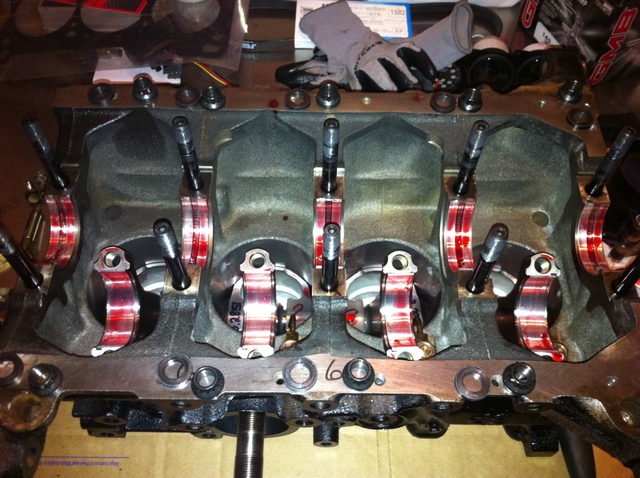
Next I inspected my rings- They were filed to spec at the machine shop and matched to each piston. The guys wrote 1,2,3,4 on each ring and seperated them into three different boxes - 1st, 2nd, oil boxes. Installing the rings is a snap, just lube everything up and install them with the openings offset, you might have your own offset pattern but it's typical to avoid the middle of the skirt and the wrist pin, then offset them as opposite from each other as possible. Then I installed one wrist pin lock and then the rod was installed using the wrist pin. I was given a set of micro polished wrist pins by a friend who works at Diamond Racing but the pin was too long and didn't allow the lock to seat completely. So I went with the stock CP wrist pin which was machined very well to begin with. Lube is important here too. The second wrist pin is snapped in- when you feel comfortable with the seating of the pin and first lock you're safe to move on. Some people use a tool to install the locks, I use my Ninja strength hands.
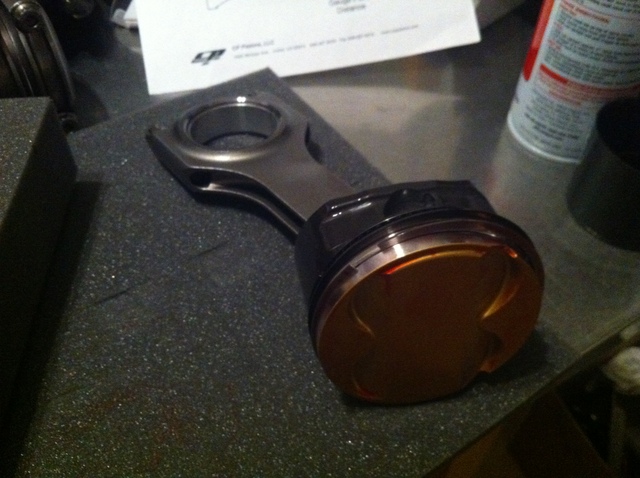
I kicked off the rod caps with a couple of light taps from a hammer with tape wrapped over the business end. The machine shop also numbered these for me because they are in matching sets to each rod with the bearings already installed. It's important to keep these matched sets- the parts were inspected and bored and line honed with this organization. It's important to make sure that the valve reliefs on the pistons are on the correct side if your piston is not identical on both sides. My CP piston spec sheet identified the intake side as -.195 and exhaust at -.150 so the bigger relief side is to the intake side of the motor. BTW your belts are always closest to #1 cylinder making the intake side to the left if you remembered what your engine looked like when it was complete! I set my piston skirts into the cylinders and took a break to update you kids.
I started with a clean checklist of items I'd need to complete the build and the engine torque specs on hand. A good torque wrench and organization is all it really takes to build an engine.
I started by taping off the block and hitting it with a wire wheel. The hot tank cant clean up these iron blocks like you see with the aluminum ones. Then I applied a couple thick layers of VHT engine enamel. I went with black because I actually want this thing to look clean after 11 miles of use. This stuff dries quickly and provides a durable finish.

Next I inspected my rings- They were filed to spec at the machine shop and matched to each piston. The guys wrote 1,2,3,4 on each ring and seperated them into three different boxes - 1st, 2nd, oil boxes. Installing the rings is a snap, just lube everything up and install them with the openings offset, you might have your own offset pattern but it's typical to avoid the middle of the skirt and the wrist pin, then offset them as opposite from each other as possible. Then I installed one wrist pin lock and then the rod was installed using the wrist pin. I was given a set of micro polished wrist pins by a friend who works at Diamond Racing but the pin was too long and didn't allow the lock to seat completely. So I went with the stock CP wrist pin which was machined very well to begin with. Lube is important here too. The second wrist pin is snapped in- when you feel comfortable with the seating of the pin and first lock you're safe to move on. Some people use a tool to install the locks, I use my Ninja strength hands.

I kicked off the rod caps with a couple of light taps from a hammer with tape wrapped over the business end. The machine shop also numbered these for me because they are in matching sets to each rod with the bearings already installed. It's important to keep these matched sets- the parts were inspected and bored and line honed with this organization. It's important to make sure that the valve reliefs on the pistons are on the correct side if your piston is not identical on both sides. My CP piston spec sheet identified the intake side as -.195 and exhaust at -.150 so the bigger relief side is to the intake side of the motor. BTW your belts are always closest to #1 cylinder making the intake side to the left if you remembered what your engine looked like when it was complete! I set my piston skirts into the cylinders and took a break to update you kids.


Last edited by miatauser123; Dec 15, 2011 at 09:51 AM.
Reply
1
1
Thread Starter
Senior Member
iTrader: (7)
Joined: Sep 2009
Posts: 754
Total Cats: 68
From: Royal Oak Michigan
The rings must be offset from each other, you'll notice each ring has an opening when it's installed (Because they are a C shape) and it's best to offset these openings from each other. Usually you don't want the openings over the middle of the skirt or the wrist pin. That way if fuel or oil were trying to pass by it would have to travel a longer distance in order to escape.
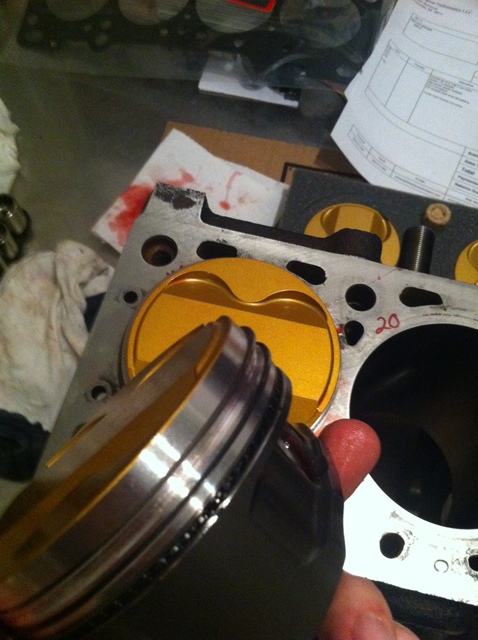
After the rods were mounted with their locks installed and the caps removed, double checking that the rings were installed and offset. I pulled out the ring compressor tool and prepared the pistons for installation by applying some assembly lube to the cylinder walls and taping off the tops of each piston. My pistons are coated so it's best to protect the finish with a couple pieces of painters tape.
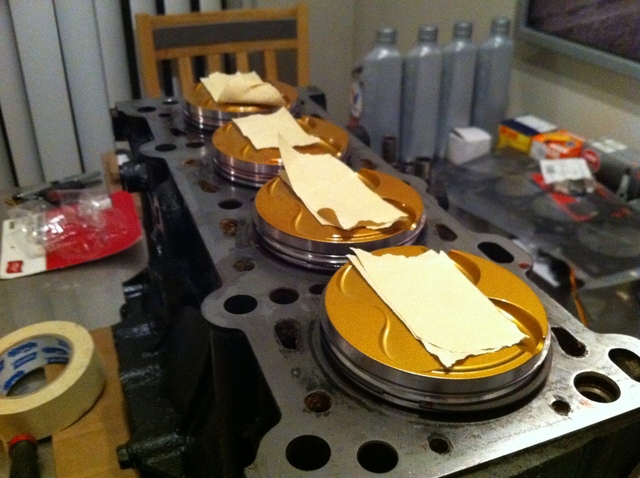
I took the ring compressor and pressed it flush against the deck around the piston. Used the supplied tool to tighten the ring compressor and it seamlessly pressed the rings into their ring lands. After checking to see if all of the rings were indeed compressed I proceeded to tap them in using a wooden hammer as an extension and a rubber mallet for the blunt force. They should easily slide in with a few easy taps. If you notice strong resistance there is a problem- check that your ring compressor has compressed each of the rings and that the piston is not cocked or bound up.
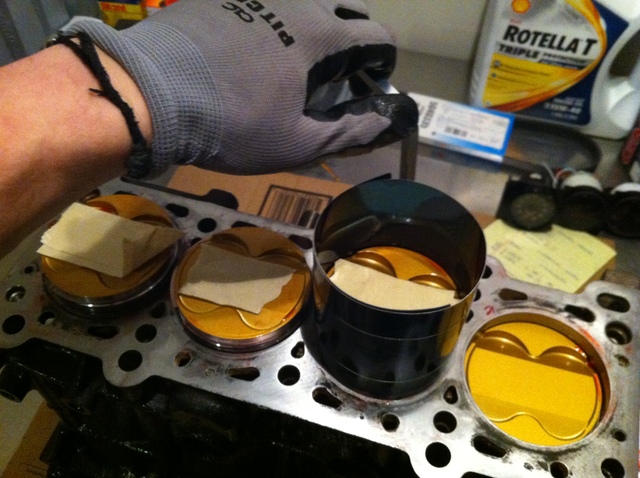
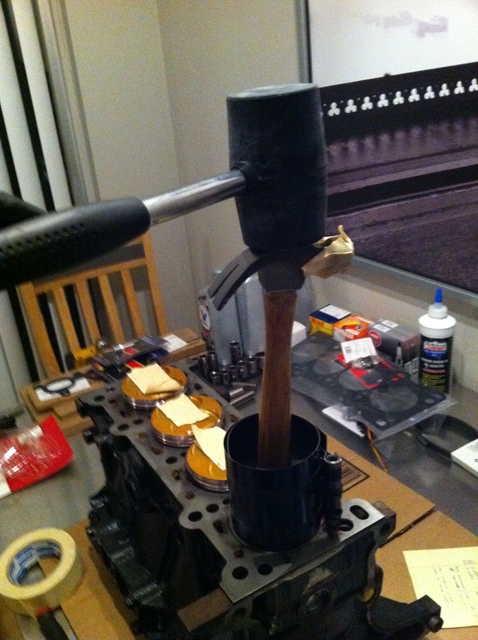
Now that my pistons have been installed I pushed them about 1/2 the way down the cylinder and removed my protective tape (you can see it did it's job protecting these sexy slugs) Putting the pistons 1/2 way down should make for an easy install of the crank when I flip this thing over.

After I flipped her over I proceeded to install the oil jets. These are installed with a banjo bolt and some copper washers. These are torqued down at 105-156 inch lbs.

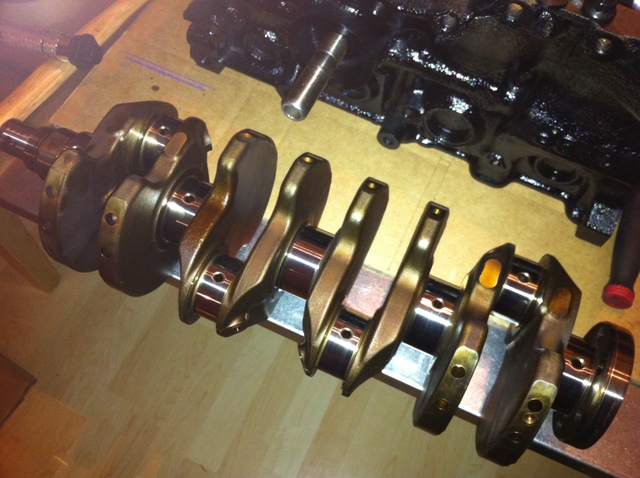
With my oil squirters installed and torqued, I set my bearings and thrust washers in place. The thrust washers are installed at the 4th main. Then I thoroughly lubed the bearings and my crankshaft contact surfaces. You'll know your bearings are in the right place because they have a hole in them that lines up with an oil feed hole in the main.
I had the crankshaft micro polished so she looks nice n shiny. A touch more lube and shes ready to set in. I took the rods and leaned them so that they would line up with my crank. 1-4 forward and 2-3 towards me.
I set the main caps on with their bearings + lube of course and then the rod caps in the same manner. A nice easy tap with a rubber mallet sets them pretty firm in place for the ARP hardware to be loosely installed. I snugged them up by jumping from bolt to bolt trying to get the clamp as evenly as possible but still not tightening them down with any force.
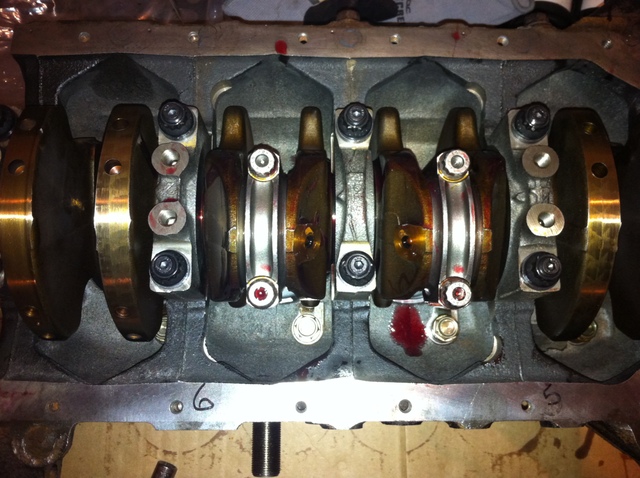
Everything looks good, she rotates nicely. I'll wait until tomorrow to torque this baby down.
After the rods were mounted with their locks installed and the caps removed, double checking that the rings were installed and offset. I pulled out the ring compressor tool and prepared the pistons for installation by applying some assembly lube to the cylinder walls and taping off the tops of each piston. My pistons are coated so it's best to protect the finish with a couple pieces of painters tape.

I took the ring compressor and pressed it flush against the deck around the piston. Used the supplied tool to tighten the ring compressor and it seamlessly pressed the rings into their ring lands. After checking to see if all of the rings were indeed compressed I proceeded to tap them in using a wooden hammer as an extension and a rubber mallet for the blunt force. They should easily slide in with a few easy taps. If you notice strong resistance there is a problem- check that your ring compressor has compressed each of the rings and that the piston is not cocked or bound up.


Now that my pistons have been installed I pushed them about 1/2 the way down the cylinder and removed my protective tape (you can see it did it's job protecting these sexy slugs) Putting the pistons 1/2 way down should make for an easy install of the crank when I flip this thing over.

After I flipped her over I proceeded to install the oil jets. These are installed with a banjo bolt and some copper washers. These are torqued down at 105-156 inch lbs.

With my oil squirters installed and torqued, I set my bearings and thrust washers in place. The thrust washers are installed at the 4th main. Then I thoroughly lubed the bearings and my crankshaft contact surfaces. You'll know your bearings are in the right place because they have a hole in them that lines up with an oil feed hole in the main.

I had the crankshaft micro polished so she looks nice n shiny. A touch more lube and shes ready to set in. I took the rods and leaned them so that they would line up with my crank. 1-4 forward and 2-3 towards me.

I set the main caps on with their bearings + lube of course and then the rod caps in the same manner. A nice easy tap with a rubber mallet sets them pretty firm in place for the ARP hardware to be loosely installed. I snugged them up by jumping from bolt to bolt trying to get the clamp as evenly as possible but still not tightening them down with any force.

Everything looks good, she rotates nicely. I'll wait until tomorrow to torque this baby down.
Reply
1
1


Awesome work man. I am in Grand Rapids - what shop are you using for all of your machine work? I have been strongly considering building a motor over the winter, but I need to find a reputable shop. I figured there would be more places near Detroit.
Reply
0
0
Thread Starter
Senior Member
iTrader: (7)
Joined: Sep 2009
Posts: 754
Total Cats: 68
From: Royal Oak Michigan
Champion Performance. Good group of guys. I had a bit of a hook up but they were highly recommended by my performance parts distributor. I got the motor back in 2 weeks.
Champion Performance - +1 (586) 755-7400
24290 Sherwood
Center Line MI 48015-2026
United States
http://www.champion-performance.com/
Take a look at their site- they outline the high quality machinery they use. If you call them any time soon let them know that Bryan Spears told you to call. They will be interested in discussing your build even if you aren't ready to pull the trigger any time soon.
Reply
0
0

Junior Member
Joined: Jan 2010
Posts: 154
Total Cats: 9
From: Helsinki, Finland
Does this mean that you torqued those in two times, first to 105 inch lbs and on second torquing to 156 inch lbs?
Reply
0
0
Thread Starter
Senior Member
iTrader: (7)
Joined: Sep 2009
Posts: 754
Total Cats: 68
From: Royal Oak Michigan
Made some serious progress tonight.
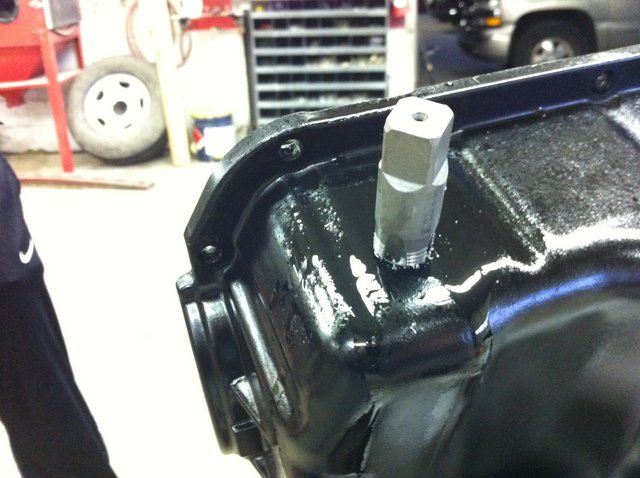
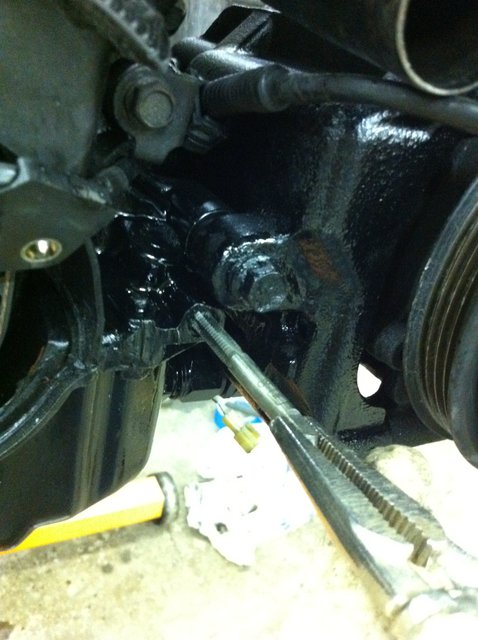
I installed the oil pump rear main seal, oil baffle and oil pick up.
Before I mounted the new pan it had to be tapped for my existing oil return line. 1 - $39.50 drill bit and 1 - $8.95 tap later and I've got myself a hole.
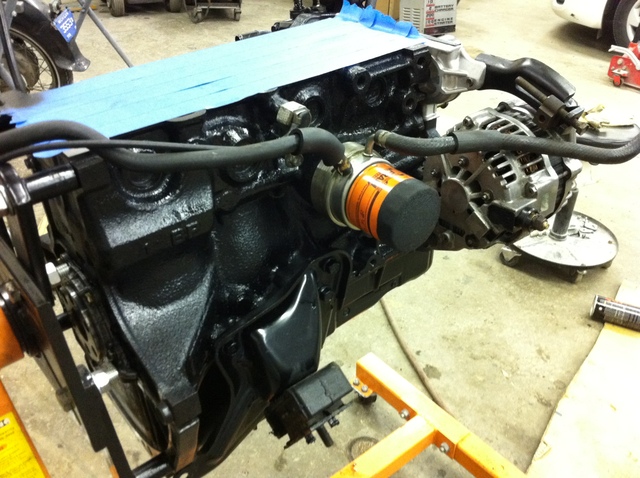
After mounting the pan I flipped the block over and started to accessorize this thing. New water pump, alternator, power steering and AC pump were all installed.
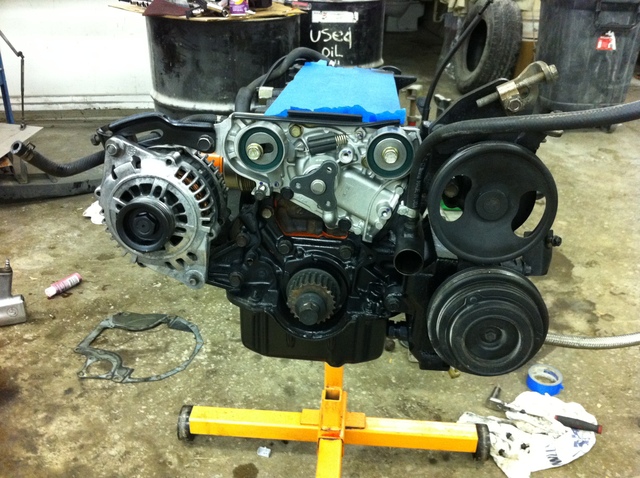
Installed the oil filter assembly and my knock sensor. The hole for the KS needed to be tapped out in order to seat it properly. The block is from an NA car so the knock sensor hole was never used and had since filled with junk.
Ran into a bit of a hiccup when i went to mount my Crank angle sensor. The previous car didn't have a coil on plug setup so the CAS hole was never used. The hole never even had threading...
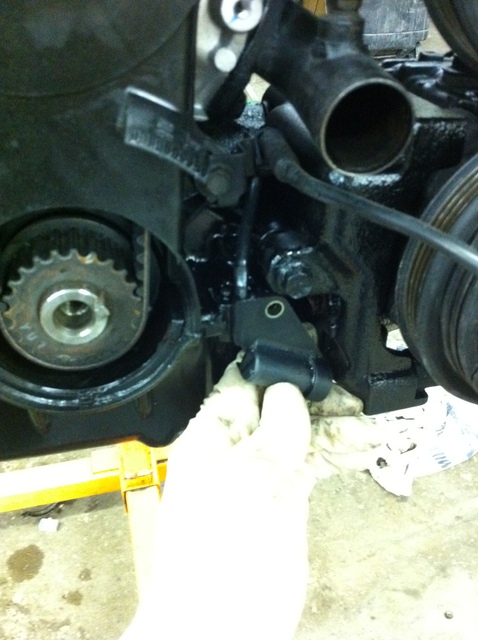
I was forced to drill and tap the hold out- everything went together nicely after that.
Slapped the head on, torqued her down and moved on to the timing.
I lined up my timing marks, mounted the belt and installed the timing covers.
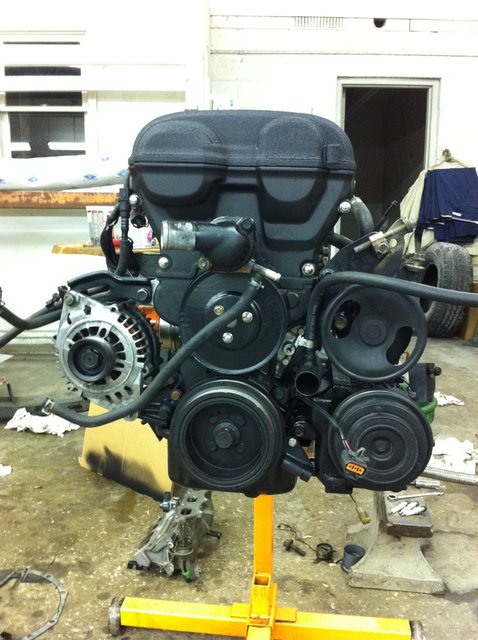
I then cleaned out my intake manifold and mounted her up using my new thermal spacer gasket.

There she is.. all in one piece. I installed my plugs and called it a night.

I installed the oil pump rear main seal, oil baffle and oil pick up.
Before I mounted the new pan it had to be tapped for my existing oil return line. 1 - $39.50 drill bit and 1 - $8.95 tap later and I've got myself a hole.

After mounting the pan I flipped the block over and started to accessorize this thing. New water pump, alternator, power steering and AC pump were all installed.

Installed the oil filter assembly and my knock sensor. The hole for the KS needed to be tapped out in order to seat it properly. The block is from an NA car so the knock sensor hole was never used and had since filled with junk.

Ran into a bit of a hiccup when i went to mount my Crank angle sensor. The previous car didn't have a coil on plug setup so the CAS hole was never used. The hole never even had threading...

I was forced to drill and tap the hold out- everything went together nicely after that.

Slapped the head on, torqued her down and moved on to the timing.
I lined up my timing marks, mounted the belt and installed the timing covers.

I then cleaned out my intake manifold and mounted her up using my new thermal spacer gasket.

There she is.. all in one piece. I installed my plugs and called it a night.

Reply
0
0


