
COP Thread


Reply
 0
0

0
Whats the benefit? My coils arent being pressed down into the holes much at all, I measured the height so that the bar sits gently on top with the main goal of keeping them from popping out.
Reply
0
0

Junior Member
Joined: Dec 2012
Posts: 79
Total Cats: 5
I'm not sure if I'm the first person to do this or not, probably not. But I didn't notice anyone mention it, so I figured I'd share.
So there are two connectors on the front of the engine which feed the injector/coils/coolant temp. One connector is for the injectors and coolant temp, and the other connector has the coils wired in just by themselves. I chose to take my injector/coil harness apart, and remove the wiring for the coils, and use it to make a separate harness just for the coil packs. This was super easy to do, as the injector and coil wires are just taped together in a few spots, none of the wires are connected within that harness.
This gave a cleaner installed look, as it gets rid of all the wires hanging around at the back of the cylinder head. The new 'coilpack-only' harness gets routed forward instead of rearward, and plugs into the vehicle harness at the normal location.
Reply
1
1

I'm not sure if I'm the first person to do this or not, probably not. But I didn't notice anyone mention it, so I figured I'd share.
So there are two connectors on the front of the engine which feed the injector/coils/coolant temp. One connector is for the injectors and coolant temp, and the other connector has the coils wired in just by themselves. I chose to take my injector/coil harness apart, and remove the wiring for the coils, and use it to make a separate harness just for the coil packs. This was super easy to do, as the injector and coil wires are just taped together in a few spots, none of the wires are connected within that harness.
This gave a cleaner installed look, as it gets rid of all the wires hanging around at the back of the cylinder head. The new 'coilpack-only' harness gets routed forward instead of rearward, and plugs into the vehicle harness at the normal location.
So there are two connectors on the front of the engine which feed the injector/coils/coolant temp. One connector is for the injectors and coolant temp, and the other connector has the coils wired in just by themselves. I chose to take my injector/coil harness apart, and remove the wiring for the coils, and use it to make a separate harness just for the coil packs. This was super easy to do, as the injector and coil wires are just taped together in a few spots, none of the wires are connected within that harness.
This gave a cleaner installed look, as it gets rid of all the wires hanging around at the back of the cylinder head. The new 'coilpack-only' harness gets routed forward instead of rearward, and plugs into the vehicle harness at the normal location.
Reply
0
0
Junior Member
Joined: Dec 2012
Posts: 79
Total Cats: 5
I have not done this, but it is my plan to do that, or at least take the wires out of the main harness even before they come forward (split the harness where the EGR leads come out). I don't understand why the coil harness comes through the firewall, to the front of the engine, then back through the intake manifold to the coils. As I plan to repurpose the EGR wires to drive coils 3 & 4, I may even add a connector or connectors at the rear and stil bring the harness forward. Third choice is to bring 1 & 2 from the front (like you did) but bring 3 & 4 from the back; running sequential.
Repurposing the EGR wires to run sequential is brilliant. Already in the harness so it'd be a nice clean install.
I suppose the cleanest way to do it would be to integrate the COP wires/connectors into the vehicle harness, so there was only one wire loom running across the top of the engine.
Reply
0
0

Welcome to the miata harness. It was either designed by 5 engineer's that hated each other's guts or one guy who was bipolar and beyond incompetent.
Reply
0
0

Alright, so 85 pages later and my brain is moosh.
As I understand it, on my 94, the ignitor is built into the coilpacks.
Because the Toyota COPs have the ignitor baked right in, I can toss my OEM coilpacks, cut the coilpack connectors, and wire directly into the harness (using 12ga and 16ga, where appropriate). Yes?
As I understand it, on my 94, the ignitor is built into the coilpacks.
Because the Toyota COPs have the ignitor baked right in, I can toss my OEM coilpacks, cut the coilpack connectors, and wire directly into the harness (using 12ga and 16ga, where appropriate). Yes?
Reply
0
0


Reply
0
0

Junior Member
iTrader: (3)
Joined: Nov 2007
Posts: 330
Total Cats: 14
From: Boston / '90 Mariner Blue
Abe is on the money.
Just measured wires on the plug, and Toyota uses 16AWG for ground, 18AWG for everything else (tach, trigger, 12V)
Just measured wires on the plug, and Toyota uses 16AWG for ground, 18AWG for everything else (tach, trigger, 12V)
Really, toyota runs them off VERY small wires. They wouldn't spend the kind of money it takes to develop a COP system with warranties and all the rest, then use wires like that.
12 guage wire is rated for 41 amps.
FOURTY ONE AMPS. Are you kidding? 1 milliohm per foot.
20 guage is rated for 11 amps, and it would take 1000 feet of it to total only ten ohms of resistance. And that's 11 amps continuous.
Do what you will, but I stick by my advice. Use what toyota used.

See the wires coming out of the coil? They are PUNY. See the giant ground strap I have? It's 16 guage, and the toyota wires would fit inside of the insulation of that with room to spare. Spend your time/money/etc on heat sheilding.
12 guage wire is rated for 41 amps.
FOURTY ONE AMPS. Are you kidding? 1 milliohm per foot.
20 guage is rated for 11 amps, and it would take 1000 feet of it to total only ten ohms of resistance. And that's 11 amps continuous.
Do what you will, but I stick by my advice. Use what toyota used.
See the wires coming out of the coil? They are PUNY. See the giant ground strap I have? It's 16 guage, and the toyota wires would fit inside of the insulation of that with room to spare. Spend your time/money/etc on heat sheilding.
Reply
0
0


is there a dxf anywhere for the bracket?
i have a laser cutter but need exact dimensions
Can't find one or dimensions that i can copy
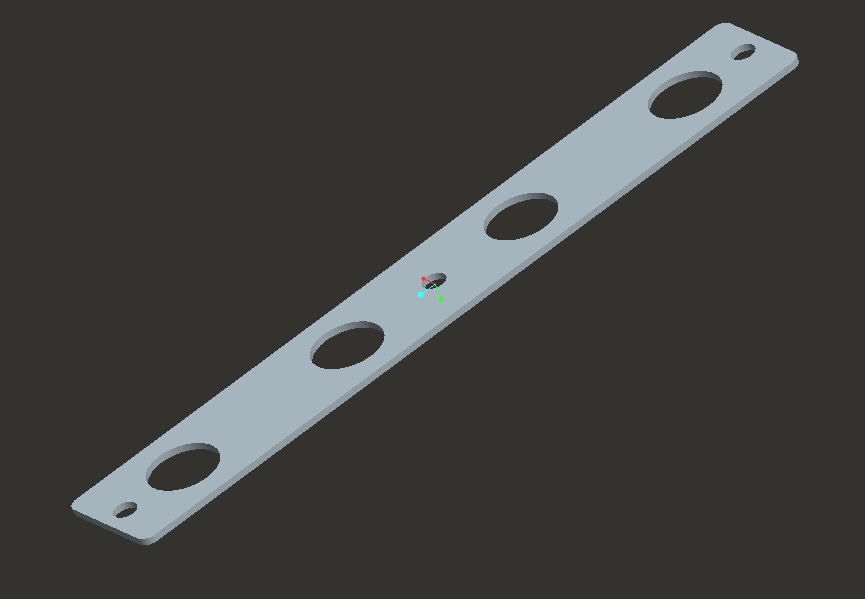
Want to make sure im correct
i have a laser cutter but need exact dimensions
Can't find one or dimensions that i can copy

Want to make sure im correct
Last edited by rhysmate; Sep 17, 2014 at 10:25 PM.
Reply
0
0


