
99mx5 EFR build


Thread Starter
Elite Member
iTrader: (16)
Joined: Oct 2006
Posts: 1,656
Total Cats: 526
From: Las Cruces, NM
The one I have is: FMPACEFR (Full Race Motorsport Piston Actuator).
So... update on the results. After I swapped the spring I took it out for a spin. I saw that I was boosting up to 24 PSI. It felt badass in test runs, but I didn't want to race at that level of sustained boost on the track without a dyno to make sure it was safe, so I swapped the low boost spring and set it to 3 mm of pre-load and was able to get to 18PSI safely.
Damn, it felt good and I raced the whole day without issue. I don't know the HP numbers but for reference: 12PSI= 315WHP, 14PSI=323WHP, 18SI=???WHP. All I can say is that it felt good all day . This was the first time I ran my tank dry at the track since I had my FFS coldside. I ran laps like crazy without probs.
If you buy the Forge actuator, you will have to specify the spring you want and you will have to buy the spring kit separately.
So... update on the results. After I swapped the spring I took it out for a spin. I saw that I was boosting up to 24 PSI. It felt badass in test runs, but I didn't want to race at that level of sustained boost on the track without a dyno to make sure it was safe, so I swapped the low boost spring and set it to 3 mm of pre-load and was able to get to 18PSI safely.
Damn, it felt good and I raced the whole day without issue. I don't know the HP numbers but for reference: 12PSI= 315WHP, 14PSI=323WHP, 18SI=???WHP. All I can say is that it felt good all day
. This was the first time I ran my tank dry at the track since I had my FFS coldside. I ran laps like crazy without probs.If you buy the Forge actuator, you will have to specify the spring you want and you will have to buy the spring kit separately.
Reply
 0
0

0

On the other, I don't because it makes me want to spend stupid money on my car.
Reply
0
0


Just a bit, I made 250 on a low reading dynapac at 12ish psi on more or less the tse base spark map (I only added spark above 6500 to make it taper off less). I got zero tuning done because of the whole spending 4 hours to make the car run somewhat on the dyno thing.
Reply
0
0


"The feed line is a little more complicated. Borg recommends a -6 line for EFR, when over a certain length, especially in cold climates. If you live in a place with warm weather or will be using a 94-95 block with a front feed port, then the smaller line will be fine. If you do go with a bigger line, keep in mind you�ll need to use an adapter at the turbo, and will need an oil sandwich adapter with a 1/4npt port, not the common 1/8npt ports."
I live in Florida and my block is 99. So I am guessing I will need to -6 line. I am told by Full Race that since EFR6258 regulates oil internally, there is no need for adapters even on the -6 lines.
What did you go with in your build? Also where did you tap for coolant feed to the turbo?
Reply
0
0
Thread Starter
Elite Member
iTrader: (16)
Joined: Oct 2006
Posts: 1,656
Total Cats: 526
From: Las Cruces, NM
I'm using a -4 oil line connected to a Tee at the oil pressure sender location on the block. The coolant lines are connected to the water pump inlet and to the blocked off thermostat housing at the front of the engine.
The original dyno was 315WHP at 12PSI. The second dyno was 323WHP at 14PSI. These pulls were done on a Mustang dyno at Western Technical College in El Paso. Next time I want to put it on a DynoJet.
The original dyno was 315WHP at 12PSI. The second dyno was 323WHP at 14PSI. These pulls were done on a Mustang dyno at Western Technical College in El Paso. Next time I want to put it on a DynoJet.
Reply
0
0

Power goals -- 300-320 hp
1. I have a 99 engine that I bought from someone here (It will be going in my 97). He had used the CAS from NA instead of the crank trigger. If I am going with a similar setup like yours, do I need to switch back to the crank trigger?
2. I bought the squaretop intake manifold like yours. Are there any special setup necessary? Did you do any porting on yours?
Thanks
Reply
0
0
Thread Starter
Elite Member
iTrader: (16)
Joined: Oct 2006
Posts: 1,656
Total Cats: 526
From: Las Cruces, NM
If you use both the 99 crank sensor and the NA cam sensor, you can mod the cam sensor like Soviet did and have full sequential ignition and use the OEM Mazda 32 tooth trigger wheel (Check out his thread for details). I was going to use the 32 tooth trigger wheel, but I had to modify my intake cam pulley for it to work. I decided not to do it at this point.
No modding was needed to install the squaretop intake. I eliminated the EGR on my car, so I just made some plates to block off the EGR port on the manifold. I smoothed the casting flash in the runners and inside of the manifold at the throat where the TB is mounted.
No modding was needed to install the squaretop intake. I eliminated the EGR on my car, so I just made some plates to block off the EGR port on the manifold. I smoothed the casting flash in the runners and inside of the manifold at the throat where the TB is mounted.
Reply
0
0
Thread Starter
Elite Member
iTrader: (16)
Joined: Oct 2006
Posts: 1,656
Total Cats: 526
From: Las Cruces, NM
It's been a while since I've done anything to the car, but here is the latest addition. Sparco Strada 330mm wheel with NRG Gen 2.5 quick release and NRG short hub.

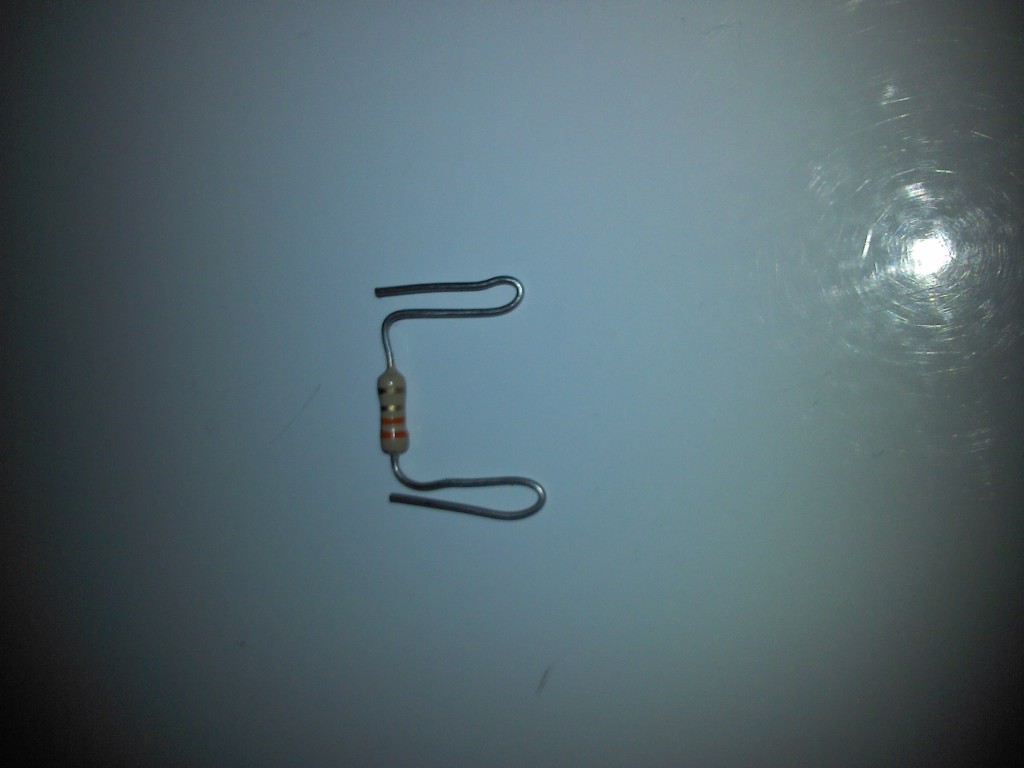
I used a 3.3 Ohm resistor for the airbag delete and bent the leads to jumper the plug.
I used a hose clamp and made a bracket to contact the rear of the hub and made a jumper for the horn plug.
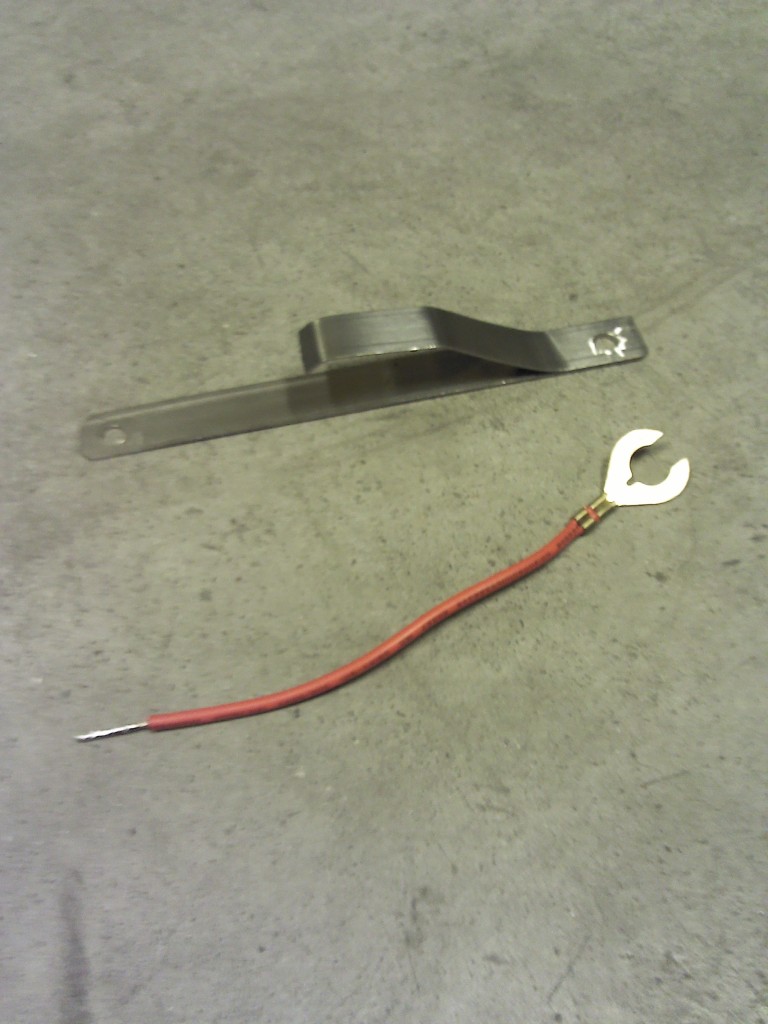
I removed the clock-spring and installed my contact bracket with the clock spring screws. I taped and zip-tied the plugs (not shown).
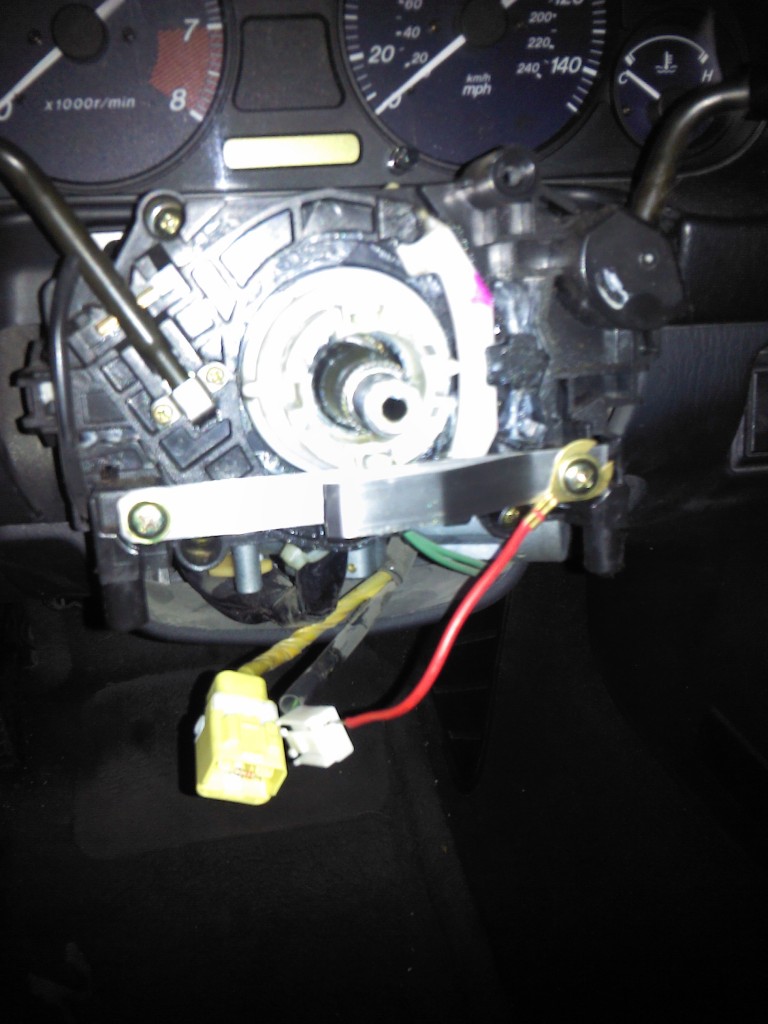
I installed the short hub, the quick-release and the steering wheel. I used a little locktight blue on the screws on the QR and the steering wheel just in case.

The wheel has no play, the horn works and no airbag light.
I used a 3.3 Ohm resistor for the airbag delete and bent the leads to jumper the plug.
I used a hose clamp and made a bracket to contact the rear of the hub and made a jumper for the horn plug.
I removed the clock-spring and installed my contact bracket with the clock spring screws. I taped and zip-tied the plugs (not shown).
I installed the short hub, the quick-release and the steering wheel. I used a little locktight blue on the screws on the QR and the steering wheel just in case.
The wheel has no play, the horn works and no airbag light.
Reply
0
0


Joined: Sep 2010
Posts: 8,154
Total Cats: 1,093
From: Lake Forest, CA
Wheel looks great. I normally don't like aftermarket steering wheels but that one looks awesome.
Reply
0
0
Thread Starter
Elite Member
iTrader: (16)
Joined: Oct 2006
Posts: 1,656
Total Cats: 526
From: Las Cruces, NM
Thanks guys! This wheel is about 10mm smaller than the OEM Nardi. I can still see all the gauges and the wheel is placed approx less than 1 inch closer than the factory wheel. Oddly enough, all of the online pics of this wheel doesn't look like the actual wheel.
Last edited by 99mx5; Nov 7, 2013 at 04:28 AM. Reason: correction
Reply
0
0
Thread Starter
Elite Member
iTrader: (16)
Joined: Oct 2006
Posts: 1,656
Total Cats: 526
From: Las Cruces, NM
I drove the car and noticed that the turn signal cancelling wasn't functioning correctly as before. I compared the factory steering wheel and the hub adapter and saw that the collar that cancels the turn signals was off by 90 degrees. I removed the hub and drilled two holes to orient the collar as it was in the OEM steering wheel. Another option would be to install the hub with the top marker 90 degrees off to one side.
Reply
0
0


