When you click on links to various merchants on this site and make a purchase, this can result in this site earning a commission. Affiliate programs and affiliations include, but are not limited to, the eBay Partner Network.
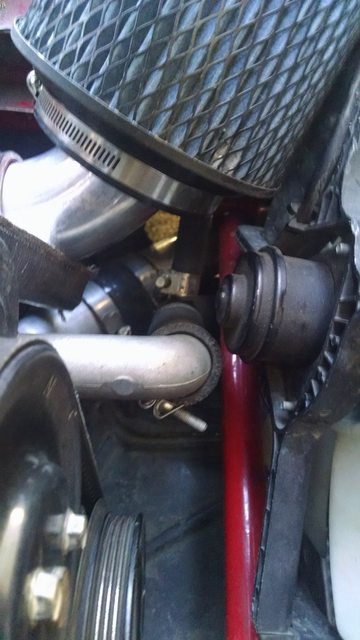
The real ticket would to be to figure out what the part number of the prothane bushings they use in the AWR mounts and cross it to the control arm bushing they're used in to get the oem rubber part to put in. Or like just design it around using the miata upper control arm rubber bushing's and some 1.75x.065 DOM tubing to press into.
The real ticket would to be to figure out what the part number of the prothane bushings they use in the AWR mounts and cross it to the control arm bushing they're used in to get the oem rubber part to put in.
That would be the thing to do. It occured to me, but didnt even attept the research as I knew id find something at oriellys or whatever that fit the bill. Regular OTS poly bushing seem way to stiff to me. Id almost bet the AWR inserts arnt from an OTS control arm rather custom made in softer durometers. If it were that simple, we all should just order any of the numerous universal shouldered poly bushings from the supplier of your choice. I dont think I mentioned it in this thread, but the intent of the design was to keep the ***** factor to a minimum, while redcuing money shifts, etc.
Originally Posted by Leafy
Or like just design it around using the miata upper control arm rubber bushing's and some 1.75x.065 DOM tubing to press into.
I have many of these just laying around, I wanted to keep it thin to try and fit it betwwen the stock mount plates, so it was just bolt in. Sop I went with a smaller bushing. The miata bushings also have way more rubber between the OD and the OD of the pin, making them softer, although im sure they would still be a vast improvment over the stock POSs. These bushings could possibly have not enough rubber to keep the vibes down too. It was just a total guess, that im somehwat commited to now lol. And the smaller bushings are lighter #becuaseracecar.
Last edited by hi_im_sean; Oct 23, 2016 at 12:17 PM.
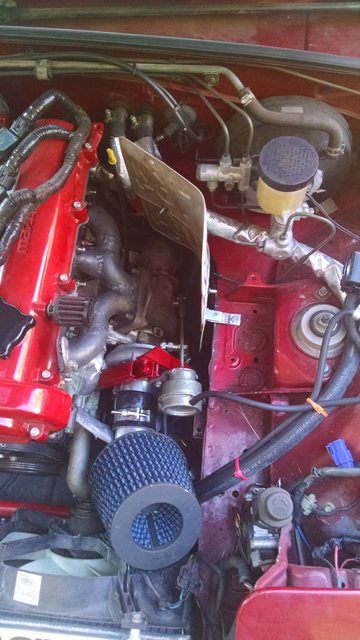
I got the drivers side mount off and started yesterday. The engine would shake violently under launch control, almost like one of the engine mounts was broken.
And mazda approved sun shade. It was around 110* yesterday.
Last edited by hi_im_sean; Oct 23, 2016 at 12:18 PM.
Im going to stuff the valve cover with scrubby, anything else i should do? I find it odd that the pvc chamber covers are completely sealed to the valve cover, is that necessary? I dont quite understand how the oil flows back well...
Motor mounts done!
I like green. Mani was basically a bitch to paint. I managed to do it and the valave cover with 1 can.
I removed the stupid clogged water port from front of manifold, that was falling apart when I first mesed with it late last year. Just about every hose connection on this car was weeping a little, except this one.
And this is why... that can be considered sedimentary rock. I had to literally drill it out, and it extedned all the way until the 90 in the casting where it exits the mani and goes into the head.
And both front and rear ports will be plugged as I wont use them. I was going to flip the lower water neck. I removed the corroded pipe from it as well and tapped it to 1/8 npt for a barb fitting. I cleand it up and realized I dont like it, specifically the heater hose fitting. It doesnt leave much room for improvement without a tig and the skills to use it, and even then it points in a shitty direction.
So I made this thing.
And bought this thing to screw into it. Meziere WP1125S
I would need to drill and tap the fitting for pipe fittings for the turbo cooalnt return and the heater core. I realized it would be much better to make the adapter thicker so I could incorporate the fitting into the adapter properly, but with the legth it would need to be, with the part stack up, it would start to interfere with the turbo outlet pipe. So I instead, made this. I still need to drill and tap for pipe fittings, but I am going to wait until I have the turbo piping ran so I can route the water lines as cleanly as possible.
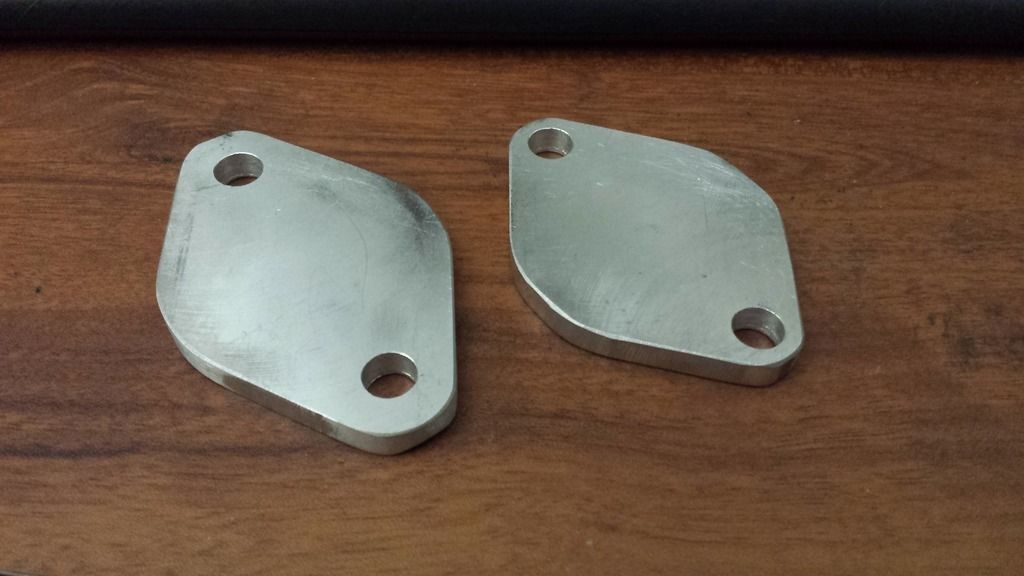
I also made a 1/2" thick front block off tapped for the stock sender
Last edited by hi_im_sean; Oct 23, 2016 at 12:24 PM.
<p>Front sensor is normally not needed with MS. Anything special about your build?</p><p>Also when flipping the waterneck normally you plug the heater hose hole and route the heater core return to a T in the lower rad hose.</p>
<p><span style="color:rgb(34, 34, 34)">Same here we had to make one for my friends 1.6 which is still on stock ecu. Ours is just 1/8th inch aluminum.....can I has?</span></p>
Regarding ninja edit, I was going to use an inline tee with the lower hose, but I hate that idea. More failure points when I have the means to eliminate them, especially in a sexy fashion.
Last edited by hi_im_sean; Oct 23, 2016 at 12:26 PM.
<p>im going to stuff the valve cover with scrubby. anything else i should do? i find it odd that the pvc chamber covers are completely sealed to the valve cover, is that necessary? i dont quite understand how the oil flows back well...
search and you shall find answers. thanks hhammerly, props awarded
Originally Posted by HHammerly
This is how the two vents differ:
The exhaust side vent system has two chambers, it vents blow by gasses in an na engine near full throttle and on a boosted engine whenever there is boost.
Air and oil enters the center chamber and most of the oil is separated and drained back in to the head, all the blow by and some of the oil however makes its way from the top of the center chamber to the bottom of the second chamber where it pools near the back of the chamber (oposite side from the vent port you see outside the valve cover, remember you are on the trottle and there are some g's and engine angle sending the oil away from the vent opening and the transfer tube between chambers enters the second chamber close to the camber floor so oil will hit it and slide toards the back of the engine) When you get off the gass and on the brakes the pcv valve creates low pressure in the cranckase/valvetrain area and the oil moves toards the front of the seccond chamber where it is sucked up the port where it came from, and it drains back in the center chamber where it is drained back in your engine where it belongs.
This is important, in order for this vent to work you need a SEALED seccond chamber AND a vacuum source (the pcv in this case) without either one the oil that got past the center chamber separator will simply come out the exhaust side vent and there is nothing that you can do about it but to modify the system and do your own r&d to get it right.
You probanly will need a vented catch can on the exhaust vent on a boosted or na engine that spends much of its life at boost or full throttle or has exesive blow by.
The pcv side consist of a single chamber oil separator/vent, in most cases the separator handles the oil well since it only vents past the pcv valve on light or clossed throttle BUT it does let some oil through when you close the throttle at redline or high rpm and boost, under tose conditione some of the oil does get past the seprator and into the im.
This is bad because that oil will lower the octane of the mixture on your next wot run and cause random detonation at high rpm whenever it gets ingested.
To prevent this from hapening I and others have installed a non vented (non vented mishimoto) catch can between the im and valve cover, you do need a pcv valve either on the line between the catch can and im (that is what i preffer) or between the valve cover and carch can (that is what i have).
Good luck and you all can wake up now, i am done.


 0
0


 we had to make one for my friends 1.6 which is still on stock ecu. Ours is just 1/8th inch aluminum.....can I has?</span></p>